1
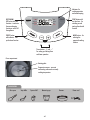
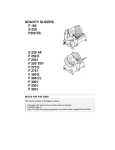
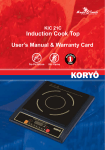
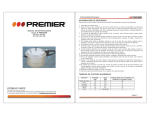
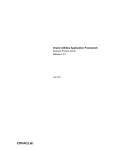
Operating Instructions
Multi - Cook
Art.-No. 42525 Multi - Cook
Read all provided instructions before first usage!
Model and attachments are subject to change!
For domestic use only!
Carefully read all provided instructions before you start running
the appliance and pay regard to the warnings mentioned in these
instructions.
Table of Contents
Knowing Your Multi - Cook.............................................................39
Important Safeguards......................................................................41
Important Safeguards for Electrical Appliances................................42
High Temperatures – Risk of Burns.................................................43
Non-stick Coating........................................................................43
Technical Specifications..................................................................44
Before First Use..............................................................................44
Properties of Your New Multi - Cook................................................44
Displaying Time and Functions.......................................................45
Buttons.......................................................................................45
Automatic Activation of Warm-Keeping..........................................46
Hints for Best Results.....................................................................46
Operation.....................................................................................46
Preparing the Cooker for Operation...............................................47
Cooking Rice...............................................................................49
Baby Food..................................................................................50
Steaming....................................................................................51
Baking and Reheating..................................................................52
Yoghurt.......................................................................................54
Soups and Sauces........................................................................55
Warm-Keeping............................................................................56
Adjusting the Timer......................................................................57
Troubleshooting.............................................................................57
Care and Cleaning........................................................................59
Storage.........................................................................................61
Notes for Disposal..........................................................................62
Warranty......................................................................................62
Information and Service..................................................................62
Recipes.........................................................................................62
Index............................................................................................66
Dear Customer!
Congratulations! Your new, innovative micro-computerized cooker will provide you with an
astonishing variety of outstanding features. Easy and effortless you will conjure up delicious
meals. Cooking times and temperatures are monitored by timer-controlled electronic, thus
reliably providing the desired results. For a lot of meals and small portions, this appliance is
a real energy-saving alternative to the usual range. Six pre-selectable cooking functions and
the additional warm-keeping feature of this compact unit offer the required flexibility to put
your ideas into practice.
These instructions for use will inform you about the various functions and features which
makes it easy to take pleasure in your new multi-functional cooker.
We hope that you will enjoy your new Multi - Cook.
Your Gastroback GmbH
Knowing Your Multi - Cook
Lid with seal
for the pot
Steam vent prevents build-up
of pressure
Upper cover
Special non-stick
coated pot with
level indicatore
Opening button
Swivelling Handle
Control panel - touch pad and
sealed display for easy cleaning
Mounting for
hanging on the
spoon shelf
39
Indicators for
cooking operation
and warm-keeping
KEEP WARM/
OFF button with two
functions - to activate
the warm-keeping
function or switch off
the appliance
KEEP WARM
OFF
Rice
Bake
(preset)
Baby Food
START
Yoghurt
(preset)
Steam cook
Soup
(preset)
(preset)
PRESET button
with indicator - calls
up the timer function
START button with
two functions - for
switching on and
starting the selected
function
MENU button - for
selecting the
requested cooking
function
Timer buttons „+“ and „–“
for setting up cooking times
and timer operation
Oven compartment
Heating plate
Temperature sensor - prevents
overheating and ensures a steady
cooking temperature
Accessories
Rice spoon
Soup ladle
Spoon shelf
Measuring cup
40
Steamer
Power cord
Important Safeguards
Carefully read all instructions before operating this appliance and save for
further reference. Do not attempt to use this appliance for any other than the intended
use described in these instructions. Any other use, especially misuse, can cause severe injuries or damage by electric shock, heat or fire.
Any operation, repair and technical maintenance of the appliance or any part of it other
than described in these instructions may only be performed at an authorised service centre.
Please contact your vendor.
• This appliance is for household use only and NOT intended for use in moving vehicles. Do
not operate or store the appliance in humid or wet areas or outdoors. Any use of accessories, attachments or spare parts not recommended by the manufacturer may result in damage
and/or injuries to persons.
• Check the entire appliance regularly for proper operation—especially the power cord.
Do not use the appliance if the non-stick coating is damaged in any way (e.g. scratched, or
peeling off). Do not operate the appliance, when liquids are in the oven compartment or accumulate under the appliance or overflow. Do not operate the
appliance, when the appliance or any part of it is likely to be damaged, to avoid risk of fire,
electric shock or any other damage and/or injuries to persons. The appliance is likely to be
damaged if the appliance was subject to inadmissible strain (e.g. overheating, mechanical
or electric shock), or if there are any cracks, excessively frayed or melted parts, or distortions, or if the appliance is leaking or not working properly. In this case, immediately unplug
the appliance and return the entire appliance (including all parts and accessories) to an
authorised service centre for examination and repair.
• During operation keep the appliance in an appropriate distance of at least 20 cm on
each side and 1 m above to furniture, walls, boards, curtains, and other objects. Do not
operate the appliance beneath or below any heat-sensitive or moisture-sensitive materials,
boards, or drop-lights to avoid damage caused by steam, heat, or condensate. Operate the
appliance on a well accessible, stable, level, dry, heat-resistant, water-resistant and suitable
large table or counter. Do not place the appliance over a power cord, or near the edge of
the table or counter, or on wet or inclined surfaces, or where it can fall. Always keep the
appliance and the table or counter clean and dry, and wipe off spilled liquids immediately.
• Do not place any clothes or tissue or other objects under or on the appliance during operation, to avoid risk of fire, electric shock and overheating. Before operation, always ensure
that there are no foreign objects in or under the pot, and the appliance is assembled properly and not leaking with the lid and upper cover firmly in place. Solely use the appliance for
processing edible food. Immediately unplug the appliance, if there is any kind of malfunction
or problem (e.g. leaking, overheating).
• This appliance is NOT intended for use by persons (including children) with reduced
physical, sensory or mental capabilities, or lack of experience and knowledge, unless they
have been given supervision or instruction concerning use of the appliance by a person
responsible for their safety. Children must be supervised to ensure that they do not play with
the appliance or any parts of the appliance or the packaging. Do not leave the appliance
unattended, when it is in reach of young children. Always keep the appliance where it is dry
and clean and where young children cannot reach it. Do not place any hard and/or heavy
objects on the appliance or any part of it. Take care that no one will pull the appliance by
the power cord.
41
• Do not leave any cooking utensils or other foreign objects in the pot of the appliance
during operation. Do not use any hard, sharp or edged objects (e.g. knives,
forks) with the appliance. Only use wooden or heat-resistant plastic cooking utensils to
stir and serve the food (e.g. supplied soup ladle and rice spoon). Do not use the inner pot
for mixing ingredients to avoid excessive wear of the non-stick coating. Do not handle the
appliance or any part of it with violence. Do not attempt to open the upper cover of the oven
compartment with violence. Always use the opening button.
• The appliance is heated by built-in electric heating elements. The appliance or power
cord may never touch hot surfaces. Do not place the appliance or any part of it on or near
hot surfaces (e.g. burner, heater or oven). Do not use any part of the appliance (e.g. pot,
steamer) with any other device (e.g. range).
• Do not move or tilt the appliance with the pot filled and inserted in the appliance to avoid
that the liquid will be spilled. Always switch OFF, and unplug the appliance when it is not
in use and let the appliance cool down sufficiently before moving, cleaning, or for storage.
Always grasp the appliance by the handle for moving or lifting.
• Always observe the maximum filling level marks, when filling the pot, especially when
heating foodstuffs that could froth. Otherwise hot liquids and foods could overflow or drip on
the appliance and cause injuries and damage.
Before starting operation, always ensure that there is a sufficient amount of liquid or foodstuffs (at least 400 ml) in the pot, the pot is inserted correctly and the upper cover is assembled and closed properly. (See: Operation)
• Except for the oven compartment, do not use abrasive cleaners or cleaning pads (e.g.
metal scouring pads) for cleaning. Do not clean the appliance with any corrosive chemicals
(e.g. bleach). Do not immerse the appliance or power cord in water or any other liquid. Do
not spill or drip any liquids on the appliance, in the oven compartment, or on the power
cord to avoid risk of fire and electric shock. When liquids are spilled in the appliance,
immediately switch OFF, unplug the power cord and wait for the appliance to cool down.
Thereafter, clean and dry the appliance thoroughly (See: Care and Cleaning).
• DO NOT place the appliance or power cord in an automatic dishwasher.
• Do not leave any food dry on the appliance. Always clean the appliance after each use to
prevent a build up of baked-on foods (See: Care and Cleaning). Always keep the appliance
and the accessories clean.
Important Safeguards for Electrical Appliances
The appliance is heated electrically. Place the appliance near a suitable wall power socket
to connect the appliance directly to a protected mains power supply with protective conductor (earth/ground) connected properly. Ensure that the voltage rating of your mains power
supply corresponds to the voltage requirements of the appliance (230 V, 50 Hz, AC, rated
for at least 8 A).
The installation of a residual current operated circuit breaker (r.c.c.b.) with a maximum rated
residual operating current of 30 mA in the supplying electrical circuit is strongly recommended. If in doubt, contact your electrician for further information.
In various foreign countries, the specifications for power supplies are subject to incompatible
norms. Therefore it is possible that power supplies in foreign countries do not meat the requirements for safe operation of the appliance. Thus, before operating the appliance abroad,
ensure that safe operation is possible.
42
• Do not to use any extension cords or multi socket outlets.
• Always handle the power cord with care. Always completely unwind the power cord before use. Do not place the appliance on a power cord. Power cords may never be knotted,
twisted, pulled, strained or squeezed. Do not let the plug or power cord hang over the edge
of the table or counter. The power cord may not touch hot surfaces. Ensure that no one will
pull the appliance by the power cord. Take care not to entangle in the power cord. Always
grasp the plug to disconnect the power cord. Do not touch the power plug with wet hands
when the appliance is connected to the power supply.
• Do not place or immerse the appliance or the power cord in water or any other liquid. Do
not spill or drip any liquids on the power cord or exterior of the appliance. When liquids are
spilled on the appliance or power cord, immediately switch OFF and unplug the appliance.
High Temperatures – Risk of Burns
The multi-functional cooker is designed for cooking and heating a variety of foods and, therefore, the interior of the appliance will get very hot during operation.
• Because pot, lid and interior of the appliance are very hot during operation and shortly
thereafter, do not touch these parts with your hands, arms or any other parts or your body or
any heat- or moisture-sensitive objects. Do not place the pot on any heat-sensitive surfaces,
shortly after operation. If required, protect your hands and arms with pot holders or oven
gloves.
• Even with the appliance properly closed (lid and upper cover properly in place), steam
will escape from the opening in the upper cover during operation and shortly thereafter.
During operation and immediately thereafter do not hold your hands, arms
or face over the appliance to avoid scalds caused by steam escaping from
the steam vent in the middle of the upper cover. In the steam vent and at the
interior of the lid and upper cover condensate could accumulate and drip and, additionally,
large amounts of steam could escape from under the cover, when opening the upper cover.
When opening the appliance, keep a sufficient distance to avoid scalds.
• Do not cook any high-proof alcoholic liquor or alcoholic foodstuffs (e.g.
mulled wine, grog) within the appliance to avoid risk of explosion and fire.
Non-stick Coating
The inner pot of your multi-functional cooker is provided with a non-stick coating. Do not use
hard or sharp objects for scratching, mixing or cutting on the coatings. Do not use the inner
pot as a mixing bowl. Always remove your foods from the pot, before mixing or cutting. We
will not be liable for damage to the non-stick coating, if metal utensils or similar objects have
been used.
Please adhere to the following precautions:
• Do not use the pot with the non-stick coating being scratched, cracked or detached due to
overheating.
• Only use wooden or heat-resistant plastic cooking utensils to stir and serve the food. Do
not use any spray-on non-stick coatings.
• The non-stick surface minimises the effort of cleaning. Do not use abrasive scourers or
abrasive cleaners for cleaning. Even stubborn residues can be removed via a soft sponge or
soft nylon brush and warm dishwater or in the automatic dishwasher.
43
Technical Specifications
Model:
Art. No. 42525 Multi - Cook
Power supply:
230 V AC, 50 Hz
Power consumption:
640 Watt
Length of power cord:
ca. 125 cm
Weight:
ca. 3.2 kg
Dimensions: (width x depth x height)
ca. 24.4 cm x 32.4 cm x 20.3 cm
Capacity, inner pot:
max. 1.8 Litre
(corresponds to 5.5 measuring cups of rice)
Certification:
Before First Use
WARNING: DO NOT let young children play with the appliance, or any part
of it, or the packaging!
1.Unpack the appliance and all accessories carefully and check that no parts are damaged or missing. Some parts of the appliance may be lying in the interior of the appliance. Press the chrome-plated opening button above the display to open the upper cover of the appliance and take out these parts.
2.Carefully remove all shipping materials and promotional materials, but DO NOT remove the warning labels or model label. Especially ensure that there are no foreign objects (e.g. packaging) in the interior of the appliance.
WARNING! Always switch OFF, unplug and let the appliance cool down to room temperature, before cleaning. Do not immerse the appliance or power cord in water or other liquids
or spill any liquids on the appliance. Do not place the appliance or power cord in
an automatic dishwasher.
3.Before first use and after a longer period of storage, clean the appliance and all
accessories (See: Care and Cleaning).
Properties of Your New Multi - Cook
Your Multi - Cook comes with a variety of useful features that are
accessed by the operating elements on the front panel (buttons and display). When pressing a button on the display, a beep sounds. Due to the
tightly closing lid and upper cover the contents will not overflow or splash
during operation. By means of the steam vent in the upper cover a build
up of pressure is prevented during the heating process.
44
Because of the energy-saving heating system, it takes approx. 20 minutes to bring about
1 litre of water to the boil. The programmed cooking times will not start until the required
temperature is reached.
WARNING: DO NOT leave the appliance unattended during
operation when cooking lathery food, because foam could come out
KEEP WARM
of the steam vent and overflow the upper cover. If foam and liquids overflow
the upper cover, immediately press the KEEP WARM/OFF button to switch
OFF
off, then unplug and, after cooling down, clean the appliance (See: Care and
Cleaning). Reduce the used quantity.
Displaying Time and Functions
Even with the appliance connected to the power supply, the display remains dark, when
switched OFF. Besides the display, the designations of the cooker functions are applied.
After pressing the START button to switch on the multi-functional cooker two dashes are
shown on the display. After pressing the MENU button, an arrow on the display is pointing
to the currently selected function, and the red operation indicator flashes. As soon as a function has been started, the operation indicator is illuminated continuously.
When a function is currently selected that is operating with a fixed cooking time, the cooking
time is shown on the display. Hours are marked by HR, and minutes by MIN. If the cooking
time flashes on the display you can adjust the cooking time within a pre-selected range using
the Timer buttons “+” and “–” (See: Operation).
With the warm-keeping function in operation, the already elapsed warm-keeping time is
shown on the display and the orange WARM indicator at the left side of the display is illuminated. The word WARM is shown on the display.
Buttons
The buttons have the following functions.
Button
Function
START
This button has two functions:
• Press this button, to switch on the appliance.
• When switched on and a function is selected, press this button to
start operation.
KEEP WARM / OFF This button has two functions as well:
• When the appliance is switched OFF, press this button to activate
the warm-keeping function (See: Warm-Keeping)
• When the appliance is switched ON and a function is selected,
press this button to switch OFF the appliance.
At any time during operation, you can switch OFF the appliance
with this button. Any selections made before will be lost.
MENU
After switching ON, press the MENU button repeatedly until the
arrow on the display points to the desired function.
45
“+” and “–”
Use these buttons to adjust the cooking time. Each time you press a
button the cooking time will be increased (“+”) or decreased (“–”) in
predefined steps, depending on the currently selected function. With
the functions “Rice” and “Bake” you cannot adjust the cooking time.
With functions marked with “PRESET”, additionally you can adjust
the timer via these buttons (See: Adjusting the Timer).
PRESET
With the functions marked with “PRESET” press this button, if you
wish to start operation by using the timer function (See: Adjusting the
Timer).
With the other cooking functions, this button is deactivated.
Automatic Activation of Warm-Keeping
After the cooking time elapsed, the multi-functional cooker toggles to the warm-keeping function automatically, (see: Warm-Keeping) except for the function “Yoghurt”. After finishing the
“Yoghurt” function, warm-keeping will NOT be entered.
Hints for Best Results
• If in any doubt about the usage, switch OFF first (KEEP WARM/OFF button) then refer to this operating instructions.
• Do not over process food. In most cases, you will achieve better results when the food is still firm and not watery.
• With the functions “Rice” and “Bake” you can adjust the cooking/baking time by using different amounts.
• For most functions, the multifunctional cooker offers a pre-selected cooking time. For your first tries, it is better to use the preferences. After getting experiences, adapt the cooking time to your liking.
• For getting the desired results, as an example, you may leave the food in the cooker for a while with the warm-keeping function in operation, or cancel operation by pressing the KEEP WARM/OFF button.
Operation
WARNING: The multi-functional cooker is designed for heating foods and is heated by
an integrated electric heating element. Do not heat the inner pot of the appliance
using any other source of heat (e.g. range, microwave oven)! Do not use
any other pot with the appliance than the designated pot! The interior of the
appliance and the steam vent will get very hot during operation and steam will come out of
the steam vent. To avoid scalds, do not touch the steam vent, and do not hold your hands,
arms and face over the steam vent during operation.
Switch OFF and unplug the appliance and let it cool down, before assembling or disassembling the appliance. Before operation, ensure that you have prepared the appliance for use
completely and properly, according to the instructions in this booklet.
46
If liquid accumulates under the appliance or overflows the upper cover during operation,
immediately switch OFF (KEEP WARM/OFF button), unplug the appliance, and let it cool
down. Check, whether you have assembled the appliance correctly, or overfilled the pot.
If necessary, take some food out of the pot, and avoid cooking foodstuffs that will violently
froth. Dry the appliance and the table thoroughly. If the problem persists, send the complete
appliance to an authorized service centre for repair.
Do not place any clothes, napkins, or other foreign objects under or on the appliance or in
the oven compartment, when the appliance is connected to the power supply. Do not place
the appliance on any power cord. Always use cooking utensils of heat-resistent plastic or
wood with the appliance. Do not use any hard or sharp objects with the appliance (e.g.
forks, knives), to avoid damage to the surfaces. Do not use violence!
Risk of Burns! Do not touch the interior of the appliance or the inner pot (or steamer) immediately after use, and do not place the pot on any heat-sensitive surface! Beware of condensate and steam, when opening the upper cover during or shortly after operation.
Preparing the Cooker for Operation
WARNING: For operation always place the appliance on a level, stable, heat- and
moisture-resistant surface. Do not operate the appliance under overhanging boards, lamps or
near delicate objects to avoid damage caused by steam, splashes and condensate. Do not
operate the appliance on inclined surfaces! Do not move or tilt the appliance during
operation. Before operation, always ensure that the brim of the pot is clean
and the lid and upper cover are closed firmly. Do not spill any liquids on the appliance or let any liquids run down on or in the appliance. If liquids are spilled on or in the
appliance, immediately switch OFF and unplug the appliance. Thereafter let the appliance
cool down and clean the appliance (See: Care and Cleaning).
1.Place the appliance on a flat, stable, heat- and moisture-resistant surface near a suitable wall power outlet. (See: Important Safeguards) Leave at least 20 cm of free space to walls, curtains, boards and other objects on each side of the appliance. Leave at least 100 cm of free space above the appliance to avoid damage due to steam, splashes and condensate.
2.Insert the smaller plug of the power cord in the appropriate socket at the rear of the
appliance (can only be inserted in the correct orientation). Do NOT connect the
appliance to the power supply, until you prepared the appliance for use completely.
3.Ensure that the upper cover of the appliance is assembled completely and properly.
At the exterior, the steam vent must be inserted correctly in the central hollow and may not protrude or fall out when opening the appliance. Press the opening button to open the
upper cover. The lid of the pot must be engaged firmly at the inner side of the upper cover with the seal at its brim facing towards the oven compartment
(See: Reassembling the Appliance).
4.Ensure that there are no foreign objects in the oven compartment, and the heating plate, temperature sensor, and the bottom of the pot are clean and there are no residues sticking to the surfaces (See: Care and Cleaning).
Residues on these surfaces prevent a sufficient thermal contact thus interfering with the temperature control of the appliance, increasing energy consumption and causing problems due to overheating. During operation, the pot may not be tilted within the oven compartment.
47
5.Select a suitable function for cooking your food according to the following table.
Selection
Examples
Cooking time
Pre-selection
Rice
Rice
Depends on the
quantity, 25 - 35
minutes + 5 minutes
––
5 minutes of stewing
Baby Food
Conjee (rice porridge) or porridge,
vegetable mush
30 - 60 minutes;
30 minutes (MIN)
adjustable in steps of
5 minutes
Steam cook
In the steamer: vegetables, potatoes,
fish, chicken filets,
heating sausage
5 - 60 minutes;
5 minutes (MIN)
adjustable in steps of
5 minutes
Without steamer:
soups, stew, potatoes, vegetables
Bake
Reheating, cake mixtures, baked dishes,
gratin, lasagne
35 - 45 minutes;
(depending on the
used quantity) + 10
minutes
––
Yoghurt
Yoghurt
Not adjustable
8 hours (HR)
Soup
Soups, sauces, stew,
potatoes, vegetables
30 - 90 minutes;
30 minutes (MIN)
adjustable in steps of
10 minutes
10 minutes countdown
6.Follow the instructions given below for the individual functions. Doing so, always observe the required filling levels.
To avoid damage and injuries from hot liquids, do not overfill the
pot, especially when cooking foodstuffs that could violently froth, to
avoid overflow of hot fat and liquids causing scalds and damage.
• For preparing Rice the maximum total amount is 1800 ml;
maximum filling level “Rice 5.5”
• For cooking rice porridge (Conjee function) and porridge
(oatsmeal) the maximum total amount is 1650 ml: “Conjee 1 ½” and “Porridge ¾”.
If necessary, divide up the given amounts in your recipe accordingly. But also ensure that
there is ALWAYS a sufficient amount of foodstuffs or water in the inner pot (lowest filling level
1), before switching on the appliance.
48
Cooking Rice
WARNING: During operation, steam will come out of the steam vent. Do not hold your
hands, arms and face over the appliance during operation. Do not place any objects (e.g.
clothes) on the upper cover of the appliance during operation. Beware of hot condensate,
steam, and hot food, when opening the upper cover, or when serving hot dishes. Before
connecting the appliance to the power supply and switching on, always ensure that the appliance is assembled correctly and the upper cover is closed properly. During operation and
shortly thereafter, do not touch the hot pot or the interior of the oven compartment with your
hands or heat- or moisture-sensitive objects.
Only the “Rice” function sets the cooking time automatically according to your selection of
rice and water quantity. After cooking, the rice will be stewed for another 5 minutes, shown
in a count-down. Thus, you cannot enter a cooking time but control the cooking time via the
used quantity of water.
1.Weight out the requested amount of rice. A measuring cup of rice (full to the brim) is ca. 150 g. Do not use more than 800 g (ca. 5.5 measuring cups).
2.Wash the rice and make sure to wash it clean. Use a different container for this to avoid scuffling the non-stick coating of the pot.
3.Put the cleaned rice into the pot of the multi-functional cooker and fill with water to the corresponding water level. Wipe dry the external surface and the upper brim of the pot.
Example: If you are cooking 3 measuring cups of rice, water should be added to level 3. The water quantity can be increased or decreased reasonably according to your individual like. But NEVER fill in more water, than up to the maximum level 5.5!
WARNING: It is essential to ensure that the upper brim of the pot is clean.
Otherwise the lid will not seal sufficiently and water could run into the oven compartment.
4.Ensure that there are no foreign objects in the oven compartment of the cooker and the interior of the oven compartment is clean. Then insert the pot.
5.Ensure that the lid of the pot is inserted properly in the upper cover of the Multi - Cook, (See: Re-assembling the Appliance) and then close the upper cover. A click sounds if the upper cover is closed correctly.
6.Connect the appliance to the power supply and press START to switch ON the appliance.
7.Press the MENU button until the arrow on the display points to the function “Rice”.
8.Press the START button to start the selected function. The operation indicator lights up and two dashes are shown on the display. The appliance will cook the rice until the complete amount of water is absorbed, still showing two dashes on the display.
After that, the stewing function is entered automatically, with the display showing the remaining stewing time in a count-down. After the stewing time expired, the appliance enters the warm-keeping mode automatically. To prevent the rice from agglomerating and reducing its taste, it is best to serve the rice within 30 minutes.
9.After use, press the KEEP WARM/OFF button to switch OFF the appliance. Then unplug the appliance.
49
WARNING: When opening the upper cover shortly after operation, condensate and a
large amount of steam could come out from under the brim of the upper cover. Thus, keep
a sufficient distance to the appliance to avoid scalding. Do not place the hot pot
on any heat- or moisture-sensitive surfaces. Do not use any hard or edged objects (e.g. metal
spoons) with the appliance to avoid damage to the surfaces, especially the non-stick coating.
Always use cooking utensils from heat-resistant plastic or wood (e.g. supplied rice spoon).
10. Press the opening button to open the upper cover and take out the rice. For this, it is best to use the supplied rice spoon.
11. Clean the appliance after each use. See: Care and Cleaning.
Baby Food
WARNING: Never let the total amount of rice and water exceed the maximum filling level.
1.Put the desired amount of properly prepared ingredients into the pot.
2.Fill in the corresponding amount of water. Then dry the exterior and upper brim of the pot.
For rice or oats porridge (“Conjee” or “Porridge”), fill the pot up to the filling level
corresponding to the used amount of rice or oat flakes according to the provided
measuring cup to prevent the meal from getting too stiff. Example: with ¼ measuring cup of rice fill up to the filling level “Conjee ¼”. But NEVER fill in more water, than up to the maximum level “Conjee ¾“)!
WARNING: It is essential to ensure that the upper brim of the pot is clean.
Otherwise the lid will not seal and water could run into the oven compartment.
3.Ensure that there are no foreign objects in the oven compartment of the cooker and the interior of the oven compartment is clean. Then insert the pot. The pot may not protrude the upper brim of the oven compartment.
4.Ensure that the lid of the pot is inserted properly in the upper cover of the multi-functional cooker, (see: Re-assembling the Appliance) and then close the upper cover. A click sounds if the upper cover is closed correctly.
5.Connect the appliance to the power supply and press START to switch on the appliance.
6.Press the MENU button until the arrow on the display is pointing to the function “Baby Food”.
7.Press the Timer buttons “+” and/or “–” until the desired cooking time is shown on the display.
8.Press the START button to start the function. The operation indicator will be illuminated continuously. A beep sounds when the function finished.
9.After use, press the KEEP WARM/OFF button to switch OFF the appliance. Then unplug the appliance.
WARNING: When opening the upper cover shortly after operation, condensate and a
large amount of steam could come out from under the brim of the upper cover. Thus, keep
a sufficient distance to the appliance to avoid scalding. Do not place the hot pot
on any heat- or moisture-sensitive surfaces. Do not use any hard or edged objects (e.g. metal
spoons) with the appliance to avoid damage to the surfaces, especially the non-stick coating.
Always use cooking utensils from heat-resistant plastic or wood (e.g. supplied rice spoon).
50
10. Press the opening button to open the upper cover of the appliance, and stir, using a plastic or wooden spoon.
WARNING: Just cooked food is too hot for feeding a baby.
11. Always let the mush cool down to body temperature before feeding.
12. Clean the appliance after each use. See: Care and Cleaning.
Steaming
To steam food over water, use the function “Steam cook”. Add an appropriate amount of
water to the inner pot. Ensure that you use a sufficient amount of water, but prevent the water
from reaching the steamer. The water filling level in the inner pot must be between filling
level 1 and 3.
Using the “Steam cook” function, additionally you can cook food in the
boiling water (e.g. boiled potatoes), while steaming delicate vegetables in the steamer. However, when steaming fish or meat (e.g. chicken
filets) in the steamer, the flavour of fish/meat could merge with the taste
of the other ingredients.
Additionally you can use this function without the steamer, for instance, to cook soups and
sauces needing a cooking time between 5 and 60 minutes. In this case, you can fill the pot
up to the filling mark 5 (including all ingredients).
1.If you wish to steam food, place the properly prepared food in the steamer, and ensure that the food will not protrude the brim of the steamer.
2.Fill the appropriate amount of water in the inner pot. Wipe dry the external surface and the upper brim of the pot. Fill the inner pot at least up to the lowest filling mark 1
(ca. 350 ml), but when using the steamer, do not fill in more than 1 Litre (filling mark 3). For saving energy and time, you should not fill in too much water, especially when selecting short cooking times. When cooking without the steamer, you can fill up to filling level 5 at the maximum.
3.Ensure that there are no foreign objects in the oven compartment of the Multi - Cook and the interior of the oven compartment is clean. Then insert the pot.
WARNING: It is essential to ensure that the upper brim of the pot is clean.
Otherwise the lid will not seal and water could run into the oven compartment.
4.For steaming, place the steamer in the pot.
5.Ensure that the lid of the pot is inserted properly in the upper cover of theMulti - Cook, (See: Re-assembling the Appliance) and then close the upper cover. A click sounds if the upper cover is closed correctly.
6.Connect the appliance to the power supply. Then press the START button to switch on the appliance.
7.Then press the MENU button until the arrow on the display points to the function “Steam cook”. The minimum cooking time 5 minutes flashes on the display.
8.Press the Timer buttons “+” and/or “–” until the desired cooking time is shown on the display. You can select cooking times between 5 and 60 minutes.
51
9.
Press the START button to start the selected function. The operation indicator will
illuminate continuously. The count-down of the cooking time will not start until the water in the inner pot comes to the boil. At this moment, a beep sounds several times. When the water is boiled down or the cooking time expires, the appliance toggles to
warm-keeping mode automatically.
The display shows the already elapsed time of warm-keeping.
Nevertheless, when the cooking time expires, an acoustic signal will sound.
10. After use, press the KEEP WARM/OFF button to switch OFF the appliance. Then unplug the appliance.
WARNING: When opening the upper cover shortly after operation, condensate and a
large amount of steam could come out from under the brim of the upper cover. Thus, keep a
sufficient distance to the appliance when pressing the opening button to avoid scalding. The
oven compartment is very hot shortly after operation. Protect your hands with pot holders or
oven gloves, when taking out the hot inner pot and/or steamer. Only place the hot pot on a
heat-resistant surface.
Do not use any hard or edged objects (e.g. metal spoons) with the appliance to avoid damage to the surfaces. Only use cooking utensils made from wood or heat-resistant plastic.
11.Press the opening button to open the upper cover and take out the food. For this, it is best to use the supplied rice spoon. If you prepared food in the pot and steamer at the same time, take out the pot carefully, using pot holders or oven gloves, and place the pot on a heat-resistant surface. Then take the steamer out of the pot.
12.Clean the appliance after each use. See: Care and Cleaning.
Baking and Reheating
The “Bake” function is suited for reheating of already cooked foods (e.g. rice, pasta, vegetables) and for baking thick pancakes, gratins, and small cakes.
Reheating of Solid Food
For heating up solid food, it is best to use the “Bake” function according to the following
instructions.
Note: Soups and sauces can be reheated via the “Soup” or “Steam cook” function. However, you should cancel the process as soon as the count-down starts, indicating that the
contents of the pot is boiling. It will take approx. 20 minutes to bring ca. 1 litre of soup to
the boil.
1.It is good advice to loosen rice or pasta before reheating. Then put the cold food into the pot.
2.Ensure that there are no foreign objects in the oven compartment of the cooker and the interior of the oven compartment is clean. Then insert the pot.
WARNING: It is essential to ensure that the upper brim of the pot is clean. Otherwise the
lid will not seal sufficiently and water could run into the oven compartment.
3.Ensure that the lid of the pot is inserted properly in the upper cover of the Multi - Cook, (See: Re-assembling the Appliance) and then close the upper cover. A click sounds if the upper cover is closed correctly.
52
4.Connect the appliance to the power supply and press the START button to switch on the appliance.
5.Press the MENU button several times until the arrow on the display is pointing to the “Bake” function. Two dashes are shown on the display.
6.Press the START button to enter the reheating process. The operation indicator lights up with two dashes on the display. As soon as the function finished, a beep sounds.
7.Press the KEEP WARM/OFF button to switch OFF the appliance.
Then unplug the appliance.
WARNING: When opening the upper cover shortly after operation, condensate and a
large amount of steam could come out from under the brim of the upper cover. Thus, keep
a sufficient distance to the appliance to avoid scalding. Do not place the hot pot
on any heat- or moisture-sensitive surfaces. Do not use any hard or edged objects (e.g. metal
spoons) with the appliance to avoid damage to the surfaces, especially the non-stick coating.
Always use cooking utensils from heat-resistant plastic or wood (e.g. supplied rice spoon).
8.Press the opening button to open the upper cover and take out the food. For this, it is best
to use the supplied rice spoon.
9.Clean the appliance after each use. See: Care and Cleaning.
Baking
CAUTION: Do not use the inner pot for mixing to avoid damage and excessive wear to the
non-stick coating.
Using the function “Bake”, you can prepare small cakes, flan cases, small thick pancakes as
well as savoury or sweet baked dishes and gratins. However, you should not prepare too
large amounts. Otherwise the food will probably not be done completely.
• If baked dishes and gratins are still half cooked after the baking time elapsed, you should leave these dishes in the appliance for some time with the warm-keeping function in operation.
• If baked dishes are too crunchy, just cancel the function at the desired time, for instance,
according to the baking time you would use when baking in an oven. For trying your accustomed recipes, you will get a good guideline by adding ca. 15 minutes to your usual baking
time in the pre-heated oven.
• When baking cakes, DO NOT open the upper cover during operation or shortly thereafter, not even for a moment. Just let the cake cool down slowly within the appliance after
switching OFF. Otherwise, the cake will not rise.
Also refer to the recipes in this booklet.
1.Combine the required ingredients and mix in a mixing bowl. Thereafter fill the prepared
mixture in the pot of the multi-functional cooker. Wipe the exterior and upper brim of the pot
dry. For instance, use the pancake recipe in this booklet for this.
2.Ensure that there are no foreign objects in the oven compartment of the cooker and the
interior of the oven compartment is clean. Then insert the pot.
WARNING: It is essential to ensure that the upper brim of the pot is clean. Otherwise the
lid will not seal sufficiently and condensate could run into the oven compartment.
53
3.Ensure that the lid of the pot is inserted properly in the upper cover of the Multi - Cook, (see: Re-assembling the Appliance) and then close the upper cover. A click sounds if the upper cover is closed correctly.
4.Connect the appliance to the power supply and press the START button to switch on the appliance.
5.Press the MENU button several times until the arrow on the display is pointing to the “Bake” function. Two dashes are shown on the display.
6.Press the START button to enter the baking process. The operation indicator illuminates continuously with two dashes appearing on the display. The baking process takes about 45 to 60 minutes. Within the last 10 minutes, a countdown is shown on the display, indicating the time until finishing.
Note: If the prepared dishes require a shorter cooking time, you can stop the baking process at any time by simply pressing the KEEP WARM/OFF button to switch OFF the appliance.
As soon as the programmed baking process is finished a beep sounds. The appliance toggles to warm-keeping, and the warm-keeping time is shown on the display.
7.Press the KEEP WARM/OFF button to switch OFF the appliance. Then unplug the appliance.
When baking cakes, do not open the upper cover; not even for a moment ! Just let th
cake cool down within the appliance for at least 1/2 hour with the upper cover still closed. Otherwise, the hot cake could cave in.
WARNING: When opening the upper cover shortly after operation, condensate and a
large amount of steam could come out from under the brim of the upper cover. Thus, keep
a sufficient distance to the appliance to avoid scalding. The oven compartment and pot are
very hot shortly after operation. Protect your hands with pot holders or oven gloves, when taking out the pot. Do not place the hot pot on any heat- or moisture-sensitive surfaces. Do not
use any hard or edged objects (e.g. metal spoons) with the appliance to avoid damage to
the surfaces, especially the non-stick coating. Always use cooking utensils from heat-resistant
plastic or wood (e.g. supplied rice spoon).
8.Press the opening button to open the upper cover and take out the food.
For this, it is best to use the supplied rice spoon. Cakes and most baked dishes and
gratins can be turned out simply. For this, use pot holders or oven gloves to take the pot out of the appliance. Only place the pot on a heat-resistant surface.
9.Clean the appliance after each use. See: Care and Cleaning.
Yoghurt
For preparing your own yoghurt it is best to use plain milk and some pure yoghurt containing living yoghurt cultures. After preparation, add flavours and other ingredients and mix
thoroughly. To get delicious yoghurt, use about 200 to 250 ml pure yoghurt and 1 or 2
tablespoons full of your favourite jam, honey or nougat cream.
Note: Do-it-yourself yoghurt is always runny. To get a more stiff quality, you can use a centrifuge. Alternatively you can thicken the yoghurt using some gelatine to your liking.
1.Mix milk and ripe yoghurt and pour the mixture into the pot. Ensure that the exterior and
upper brim of the pot are clean.
54
2. Ensure that there are no foreign objects in the oven compartment of the cooker and the interior of the oven compartment is clean. Then insert the pot. The pot may not protrude the upper brim of the oven compartment.
WARNING: It is essential to ensure that the upper brim of the pot is clean.
Otherwise the lid will not seal sufficiently and condensate could run into the oven compartment.
3. Ensure that the lid of the pot is inserted properly in the upper cover of the Multi - Cook, (see: Re-assembling the Appliance) and then close the upper cover. A click sounds if the upper cover is closed correctly.
4. Connect the appliance to the power supply and press the START button to switch on the appliance.
5. Press the MENU button several times until the arrow on the display is pointing to the “Yoghurt” function. On the display the pre-selected time of preparation (8:00 hours) is shown.
6. Press the START button to start the function. The operation indicator lights up continuous-
ly, and on the display the count-down of the time of preparation starts.
7. Press the KEEP WARM/OFF button to switch OFF and unplug the appliance. Then press the opening button to open the upper cover and take out the inner pot carefully.
8. Pour out the yoghurt in a high narrow container and clean the appliance (See: Care and
Cleaning).
9. Let the yoghurt settle for several hours at room temperature. Then carefully pour off the whey.
10. Flavour whey and yoghurt to taste. For this, refer to the recipes in this booklet.
Soups and Sauces
WARNING: Always ensure that there is a sufficient amount of water in the inner pot, before
switching on the appliance. The water filling level in the inner pot must reach the minimum
mark 1 at least, but do not fill in more than up to mark 5. Do not overfill the inner pot.
Do not leave the appliance unattended when cooking food that could froth! Immediately
switch OFF and unplug the appliance, when froth is running down the upper cover.
Using the “Soup” function you can prepare soups and sauces that require a cooking time of
30 to 90 minutes. For cooking soups or sauces the water filling level must lie between filling
level marks 1 and 5. The actually required cooking time depends on your individual liking.
1.Add broth and the required ingredients to the pot. Ensure that the total amount will not
exceed the filling level mark 5. If necessary, wipe the exterior and upper brim of the pot clean and dry.
2.Ensure that there are no foreign objects in the oven compartment of the cooker and the interior of the oven compartment is clean. Then insert the pot.
WARNING: It is essential to ensure that the upper brim of the pot is clean.
Otherwise the lid will not seal the pot sufficiently and liquid could run into the oven compartment.
3.Ensure that the lid of the pot is inserted properly in the upper cover of the Multi - Cook,
(see: Re-assembling the Appliance) and then close the upper cover. A click sounds if the
upper cover is closed correctly.
55
4. Connect the appliance to the power supply and press the START button to switch on the appliance.
5.
Press the MENU button several times until the arrow on the display is pointing to the “Soup” function. On the display, the minimum cooking time (30 minutes) is flashing. The flashing of the time display indicates that you can adjust the cooking time via the Timer buttons “+” and “–”.
6. Press the Timer buttons “+” and/or “–” until the desired cooking time between 30 and 90 minutes is shown on the display.
7.
Press the START button to start the function. The operation indicator lights up
continuously. However, the cooking time starts as soon as the water comes to the boil and a beep sounds. When the cooking time expires, an acoustic signal will sound again, and the appliance will automatically toggle to the warm-keeping mode.
8. Press the KEEP WARM/OFF button to switch OFF the appliance. Then unplug the appliance.
WARNING: When opening the upper cover shortly after operation, condensate and a
large amount of steam could come out from under the brim of the upper cover. Thus, keep
a sufficient distance to the appliance to avoid scalding. Do not place the hot pot
on any heat- or moisture-sensitive surfaces. Do not use any hard or edged objects (e.g. metal
spoons) with the appliance to avoid damage to the surfaces, especially the non-stick coating.
Always use cooking utensils from heat-resistant plastic or wood (e.g. supplied soup ladle).
9. Press the opening button to open the upper cover and take out the food. For this, it is best to use the supplied soup ladle.
10.Clean the appliance after each use. See: Care and Cleaning.
Warm-Keeping
You can use the multi-functional cooker for keeping your dishes warm. For this, the cooker
maintains a temperature of about 70 to 75 °C within the pot.
1.Fill your foods in the inner pot. Only fill the appliance up to a filling level between mark
1 and 5.5.
2.Place the inner pot in the appliance and close the upper cover.
3.Connect the appliance to the power supply and directly (with the appliance
switched OFF) press the KEEP WARM/OFF button. The KEEP WARM indicator lights up, indicating that the appliance entered the warm-keeping mode. The display shows the time of warm-keeping in 5 minute intervals.
Note: The other operating elements are blocked during warm-keeping. If you wish to use
another function, press the KEEP WARM/OFF button to switch OFF the appliance first. Then
switch ON the appliance using the START button.
4.You can stop the warm-keeping mode at any time. Simply press the KEEP WARM/OFF
button to switch OFF the appliance.
56
Adjusting the Timer
For operating the functions “Rice”, “Baby Food”, “Steam cook” or “Soup” the timer function
(preset) can be used to pre-select the start time of operation. The period of timing lies within
1 to 15 hours.
1.Prepare the appliance for use and connect the appliance to the power supply
(See: Preparing the Cooker for Operation).
2.Press the START button to switch on the appliance.
3.Press the MENU button to select the desired function.
4.Press the PRESET button to enter the setting mode of the timer. On the display the minimum time delay for the start of cooking in hours and minutes (HR and MIN) flashes: 1 hour.
5.Select the desired time by pressing the Timer buttons “+” and “–”.
Any time you press one of these buttons, the time will increase (“+”) or decrease (“–”) in predefined steps.
6.Press the START button.
The PRESET indicator will illuminate, and the display will still show the selected time.
Until entering the cooking process, the display will show the remaining time until starting the
function as a count-down in steps of 30 minutes.
As soon as the multi-functional cooker starts the cooking process automatically, the PRESET
indicator goes out and the usual information of the selected function is shown.
7.You can stop the timer at any time. Simply press the KEEP WARM/OFF button to switch
OFF the appliance.
Troubleshooting
The following hints are meant to aid you in solving problems.
Problem
Possible Reasons
The solution
Indicator remains dark,
oven compartment remains
cold
The appliance is not
connected to the power
supply.
Connect the appliance to
the power supply. Check
whether the used power
outlet is live.
Malfunction in the electric
circuit.
Send to the designated
service centre for repair.
Indicator remains dark,
oven compartment gets
warm
Malfunction in the electric
circuit.
Send to the designated
service centre for repair.
Indicator is illuminated,
oven compartment remains
cold
Heating elements are burnt
out, or malfunction in the
electric circuits.
Send to the designated
service centre for repair.
Display shows “C1”, “C2”,
“C3”, or “C4”.
Malfunction of the
appliance.
Send to the designated
service centre for repair.
57
Ingredients are crude or
over-cooked.
Cooked food is burnt or
cannot be kept warm automatically.
Overflow happens when
cooking porridge.
It will not boil in the pot
within a very long time.
The upper cover cannot be
closed.
Insufficiently adjusted
cooking time.
Adjust the proper cooking
time. Leave the meal in the
appliance for some time
after cooking or cancel the
used function at the right
time.
Too large amounts of food/
water.
Decrease the used quantities.
The heating plate is
deformed.
Send to the designated
service centre for repair.
The pot is not inserted
correctly and thus has no
sufficient contact with the
heating plate.
Insert the pot correctly. The
brim of the pot must fit on
the brim of the oven compartment.
There is foreign matter between pot and heating plate
or temperature sensor.
Clean the oven compartment
and exterior of the pot (See:
Care and Cleaning).
The pot is deformed.
Replace the pot. For this,
contact your service centre.
Malfunction in the electric
circuits.
Send to the designated
service centre for repair.
With the “Yoghurt” function,
automatic warm-keeping is
not programmed.
Activate warm-keeping
manually
(See: Warm-Keeping).
Temperature sensor is
stained.
Clean the temperature
sensor with fine sandpaper
(320#).
Malfunction in the electric
circuits.
Send to the designated
service centre for repair.
Steam vent is blocked.
Clean the steam vent.
Malfunction in the electric
circuits.
Send to the designated
service centre for repair.
With some functions, the appliance is pre-programmed
to adjust a lower temperature.
Select another function.
Malfunction of the appliance.
Send to the designated
service centre for repair.
The lid is missing.
Insert the lid in the upper
cover.
58
You cannot adjust the Timer
(PRESET).
The lid is not inserted
properly.
Insert the lid with the seal
facing towards the oven
compartment.
The functions “Bake” and
“Yoghurt” cannot be operated via the PRESET timer.
Select an appropriate
function.
Liquid is accumulating below The pot is overfilled.
the appliance
Take out an appropriate
amount of food.
Froth or liquid is coming out
of the steam vent.
The pot is overfilled.
Take out an appropriate
amount of food.
The steam vent is blocked.
Clean the steam vent.
The food in the pot is
violently frothing.
If the froth does not overflow
over the steam vent, this is
harmless. If the froth overflows the upper cover decrease the amount of food.
Care and Cleaning
WARNING! Shortly after usage, the interior of the appliance, the lid and upper cover and
the pot are very hot. Always switch OFF the appliance, unplug from power outlet and allow
cooling before disassembling or cleaning the appliance. Do not immerse the appliance or
power cord in water or any other liquids or place the appliance or power cord in an automatic dishwasher.
Never leave any food dry up on the appliance or any parts of it to
prevent a build up of baked-on foods. Especially keep the heating
plate and sensor plate at the bottom of the oven compartment clean
to maintain full contact to the pot, as residues between pot and heating elements will interfere the temperature control of the appliance.
Always clean the appliance after each use according to the following instructions.
Disassembling the Appliance
1.Switch OFF, unplug and let the appliance cool down sufficiently. Then, unplug the power cord from the rear of the appliance.
2.Remove the steam vent from the upper cover. To do so, grasp in the hollow besides the steam vent and lift the steam vent up and out.
3.Press the opening button, take the inner pot and, if necessary, the steamer out of the
appliance and empty the parts completely.
Note: Steam always sweeps away a little fat and proteins from the food, that will condensate at the steam vent. Thus, it is necessary to clean the steam vent after each use to avoid a
build up of residues in the steam vent.
59
4.Press the white button at the underside of the steam vent and fold the two halves of the steam vent apart.
5.Remove the lid of the inner pot from the upper cover of the appliance. To do so, press the two white buttons above the hinge to release the lid of the inner pot from the upper cover of the appliance. Then pull out the lid.
CAUTION: At the lid of the pot and at both parts of the steam vent seals are mounted. Ensure
not to damage the seals.
Open the steam valve
Remove the steam valve
Open
Assembly
Cleaning
Close
Cleaning the Parts
CAUTION: DO NOT scratch in the pot with any hard or sharp-edged objects to avoid
damage to the non-stick coating. Be careful when cleaning the parts to avoid damage to the
seals. Do not use violence.
Abrasive cleaners, cleaning pads, or fine sandpaper may be used for cleaning the heating
plate or temperature sensor in the oven compartment. Do not use such materials for cleaning
any other surface of the appliance. Do not use hard or sharp-edged objects, chemicals, or
corrosive liquids for cleaning the appliance as this could affect or damage the surfaces. Do
not spill or pour any liquids on the appliance or in the interior of the oven
compartment.
1.Clean the pot and lid, base/lid of the steam vent, as well as all used accessories (steamer, spoon, ladle, measuring cup, and scoop shelf) with warm dish-water and a soft nylon brush. Alternatively, you may clean these parts in an automatic dishwasher.
60
2.Moisten a clean cloth or soft sponge with a little warm dishwater and carefully wipe the exterior of the appliance, the upper cover, the oven compartment, and the power cord.
Stubborn residues on the other surfaces can be removed better by moistening with some warm dish-water. Baked-on residues on the heating plate in the oven compartment can be removed using a scouring pad or, if necessary, some fine sandpaper.
3.Thereafter wipe all surfaces with a clean moistened cloth.
CAUTION: Always ensure that the appliance and all parts of it are out of reach of young
children.
4.Thoroughly dry all parts and let dry naturally for about half an hour before re-assembling
the appliance.
Re-Assembling the Appliance
1.Ensure that the seals at the upper cover, base of steam vent and lid of the pot are clean and without any damage (e.g. cracks, scratches, or signs of wear). Damaged seals must be exchanged by an authorized service centre.
2.Hang the hooks on the base of the steam vent in the hinges of the steam vent lid, fold up the two halves, and press the base onto the lid until it engages with a click.
3.Place the steam vent with the chrome-plated steam vent lid pointing upwards in the hollow of the upper cover of the appliance. The protrusion on the steam vent must face to the hinge of the upper cover. Gently press the steam vent down into the upper cover.
4.Open the upper cover and, with the seal on the lid facing towards the oven compartment, insert the tongue at the brim of the lid in the slit in the front part of the upper cover brim.
Note: You cannot close the upper cover, if the lid is not mounted properly.
5.Then, above the hinge, press the lid onto the upper cover until the left and right retainer engage with a click.
Storage
WARNING: Always unplug the appliance, let the appliance cool down sufficiently, and
clean the appliance and all its parts before storing. (See: Care and Cleaning).
Ensure to store the appliance where it is clean, dry and safe from frost, direct sunlight and
inadmissible strain (mechanical or electric shock, heat, moisture) and where it is out of reach
of young children. Place the appliance on a clean and stable surface, where it can not fall.
Do not place any hard or heavy objects on or in the appliance or on the power cord.
Always handle the power cord with care. Power cords may never be knotted, twisted,
pulled, strained or squeezed.
Do not use any accessories of the appliance (e.g. pot, spoon, ladle, or power cord) for any
other purpose than operating the appliance. Always store the parts and accessories of the
appliance with the appliance.
1.Always clean and completely re-assemble the appliance before storage
(See: Care and Cleaning).
2.Place spoon, spoon shelf and ladle of the appliance carefully in the inner pot. Then place the steamer in the inner pot.
61
3.Place the power cord and the measuring cup in the steamer.
4.Then place the pot in the oven compartment and carefully close the upper cover.
5.To move the appliance, grasp the handle. Place the appliance on a suitable surface where it can not fall, and is out of reach of young children.
Notes for disposal
Dispose of the appliance and packaging must be effected in accordance with the corresponding local regulations and requirements for electrical appliances and packaging. Please
contact your local disposal company.
Warranty
We guarantee that all our products are free of defects at the time of purchase.
Any demonstrable manufacturing or material defects will be to the exclusion of any further
claim and within warranty limits of the law free of charge repaired or substituted. There is no
Warranty claim of the purchaser if the damage or defect of the appliance is caused by inappropriate treatment, over loading or installation mistakes. The Warranty claim expires if there is
any technical interference of a third party without an written agreement.
The purchaser has to present the sales slip in assertion-of-claim and has to bear all charges of
costs and risk of the transport.
Information and Service
Please check www.gastroback.de for further information. For technical support, please
contact Gastroback Customer Care Center by phone: +49 (0)4165/22 25-0 or e-mail
[email protected].
Recipes
Carrot Potato Mush
Ingredients
50 g potatoes, cut into cubes
100 g carrots, cut into cubes
400 ml water
1 heaped teaspoon of butter
Preparation
1.Cut carrots and potatoes in small cubes and place the mixture in the steamer.
2.Pour the water into the pot and place the steamer in the pot. Start the function “Baby Food”.
3.As soon as the beep sounds, take out the steamer and the pot and pour ca. 80 - 100 ml of the water in a mixing bowl. Add butter and the content of the steamer. Mix and purée the mixture.
4.By all means, let baby food cool down to body temperature before feeding!
Comments:
Many other tender vegetables can be combined with potatoes according to this recipe,
giving a pure vegetable potato mush.
62
Thick Pancake
Ingredients
3 eggs
100 g caster sugar
100 g cake flour
50 g butter
20 ml milk
The proportion of ingredients can be adjusted according to individual tastes. If too much ingredients are used, the cake effect may the affected and even the cake may be half cooked.
However, you can add flavours to taste (e.g. vanilla, rum or almond oil).
Preparation
1.Combine sugar and eggs in a mixing bowl and beat the mixture until it is frothy and the sugar is dissolved completely.
2.Add cake flour and mix until there are no more lumps.
3.Melt the butter in a warm water bath. After adding milk and melted butter, mix quickly.
If not stirred thoroughly, the pancake may contain big bubbles, and the taste is unsatisfactory.
4.Pour the mixture in the pot of the multi-functional cooker. Bake immediately using the “Bake” function, to avoid that the bubbles disappear completely when heated.
5.Serve hot with jam, vanilla sauce and sweet berries (bilberries, cranberries, or
redcurrant), or with maple syrup.
Nougat Yoghurt Drink and Whey Drink
Note: When preparing yoghurt, you will always get a small amount of whey. Do not deposit the whey. It is a refreshing drink!
Ingredients
1 litre fat-reduced plain milk
ca. 100 ml plain yoghurt
ca. 100 g nougat crème
For the whey drink:
1-2 tablespoons lemon juice,
1 teaspoon sugar
Preparation
1.Mix milk and pure yoghurt and add the mixture to the pot.
2.Place the pot in the appliance and start the “Yoghurt” function. After the time of preparati
on expires, you can allow the yoghurt to ripe further at room temperature to your liking.
3.Pour out the yoghurt in a sufficiently large high vessel. Preferably the vessel should have a spout.
4.Leave the yoghurt for some hours at room temperature (e.g. overnight). In this time the yoghurt will be deposited and the whey will accumulate.
5.Carefully pour off the whey in a sufficiently large glass. For the whey drink, mix whey, lemon juice and sugar.
6.Add the nougat crème to the yoghurt and mix thoroughly. Then place yoghurt and whey in the refrigerator for about 20 minutes.
7.For serving, divide up the yoghurt drink into 4 to 6 glasses.
63
Cheese Pasta Gratin
Ingredients
100 g dried pasta
1 teaspoon salt
150 g carrots
200 g broccoli
200 g courgette (zucchini)
1 small parsnip
2 slices of Gauda (50 to 80 g)
2 teaspoons of instant broth
50 ml sweet cream
50 ml milk
1/2 teaspoon of pepper
1 pinch grounded nutmeg
1 teaspoon chopped parsley
Preparation
1.Cook the pasta. Thereafter let the pasta cool down.
2.Cut carrots and courgette to slices, and the parsnip in small cubes. Cut broccoli to florets.
3.Combine pasta, carrots, parsnip, and broccoli and fill these ingredients in the pot of the Multi - Cook.
4.Cover with cheese slices.
5.Mix milk, cream, instant broth, pepper and nutmeg and spread out the mixture on the cheese.
6.Place the pot in the multi-functional cooker and start the “Bake” function.
7.As soon as the countdown of the cooking time reaches 8 to 5 minutes, press the KEEP WARM/OFF button to switch off the appliance.
8.Spread some chopped parsley on each portion and serve hot.
Small Strawberry-Cream-Flan
Ingredients
2 eggs
50 - 60 g sugar
ca. 50 ml milk
20 g marge
100 g cake flour
1/2 pack baking powder
1/4 vial vanilla flavour
1 pinch of salt
150 g fromage frais (double fat)
150 g strawberry jam
100 g sweet cream
1-2 leaves gelatine
50 g fresh strawberries
1 orange
1 Pack vanilla sugar
64
Preparation
1. Separate the eggs and beat the egg white. Combine yolks and sugar and beat it until it is frothy.
2. Combine flour and baking powder and add it to the mixture of yolk and sugar. Melt
marge in warm water bath and then add it to the cake mixture. Add vanilla flavour and
a small pinch of salt. Mix thoroughly until there are no more lumps. Fold in the egg white.
3. Grease the pot of the multi-functional cooker and spread some samolina in to evenly cover the interior of the pot.
4. Pour the cake mixture in the pot and level the surface. Bake in the cooker, using the “Bake” function. After the baking process has been finished, switch off the cooker, but
do not open the cover; not even for a moment! Let the flan cool down in the cooker for about 45 minutes.
5. Take out the pot and turn out the cake. Let it cool down completely. Thereafter cut the flan into 2 flan cases.
6. Combine cream and vanilla sugar and whip it. Dissolve the gelatine according to the instructions on the packaging. Beat fromage frais and strawberry jam until it is frothy.
7. As soon as the gelatine stiffens, add 1 tablespoon of the fromage frais, then combine fromage frais mixture and gelatine and mix thoroughly. Fold in the cream.
8. Fit a flan ring around the lower half of the flan. Spread one half of the strawberry cream on the flan case.
9. Place the other half of the flan case on the strawberry cream and spread the remaining strawberry cream on it. Place the flan in the refrigerator for at least 20 minutes.
10. Remove the flan ring and garnish with fresh strawberries and orange filets.
Apple in the Snow
Ingredients
500 ml fresh milk
150 g pudding rice
1 pack vanilla sugar
1 pinch of salt
2 eggs
2 apples, peeled, sliced without core
1 tablespoon grounded or finely chopped hazel nuts, walnuts or almonds
1 tablespoon raisins
1 tablespoon honey
1/2 teaspoon cinnamon powder
1 splash almond oil
Preparation
1.Wash rice and cook the rice in milk, vanilla sugar and a pinch of salt according to the instructions on the packaging. Let the rice cool down to room temperature.
2.Chop the raisins and thoroughly mix with honey, cinnamon, almond oil and chopped nuts or almonds.
3.Separate the eggs and whip the egg white. Mix yolk and rice pudding and fold in the egg white.
4.Fill one half of the rice pudding in the pot of the multi-functional cooker.
5.Cover the rice with a layer of apple slices and spread the raisin mixture on the apple slices.
65
6.Cover with the remaining rice pudding and bake in the multi-functional cooker using the function “Bake”.
7.Serve hot with vanilla sauce.
Comments:
This sweet dish is delicious with a lot of other fruits (without raisin mixture) as well. For
instance, try cherries, bananas, peaches, strawberries, raspberries, and blackberries.
Index
|A|
abroad operation..................................42
accessories...............................40, 41, 60
assemble..............................................61
|B|
baby food............................................50
bake..............................................52, 53
buttons.....................................39, 40, 45
|C|
capacity...............................................44
care and cleaning...........................43, 59
conjee...........................................48, 50
cooking time...................................45, 46
cover...................................................39
|D|
disassemble..........................................59
display................................................45
disposal...............................................62
|E|
extension cord......................................43
|A|
filling level...........................................51
first use................................................44
flan case..............................................53
functions........................................44, 48
|H|
heating plate........................................40
hot surfaces..........................................43
|I|
indicators.................................39, 40, 45
intended use.........................................41
|L|
lid...........................................39, 60, 61
|M|
maximum amount................42, 44, 48, 55
maximum, timer....................................57
minimum amount.......................42, 48, 55
|N|
non-stick coating...................................43
|O|
opening button.....................................39
operating elements................................39
operation.............................................46
oven compartment.................................40
|P|
pancake..............................................53
porridge..............................................48
power consumption...............................44
power cord........................39, 43, 44, 47
power supply..................................42, 44
preparation for use..........................46, 47
problems..............................................57
|R|
reheat..................................................52
rice.....................................................49
|S|
safety instructions..................................41
sauce..................................................55
saving energy...........................45, 47, 51
seals..............................................60, 61
selecting functions.................................45
soup..............................................51, 55
steam..................................................43
steam cook...........................................51
steam vent......................................39, 59
steamer................................................60
storage................................................61
|T|
technical specifications..........................44
temperature sensor................................40
testing for proper operation....................41
timer....................................................57
tips......................................................57
|W|
warm-keeping.................................46, 56
|Y|
yoghurt..........................................46, 54
66
GASTROBACK GmbH
Gewerbestraße 20 . D-21279 Hollenstedt / Germany
Telefon +49 (0)41 65/22 25-0 . Telefax +49 (0)41 65/22 25-29
[email protected] . www.gastroback.de