1
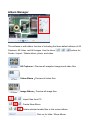
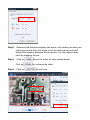
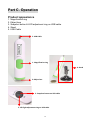
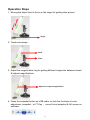
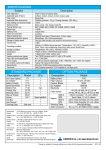
USB AUTOFOCUS MICROSCOPE CAMERA User Manual INDEX Part A. Product Information Part B. Application Part C. Operation Part A. Product Information Features Detailed examination of any area you choose Zoom function: 50X to 170X Snapshot to JPG or BMP files, Burst snapshot Capture to Windows Media video files Full screen mode Slide Show for image Video adjust Basic Requirement Pentium 4 Class CPU or above 256 MB of free system RAM or above VGA system with at least 16bit color support Windows XP SP2 or above One free USB 2.0 interface 30MB of hard disk space Specifications Image resolution: adjustable Image sensor: Color CMOS sensor Light source: White light LED x 8 Hardware interface: USB 2.0 Cable length: 1.5m Dimension: 31mm x 120mm Weight: about 125g 1 Part B. Application Function buttons The function buttons are listed on the toolbars as below. Snapshot or record video Click on into Snapshot or record video mode Browser your media files Click on “Browser mode” for reviewing and editing the videos & photos. 2 Next/Back picture Click on for next/back picture. Editing Editing the videos & photos 3 Click on for edit function, there are a lot of tools for edit such as color adjustment, rotation … etc. File Manager New Album:Add New Album Preview:Preview selected image / Video file Properties:Display selected image / Video file properties Find Target:Find selected image / Video location File Edit After selected files / photos / videos, there are functions for Copy, Cut, Paste, Delete, Copy to, Move to, Preview, Properties, and Find Target. 4 Email image file Email selected photo / video files Slide show setting and play Begin a Slide show for all photos or selected photos. There are some slide show effects & slide show interval time for setting. 5 Print photo Print for selected photo/photos, which can be printed on one A4(Letter, Legal, A5, B5)paper , for 1 photo to 42 photos with different photo modules. Note: After changing paper size, the photo modules will be different from original photo modules. Setting 6 Format Image Format:Save the captured image as JPG or BMP file. Video Format:The captured video will be saved as .WMV file. Number of photos in burst:Set photo number for burst mode. Image Resolution:Image resolution supported by the webcam Video Resolution:Video resolution supported by webcam Device Video Device:Choose the webcam that is connecting to your computer. Click Setting button to change the parameters of this webcam. Audio Device:Choose an audio device on your computer. If the Audio is checked, it will record videos with audio. To call camera driver setting Other Language:Choose your language preference for the application. Media folder:Select the default folder to which captured images are saved. 7 Album Manager The software is with album function of including the three default albums of All Captures, All Video, and All Images. Use the three Create / Import / Delete album, photo, and video. buttons for All Captures:Preview all snapshot images and video files Video Album:Preview all video files Image Album:Preview all image files Import files from PC Create New Album Delete selected media files or the current album Click on for Hide / Show Album 8 Snapshot and Record Adjust Color、Snapshot、Record and Full Screen button Current Snapshot and Video resolution setting adjusts Adjust Color:Real time color for Brightness, Contrast, Hue, Saturation, Sharpness, and Gamma. Snapshot button:Capture a still image from current video. And this image will be shown on the Capture Browser under All Images album. 9 Video record button:Click the button to starts recording video from your microscope. Click the button again to stop recording. Burst:Capture multiple images in a quick succession. Full Screen:Click the button to show the current video in full screen, and then double-click in full screen, back to the main panel. Full Screen Mode Measure the video:Measurement length function as the below steps. Step1. Selected Low / High Magnification depend on magnification rate of microscope 10 Step2. Measures the distance between two points, click where you want your starting point and then click again to set the ending point and it will display the distance between the two points. You can adjust either point by dragging the pin. Step3. Click on Click on Step4. Click on freeze the video for easy measurement, for unfreeze the video to start over 11 Part C. Operation Product appearance 1. Magnification ring 2. Object lens 3. Snapshot button & LED adjustment ring on USB cable 4. Stand 5. USB Cable 5. USB Cable 1. Magnification ring 4. Stand 2. Object lens 3. Snapshot button on USB cable 3. LED light adjustment ring on USB cable 12 Operation Steps 1. Moving the object lens to focus on the target for getting clear picture. Target 2. Fixed microscope Fixed Fixed 3. Adjust the magnification ring for getting different image size between lowest & highest magnifications. Adjust for request magnification 4. Press the snapshot button on USB cable, or click the functions of color adjustment, snapshot(or F7 Key), record, burst snapshot & full screen on software. 13