1
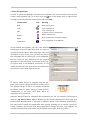
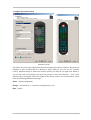
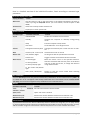
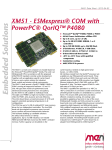
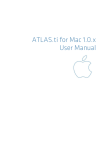
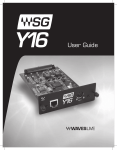
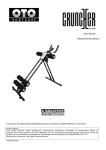
Remote Control
English Manual
Version:01.10.04
Contents
The Remote Control Editor..................................................................................................... 3
Installation .......................................................................................................................... 3
The menu............................................................................................................................. 4
The command sets .............................................................................................................. 5
1. Select the application ................................................................................................... 7
2. Program the remote control .......................................................................................... 8
3. Check the assignments................................................................................................ 11
4. Done! .......................................................................................................................... 11
The options......................................................................................................................... 11
2
Remote Control (English)
The Remote Control Editor.
Installation
The Remote Control Editor was installed together with the TV software. The program can be
launched from its system tray icon or the configuration menu of the TV software. In the configuration menu, select the "Options" tab and click the "Remote Control" icon under "Miscellaneous".
Remote Control Editor icon in the system tray
Remote Control (English)
3
The menu
If you have not made any changes, the window displayed above appears, with similar contents. This overview shows the currently loaded settings for various applications. Of course,
some of the applications which appear in the screenshot may not be set up on your system. In
order to select other sets of commands than these, or to switch these off, simply click the
corresponding field and a dialog window opens with all command sets and the entry "---".
Select the entry to disable this menu input. In the default settings, you can reach this menu
via the APP or OSD button of the remote control as an OSD (On Screen Display) menu.
4
Remote Control (English)
Autoselect. You can use the "Autoselect" button to clean up your menu at the touch of a
button. Clicking it performs a check of whether the program file associated with the instruction set is actually located on your hard drive and/or removes entries between two command
sets which have been disabled, and the menu items move more closely together.
In the row of tabs to the right of the "Menu" item, you can switch to the "Command sets" tab
to create your own command sets, edit existing ones or delete existing ones.
The command sets
While developing the software interface between the operating system on the one side and
the TerraTec hardware on the other, our first priority was to provide the user with as much
flexibility as possible, and thus not to restrict the remote control options to TerraTec applications. The convenient user interface allows you to create your own command sets, adjust
existing ones to your requirements and remove command sets. If you go to the " Command
sets" window, a list of all currently available sets is displayed first.
Remote Control (English)
5
Where's the program? When the warning symbol appears as the icon, it indicates that a
command set cannot be used at this time. This can happen if you have uninstalled an application, or a preinstalled command set cannot find the executable file in the application's
default directory. If, on the other hand, the settings are correct, the correct program icon is
displayed.
Information. An information window is displayed in the lower area and provides the most
significant key date relevant to the selected command sets. In the example here, the path to
the program (program folder) appears unavailable.
Using the example of the Windows Calculator—an often underrated, cool little app—we want
to provide you with an example of how you can create your own presets for a desired application. To do so, click the icon we mentioned above in your taskbar.
6
Remote Control (English)
1. Select the application
In order to allow the Windows Calculator to be operated via remote control, we must first
icon in the upper area, or right-click an
create a new command set. To do this, click the
existing list entry to open the context menu and select New.
Context menu
Icon
Meaning
New
New command set
Copy
Copy command set
Edit
Copy command set
(or double-click a command set)
Delete
Delete command set
Reset
Reset command set to original settings
Information
Show assignment as an HTML file.
In the window that appears, you can enter detailed
information about the application that you want to
operate by remote control. After entering a name and
description of your choice, you can enter the path to
the executable file by clicking [>>]. In all probability,
the file name will vary depending on the program
description in the start menu or the name of the icon.
This goes back to old MS-DOS restrictions on file
names. At that time, the name of the executable files
could have no more than eight characters.
To make it easier for you to navigate using the program icons, you can change the view so that the icons
are displayed larger, if this is not already configured
by default. From the "Open" dialog, it is best to select
"Thumbnails" as the menu view. Now, select an
application to be controlled.
Using the optional input for command-line parameters, you can, for example, send the parameter C:\My Music\Hits.m3u to WinAmp (as the selected application), which calls up a
playlist when WinAmp starts. If you enter a window caption under "Window identification",
this may help to identify the application more quickly, allowing you to control it more efficiently. However, please note that many applications change this title, and integrate, for
example, the document name of the last file loaded into the title. Now click "Next >".
Remote Control (English)
7
2. Program the remote control
Illustration similar.
This takes you to the most important window for assigning functions to buttons. Because this
software is also included with the delivery of other products, you can use the "Remote
control" pulldown menu to select the TerraTec product you want to use right now. Below it,
you see the name of the button you have just pressed, in this case Channel + . This is also
indicated by a red outline around the image of the remote control. The various outline colors
have the following additional meanings:
Green – default assignment;
Orange – user-defined, i.e. created or changed by you; and
Blue – preset.
8
Remote Control (English)
Unfortunately, things now become a little more complicated. Because of the wide range of
options provided for command assignments, we won't try to provide a thorough description of
every parameter here, but just an overview of them in table form. The possible commands can
be subdivided into five areas using the "Command type" and "Parameters" pulldown menus:
·
On-screen display menu (OSD)
…"On Screen Display" functions such as the clock etc.
·
System command
… Execute or assign basic functions of the operating system.
·
Key combination
… Anything you can do from the keyboard can also be programmed here.
·
Window
… Functions that are familiar from usual window menus, such as maximize etc.
·
Control element
… For hardcore users only: In Windows, all program buttons and menus are identified
using unique designations, which can be used in commands to jump to them. Thus, it
is also possible to use them via the remote control. As a rule, though, the functional
areas listed above are sufficient for household use.
Remote Control (English)
9
Here is a detailed overview of the individual functions, listed according to command type
parameter…
On-screen display menu (OSD)
Display parameter
Function
Main menu
Use this button to call up the main menu; in the default assignment, the menu is
called up using the APP/OSD button. (For more details, see the chapter on The
menu)
Software info
Shows the currently loaded command set
Time
Displays the current system time
System command
Parameter type
Parameter command
Function
On/off
SCREEN SAVER
Enables and disables the screensaver.
Standby
Switches the computer to "Standby" energy-saving
mode.
Sleep
Puts the computer in sleep mode.
Shut down
Closes Windows—don't forget to save!
Volume
Change the volume by XX%
Changes the volume by XX % each time this is selected
Mute
Switch on/off mute on/off
Switches the sound on and off
Mouse click
Left / Middle / Right
Clicking once with the specified mouse button
Double click
Triggers a double click with the left mouse button
To the left/right
Move the mouse cursor in the specified direction.
Start the movement with the first press of the button
and stop it with the second, or change the direction
using another button.
Move mouse
To the top/bottom
To the top left/top right
To the bottom left/bottom
right
Cursor
Hide / show / show/hide
Display or hide the cursor—useful when watching
movies and the like.
Key combination
Click the Next Entry button and press the desired key combination, such as Control and "A" (CTRL + A)
for "Select All". An "A" will appear under the key combination and a check mark in front of Ctrl to confirm
your entry. You have now assigned the key combination to the selected button.
Window
Parameter command
Close
/
minimize / restore
Function
maximize Executes each window command listed.
Open/Close
Opens and closes a window
Maximized on/off
Switches the window between maximized and restored sizes.
Minimized on/off
Switches the window between minimized and restored sizes.
Control element
Anyone familiar with the term Resource Workshop will be at home here. Using this, you can jump directly
to certain program functions which would otherwise be impossible to reach via keyboard input, and very
difficult to reach using mouse movements. The best way to find out is to ask someone who knows.
10
Remote Control (English)
This concludes our discussion of the essential part of assigning functions. For the calculator
in our example, this basically means assigning key combinations with the digit block from 0
to 9; the AV button of the remote control could be assigned the plus key, the '-/--' button
assigned the minus key, the Mute button assigned the key code of the Enter key, and so on.
Now you can perform a simple calculation using the remote control. OK, it doesn't make a
whole lot of sense to do it that way. However, we hope that it clearly illustrates how the process itself works.
In the description field, you can then insert a description of your own creation (for example,
"ultimate number cruncher") and test the assignment you have chosen by pressing "Test",
which starts the calculator. Then, continue by selecting "Next >".
3. Check the assignments
The following window now gives you the opportunity to check all the settings you have configured. To do so, click [ >> ]. Now, the browser of your choice should open and provide you with
an overview of the assignment of all buttons of the remote control for this application. For the
first time, the browser also allows you to print out the whole thing if you like.
4. Done!
Once you have decided on a command set
using the possible function assignments and
have checked and saved it, you can select this
application for the menu, making it conveniently accessible using the remote control via the
application menu.
The options
Now, about the options: there, you can switch the on-screen display menu (OSD) on and off
completely, and modify its display options.
If you have installed more than one TerraTec product with infrared receivers, here you can
choose which one you want enabled. You can select the "Start with Windows" option to ensure that the Remote Control Editor loads automatically to manage the command sets each time
the system is started.
Remote Control (English)
11