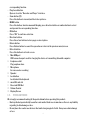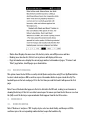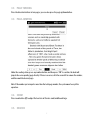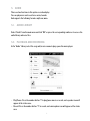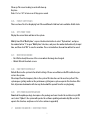
1
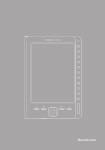
User Manual
Contains Reader® Mobile technology by Adobe Systems Incorporated.
Due to continuous updates on the product, all figures in this manual are only for reference, the actual
item is the standard.
2
1. QUICK GUIDE
1.1. DEVICE BUTTONS
1. Power button
Press this button to turn on/off the device. The red indicator will light when the device is
charging, and the blue indicator will light when the device is operating.
2. Page up button
Click this button turn page up.
3. Page down button
Click this button to turn page down.
4. Keyboard area
Including: Number button, letters, function keys. The integrated QWERTY keyboard enables you
to take notes quickly and easily.
≥≥ Index button (Number)
Press any number button 1~9 to select and operate the corresponding function at the function
menu.
≥≥ Page jump button (Number)
Under the reading status in DOC, TXT, HTXT, HTML, press the number button 0~9 or any combined
number button can jump to the corresponding page directly.
≥≥ Function shortcut key (Number)
Press “MENU”, the function menu will display. Press any number button to select and operate the
3
corresponding function.
≥≥ Play/record button
Open or close the “Recorder and Player” interface.
≥≥ Zoom button (Z)
Press this button to zoom in/out the text or pictures.
≥≥ MENU button
Press this button, function menu will display, press direction button or number button to select
and operate the corresponding function.
≥≥ OK button
Press “OK” to confirm a selection.
≥≥ Direction buttons
Press these four buttons to turn page or select option.
≥≥ Return button
Press Return button to cancel the operation or return to the previous menu/screen.
≥≥ Refresh button
Press this button to refresh screen.
5. Mini USB port
USB connection port used for charging the device or transmitting data with computer.
6. Earphone outlet
Plug earphone here.
7. Microphone
For voice notes recording.
8. Speaker
9. Lock button
Lock/unlock the keyboard.
10. microSD card slot
11. Reserved USB Hot
12. Volume Control
13. Display Screen
1.2. PRECAUTIONS
We strongly recommend reading all the points below before operating this product:
≥≥ Back up the data periodically to another safe media. Under no circumstances there is any liability
regarding to data damage or loss.
≥≥ Do not place the reader near devices that emit strong magnetic fields. It may cause data damage
or loss.
4
≥≥ Do not place the reader near devices that emit strong magnetic fields.
≥≥ It may cause data damage or loss.
≥≥ Do not disassemble or remodel the device.
≥≥ Do not let the device drop or shock.
≥≥ Do not use the device under heavy moisture or wet.
≥≥ Do not press the device screen.
≥≥ Do not use the device in a dirty or dusty environment.
≥≥ Do not use chemicals to clean the device screen.
2. INTERFACE
2.1. MAIN MENU
15:40
1 Recent files
2 Bookcase
3 Digital Editions
4 Picture View
5 Audio
6 Settings
7 Memo
1
<<
Previo
Pre
1
Próximo
Next
>>
2
Turn on the device, the main menu will display automatically.
To return to the main menu from other menus/screens press “MENU” and the number “1”.
2.2. READING INTERFACE
The screen is separated into 3 parts:
5
≥≥ Status Area: Displays the menu icon, title, battery status, microSD presence and time.
≥≥ Reading area: function list, file list, text or pictures will display at this area.
≥≥ Page information area: display the current page number, total number of pages, “Previous” and
“Next” page button, turn 10 pages up or down button.
2.3. RECENT READING
This option shows the last 14 files recently visited (books and pictures only). Press Up/Down button
to select a book and press OK to confirm, or press the number button to open a book directly. The
book will open on the last-read page. If it is the first time you read this book it will open on the first
page.
Note: If one of the books that appear in the list is deleted in the SD card, reading record remains in
showing the history of files list recent but cannot open. To remove you from the list the user can clear
the (all) recent file history or open new books file disappear from the last 14 searches.
3. BOOKCASE
3.1. BOOK READING
Select “Bookcase” and press “OK” step by step to select one book finally, and then press OK to
confirm or press the corresponding number button to open the book directly.
6
3.2. PAGE TURNING
Press the direction buttons to turn pages, you can also press the page up/down button.
3.3. PAGE JUMPING
Under the reading status, press any number button, and then press “OK” to confirm, the book will
jump to the corresponding page directly. If there is an error, click the arrow left to remove the number,
and then mark the desired page.
Note: If the number you’ve input is more than the total page number, the system won’t accept this
operation.
3.4. ZOOM
Press zoom button (Z) to adjust the font size in 3 levels: small, middle and large.
3.5. SEARCH
7
3.5.1.Books
Press “MENU” button in the Bookcase screen, select “File Search” in the menu, an input frame will
display, you could press any button to input words. Then press “ok” button to find the content that
you want, press return button “ ” to close the frame.
If you want to search the other content, just click the input frame again to awake it, and input
anything you want, and then press “ok”.
3.5.2.Words
Press “MENU” key read mode, select “Search” in the menu, in the box of entry, type the word you
want to search, press “OK” to find the content you want, press key to close the search. If you
want to continue searching for the same word, simply click on the “Right” arrow key. The lower bar
will display the page where you are.
3.6. BOOKMARK
To mark the desired page must be displayed on screen the desired page, then click the ‘MENU’ key
and the ‘Mark page’ option, then press the number key “0” you can add a maximum 5 pages per book.
To go to the marked page, repeat the steps above and the list of pages with the arrow keys up/down
press “OK” on the page desired and automatically takes you to the page.
Note: The bookmarks will be sorted by date; only the recent 5 bookmarks can be shown.
In the image files, only shift bookmark can be added.
4. PICTURE VIEW
4.1. PICTURE VIEW
Select “Picture View” in the main menu and press “OK” Browse and select folders and files, then click
“OK” to confirm or press the corresponding number to open the image directly.
There are four display modes for viewing the pictures: Fit Window, Fit Width, Fit Height and Actual
Size. Press “MENU” button, and then select the corresponding display modes by press related
number button.
4.2. PICTURE SIZE
Support 3,000,000 pixels in maximum.
8
5. AUDIO
There are two functions in this option: record and play.
You can play music and record voice notes/sounds.
And supports the following formats: mp3, wav, wma.
5.1. AUDIO LIBRARY
Select “Audio” from the main menu and click “OK” or press the corresponding number or to access the
audio library and voice files.
5.2. PLAYBACK AND RECORDING
In the “Audio” Library select the song and/or voice memo to play, opens the music player.
≥≥ Play/Pause: Press the number button “1” to play/pause music or record, and a speaker icon will
appear at the status area.
≥≥ Record: Press the number button “2” to record, and a microphone icon will appear at the status
area.
9
≥≥ Stop: Press the number button “3” to stop music or record.
≥≥ Forward/Rewind: “Forward” and “Rewind” functions are implemented by the number button “4”
and “5”.
≥≥ Single/Cycle: These two playing modes are implemented by the number key “6”.
≥≥ VOL+/-: Press the left/right arrow to decrease or increase the volume.
≥≥ Pre/Next: Press the up/down arrow to select the previous or next music.
5.3. VOICE NOTES
Press” REC” to record the log file is saved in the folder E-audio, wav format.
Press the number “1” to play this file recording..
5.4. QUICK MUSIC KEY
Press
key and will be open the music player.
6. SETTINGS
Select “Settings” in the main menu, and press “OK” to enter the interface. Press the direction button
to select the corresponding option, and you also can press the number button to select the function.
6.1. RECOGNITION
There are three levels for recognition time delay: short, middle, long. Select “Short”, the recognition
delay will be short; select “Long”, the recognition delay time will get longer.
6.2. LINE THICKNESS
There are three options for the line thickness: thin, normal, thick. That function can’t be used in
remarks and notes.
6.3. SLEEP SETTINGS
Sleep: Select “Yes”, the system will sleep after 3 seconds if there isn’t any operation on the device,
the LED indicator will turn off; select “No”, the system won’t sleep, and the LED indicator will always
light. The system won’t sleep in this option: “Music”.
Sleep Delay: There are three levels can be selected: short, middle, long. Select “short”, the system will
get into sleeping mode quickly; select “long”, the system will get into sleeping mode slowly.
6.4. RECENT FILES
Select “Record”: Save the reading records.
Select “Not recorded”: The system will not save the reading records.
10
Clean up: The recent reading records will clean up.
Key tone
Select “on” or “off” to turn on or off key-press sound.
6.5. FONT SETTINGS
There are two effects for displaying font: Clear and Smooth. And two fonts available: Arial & Latin.
6.6. SYSTEM TIME
Display the current date and time in the system.
Modify time: Click “Modify time”, or press the direction button to select “System time”, and press
the number button “1” to open “Modify time” interface, and press the number button directly to input
time, and then click “OK” to save the new time. Press return button, the new time will not be saved.
6.7. REFRESH MODE
≥≥ Part: Refresh only the areas of the screen where the image has changed.
≥≥ Global: Refresh the whole screen.
6.8. FACTORY DEFAULT
Default: Restore the system to the default settings. Please save all data on the SD card before you
restore the system.
Clear temp: Clear the temporary files in the system. This function can’t be used very often. If the
system space getting smaller or the performance getting worse, please operate this function. After
that, all previous bookmarks will clear up; the book will be opened from the very beginning.
6.9. SYSTEM MAINTENANCE
Download the update package, decompress the package and save it under the root directory in SD
card, select “Update”, the system will operate the software updating automatically. (Be careful to
operate this function, and please refer to the cautions in appendix)
7. ADOBE READER© INSTRUCTION
11
7.1. FORMAT
Support PDF & EPUB files
7.2. DRM
Adobe DRM protected PDF and EPUB file is supported only if Adobe Digital Editions 1.5 or later is
installed on your computer and your Ebook is connected r to the computer.
Setup:
1. Install the Adobe Digital Edition on your computer.
2. After installation, open the above software, and enter your Adobe account
3. After turning on the Ebook, (click on “Set DRM” which is included in the “Settings” interface.
Please ignore this item if you cannot find it). Then, keep the Adobe Digital Edition open, and
connect the Ebook to the computer, there will show a window for activation. Click ”Authorization”,
then DRM activation is completed.
Notes:
The authorization information is stored in SD card. Thus, you need to active the device again if using
a new SD card.
After activated, if you want to use a new account to active, please delete the hidden folder under SD
root ”.adobe-digital-editions”.
Please refer to below website for more information.
http://www.adobe.com/products/digitaleditions
8. OTHER OPERATIONS
8.1. BATTERY CHARGING
We recommend that you do a full battery charge before first use, because it may not be enough
charge on the device to perform normal operations.
You can use two modes for charge the battery, AC/DC power adapter and USB cable. Use the AC/DC
power to a power outlet adapter to charge it. Or connect the USB cable on available USB port on your
computer using the supplied USB cable.
The loading icon of the screen indicates that the device is in charging mode.
12
The red LED indicator will light; the battery in the status bar icon indicates that the battery is
charging. The device will shut down automatically when does not have enough battery.
Please charge the battery when out load.
Note: The charging time is about 4 hours using the USB cable, and 2 hours using the AC/DC power
adaptor. The red LED indicator will be off when charging is finished. It’s better to charge the battery
when the hint screen disappears, and please ensure the battery is fully charged. This will extend the
Lithium battery life.
8.2. FILE MANAGEMENT
8.2.1.Connecting to computer
Connect the device to the computer with the USB data cable. Turn on the device, “Are you sure to
transmit data?” will display on the screen. Press “OK” to confirm. The computer will automatically
detect a new storage device connecting.
8.2.2.File management
From your PC browser you can copy, delete, and organize the files or folders. When you connect your
E-book reader will be blocked.
Factory adjustment came from multiple folders on the SD card: e_audio, e_book, e_image, save the
files in the folder corresponding and respectively.
The SD/MMC card is the storage media for the device, so everything (books, documents, music)
should be stored in the memory card.
The eBook will compile all the information stored on the SD card. The process may take several minutes depending on the amount of available memory and the ability of the files. The eBook is compatible
with SD/SDHC cards up to 16 GB, but more is used memory card capacity, more load time to be with
risk of generating certain instability to the device.
Note: These pre-stored folders can’t be renamed or deleted, and please save the files in the right
folder, otherwise, the files won’t be opened, for example, save TXT, HTXT, PDF, EPUB, DOC, HTML
files into “e_book”, save pictures into “e_image” and save music into “e_audio”.
13
9. SPECIFICATIONS
Display Technology:
Screen Size:
Resolution:
Gray Scale:
Supported text types:
Supported image types:
Supported audio types:
Storage Media
Power Battery Type:
Recharging Time:
Weight:
Measurements:
Operating temperature:
Storage temperature:
Power Consuming
E Ink® “Electronic Paper”
Approx. 5” Measured Diagonally
800(H) x 600(V)
Max. 8-Level Gray Scale
TXT, HTXT, HTML, PDF, EPUB, DOC
JPG, TIF, BMP, PNG, GIF
WAV, WMA, MP3
Micro SD Cards up to 32GB
Rechargeable Lithium-Polymer 3.7V, 1500mAh
Approx. 4 Hours with USB charging from powered Computer
or Approx. 2 Hours when using AC wall charger
Approx. 200 grams without cover
173 x 117 x 10.3 mm without cover
32 to 104 degrees F (0 to 40 degrees C)
-4 to 113 degrees F (-20 to 55 degrees C)
Less than [email protected] at EPD refresh time
Less than [email protected] at sleep time.
It can show more than 8000 pages continuously with full charged battery.
9.1. ABOUT SD CARD
If SD card can’t be recognized for a long time, you can plug in the SD card again or restart the device.
When the system is reading data, please do not remove the SD card or reset the system.
If SD card needs to be formatted, please backup all data in SD card first, and then select FAT-32
format.
9.2. RESET
When the device present bad function, click the “RESET” hole located at the back of device to restart
the system.
9.3. RECOMMENDATIONS
Under the direct sunlight or low-temperature environment, the characters displayed on the screen
would be fading, please refresh the whole screen
Due to the limitation of memory, some complex DOC, PDF and HTML files can’t be decoded by the
14
device.
Prevent impaired hearing by using earphone for a long time, Please adjust the volume at a lower level
before using the earphone.
We recommend that you keep a copy of the contents of the SD card in additional external storage
medium (pen drives, hard drives, etc.). We recommend that you keep a copy of the contents of the SD
card in additional external storage medium (pen drives, hard drives, etc.).
15
Energy Sistem Soyntec S.A. warrants its products to be free from defects in materials and workmanship at the time of purchase.
The warranty period is 36 months from the date of purchase.
9.4. WARRANTY PROCEDURE
≥≥ Visit the Support section at http://support.energysistem.com and select your product to view the
FAQ (Frequently Asked Questions). The solution to your problem is very likely to have been already
published there. You will also be able to download user manuals, user guides, drivers and updates
≥≥ If you cannot find an appropriate solution in the Support section, you may send us your enquiry or
warranty service request by email: [email protected]
≥≥ Alternatively, you may prefer to contact the distributor from which you purchased the product,
presenting the purchase receipt or invoice.
Specifications are subject to change without notice.
© 2010 by Energy Sistem®. All rights reserved.
10. TRADERMARKS
All company, brand and product names are trademarks or registered trademarks of their respective companies.
11. DECLARATION OF CONFIRMITY
Manufacturer Name: Energy Sistem Soyntec S.A.
Address: Pol. Ind. Finestrat, C/.Calpe nº1, 03509, Finestrat Alicante (Spain)
Tel: 902 388 388
Fax: 902 119 034
NIF: A53107488
We declare under our own exclusive responsibility that the product:
Energy Sistem® eBook Reader Energy™ Book 3050
Manufacturing country: China
Is in compliance with the essential directives, norms and standards of the European Union 89/336/EEC (EMC
Directive).
16