1
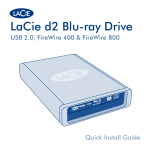
LaCie 12big Rack Fibre and expansion
Quick Install Guide
EN
Table of Contents
page 1
English
Table of Contents
1. Introduction.............................................................................................................. 2
1.1. Safe Handling............................................................................................................................... 2
1.2. Safety........................................................................................................................................... 2
1.3. Rack System Precautions................................................................................................................ 2
1.4. Battery Disposal............................................................................................................................ 3
1.5. Power Supply................................................................................................................................ 3
1.6. ESD Precaution............................................................................................................................. 3
1.7. SFP Optical Transceiver Precaution................................................................................................. 3
2. Preparation.............................................................................................................. 4
2.1. Before you begin........................................................................................................................... 4
2.2. Unpackaging the Storage System................................................................................................... 4
3. Rack Installation....................................................................................................... 4
3.1. Rack Installation Prerequisites......................................................................................................... 4
3.2. Formatting for Mac Users.............................................................................................................. 5
3.3. Installation Preparation.................................................................................................................. 5
3.4. Rack Installation Procedures........................................................................................................ 5-6
4. Disk Rules and Configuartion................................................................................... 7
4.1. Disk Slot Arrangement................................................................................................................... 7
4.2. Disk Configuration Rules............................................................................................................... 7
5. Setup and Cabling.................................................................................................... 7
5.1. SFP Installation............................................................................................................................. 7
5.2. Ethernet Connection (Embedded StorView)...................................................................................... 7
5.3. Connecting the Storage System to the Host.................................................................................. 8-9
6. Completing the Installation...................................................................................... 9
6.1. Connecting the Power Cords.......................................................................................................... 9
6.2. Powering On The System............................................................................................................... 9
6.3. Initial Setup of Embedded StorView............................................................................................ 9-11
6.4. Setting up the Embedded StorView Module: Mac OS................................................................... 11
LaCie 12big Rack Fibre and expansion
Quick Install Guide
Introduction
page 2
1.Introduction
• When powered by multiple power sources, disconnect all
supply power for complete power isolation.
European Regulations
• A safe electrical ground connection must be provided to the
power cords. Check the grounding of the enclosure before
applying power.
This equipment complies with European Regulations EN
55022 Class A: Limits and Methods of Measurement of Radio
Disturbance Characteristics of Information Technology
Equipments and EN50082-1: Generic Immunity.
USA Federal Communications Commission (FCC)
This equipment has been tested and found to comply with
the limits for a class A digital device, pursuant to part 15 of
the FCC rules.
1.1. Safe Handling
• The enclosure can weigh up to 32 kg (70 lb.). Do not try to
lift it by yourself.
• Before moving the enclosure, always remove the Power
Supplies, Cooling Fan Module, I/O Modules and Disk Disks
to minimize the weight.
• Unplug the Power Supplies and any other cables before you
move the enclosure.
• Do not lift the enclosure by the handles of the Power
Supplies or Cooling Fan Modules. They are not designed
to support the weight.
1.2. Safety
• All plug-in and blank modules are part of the fire enclosure
and must only be removed when a replacement can be
immediately installed. The enclosure must not be operated
without all modules in place.
• Unplug the Power Supplies if you believe the system has
become damaged in any way.
• The enclosure must only be operated from a power supply
input voltage range of 100 - 120V or 200 - 240V.
• In order to comply with applicable safety, emission and
thermal requirements no covers should be removed and all
bays/slots must have plug-in modules installed.
• The power cords are the main power disconnect. Ensure
that the socket outlets are located near the equipment and
are easily accessible.
• Provide a suitable power source with electrical overload
protection to meet the requirements established by the
specifications.
• Only connect the enclosure to a power source that has
overcurrent protection of 20A or less.
• The equipment must be operated with two power supply
modules.
• To prevent overheating do not operate the enclosure with
one power supply removed for more than 30 minutes.
1.3. Rack System Precautions
The following safety requirements must be
considered when mounting in a rack cabinet.
• The rack design should support the total weight of the
installed enclosures and incorporate stabilizing features
suitable to prevent the rack from tipping or being pushed
over during installation or normal use.
• When loading a rack, fill the rack from the bottom up and
empty from the top down.
• Do not slide more than one enclosure out of the rack at a
time to avoid the danger of the rack toppling over.
• The rack design should take into consideration the
maximum enclosure operating ambient temperature which
is 40°C (104°F).
• The system must be operated with low pressure rear exhaust installation (back pressure created by rack doors and
obstacles not to exceed 5 pascals (0.5 mm water gauge)).
• The rack should have a safe electrical distribution system.
It must provide over-current protection for the enclosure and
must not be overloaded by the total number of enclosures
installed. The electrical power consumption rating shown on
the nameplate should be observed.
• The electrical distribution system must provide a reliable
ground for each enclosure in the rack.
LaCie 12big Rack Fibre and expansion
Quick Install Guide
• Each power supply in each enclosure has a ground
leakage current of 1.8 mA max. at 60 Hz, 264V. The
design of the electrical distribution system must take into
consideration the total ground leakage current from all
supplies in all the enclosures. The rack may require labeling
with “HIGH LEAKAGE CURRENT. Ground (earth) connection
is essential before connecting a supply.”
• The rack when configured with the enclosures must meet
the safety requirements of UL 60950-1 and IEC 60950-1/
EN60950-1.
1.4. Battery Disposal
caution: There is a danger of explosion if the RAID
Controller battery is disposed of improperly. Dispose of used
batteries in accordance with the manufacturer’s instructions and
national regulations.
1.5. Power Supply
WARNING: Do not remove the covers from the Power
Supplies. Danger of electric shock inside. Return them to your
supplier for replacement.
CAUTION: If this equipment is used in a manner not specified
by the manufacturer, the protection provided by the equipment
may be impaired.
1.6. ESD Precaution
WARNING: Ensure that you have installed and checked a
suitable anti-static wrist or ankle strap and observe all
conventional ESD precautions when handling modules and
components. Avoid contact with backplane components and
module connectors, etc. ESD damage is not covered by warranty.
Introduction
page 3
1.7. SFP Optical Transceiver
Precaution
IMPORTANT note: Class 1 Laser Product. The optical SFP
transceiver modules must be a UL (or other North American
NRTL) RECOGNIZED COMPONENT, and must be approved
by TUV (or other European Product Safety test house) and
the laser in the module must comply with Laser Class 1, US
21 CFR (J) and EN 60825-1. If optical modules are to be
provided and installed by the end user, they must also comply
with the standards listed above.
IMPORTANT note: The optical modules provided and
installed by the end user must be a UL (or other North America
NRTL) RECOGNIZED COMPONENT and must be approved by
TUV (or other European product safety test house), and the laser
in the module must comply with Laser Class 1, US 21 CFR (J)
and EN 60825-1).
CAUTION: The RJ45 socket on the RAID Controller is for
Ethernet connection only and must not be connected to a
telecommunications network.
LaCie 12big Rack Fibre and expansion
Quick Install Guide
2. Preparation
Preparation/Rack Installation
page 4
2.2. Unpacking the Storage System
Position the shipping packaging within reasonable distance of
the site where you intend to install the storage system.
2.1. Before You Begin
Before you begin, make sure the site where you
intend to set up and use your storage system has
the following:
• Standard AC supply power from an independent source or
a rack power distribution unit with a UPS.
• Host computer with a standard Fibre Channel HBA (host
bus adapter) with the latest BIOS and drivers. Follow the
instructions provided with your host bus adapter, and install
the HBA and its driver software, if necessary.
• The RAID chassis and Expansion chassis enclosures are
shipped with all the plug-in modules installed.
• The Accessory Box contains the AC power cord(s), the
Software and Manuals Disc, and the rails-hardware parts
for rack mounting.
For Microsoft Windows Servers - Insert the Software and
Manuals Disc, click the Pseudo LUN Driver (INF) button and
following the on-screen installation instructions.
Inspect the packaging for crushes, cuts, water damage, or any
other evidence of mishandling during transit. If any damage
appears to be present, it is suggested to take photographs
before opening any boxes. You may wish to contact the
shipping company if there is apparent damage.
Open the carton top and remove the accessory kit.
Remove the foam component on top of the enclosure.
Using an assistant, lift the enclosure from the carton and
place it on a stable work surface.
3. Rack Installation
3.1. Rack Installation Prerequisites
The 12big rack fibre and expansion enclosures are designed
for installation into an industry standard 19-inch cabinet.
• Weight, the fully populated enclosure weighs about 32 kg
(70 lb.). It is not recommended to lift the enclosure by yourself.
• Minimum depth: 700 mm (27.6 inches) from front flange to
rear metalwork.
• A minimum gap of 25 mm (1 inch) clearance between the
rack door and front of the enclosure; and 50 mm (2 inches)
rear clearance between the rear of the enclosure and the rear
of the rack is recommended in order to maintain the correct
air flow.
• The rack should present a maximum back pressure of 5
pascals (0.5 mm water gauge).
Figure 1: Unpacking the Storage System
LaCie 12big Rack Fibre and expansion
Quick Install Guide
3.2. Tools Required
Tools:
✦✦ Slotted screwdriver.
✦✦ #2 PoziDisk screwdriver.
✦✦ #2 PoziDisk screwdriver, stubby.
✦✦ 2 mm Allen key.
IMPORTANT note: Use of other mounting hardware may
cause loss of rack space, and a danger of failure or injury.
Table 1: Parts List for Rail Kit
Item
Qty
Description
1
8
M5 Spring Washer
2
8
Slide Washer Square Hole
3
2
Chassis Side Slide
4
8
Slide Washer Round Hole
5
10
M3 x 4 Buttonhead Patchlock Screw
6
2
Chassis Latch
7
2
Chassis Latch Screw
8
8
M5 x 12 Phillips Patchlock Screw
9
8
10-32 UNF Phillips Screw
10
2
Rack Bracket Assembly
Rack Installation
page 5
Remove the disks. Disk carrier modules are shipped from
the factory with the anti-tamper locks enabled. Using the
key provided in the accessory kit, insert the key into the
cutout in the handle and rotate in a counter-clockwise
direction until the “red” indicator is not visible. Release
the carrier handle by pressing the latch in the handle with
your forefinger and rotating the handle to the right to eject
the carrier. Using the handle gently withdraw the carrier
module from the enclosure.
3.4. Rack Installation Procedures
1. Place the empty enclosure chassis on a stable work
surface. Remove the Rack Mounting Rail kit from the
accessory kit, inspect the contents and check for damage.
2. Attach the left and right chassis slides to the enclosure
sides using six M3x4 button head screws. Three screws
each side see Figure 2 for locations.
3. Assemble the left and right chassis latches using the
chassis latch screws. Ensure that the latch is orientated
as shown in Figure 2, with the spring arm (small arm
portion) located against its stop. On the right hand side
the stop is located at the top, and on the left side it is
located at the bottom.
3.3. Installation Preparation
Remove the plug-in modules (Power Supplies, Cooling Fan
module, RAID Controller or Disk I/O modules, and Disks).
Remove the power supply modules by pushing the latch
above the handle to the right and pulling the module from
the enclosure.
Remove the cooling fan module by grasping the latch between your thumb and forefinger, squeeze to release the latch
and pull outward to eject the module. Withdraw the module
from the enclosure.
Remove the RAID Controller or Disk I/O modules, using
two hands squeeze your thumbs and forefingers together to
release the latches. Pull out on the latches to eject the module
and withdraw the module from the enclosure.
Figure 2: Securing Chassis Slides
LaCie 12big Rack Fibre and expansion
Quick Install Guide
4. Assemble the rack brackets to the rack posts as follows
(see Figure 3). The brackets are universal and will fit
either side.
Rack Installation
page 6
f. Push the enclosure completely into the rack cabinet
and attach to the front of the rack using the captive
fasteners on the front flanges.
a. Locate the guide pin at the rear of each bracket
and insert the pin into a rear rack post hole. Attach the
bracket to the rear rack post using the washers and
screws supplied. The screws should be left loose.
Figure 4: Mounting the Enclosure into a Rack
6. Re-install the modules removed earlier.
Front attach points only. Remove this nut
for tapped hole rack installations.
Figure 3: Securing Brackets to Rack - Left Hand Assembly Shown
b. Extend the rail to fit between the rack posts.
c. Attach the bracket to the front rack post using the
washers and screws supplied. The screws should be
left loose.
d. Tighten the two clamping screws located along the
inside of the rear section of the rack bracket.
5. Mount the enclosure in the rack as follows (refer to
Figure 4):
a. Using an assistant, lift the enclosure aligning it with
the rack rails and carefully insert the chassis slides into
the rack rails.
b. Push the enclosure completely into the rack cabinet.
c. Tighten the rear rack bracket mounting screws.
(Previously left loose.)
d. Withdraw the enclosure until it reaches the hard stops
(approximately 400 mm (15.75 inches)).
e. Tighten the front rack bracket mounting screws
(Again, previously left loose.)
a. Install the power supply modules by sliding each
module into the power supply module bays, left side
rear of the enclosure. Continue to push until the
power supply fully seats. A click will be heard as the
latch engages.
b. Install the cooling fan module. With the latch in the
open position, slide the module into the cooling fan
module bay until the latch engages, center rear of the
enclosure. Secure the module by manually closing the
latch. A click will be heard as the latch engages.
c. Install the RAID Controller or Disk I/O modules. With
the latches in the open position, slide the module into
the I/O module bay until the latches engage. Secure the
module by manually closing the latches. Repeat for the
second module or a blank module.
d. Install the disks. Release the disk carrier handle by
pressing the latch with your forefinger and rotating the
handle to the right. Insert the carrier module into an
empty disk slot at the front of the enclosure and gently
slide it in until it stops. Seat the module by pressing on
the left edge of the disk with your thumb and secure it
by closing the handle. A click will be heard as the latch
engages. (See Section 4 on the next page.)
LaCie 12big Rack Fibre and expansion
Quick Install Guide
Disk Rules and Configuration/Setup and Cabling
page 7
4. Disk Rules and
Configuration
5. Setup and Cabling
5.1. SFP Installation
4.1. Disk Slot Arrangement
1. Remove the dust cover from each of the SFP cages and
SFP Transceivers to be populated.
2. Insert the SFP Transceiver into the SFP cage and push
to seat it. Ensure the ejector is positioned to its stored
location.
Figure 5: Slot Number Identification
cauTion: All disk slots must have either a Disk Carrier or
Dummy Carrier module installed. No slot should be left empty.
3. Connect the fibre channel data cables as described in
the next section.
4.2. Disk Configuration Rules
The 12big rack fibre and expansion enclosure systems support
two different types of disks: SATA and SAS. In order to allow
optimal configurations to be built, the following rules should
be observed.
Example of Ejector Stored
• Different disk types cannot be mixed in the same column.
• SATA disks must either have all Active-Passive or all
Active-Active MUX Transition cards. They cannot be mixed
in an array.
• To achieve optimum performance, slots should be populated in the following sequence, if all slots are not being
populated (see Figure 6):
✦ 1 - Column 2 (Disks 2, 6, & 10)
✦ 2 - Column 3 (Disks 3, 7, & 11)
✦ 3 - Column 1 (Disks 1, 5, & 9)
✦ 4 - Column 4 (Disks 4, 8, & 12)
• If it is necessary to install a different type of drive, install the
new drive in a different column (see figure 6). All drives in the
column should be the same drive type.
Figure 7: Installing the SFP Modules
5.2. Ethernet Connection (Embedded
StorView)
The controller is connected to the network for out-of-band
management and monitoring via the RJ45 10/100 BaseT Ethernet port, using the embedded StorView Management module and software.
Ensure that the host computer is connected either directly to or
via a switched LAN to the Ethernet port on the RAID Controller
using a shielded Cat 5 cable.
iMPoRTanT: Only shielded Cat 5 (or better) cables should be
used for connection to the Ethernet port for EMC conformance.
Figure 6: Drive Population Order and Sample Type Loading
LaCie 12big Rack Fibre and expansion
Quick Install Guide
Setup and Cabling
page 8
5.3. Connecting the Storage System
to the Host
The following illustrated diagrams (Figures 8 - 13) depict the
supported cabling configurations. Refer to the configuration you
are setting up and cable your enclosures per the diagrams.
Figure 8: Simplex: Single Host (Single HBA)
Figure 11: Duplex: Dual Host (Dual HBAs)
Figure 9: Duplex: Single Host (Dual HBAs)
Figure 10: Simplex: Dual Host (Single HBAs)
Figure 12: Duplex: Dual Host (Single HBAs) and a Switch
LaCie 12big Rack Fibre and expansion
Quick Install Guide
Setup and Cabling/Completing the Installation
page 9
6.2. Powering On the System
Before powering up the 12big fibre and expansion enclosures, please ensure that all the modules are firmly seated in
their correct bays. All three power supplies must be installed
in order to power up the enclosure.
Warning: The 12big rack fibre or expansion enclosure
MUST be grounded before applying power.
Caution: Do not operate the system until the ambient temperature is within the specified operating range. If the disks have
been recently installed, ensure they have had time to acclimatize
before operating them.
Important: The power cords are used as the main disconnect,
the Power On/Standby switch does not fulfill this requirement.
Figure 13: Duplex Expansion: Dual RAID Controller Enclosure with
Two Expansion Enclosures Attached (Dual HBAs)
6. Completing the Installation
6.1. Connecting the Power Cords
1. Connect the power supply cords to the power source
and to each power supply.
2. Secure the strain relief bales. The bale fits over and onto
the cord.
6.3. Initial Setup of Embedded
StorView
On first startup of the embedded StorView module, you will
need to configure the network settings. By default the embedded module will look for a DHCP server to obtain an IP address. If one is not found, it will search to determine if an IP
address had been previously assigned.
If an address was not previously assigned, then the system defaults to an IP address of:
✦✦ 10.1.1.5 for the lower RAID Controller (Controller 0 (A))
✦✦ 10.1.1.6 for the upper RAID Controller (Controller 1 (B))
✦✦ 10.1.1.7 if an error is detected
✦✦ Subnet Mask is 255.0.0.0
During the process of configuring an embedded module, you
will be required to enter a “new” password and confirm that
password. The default password is “password.” See step 6
later in the procedure.
Figure 14: Connecting the AC Power Cords to the PDU
LaCie 12big Rack Fibre and expansion
Quick Install Guide
The embedded module is identified by its MAC and IP address. It may be more helpful during setup to configure one
embedded module at a time. You will find the MAC and IP
address by accessing the VT-100 RAID Configuration Utility,
selecting Diagnostics then choosing StorView Embedded Module
Support. Select Enter StorView Embedded Module Menu Mode
and selecting View Network Settings.
Completing the Installation
page 10
6. Enter a “new” password and confirm the new password.
Click the Configure button.
7. If you have additional Uninitialized Systems, select the next
MAC address and choose the appropriate settings from the
previous steps.
Once you have completed configuring all the Uninitialized
Systems and have clicked the Configure button, the wizard
will display a popup message indicating all systems have
been configured. It will then re-scan for Uninitialized Systems
and if none are found, you will be taken to the Initialized
Systems screen.
Setting up the Embedded StorView Module:
Microsoft Windows
1. Insert the Software and Manuals Disc into your CD disk.
The autorun program will automatically start the
navigation menu.
However, if you wish to only configure one Unitialized
System, the one you are configuring, and choose not
to configure any other discovered Uninitialized System,
click the Next button. You will receive a prompt that you
have not configured all systems. Click the YES button to
continue or NO to cancel and return to the Uninitialized
Systems screen.
2. Click the Embedded StorView Setup Wizard link to begin
the configuration.
3. You are presented with a “Welcome” screen and
instructions to proceed. Review the information.
4. Click the Next button. The program will begin searching
for Embedded StorView Modules.
Those Embedded Modules with their default password
intact will be displayed with their MAC address in an
Uninitialized Systems list window.
Figure 16: Initialized Embedded Systems
8. Select the MAC address of the Initialized System you
wish to start and click the Launch button. StorView will
start up.
Figure 15: Uninitialized Embedded Systems
5. From the “Uninitialized Systems” screen, select the MAC
address of the Embedded Module you wish to configure.
If you wish to use a DHCP server to assign your IP address, click the check box Use DHCP.
If you wish to manually configure your network setting,
enter the correct information in the appropriate fields.
9. Your web browser will open with a login screen. Enter
the login name and password then click OK. StorView
will open in the browser at the Main screen.
10.
login: admin
password: password
IMPORTANT NOTE: If you are finished starting up Embedded
Modules, be sure to select the active Embedded StorView Setup
Wizard window in the Windows Task Bar and click the Close button.
LaCie 12big Rack Fibre and expansion
Quick Install Guide
Setting up the Embedded StorView Module:
Linux
Completing the Installation
page 11
3. In the address field, type in the following:
http: //10.1.1.5:9292
1. Log in as “root.”
2. Insert the Software & Manuals Disc into your CD disk.
3. Change directories to the software location. Type:
4. login: admin
password: password
cd [CDROM mount point path]/software/storview/ embedded
4. Execute the Setup Tool. From the command prompt,
type:
./esvsetupcl-linux
Embedded StorView Setup Tool. v1.0
5. Wait for a few seconds to be directed to the embedded
Storeview module and to start managing your storage.
Entering Menu Mode.
5. Follow the on screen prompts. At the conclusion of the
setup you will be instructed on how to proceed. StorView
will start within your web browser.
6.4. Setting up the Embedded
StorView Module: Mac OS
6. Access the embedded StorView GUI.
StorView is started by launching your web browser and entering the IP address of the local host or the embedded module
followed by “:9292.” For more information, refer to the
StorView Storage Management Software RAID Module User’s
Guide.
Also, for information regarding Secure Web Proxy, refer to the
StorView Storage Management Software RAID Module User’s
Guide.
For more detailed information about the individual module
LEDs or notifications, refer to the 12big rack fibre and expansion Installation and User Guide.
1. Directly connect the Ethernet cable from the host computer’s Ethernet port to the Ethernet port of the lower
controller on the 12big fibre. You can use either a
straight or crossed RJ45 cable.
2. Open a Safari browser window.
7. You are now connected to the embedded Storeview
GUI. From this page, you can set a fixed IP address,
which will allow you to monitor your storage from any
workstation located on your LAN by entering the fixed IP
address together with the 9292 port number.
Contact Us
LaCie USA
22985 NW Evergreen Pkwy
Hillsboro, OR 97124
[email protected]
LaCie Canada
235 Dufferin St.
Toronto, Ontario M6K 1Z5
[email protected]
LaCie France
17, rue Ampère
91349 Massy Cedex
[email protected]
LaCie Germany
Am Kesselhaus 5
D-79576 Weil Am Rhein
[email protected]
LaCie Asia (HK)
25/F Winsan Tower
98 Thomson Road
Wanchai, Hong-Kong
[email protected]
LaCie Italy
Milano Business Park
Via dei Missaglia 97
20142 Milano
[email protected]
LaCie Asia (Singapore)
Centennial Tower, Level 34
3 Temasek Avenue
Singapore 039190
[email protected]
LaCie Japan K.K.
Uruma Kowa Bldg. 6F
8-11-37 Akasaka, Minato-ku
Tokyo 107-0052
[email protected]
LaCie Australia
458 Gardeners Rd.
Alexandria, NSW 2015
[email protected]
LaCie Netherlands
Postbus 134
3480 DC Harmelen
[email protected]
LaCie Belgium
Vorstlaan 165/ Bld
du Souverain 165
1160 Brussels
[email protected]
LaCie Middle East FZE
LIU-E6, PO Box 293860,
Dubai Airport Free Zone,
Dubai, U.A.E.
[email protected]
LaCie Nordic
(Sweden, Denmark, Norway, Finland)
Sveavägen 90, 5tr
113 59 Stockholm, Sweden
[email protected]
LaCie Spain
C/ Núñez Morgado, 3, 5a pl.
28036 Madrid
[email protected]
LaCie Switzerland
Davidsbodenstrasse 15 A
4004 Basel
[email protected]
LaCie United Kingdom
and Ireland
LaCie LTD - Friendly House
52-58 Tabernacle Street
London, England EC2A 4NJ
UK: [email protected]
Ireland: [email protected]
LaCie Worldwide Export
17, rue Ampère
91349 Massy Cedex, France
[email protected]
Visit www.lacie.com for more
information on LaCie products.
Copyright © 2009, LaCie
713353
090603