1
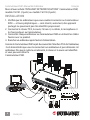
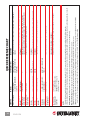
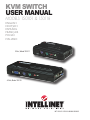
kvm switch
user manual
Models 150101 & 150118
English
Deutsch
Español
FRANçAIS
POLSKI
italiano
2-Port, Model 150101
4-Port, Model 150118
INT-150101/150118-UM-ML-0208-03
Compact KVM Switch • User Manual
English
Thank you for purchasing the INTELLINET NETWORK SOLUTIONS™ Compact
KVM Switch, Model 150101 (2-Port) or Model 150118 (4-Port).
installation
1. Make sure all the computers that are to be connected to the KVM switch —
and their peripherals — are turned off; otherwise, shared items may not be
recognized properly.
2. Connect the shared PS/2 keyboard, mouse, monitor and, if used,.speaker
set and microphone to the switch.
3. Connect each of the computers to the KVM switch, using the included cables.
4. Turn the power on to each of the connected computers one by one.
Since the KVM switch receives power from the computer’s PS/2 interface, it’s
powered up when you connect it to a PC and then turn on the PC. Once the
connected system has power, the keyboard and mouse will be recognized,
and you can begin operating the KVM switch.
2
ENGLISH
operation
There are two ways to control PC switching: using the top-panel push buttons
or a hotkey sequence. (For audio/mic switching, use the hotkey command as
listed on the Quick Reference Chart at the back of this manual.)
Top-Panel Buttons
The top-panel buttons (on top of the device) allow you direct control over PC
port switching: Simply press a button to switch to the corresponding PC port.
By default, PC port switching and audio/mic port switching are bound
together (both will be switched simultaneously). To disable the binding, hit
ScrLk +ScrLk + W on the keyboard. To re-enable the binding of PC and audio/
mic port switching, use the hotkey sequence ScrLk + ScrLk + Q.
Keyboard Hotkeys
A keyboard hotkey sequence consists of at least three specific keystrokes:
ScrLk + ScrLk + Command key(s). NOTE: The two consecutive ScrLk keystrokes
and the command key or keys that follow need to be pressed within 2 seconds
of each other; otherwise, the hotkey sequence won’t be validated.
To use a preceding sequence other than two consecutive Scroll Locks, there
are two options:
Option 1
• Hit ScrLk + ScrLk + H or press and hold down the last front-panel button
(Button 2 or Button 4) for more than 8 seconds.
• Press the key you would like to use as your preceding sequence (SCROLL
LOCK, CAPS, ESC, F12 and NUM LOCK keys are your choices). Now you can
use the new preceding sequence to execute your hotkey commands.
Option 2
• Press the last front-panel button (Button 2 or Button 4) for more than 3
seconds.
• Press the key you would like to use as the preceding sequence.
ENGLISH
3
KVM Umschalter • Handbuch
Deutsch
Vielen Dank für den Kauf des INTELLINET NETWORK SOLUTIONS™ KVM
Umschalter, Modell 150101 (2-Port) oder Modell 150118 (4-Port).
installation
1. Stellen Sie sicher, dass alle mit dem KVM-Umschalter verbundenen Geräte
— und ihre Peripheriegeräte — ausgeschaltet sind; ansonsten werden
diese Geräte eventuell nicht korrekt erkannt.
2. Schließen Sie gemeinsam genutzte PS/2-Tastatur, Maus, Monitor und, falls
vorhanden, Lautsprecher und Mikrofon an den Umschalter an.
3. Schließen Sie alle Computer mit den beiliegenden Kabeln an den KVM Umschalter an.
4. Schalten Sie jeden der angeschlossenen Computer nacheinander ein.
Da der KVM-Umschalter Strom über die PS/2-Schnittstelle des Computers
bezieht, wird er mit Strom versorgt, sobald Sie die Computer einschalten. Wird
das angeschlossene System gestartet, werden Tastatur und Maus erkannt und
Sie können den KVMUmschalter nutzen.
4
deutsch
Verwendung
Sie können auf zwei Arten zwischen angeschlossenen Computern umschalten:
Über die Knöpfe auf dem Bedienfeld oder mit einer Tastenkombination auf
der Tastatur (für das Audio/Mikro-Umschalten, verwenden Sie die entsprechende
Tastenkombination der Kurzübersicht auf der Rückseite dieses Handbuchs.)
Tasten auf dem Bedienfeld
Die Tasten auf dem Bedienfeld (auf der Oberseite des Geräts) erlauben Ihnen
direkte Steuerung der PC-Port-Umschaltung: Drücken Sie einfach eine Taste,
um zum entsprechenden PC-Port umzuschalten. In der Standardeinstellung
sind die Umschaltung zwischen PC-Port und Audio/Mikro-Port miteinander
verknüpft, so dass beide simultan umgeschaltet werden können). Um diese
Verknüpfung zu deaktivieren, verwenden Sie die Tastenkombination Rollen +
Rollen + W auf der Tastatur. Um die Verbindung wiederherzustellen, drücken
Sie Rollen + Rollen + Q.
Tastenkombinationen auf der Tastatur
Eine Tastenkombination besteht aus mindestens drei speziellen Eingaben:
Rollen + Rollen + Taste(n). HINWEIS: Die aufeinander folgenden Rollen-Eingaben
und die folgende(n) Taste(n) müssen im maximalen Abstand von 2 Sekunden
gedrückt werden, sonst wird die Tastenkombination nicht erkannt.
Um für die Tastenkombinationen eine andere als die Rollen-Taste festzulegen,
gibt es zwei Optionen:
Option 1
• Drücken Sie Rollen + Rollen + H oder halten Sie die letzte Taste auf dem
Bedienfeld (Taste 2 oder Taste 4) mindestens 8 Sekunden gedrückt.
• Drücken Sie die Taste, die Sie in der Kombination verwenden möchten (Rollen,
CAPS-Lock, ESC, F12 und NUM-LOCK stehen zur Auswahl). Nun können Sie
die Tastenkombination mit Ihrer bevorzugten Taste verwenden.
Option 2
• Halten Sie die letzte Taste auf dem Bedienfeld (Taste 2 oder Taste 4)
mindestens 3 Sekunden gedrückt.
• Drücken Sie die Taste, die Sie in der Tastenkombination verwenden möchten.
DEUTSCH
5
Switch KVM • Manual del usuario
Español
Gracias por comprar el Switch KVM de INTELLINET NETWORK SOLUTIONS™
KVM Switch, modelo 150101 (2-Puertos) o modelo 150118 (4-Puertos).
instalaCiÓn
1. Asegurese que todos los ordenadores que se van a conectar al switch KVM
— y sus perifericos — son apagados; de lo contrario, los elementos
compartidos pueden no ser reconocidos correctamente.
2. Conecte el teclado, ratón PS/2 y el monitor compartido, si se utiliza, conecte
bocinas y microfono al switch.
3. Conecte cada uno de los ordenadores al switch KVM, utilizando los cables
incluidos.
4. Encienda a cada uno de los ordenadores conectados, uno por uno.
El switch KVM recibe energia de la interface PS/2, enciende cuando usted lo
conecta a la PC y la enciende. Una vez que el sistema ha encendido, el teclado
y ratón son reconocidos, y usted puede comenzar a operar el switch KVM.
6
español
operacion
Hay dos formas de controlar de controlar el cambio de PC: utilizando los botones
en el panel superior ó con la secuencia de teclas. (Para audio/cambio de mic,
use el comado de las teclas rápidasque se listan en la tabla de referencia rápida
en la parte posterior de este manual.)
Botones panel superior
Los botones del panel superior (en la parte superior del dispositivo) le permiten
un control directo sobre los cambios de puerto del Switch : Solo presione el
boton correspondiente a la PC a que desea cambiar. De forma predeterminada,
el cambio de puerto de PC y cambio de puerto de audio/mic estan unidos
entre si (ambos se cambiaran al mismo tiempo). Para desactivar este vinculo,
presione Bloq Despl + Bloq Despl + W en el teclado. Para reactivar este vinculo
entre el puerto cambio PC y el puerto de audio/mic, use la siguiente secuencia
de teclas Bloq Despl + Bloq Despl + Q.
Teclas de Acceso Rápido
Las teclas de acceso rapido de teclado se componen al menos de tres
combinaciones de teclas especificas: Bloq Despl + Bloq Despl + Tecla de
comando(s). NOTA: Los dos pulsaciones de Bloq Despl consecutivos y la tecla
de comando ó las teclas siguientes necesitan ser presionadas dentro de los
2 segundos el uno del otro, de lo contrario, las teclas de acceso rapido no sera
valido.
Para utilizar una secuencia anterior otra que dos consecutivos Bloq Despl, hay
dos opciones:
Opción 1
• Presione Bloq Despl + Bloq Despl + H ó mantenga presionado el ultimo
botón del panel frotal (Botón 2 ó Botón 4) por mas de 8 segundos.
• Presione la tecla que desea utilizar como su secuencia anterior (Bloq Desp,
Bloq Mayus, ESC, F12 y Bloq NUM son sus opciones). Ahora usted puede
utilizar la secuencia anterior para ejecutar nuevos comandos de acceso
rápido.
Opción 2
• Pulse el boton por ultima vez en panel frontal (Botón 2 ó Botón 4) por mas
de 3 segundos.
• Pulse la tecla que desea utilizar como secuencia anterior.
español
7
Commutateur KVM • Manuel de l’utilisateur
Français
Merci d’avoir acheté l’INTELLINET NETWORK SOLUTIONS™ Commutateur KVM,
modèle 150101 (2 ports) ou modèle 150118 (4 ports).
installation
1. Vérifiez que les ordinateurs que vous voudriez connecter au Commutateur
KVM — et leurs périphériques — sont éteints; autrement, des appareils
partagés ne pourraient pas être identifiés proprement.
2. Connectez le clavier PS/2, la souris, l’écran et, si utilisés, le microphone et
les haut-parleurs au Commutateur.
3. Connectez chaque ordinateur au Commutateur KVM en utilisant les câbles
fournis avec ce produit.
4. Branchez un ordinateur après l’autre à l’alimentation.
Comme le Commutateur KVM reçoit du courant de l’interface PS/2 de l’ordinateur,
il est alimenté dès que vous le connectez à un ordinateur et puis démarrez cet
ordinateur. Dès que le système est alimenté, le clavier et la souris sont identifiés
et vous pouvez utiliser le
Commutateur KVM.
8
FRANçAIS
Service
Il y a deux manières de contrôler la commutation entre les ordinateurs: utiliser
les boutons sur la console ou des raccourcis clavier (pour la commutation
audio/micro, utilisez le raccourci clavier comme mentionné sur la fiche de
référence rapide au verso de ce manuel).
Boutons sur la console
Les boutons sur la console vous permettent l’accès direct à la commutation
entre les ports des ordinateurs: Appuyez simplement sur un bouton afin de
commuter au port correspondant. Par défaut, la commutation entre les ports
des ordinateurs et audio/micro est liée (tous les deux sont commutés
simultanément). Afin de désactiver ce lien, appuyez sur Arrêt défil + Arrêt
défil + W sur le clavier. Afin de la réactiver, utilisez le raccourci clavier Arrêt
défil + Arrêt défil + Q.
Raccourcis clavier
Un raccourci clavier consiste en au moins trois touches spécifiques: Arrêt défil
+Arrêt défil + touche(s). NOTE: Les deux touches Arrêt défil consécutives et
les entrées suivantes doivent être appuyées respectivement dans 2 secondes;
autrement, le raccourci clavier n’est pas validé.
Afin d’utiliser une autre séquence que deux Arrêts défil consécutives, il y a
deux options :
Option 1
• Appuyez sur Arrêt défil + Arrêt défil + H ou pressez le dernier bouton sur la
console (bouton 2 ou bouton 4) plus que 8 secondes.
• Appuyez sur le bouton que vous voudriez utiliser pour votre séquence de
raccourcis clavier (vous avez le choix entre les boutons Arrêt défil, Verr maj,
Échap, F12 et Verr. num). Maintenant vous pouvez utiliser la nouvelle séquence
pour exécuter vos raccourcis clavier.
Option 2
• Pressez le dernier bouton sur la console (bouton 2 ou bouton 4) plus que 3
secondes.
• Appuyez sur le bouton que vous voudriez utiliser pour la séquence de
raccourci.
FRANçAIS
9
Przełącznik KVM • Instrukcja użytkownika
Polski
Dziękujemy za zakup przełącznika KVM INTELLINET NETWORK SOLUTIONS™,
model 150101 (2 porty) lub model 150118 (4 porty).
PODŁĄCZENIE
1. Upewnij się, że wszystkie komputery, które mają być podłączone do
przełącznika KVM oraz ich urządzenia peryferyjne są wyłączone, w przeciwnym
razie niektóre wspólne elementy mogą być nie rozpoznane prawidłowo.
2. Podłącz do przełącznika klawiaturę oraz myszkę w standardzie PS/2, monitor
oraz, jeśli zachodzi taka potrzeba głośniki oraz mikrofon.
3. Używając dołączonych kabli, podłącz komputery do przełącznika KVM.
4. Podłącz zasilanie do wszystkich komputerów.
Po włączeniu komputerów przełącznik KVM zostanie zasilony z portów PS/2
komputerów. Gdy klawiatura oraz mysz zostaną rozpoznane, urządzenie jest
gotowe do użycia.
URZĄDZENIE
10
POLSKI
OBSŁUGA
Istnieją dwa sposoby przełączania między komputerami – za pomocą przycisku
na przełączniku KVM lub za pomocą skrótów klawiszowych – hotkeys. (Aby
przełączać audio zapoznaj się z tabelą skrótów klawiszowych na końcu dokumentu.)
Przyciski na przełączniku
Przyciski na przełączniku (znajdujące się na górnej części urządzenia)
umożliwiają bezpośrednią kontrolę podłączonych komputerów. Wystarczy
nacisnąć przycisk, aby przełączyć się na odpowiedni port. Domyślnie zostanie
przełączone również audio. Aby wyłączyć wspólne przełączanie audio razem
z obrazem, użyj skrótu klawiszowego ScrLk + ScrLk + W. Aby ponownie włączyć
przełączanie audio wraz z obrazem, użyj skrótu klawiszowego ScrLk + ScrLk + Q.
Skróty klawiszowe – hotkeys
Sekwencja składa się co najmniej z trzech konkretnych klawiszy: ScrLk + ScrLk
+ klawisz(e) komendy. UWAGA: Dwukrotne naciśnięcie klawisza ScrLk oraz
klawisza komendy musi być wykonane w odstępie czasowym nie większym
niż 2 sekundy jeden po drugim, w przeciwnym wypadku akcja nie zostanie
wykonana.
Aby skorzystać z sekwencji innej niż wymieniona wyżej, wykonaj następujące
czynności (dostępne są dwie metody):
Metoda 1
• Wciśnij kombinację klawiszy ScrLk + ScrLk + H lub wciśnij i przytrzymaj
przycisk ostatniego portu na przełączniku KMV (Przycisk 2 lub Przycisk 4)
dłużej niż 8 sekund.
• Wciśnij klawisz, który ma być wykorzystywany jako prefiks komendy (można
wybrać następujące klawisze: Scroll Lock, Caps Lock, Esc, F12 lub Num Lock).
Teraz można już skorzystać z nowej sekwencji klawiszy poprzedzających
klawisz(e) komendy.
Metoda 2
• Wciśnij i przytrzymaj przycisk ostatniego portu na przełączniku KMV
(Przycisk 2 lub Przycisk 4) dłużej niż 3 sekundy.
• Wciśnij klawisz, który ma być wykorzystywany jako prefiks komendy.
polski
11
KVM Switch Compatto • Manuale d’istruzione
Italiano
Grazie per aver scelto il KVM Switch compatto INTELLINET NETWORK
SOLUTIONS™, Modello 150101 (2-Porte) o Modello 150118 (4-Porte).
installazione
1. Assicurarsi che i computer — e le loro periferiche — che stanno per essere
connessi al KVM switch siano spenti; altrimenti, gli elementi condivisi
potrebbero non essere riconosciuti correttamente.
2. Collegare la tastiera PS/2, il mouse, il monitor e, se utilizzati, la coppia di
speaker e il microfono condivisi allo switch.
3. Collegare ciascuno dei computer al KVM switch, utilizzando i cavi inclusi.
4. Accendere uno per uno ciascuno dei computer connessi. Siccome il KVM
switch riceve l’alimentazione dall’interfaccia PS/2 del computer, esso viene
alimentato quando viene collegato ad un PC e quest’ultimo viene acceso.
Appena il sistema connesso riceve l’alimentazione, la tastiera e il mouse
verranno riconosciuti, e il KVM switch diventerà operativo.
12
italiano
Funzionamento
Ci sono due modi per controllare lo spostamento da un PC all’altro: utilizzando
i tasti sulla parte alta del pannello oppure attraverso una sequenza di tasti di
selezione rapida. (Per il cambio audio/mic, usare il commando funzione come
elencato nella Tabella rapida di riferimento nel retro di questo manuale.)
Tasti presenti sul pannello superiore
I tasti sul pannello superiore (sulla parte alta dell’apparecchiatura) permettono
all’utente di avere il controllo sul cambiamento della porta PC: è sufficiente
premere un tasto per passare alla corrispondente porta PC. Automaticamente,
il cambiamento della porta PC e il cambiamento della porta audio/mic sono
legati insieme (entrambi verranno cambiati simultaneamente). Per disabilitare
il collegamento, premere Bloc Scorr + Bloc Scorr + W sulla tastiera. Per
riabilitare il collegamento dello scambio della porta PC insieme a quella
audio/mic, utilizzare la sequenza di tasti funzione Bloc Scorr + Bloc Scorr + Q.
“Keyboard Hotkeys”
La sequenza di scelta rapida tramite tastiera (definiti Hotkey) consiste nella
pressione in sequenza di 3 tasti specifici: Bloc Scorr + Bloc Scorr + Tasto/i di
comando. NOTA: I due Bloc Scorr e il/i tasto/i di comando che seguono devono
essere premuti entro 2 secondi l’uno dall’altro; altrimenti la sequenza di
comando non verrà riconosciuta.
Per impostare una sequenza diversa dal “Bloc Scorr” che precede il tasto
comando, ci sono due opzioni:
Opzione 1
• Premere Bloc Scorr + Bloc Scorr + H o tenere premuto il pulsante 2 o 4 dello
switch (a seconda del modello) per più di 8 secondi.
• Premere il tasto che si desidera usare al posto della sequenza predefinita tra
i seguenti BLOC SCORR, MAIUSC, ESC, F12 e BLOC NUM). Ora è possibile
utilizzare la nuova sequenza di comandi impostata.
Opzione 2
• Premere il pulsante 2 o 4 dello switch (a seconda del modello) per più di 3
secondi.
• Premere il tasto che si desidera usare al posto della sequenza predefinita tra
i seguenti BLOC SCORR, MAIUSC, ESC, F12 e BLOC NUM). Ora è possibile
utilizzare la nuova sequenza di comandi impostata.
italiano
13
14
ENGLISH
Quick reference chart
HotkeysTop-panel ButtonsDescription
Mouse Troubleshooting: If your mouse hangs up or behaves abnormally, you can hit the following hotkey commands for mouse reset:
(a) When you are using a PnP OS such as Windows 98SE or later Windows operating systems such as Vista, hit ScrLk + ScrLk + End for mouse reset.
(b) When you are using a non-PnP OS such as Linux, NT4.0, etc., just hit one of the following hotkey commands for mouse reset according to your mouse configuration on the non-PnP OS:
ScrLk + ScrLk + M + 1 for a 2-key mouse setting; ScrLk + ScrLk + M + 2 for a 3-key wheel mouse setting; ScrLk + ScrLk + M + 3 for a 5-key wheel mouse setting.
Hotkey convention: The hotkey notation ScrLk + ScrLk + (key), denotes that you should hit the individual keys consecutively one at a time, not simultaneously.
Notes:
1. Note that (x) denotes a number key for the selected port number (x = 1 – 2). You can use either the top row number keys or the number pad for the hotkey commands.
2. When the binding of PC & Audio/Mic port switching is enabled by the hotkey sequence: ScrLk + ScrLk + Q, any PC and Audio/Mic switching are bound together. To remove this binding, hit ScrLk + ScrLk + W.
select pc channelscrLk+scrLk+(X) Press corresponding
Select the active pc channel. (Joint-select pc & audio/mic port, if binding is
(x = a top-row number key; button to switch to that
enabled.
1-2 or 1-4)pc channel.
next audio/mic scrLk+scrLk+(fx)
—
Select the active audio/mic channel. (Joint-select pc & audio/mic port, if binding
channel (fx = function key)
is enabled.)
bind pc & audio/scrLk+scrLk+q
—
Enable the binding of PC and Audio/Mic switching. (Once this feature is mic switchingenabled, PC and Audio/Mic switching is bound together) [factory default].
unbind pc & audio/scrLk+scrLk+w
—
Disable the binding of PC and Audio/Mic switching. mic switching
next lower pcscrLk+scrLk+up arrow
Press corresponding Select the next lower pc channel. (Joint-select pc & audio/mic port, if binding
channelbutton. is enabled.)
next higher pcscrLk+scrLk+down arrow
Press corresponding Select the next higher pc channel. (Joint-select pc & audio/mic port, if binding
channelbutton. is enabled.)
previous pcscrLk+scrLk+backspace
—
Toggle between the previous channel and current channel.
channel
define hotkeyscrLk+scrLk+h+(y)press button 2 or 4 for Select the hotkey preceding sequence from among 5 alternative keys.
preceding
(y = scroll lock, caps, esc,more than 2 seconds, then
sequencef12 or num lock)press (y).
console mouse/scrLk+scrLk+End
—
Reset the keyboard and mouse on the console side.
keyboard reset Autoscan
ScrLk+scrLk+S —
Autoscan through every connected channel for quick screen browsing of
each channel (scan delay = 5 seconds).
autoscan with
ScrLk+scrLk+S+ (x)
—
Autoscan with a user-defined delay time within a range of 5 -100 seconds.
programmable
(x = 0-9, representing 10-sec.
delay timeincrements: 1 = 10 sec.; 2 = 20
sec., etc.; 0 = 100 sec.)
stop Autoscan
Any key
Press any button.
Terminate Autoscan activity.
Command
DEUTSCH
15
Problemlösungen für Mäuse: Sollte Ihre Maus nicht mehr reagieren oder unzureichend funktionieren, können Sie sie mit der folgenden Tastenkombination zurücksetzen:
(a) Auf Plug & Play-fähigen Betriebssystemen z. B. Windows Vista, drücken Sie Rollen + Rollen + Ende, um die Maus zurückzusetzen.
(b) Auf nicht-Plug&Play-fähigen Betriebsystemen wie Linux, NT4.0, etc., nutzen Sie einen der folgenden Tastenkombinationen entsprechend Ihrer Maus-Konfiguration:
Rollen + Rollen + M + 1 für eine 2-Tasten-Maus; Rollen + Rollen + M + 2 für eine 3-Tasten-Maus; Rollen + Rollen + M + 3 für eine 5-Tasten-Maus.
Ausführung derTastenkombinationen: Die Darstellung Rollen + Rollen + (Taste), bedeutet, dass Sie die Tasten nacheinander drücken müssen, nicht gleichzeitig.
hinweise:
1. (X) steht für eine Zifferntaste der ausgewählten Port-Nummer (x = 1 – 2). Sie können sowohl die normalen als auch die Tasten des Ziffernblocks zur Eingabe verwenden.
2. Wenn die Verknüpfung von PC & Audio/Mikro-Port durch Rollen + Rollen + Q, aktiviert wurde, werden PC- und Audio/Mikro-Port immer simultan umgeschaltet. Zur Deaktivierung: Rollen+Rollen+W.
Pc-Kanal Rollen+Rollen+(X) drücken Sie die jeweiligewählen sie den aktiven pc-kanal aus (wählt pc & audio/mikro-port gleichzeitig
Auswählen
(x = Zifferntaste; taste um zum entsprechenden aus, wenn verknüpfung aktiviert ist).
1-2 oder 1-4)pc-kanal umzuschalten
audio/mikrofon- Rollen+Rollen+(fx)
—wählen sie den aktiven audio/mikro-kanal aus (wählt pc & audio/mikro-port
kanal auswählen (fx = funktionstaste)
gleichzeitig aus, wenn verknüpfung aktiviert ist).
pc & audio/Mikrorollen+rollen+q
—
Aktiviert Verknüpfung von PC- und Audio/Mikro-port (bei aktivierung
umschalten verknüpfenwerden PC- und Audio/Mikro-port immer simultan umgeschaltet) [standardeinst.].
pc & audio/Mikrorollen+rollen+w
— deaktiviert verknüpfung v.pc- und Audio/mikro-port. separat Umschalten
einen PC-kanal rollen+rollen+pfeil oben
Entsprechende Taste wählen sie den nächstniedrigeren pc-kanal aus (pc & audio/mikro-port, wenn
zurückschaltendrücken verknüpfung aktiviert ist).
einen PC-Kanalrollen+rollen+pfeil unten
Entsprechende Taste wählen sie den nächsthöheren pc-kanal aus. (pc & audio/mikro-port, wenn weiterschaltendrücken verknüpfung aktiviert ist.)
Zuletzt genutzterrollen+rollen+backspace
—wechsel zwischen vorherigem und aktuellem kanal.
PC-kanal
Taste für rollen+rollen+h+(y)taste 2 oder 4 länger wählen sie die taste für die tastenkombination aus (5 tasten zur auswahl).
tastenkombi . festlegen(y = rollen, caps-lock, esc,als 2 sekunden, gedrückt
f12 oder num-lock)halten, dann (y) drücken
maus/tastatur
Rollen+rollen+Ende
—setzen sie tastatur und maus an der konsole zurück.
an konsole zurücksetzen Autoscanrollen+rollen+S —
Autoscan durch jeden genutzten kanal für das schnelle durchsuchen der
kanäle (scan-verzögerung = 5 sekunden).
autoscan mitrollen+rollen+S+ (x)
—
Autoscan mit benutzerdefinierter verzögerungszeit, Bereich: 5 -100 sekunden.
programmierbarer
(x = 0-9, jeweils 10-sekündige
verzögerungZeitabstände 1 = 10 sek.; 2 = 20
sek., etc.; 0 = 100 sek.)
autoscan anhaltenbeliebige tastebeliebige taste drücken
Autoscan -aktivitäten beenden.
Beschreibung
Kurzübersicht
EingabebefehlTastenkombinationTasten auf Bedienfeld
16
español
Botones panel frontalDescripcion
tabla de referencia rapida
Solución de problemas ratón: Si el ratón se bloquea ó se comporta de nomo anormal, presione las siguientes teclas para restablecerlo:
(a) Cuando utiliza un SO PnP como Windows 98SE ó posterior como Windows Vista, pulse Bloq Despl + Bloq Despl + Fin para restablecer el ratón.
(b) Cuando utiliza un SO no-PnP como Linux, NT4.0, etc., solo presione una secuencia de teclas para restablecer el ratón de acuerdo a las funciones del raton en su SO non-PnP :
Bloq despl + Bloq despl+ M + 1 para usar 2 botones (Izq/ Der)Bloq despl + Bloq despl + M + 2 Para usar 3 botones (Izq/ Der/Scroll); Bloq despl + Bloq despl+ M + 3 para ratones con mas de 3 botones.
Teclas abreviadas usuales: La secuencia de teclas Bloq Despl + Bloq Despl + (tecla), denota que usted debe presionar las teclas una despues de la otra, no simultáneamente.
Notas:
1. Tome en cuenta que (x) denota una tecla numerica para el número de puerto seleccionado (x = 1 – 2). Puede utilizar cualquiera de las teclas de la fila de numeros o del teclado numerico.
2. Cuando el vinculo PC & Audio/Mic esta activo por la secuencia de teclas: Bloq despl + Bloq despl + Q cualquier PC y Audio/Mic cambiaran unidos. Para desactivar este vinculo, pulse Bloq despl + Bloq despl+ W.
seleccion de pc
BLOQ DESPL+ BLOQ DESPL +(X) Pulse el boton Selecciona el canal de la pc activa. (selecciona al mismo tiempo pc& audio/mic , si
(x = NUMERO SUPERIOR; correspondiente paraesta activado el vinculo ó sincronizacion).
1-2 Ó 1-4)cambiar a la pc deseada.
SIGUIENTE CANAL BLOQ DESPL+BLOQ DESPL+(fx)
—
Seleciona el canal activo de audio/mic . (selecciona al mismo tiempo
AUDIO/MIC
(fx = TECLA FUNCION)
pc & audio/mic , si esta activado el vinculo ó sincronizacion).
vincular
BLOQ DESPL +BLOQ DESPL+q
—habilitar sincronia PC y Audio/Mic . (una vez que esta caracteristica esta PC & AUDIO/mic activada, PC y Audio/Mic se matnienen sincronizados) [predeterminado].
DESVINCULAR CAMBIOS BLOQ DESPL+BLOQ DESPL+w
—
DESHABILITAR LA vinculacion DE PC Y Audio/Mic AL CAMBIAR DE CANAL .
PC & AUDIO/mic
PC SIGUIENTE ABAJO
BLOQ DESPL+bloq despl+pulse el boton Selecciona la pc del canal inferior. (selecciona al mismo tiempo pc & audio/mic , si flecha abajocorrespondiente. esta activado el vinculo ó sincronizacion).
PC SIGUIENTE BLOQ DESPL+bloq despl+pulse el boton SSelecciona la pc del canal superior. (selecciona al mismo tiempo pc & audio/mic , si ARRIBAflecha arribacorrespondiente. esta activado el vinculo ó sincronizacion).
pc previa
BLOQ DESPL+bloq despl+
—permite alternar entyre la pc actual y la previa.
backspace
personalizar teclas BLOQ DESPL+bloq despl+h+(y)presione el boton 2 ó 4 por Selecciona la tecla de acceso rapido de la secuencia anterior
secuencia
(y = bloq despl, mayus, esc,mas de 2 segundos, a
de entre las 5 teclas alternativas.
anteriorf12 ó bloq num)continuacion presione (y).
restablecimiento
BLOQ DESPL+BLOQ DESPL+End
—restablece el teclado y raton de la consola lateral.
teclado /raton
Autoscan
BLOQ DESPL+BLOQ DESPL+S —scanea todos los canales conectados realizando una vista rapida de cada canal
(retardo scaneo = 5 segundos).
autoscan
BLOQ DESPL+BLOQ DESPL+S+ (x) —autoscan tiempo de retardo definido por el usuario del rango de 5 -100 segundos.
programacion
(x = 0-9, representan 10-seg.eg
del tiempo de retardoincremento: 1 = 10 seg; 2 = 20
seg, etc.; 0 = 100 seg.)
detener Autoscancualquier teclapresione cualquier botondetiene el autoscan.
ComandoTeclas de acceso rapido
FRANçAIS
17
Clavier Raccourci
Boutons Sur ConsoleDescription
fiche de référence rapide
Dépannage souris: Si votre souris se plante ou ne marche pas proprement, vous pouvez utiliser les séquences raccourci suivantes pour réinitialiser la souris:
(a) Si vous utilisez un système d’exploitation PnP comme Windows 98SE ou plus nouveau comme Vista, appuyez sur Arrêt défil + Arrêt défil + Fin.
(b) Si vous utilisez un système non PnP comme Linux, NT4.0, etc., utilisez simplement un des claviers raccourci pour réinitialiser votre souris accordément à votre configuration de souris sur un système non PnP:
Arrêt défil + A rrêt défil + M + 1 pour une souris avec deux boutons; Arrêt défil+Arrêt défil + M + 2 pour une souris avec 3 boutons; Arrêt défil + Arrêt défil + M + 3 pour une souris avec 5 boutons.
Convention clavier raccourci: La séquence Arrêt défil+A rrêt défil + (touche), veut dire que vous devez appuyer sur les touches consécutivement une après l’autre, pas simultanément.
Notes:
1. (X) désigne une touche de numéro pour le numéro de port choisi (x = 1 – 2). Vous pouvez utiliser les touches de numéro ou le pavé numérique pour les claviers raccourci.
2. Si le lien des ports d’ordi. et audio/micro est activé par la séquence Arrêt défil+Arrêt défil+Q, chaque commutation audio/micro et ordi. est simultane. Afin de le désactiver appuyez sur Arrêt défil+Arrêt défil+ W.
CHOISIR canalarrêt défil+arrêt défil+(X) appuyez sur le bouton
Choisir le canal d’ordinateur actif (& port Audio/micro, si le lien
des ordinateurs
(x = bouton de numéro; respectif pour
entre les deux est activé.
1-2 ou 1-4)commuter à ce port.
Choisir canal Arrêt Défil+Arrêt Défil+(fx)
—
Choisir le canal audio/micro actif (& Port ordinateur, si le lien
audio/micro (fx = Touche de Fonction)
entre les deux est activé).
Lier Commutation
Arrêt défil+Arrêt défil +q
—
Activer le lien de l’ordi. et Audio/Micro (dès que celui est activé ordi. & audio/microla commutation de ces deux marche simultanément) [Paramètre par défaut].
Délier Commutation
Arrêt défil+Arrêt défil +w
— désActiver le liende l’ordi. et Audio/Micro. ordi. & audio/micro
canal d’ordinateur
Arrêt défil+Arrêt défil+Haut APPUYEZ SUR le BOUTON choisir le canal d’ordinateur antérieur (& port audio/micro simultanément si
antérieur
Respectif le lien est activé).
canal d’ordinateur
Arrêt défil+Arrêt défil +bas
APPUYEZ SUR le BOUTON choisir le canal d’ordinateur prochain (& port audio/micro simultanément
prochainrespectif si le lien est activé).
dernier canal
Arrêt défil+Arrêt défil+backspace—commuter entre le dernier canal et le canal actuel.
d’ordinateur
définir Séquence Arrêt défil+Arrêt défil +h+(y)pressEZ bOUTon 2 oU 4 PLUS choisir la séquence de claviers raccourci de cinq touches alternatives.
clavier raccourci
(y = Arrêt défil, Verr maj, Échap, QUE 2 secondEs, PUIS APPUYEZ
f12 ou verr. num)
SUR(y).
reset souris/
Arrêt défil+arrêt défil+fin
—
RÉINITIALISE CLAVIER ET SOURIS à la console.
clavier Autoscan
Arrêt défil+Arrêt défil+S —
Autoscan de chaque port connecté pour parcourir les ports rapidement (délai de scan = 5 secondes).
autoscan avec
Arrêt défil+Arrêt défil+S+(x) —
Autoscan avec temps de délai défini par l’utilisateur avec portée de 5 -100 secondes.
temps de délai
(x = 0-9, représentant 10-sec.
programmableaugmentations: 1 = 10 sec.; 2 = 20
sec., etc.; 0 = 100 sec.)
arrêter Autoscan
Chaque toucheappuyez sur bouton au choix. Terminer l’Activité Autoscan.
Commande
18
POLSKI
Wybór kanału scrLk+scrLk+(X) Wciśnięcie przycisku z numerem
Wybór aktywnego komputera (jeśli opcja jest włączona razem z obrazem
komputera
(X – wybrany kanał 1-2 lub 1-4)odpowiadającym numerowi
przełączane będzie również audio).
komputera.
Następny kanał scrLk+scrLk+(fx)
—
Wybór aktywnego kanału audio (jeśli opcja jest włączona audio będzie
audio (FX – klawisz funkcyjny)
przełączane razem z obrazem)
Wspólne przełączanie scrLk+scrLk+q
—
Włączenie opcji wspólnego przełączania obrazu oraz audio (ustawienia kanałów – obraz/audiodomyślne).
Rozłączne przełączanie scrLk+scrLk+w
—
Audio nie będzie przełączane wraz z obrazem.
kanałów – obraz/audio
Następny niższy kanał scrLk+scrLk+strzałka w górę Wciśnięcie przycisku z numerem Wybór następnego niższego kanału komputera.
komputera
odpowiadającym numerowi komputera. Następny wyższy kanał scrLk+scrLk+strzałka w dół Wciśnięcie przycisku z numerem Wybór następnego wyższego kanału komputera.
komputera
odpowiadającym numerowi komputera. Poprzedni kanał scrLk+scrLk+backspace
—
Przełączanie pomiędzy poprzednim i bieżącym kanałem komputera.
komputera
Definiowanie klawisza scrLk+scrLk+h+(y)
Wciśnięcie i przytrzymanie przycisku Wybór klawisza, który ma służyć jako prefiks do klawisza komendy.
prefiksu
(Y – klawisze scroll lock, caps, 2 lub 4 dłużej niż 3 sekundy a
esc, f12 lub num lock)następnie wybór klawisza (Y).
Reset konsoli scrLk+scrLk+End
—
Reset konsoli – myszy oraz klawiatury.
mysz/klawiatura Automatyczne
ScrLk+scrLk+S —
Automatyczne skanowanie wszystkich podłączonych kanałów z interwałem
skanowanie kanałów czasowym równych 5 sekund.
Automatyczne
ScrLk+scrLk+S+ (x)
—
Automatyczne skanowanie wszystkich podłączonych kanałów z interwałem
skanowanie z (X – liczby 0-9; 1=10 sekund, 2=20 czasowym zdefiniowanym przez użytkownika (5-100 sekund).
programowalnymsekund, 0=100 sekund, itd.
interwałem czasowym
Wyłączenie
Wciśnięcie dowolnego
Wciśnięcie dowolnego przycisku. Wyłączenie autoskanowania.
autoskanowaniaklawisza
uwagi:
1. Zauważ, że (X) oznacza numer klawisza, który odpowiada numerowi portu przełącznika (X = 1 – 2). Można używać klawiszy z klawiatury numerycznej oraz z klawiatury podstawowej.
2. Gdy opcja wspólnego przełączania obrazu oraz audio jest włączona poprzez wciśnięcie kombinacji klawiszy ScrLk+ ScrLk+Q można ją wyłączyć skrótem ScrLk+ ScrLk+W.
Skróty klawiszowe: Kombinacja klawiszy ScrLk + ScrLk + (klawisz)oznacza, że klawisze należy wciskać kolejno jeden po drugim, nie jednocześnie.
Rozwiązywanie problemów z myszą: Jeśli mysz zawiesza się lub działa nieprawidłowo wykonaj następujące czynności aby ją zresetować:
a) W przypadku użytkowania systemu Windows 98SE lub wyższych wersji należy wcisnąć kombinację klawiszy: ScrLk + ScrLk + End.
b) W przypadku użytkowania systemów Linux, NT4.0 itp. należy wcisnąć jedną z kombinacji klawiszy: ScrLk + ScrLk + M + 1 – dla myszy z 2 przyciskami, ScrLk + ScrLk + M + 2 – dla myszy z 3
przyciskami, ScrLk + ScrLk + M + 3 – dla myszy z 5 przyciskami.
TABELA SKRÓTÓW KLAWISZOWYCH
PolecenieSkrót klawiszowy Przycisk na przełącznikuOpis
italiano
19
Note:
1. Notare che (x) indica un tasto numerico per il numero di porta selezionabile (x=1-2). E’ possibile utilizzare sia i tasti numerici della prima fila in alto della tastiera sia i numeri del tastierino numerico per i comandi di scelta rapida.
2. Quando il collegamento dello spostamento di PC & porta audio/mic è attivo tramite la sequenza : Bloc Scorr+Blocc Scorr+Q, qualsiasi spostamento PC e Audio/mic sono fatti simultaneamente. Per rimuovere questa unione premere Blocc Scorr+Blocc Scorr+ W.
Convenzione Hotkey: La notazione hotkey Blocc Scorr+ Blocc Scorr+ (tasto) denota che si dovrebbero premere i tasti una alla volta in modo consecutivo, non simultaneamente.
Ricerca e riparazione veloce di problemi di funzionamento del mouse: Se il mouse si blacca o funziona in modo anomalo, si possono premere i seguenti tasti hotkey per ripristinare il mouse:
a) quando si utilizza un PnP OS come Windows 98SE o sistemi operativi Windows più recenti come Vista, premere Bloc Scorr + Bloc Scorr + Fine per ripristinare il mouse
b) quando si utilizza un non-PnP OS come Linux, NT4.0, ecc…premere solamente uno dei seguenti tasti di scelta rapida per ripristinare il mouse a seconda della configurazione del mouse sul non-PnP OS: Bloc Scorr
+Bloc Scorr + M + 1 per il settaggio di mouse a 2 tasti; Bloc Scorr + Bloc Scorr + M + 2 per il settaggio di mouse a 3 tasti con rotella; Bloc Scorr + Bloc Scorr + M + 3 per il settaggio di mouse a 5 tasti con rotella.
SELEZIONE DIRETTA
BLOC SCORR+BLOC SCORR+(X)
PreMERE IL CORRISPONDENTE
SeleZIONE LA PORTA PC ATTIVA (PORTA PC & AUDIO/MICROFONO SELEZIONATE UNITARIAMENTE;
PORTA COMPUTER
(x = UN TASTO NUMERICO DELLA PULSANTE PER SELEZIONE UNA
SE IL COLLEGAMENTO è ATTIVO.
FILA IN ALTO; 1-2 o 1-4)pORTA PC.
CANALE AUDIO/MIC BLOC SCORR+BLOC SCORR+(FX)
—
Seleziona il canale audio/mic attivo (Porta PC & Audio/microfono selezionate
SUCCESSIVO (fx = TASTO funZionE)
unitariamente; SE IL COLLEGAMENTO è ATTIVO.
COLLEGARE IL PASSAGGIO BLOC SCORR+BLOC SCORR+q
—
Collega il passaggio da un PC a quello Audio/Mic (quando la funzione è attiva, LO
PC & AUDIO/MICspostamento di PC & Audio/Mic avviene insieme) [opzione predefinita].
ELIMINARE IL COLLEGAMENTOscrLk+scrLk+w
—
Disabilita la funzione per cui il cambiamento della porta PC COMPORTA ANCHE LO PER IL PASSAGIO PC & AUDIO/
spostamento della porta del Audio/Mic.
MIC SIMULTANEO
SELEZIONE DEL CANALE BLOC SCORR+BLOC SCORR+
PreMERE IL TASTO Seleziona il canale precedente (Porta PC & Audio/microfono selezionare
PC PRECEDENTE
Freccia verso l’alto
CORRISPONDENTE. unitariamente; se il legame è attivo).
SELEZIONE DEL CANALE BLOC SCORR+BLOC SCORR+
PreMERE IL TASTO Seleziona il canale SUCCESSIVO (Porta PC & Audio/microfono selezionare
PC SUCCESSIVO
Freccia verso Il BASSO
CORRISPONDENTE. unitariamente; se il legame è attivo).
Selezione dell’ultimo BLOC SCORR+BLOC SCORR+
—
Scorre tra l’ultima selezione di canale e quella subito PRECEDENTE.
cANALE PC
Barra spaziatrice
Definire la sequenza BLOC SCORR+BLOC SCORR+H+(Y) PreMERE IL TASTO 2 o 4 PEr Seleziona la sequenza di tasti di scelta rapida tra 5 tasti alternativi.
di scelta rapida
(y = BLOC SCORR, MAIUSC, ESC,più di 2 secondi, QUINDI
f12 e BLOC NUM)preMERE (y).
Ripristino console
BLOC SCORR+BLOC SCORR+FINE —
RIpristina il mouse e la tastiera dal lato console.
mouse e tastiera Modalità Auto scan BLOC SCORR+BLOC SCORR+S —
Auto scan attraverso qualsiasi canale connesso per una rapida visualizzazione
di ciascun canale (ritardo della scansione=5 secondi).
Auto scan con ritardo BLOC SCORR+BLOC SCORR+S+(x) —
Auto scan con ritardo definito dall’utente con un indice di 5-100 secondi.
programmabIle
(x = 0-9, rappresenza INCREMENTI
DI 10SECONDI: 1 = 10sec.; 2 =
20sec., eCc.; 0 = 100sec.)
Termine auto scan
Qualsiasi tasto
Premere qualsiasi pulsante. Termina l’attività di auto scan.
Tabella rapida di riferimento
ComandoTasti di scelta rapidaPulsanti del pannello Descrizione
WASTE ELECTRICAL & ELECTRONIC EQUIPMENT
Disposal of Electric and Electronic Equipment
(applicable in the European Union and other European countries with separate collection systems)
ENGLISH
This symbol on the product or its packaging indicates that this product shall not be treated as household waste.
Instead, it should be taken to an applicable collection point for the recycling of electrical and
electronic equipment. By ensuring this product is disposed of correctly, you will help prevent
potential negative consequences to the environment and human health, which could otherwise
be caused by inappropriate waste handling of this product. If your equipment contains easily
removable batteries or accumulators, dispose of these separately according to your local
requirements. The recycling of materials will help to conserve natural resources. For more
detailed information about recycling of this product, contact your local city office, your household waste
disposal service or the shop where you purchased this product. In countries outside of the EU: If you wish
to discard this product, contact your local authorities and ask for the correct manner of disposal.
deutsch
Dieses auf dem Produkt oder der Verpackung angebrachte Symbol zeigt an, dass dieses Produkt nicht mit
dem Hausmüll entsorgt werden darf. In Übereinstimmung mit der Richtlinie 2002/96/EG des Europäischen
Parlaments und des Rates über Elektro- und Elektronik-Altgeräte (WEEE) darf dieses Elektrogerät nicht
im normalen Hausmüll oder dem Gelben Sack entsorgt werden. Wenn Sie dieses Produkt entsorgen
möchten, bringen Sie es bitte zur Verkaufsstelle zurück oder zum Recycling-Sammelpunkt Ihrer Gemeinde.
ESPAñOL
Este símbolo en el producto o su embalaje indica que el producto no debe tratarse como residuo doméstico.
De conformidad con la Directiva 2002/96/CE de la UE sobre residuos de aparatos eléctricos y electrónicos
(RAEE), este producto eléctrico no puede desecha se con el resto de residuos no clasificados. Deshágase
de este producto devolviéndolo al punta de venta o a un punta de recogida municipal para su reciclaje.
FRANçAIS
Ce symbole sur Ie produit ou son emballage signifie que ce produit ne doit pas être traité comme un
déchet ménager. Conformément à la Directive 2002/96/EC sur les déchets d’équipements électriques
et électroniques (DEEE), ce produit électrique ne doit en aucun cas être mis au rebut sous forme de
déchet municipal non trié. Veuillez vous débarrasser de ce produit en Ie renvoyant à son point
de vente ou au point de ramassage local dans votre municipalité, à des fins de recyclage.
Italiano
Questo simbolo sui prodotto o sulla relativa confezione indica che il prodotto non va trattato come un rifiuto
domestico. In ottemperanza alla Direttiva UE 2002/96/EC sui rifiuti di apparecchiature elettriche ed
elettroniche (RAEE), questa prodotto elettrico non deve essere smaltito come rifiuto municipale misto. Si
prega di smaltire il prodotto riportandolo al punto vendita o al punto di raccolta municipale locale per un
opportuno riciclaggio.
Polski
Jeśli na produkcie lub jego opakowaniu umieszczono ten symbol, wówczas w czasie utylizacji nie wolno
wyrzucać tego produktu wraz z odpadami komunalnymi. Zgodnie z Dyrektywą Nr 2002/96/WE w sprawie
zużytego sprzętu elektrycznego i elektronicznego (WEEE), niniejszego produktu elektrycznego nie wolno
usuwać jako nie posortowanego odpadu komunalnego. Prosimy o usuniecie niniejszego produktu
poprzez jego zwrot do punktu zakupu lub oddanie do miejscowego komunalnego punktu zbiórki
odpadów przeznaczonych do recyklingu.
20
WARRANTY INFORMATION
english — For warranty information, go to www.intellinet-network.com/warranty.
deutsch — Garantieinformationen finden Sie unter www.intellinet-network.com/warranty.
ESPAñOL — Si desea obtener información sobre la garantía, visite
www.intellinet-network.com/warranty.
www.intellinet-network.com/warranty.
www.intellinet-network.com/warranty.
FRANçAIS — Pour consulter les informations sur la garantie, visitez
Polski — Informacje dotyczące gwarancji znajdują się na stronie
Italiano — Per informazioni sulla garanzia, accedere a www.intellinet-network.com/warranty.
EN MéXICO: Poliza de Garantia INTELLINET — Datos del importador y responsable ante el consumidor
IC Intracom México, S.A. de C.V. • Av. Interceptor Poniente # 73, Col. Parque Industrial La Joya, Cuautitlan
Izcalli, Estado de México, C.P. 54730, México. • Tel. (55)1500-4500
La presente garantía cubre este producto por 3 años contra cualquier defecto de fabricación en sus
materiales y mano de obra, bajo las siguientes condiciones:
1. Todos los productos a que se refiere esta garantía, ampara su cambio físico, sin ningún cargo para
el consumidor.
2. El comercializador no tiene talleres de servicio, debido a que los productos que se garantizan no
cuentan con reparaciones, ni refacciones, ya que su garantía es de cambio físico.
3. La garantía cubre exclusivamente aquellas partes, equipos o sub-ensambles que hayan sido instaladas
defábrica y no incluye en ningún caso el equipo adicional o cualesquiera que hayan sido adicionados
al mismo por el usuario o distribuidor.
Para hacer efectiva esta garantía bastara con presentar el producto al distribuidor en el domicilio donde
fue adquirido o en el domicilio de IC Intracom México, S.A. de C.V., junto con los accesorios contenidos
en su empaque, acompañado de su póliza debidamente llenada y sellada por la casa vendedora
(indispensable el sello y fecha de compra) donde lo adquirió, o bien, la factura o ticket de
compra original donde se mencione claramente el modelo, numero de serie (cuando aplique) y
fecha de adquisición. Esta garantia no es valida en los siguientes casos: Si el producto se hubiese
utilizado en condiciones distintas a las normales; si el producto no ha sido operado conforme a los
instructivos de uso; ó si el producto ha sido alterado o tratado de ser reparado por el consumidor ó
terceras personas.
21
FEDERAL COMMUNICATIONS COMMISSION
REGULATORY STATEMENT
FCC Class B
This equipment has been tested and found to comply with the limits for
a Class B digital device, pursuant to Part 15 of Federal Communications
Commission (FCC) Rules. These limits are designed to provide reasonable
protection against harmful interference in a residential installation. This
equipment generates, uses and can radiate radio frequency energy and,
if not installed and used in accordance with the instructions, may cause
harmful interference to radio communications. However, there is no guarantee
that interference will not occur in a particular installation. If this equipment
does cause harmful interference to radio or television reception, which can be
determined by turning the equipment off and on, the user is encouraged to
try to correct the interference by one or more of the following measures:
•Reorient or relocate the receiving antenna.
• Increase the separation between the equipment and the receiver.
• Connect the equipment to an outlet on a circuit different from the receiver.
•Consult the dealer or an experienced radio/TV technician for help.
R&TTE
english
This device complies with the requirements of the R&TTE Directive 1999/5/EC.
deutsch
Dieses Gerät enspricht der Direktive R&TTE Direktive 1999/5/EC.
ESPAñOL
Este dispositivo cumple con los requerimientos de la Directiva R&TTE 1999/5/EC.
FRANçAIS
Cet appareil satisfait aux exigences de la directive R&TTE 1999/5/CE.
Polski
Urządzenie spełnia wymagania dyrektywy R&TTE 1999/5/EC.
Italiano
Questo dispositivo è conforme alla Direttiva 1999/5/EC R&TTE.
22
INTELLINET NETWORK SOLUTIONS™ offers a complete line of active and passive networking products.
Ask your local computer dealer for more information or visit www.intellinet-network.com.
All products mentioned are trademarks or registered trademarks of their respective owners.
INTELLINET NETWORK SOLUTIONS™ bietet ein vollständiges Sortiment aktiver und passiver
Netzwerkkomponenten. Für weitere Informationen wenden Sie sich bitte an Ihren Händler oder
nutzen Sie die Webseite www.intellinet-network.com.
Alle erwähnten Produkte sind registrierte Marken und Eigentum Ihrer jeweiligen Besitzer.
INTELLINET NETWORK SOLUTIONS™ ofrece una línea completa de productos de red activa y pasiva.
Pregunte a su distribuidor para obtener mayor informacion o visite:
www.intellinet-network.com.
Todos los productos mencionados son marcas comerciales o marcas registradas de sus respectivos propietarios.
INTELLINET NETWORK SOLUTIONS™ offre un assortiment complet de produits de réseau actifs et
passifs. Pour plus d’informations veuillez contacter votre revendeur ou utiliser la page d’accueil
www.intellinet-network.com.
Tous les produits mentionnés sont des marques commerciales ou des marques déposées de leurs
propriétaires respectifs.
INTELLINET NETWORK SOLUTIONS™ to kompletna linia aktywnych oraz pasywnych komponentów
sieciowych. Poproś lokalnego dealera o więcej informacji lub odwiedź stronę
www.intellinet-network.com.
Wszystkie nazwy handlowe i towarów są nazwami i znakami towarowymi
zastrzeżonymi odpowiednich firm odnośnych właścicieli.
INTELLINET NETWORK SOLUTIONS™ offre una linea completa di prodotti di rete attivi e passivi.
Chiedi maggiori informazioni al tuo rivenditore di computer o visita il sito
www.intellinet-network.com.
Tutti i prodotti sopracitati sono marchi di fabbrica o marchi registrati depositati dai proprietari.
Copyright © INTELLINET NETWORK SOLUTIONS