1
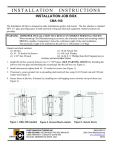
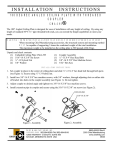
INSTALLATION
INSTRUCTIONS
BRACKET
SSC-4
The SSC bracket is designed for adding additional security to installations. By installing the SSC, a locking
device can be placed to obscure access to fastening hardware.
Unpack and check contents (see Figure 1):
Figure 1.
(2) SSC-3 (5/16” clearance hole)
(1) M4 Flat Washer
(3) SSC-1 (#10 clearance hole)
(1) M5 Flat Washer
(1) 10-24 x .25” Phillips Head Cap Screw
(1) M6 Flat Washer
(1) 5/16-18 x .625” Button Head Cap Screw
(1) 3/16” Hex Key
1. Remove one of the 10-24 screws from the projector’s SLB interface bracket (see Figure 2).
Figure 2.
2. Replace the 5/16” set screw of the RPA projector mount with the supplied 5/16” Button Head Cap
Screw and an SSC-3 (see Figure 3).
Figure 3.
3. Install an SSC-1 bracket in one pitch and one roll adjustment screw on the RPA projector mount (see
Figure 4 & Figure 5).
CHIEF MANUFACTURING INC.
1-800-582-6480 952-894-6280 FAX 952-894-6918
12800 HIGHWAY 13 SOUTH, SUITE 500
SAVAGE, MINNESOTA 55378 USA
8802-000130
2004 Chief Manufacturing
www.chiefmfg.com
01/04
Figure 5.
Figure 4.
4. Place an SSC-3 bracket on one of the mounting points of the SLB interface bracket (see Figure 6).
Depending on the screw size, a flat washer (provided) may be necessary.
Figure 6.
5. Install the projector on the RPA ceiling mount.
6. Install the final SSC-1 bracket and 10-24 x .25” screw (provided) into the hole from Step #1 (see
Figure 7).
Figure 7.
7. Install locking device in each of the SSC brackets or connect all five by a cable, making sure the head
of each screw is covered (see Figure 8).
Figure 8.