1
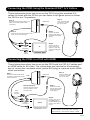
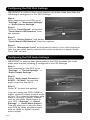
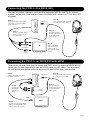
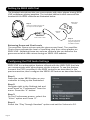
Gaming Headset for
PlayStation®3, XBOX 360®
and PC Gaming
User’s Guide
Package Contents
• PX21 headset with amplifier
• Stereo RCA adapter cable
• Controller cable for XBOX LIVE®
• This User’s Guide
For more products, accessories and our product
support knowledge base, please visit
TurtleBeach.com
For warranty information, please visit http://turtlebeach.com/support
FCC Caution:
Any changes or modifications not expressly approved by the party responsible for compliance could
void the user’s authority to operate the equipment. This device complies with part 15 of the FCC Rules.
Operation is subject to the following two conditions: (1) This device may not cause harmful interference, and (2) this device must accept any interference received, including interference that may cause
undesired operation.
This product is CE marked according to the provisions of the R&TTE Directive (99/5/EC)
Grantee Code/Reg Number: XGB/GC229855
FCC Code: XGB-TB2130
Voyetra Turtle Beach, Inc.
Copyright © 2010, Voyetra Turtle Beach, Inc. (VTB). All rights reserved. No part of this document may be reproduced
without prior written consent from Voyetra Turtle Beach, Inc. Turtle Beach, the Turtle Beach logo, Voyetra, Ear Force and
Chat Boost are either trademarks or registered trademarks of VTB. Playstation and PS3 are either trademarks or registered trademarks of Sony Corporation. Windows, Vista, XBOX, XBOX 360 and XBOX LIVE are registered trademarks of
Microsoft Corporation. Apple and Mac are registered trademarks of Apple Inc. All other trademarks are properties of their
respective companies and are hereby acknowledged. Product features, visual design, package contents and specifications are subject to change without notice. Made in China. Product# TBS-2130 V2
About the PX21 Headset
The Ear Force PX21 is a universal gaming headset that’s compatible with the
PS3™, XBOX 360 and Mac®/Windows® PCs. The PX21 pushes your gaming
experience to a new level with superior stereo sound and crystal-clear communication over PlayStation Network (PSN), XBOX LIVE or online PC gaming.
By combining chat with stereo game audio, the PX21 lets you hear the voices
of online players together with the game sound, without the need for external
speakers and a communicator headset.
Important Information
1. Be careful when turning up the master volume control on the amplifier.
Before placing the headphones over your ears, set the volume control to
minimum, then slowly increase until you reach a comfortable level.
2. Like any speakers, overdriving headphones may cause damage to both
the headset and your ears. Please listen at moderate levels.
3. WARNING: Long term exposure to loud music or other sounds in a headset
may cause hearing damage. It is best to avoid extreme volume levels when
using a headset, especially for extended periods.
Avoid Hearing Damage
Over time, your ears adapt to loud volume levels, so a level that may not
cause initial discomfort may still damage your hearing.
If you experience ringing in your ears after using the headset, it means the
volume is set too loud. The louder the volume is set, the less time it takes to
affect your hearing. So, please take care to listen at moderate levels.
Turn down the volume if you can’t hear people speaking near you.
Avoid turning up the volume to block out noisy surroundings.
Page 2
Connecting the PX21 Using the Standard PS3™ A/V Cables
These instructions show how to set up the PX21 using the standard A/V
cables included with the PS3 so you can listen to the game sound on either
the PX21 or the TV speakers.
Step 4
Step 1
Insert the PX21 USB
connector to a USB
port on the PS3.
USB/Power
Connect the PS3 audio cables (red/
white) to the PX21 splitter cable
(red/white).
Step 3
Step 2
Connect the PX21
splitter cable (green) to
the PX21 audio cable
(green).
Connect the PX21 splitter cable (red/
white) to the TV audio input.
Mic Mute
Audio
(red/white)
Chat
Expander
TV
Game
Bass
Step 5
Chat
Boost
Connect the PS3
video output plug
(yellow) to your TV’s
video input RCA jack
(yellow).
Video
(yellow)
Connecting the PX21 to a PS3 with HDMI
These instructions show how to set up the PX21 with the PS3 A/V cables and
an HDMI cable for HD video. The connections are identical to the standard
set up, except the composite video (yellow RCA plug) is replaced by the HDMI
video connection.
Step 4
Step 1
Step 3
Connect the PX21 splitter
cable (red/white) to the
TV audio input.
Connect the PX21
splitter cable (green)
to the PX21 audio
cable (green).
Bass
Game
Step 2 (optional)
Video
(yellow)
not used
Insert the PX21 USB
connector to a USB
port on the PS3.
USB/Power
HDMI
Expander
Chat
Connect the PS3 audio cables
(red/white) to the PX21 splitter
cable (red/white).
Mic Mute
Chat
Boost
Step 5
Audio
(red/white)
HDMI
HD TV
Connect one end of
the HDMI cable to
the PS3 HDMI output
and the other end to
the TV.
PLEASE NOTE: You will have to change the PS3 video
output to HDMI in the Settings menu. (Settings >
Display Settings > Video Output Settings > HDMI).
Page 3
Configuring the PS3 Chat Settings
IMPORTANT: In order to hear other players you must make sure that the
following is configured in the PS3 Settings:
Step 1
After powering on the PS3, go to
“Settings” → “Accessory Settings”
→ “Audio Device Settings”.
Step 2
Click on “Input Device” and select
“Turtle Beach USB Headset” from
the options.
Step 3
Click on “Output Device” and select
“Turtle Beach USB Headset” from the options.
Step 4
Click on “Microphone Level” and adjust the level of your chat output so
that the bar graph barely reaches the red area when you speak loudly.
Click “OK” to save.
Configuring the PS3 Audio Settings
IMPORTANT: In order to hear game audio in the PX21 headset, you must
make sure that the following is configured in the PS3 Settings:
Step 1
After powering on the PS3, go to
“Settings” → “Sound Settings” →
“Audio Output Settings”.
Step 2
Select ”Audio Input Connector /
SCART / AV Multi” to send the
audio output to the PX21.
Step 3
Press “X” to save this setting.
If you are using the PS3’s HDMI or
digital (optical) output to send audio
to your TV or external speakers, skip
Steps 1 through 3 above. Instead
turn on the Audio Multi Output in
your PS3. (“Settings” → “Sound
Settings” → “Audio Multi-Output”).
This will allow you to use the standard PS3 AV cable simultaneously
with an HDMI or digital (optical)
audio output.
Page 4
Connecting the PX21 to the XBOX 360
Use the included cables to connect the headset, XBOX® and TV (or sound
system) as shown. This lets you hear the XBOX with either the TV or the PX21
headset.
Step 1
Step 4
USB/Power
Connect the XBOX audio cables
(red/white) to the PX21 splitter
cable (red/white).
Insert the PX21 USB connector
to a USB port on the XBOX.
Step 3
Step 2
Connect the PX21
splitter cable (green)
to the PX21 audio
cable (green).
Connect the PX21 splitter
cable (red/white) to the
TV audio input.
Game
Bass
Mic Mute
TV
Chat
Expander
Audio
(red/white)
Step 5
Chat
Boost
Connect the XBOX
video output plug
(yellow) to the TV
video input RCA jack
(yellow).
Video
(yellow)
Connecting the PX21 to an XBOX 360 with HDMI
These instructions show how to set up the PX21 with the optional XBOX HD AV
cable (purchased separately) and an HDMI cable for HD video. The standard
AV cable with composite video is replaced by the HDMI video connection.
Step 1
USB/Power
Connect the HDMI cable from
the XBOX to the TV.
Step 4
Insert the PX21 USB connector
to a USB port on the XBOX.
Step 3
Audio
(red/white)
Connect the PX21
splitter cable (green)
to the PX21 audio
cable (green).
Bass
Expander
Mic Mute
HDMI
Step 5
Game
Connect the
XBOX HD AV
cable to the
XBOX.
Chat
Step 2
Chat
Boost
HD TV
Connect one end of the HDMI
cable to the XBOX HDMI output
and the other end to the TV.
Page 5
Setting Up XBOX LIVE Chat
The headset microphone lets you communicate with other players during XBOX
LIVE multiplayer gaming sessions. The included talkback cable connects the
headset to the XBOX controller as illustrated below.
XBOX Game
Controller
Step 1
Game
Chat
Bass
Expander
Chat
Boost
Insert the straight plug into the
mic output on the amplifier.
Talkback
Cable
Mic Mute
Audio cable to PS3
Step 2
Insert the right angle
plug into the jack on
the XBOX controller.
Balancing Game and Chat Levels
The amplifier Game volume sets the game sound level. The amplifier
Chat volume adjusts the level of incoming chat from other players on
XBOX LIVE. Adjusting these two volume controls lets you balance the
game sound and chat voices during an XBOX LIVE session.
Configuring the PS3 Audio Settings
XBOX LIVE is a subscription feature offered with the XBOX 360 that lets
you communicate with other players via the internet. To use this feature,
connect the PX21 amplifier to the XBOX controller as described in the
previous section, then configure the XBOX LIVE feature as described below.
Step 1
Press the center XBOX button on your
controller to bring up the Dashboard.
Step 2
Navigate right to the Settings tab and
scroll down to “Preferences” from the
menu. Press the “A” button.
Step 3
On the Preferences screen, select the
“Voice” option and Press “A”.
Step 4
Select the “Play Through Headset” option and set the Volume to 10.
Page 6
Connecting the PX21 to a PC or Laptop
When used as a PC gaming headset, the PX21 functions as two independent
headsets in one package:
Amplified Stereo Headphones: The green 3.5mm plug is used for sending the
stereo game signal from the PC sound card to the PX21 headphone amplifier
so you can hear game sounds, music and other sounds from your PC. The
overall volume level is set by the Game volume control on the PX21 amplifier.
USB Stereo Headset: The USB connection is used for mic and chat signals and
appears as “Turtle Beach USB Headset” in Windows operating systems. This
lets you assign the PX21 mic and chat in your game software as a USB audio
device. You can set the microphone and chat levels independently with the
Windows mixer software, as described below. After configuring these volume
settings, you can set the chat level with the Chat volume control on the PX21
amplifier. Note that each time you disconnect the PX21 from the USB port, the
volume settings described below may revert back to their default settings. As
such, you might have to go back and set them again each time you remove
and insert the PX21 USB connector.
Expander
Bass
Mic Mute
USB
Chat
Boost
3.5mm audio
plug (green)
Chat
Game
Page 7
Windows XP Setup Procedure
1. Insert the green 3.5mm plug
into the sound card or headphone
output. This connects the stereo
output signal to the PX21 amplifier
so you can set the level with the
Game volume control.
2. Insert the PX21 USB connector
into a USB port on your PC or laptop. After Windows indicates that
it found a new USB audio device,
click on Start → Control Panel →
Sounds and Audio Devices.
3. In the dialog box (shown here),
click on the Audio tab. Note the
device that’s selected under the
Playback and Recording menus,
as you may want to set these back
once you’re done setting up the
PX21.
4. Select “Turtle Beach USB Headset” in the pull down menus for Sound
Playback and Sound Recording. You can change these back to the original
settings after you’re done setting the PX21 volume levels.
5. Click on the Volume button in the Sound Playback section to activate the
mixer panel (shown here).
6. Click on Options → Properties
in the top menu. In the dialog
box, click on Playback and check
Speaker, WAV and Microphone.
This determines which volume
controls will appear in the mixer.
Click OK to activate the playback
mixer (shown here).
7. Turn up the Speaker and Wave
volume sliders to maximum.
These determine the level of chat
you hear in the PX21. Since the
PX21 has a Chat volume control
on the amplifier, setting these to
maximum allows you to adjust
the incoming chat volume on the
amplifier without having to access these mixer controls.
Page 8
Windows XP Setup Procedure (cont’d)
8. The Microphone slider on the far right of this mixer panel determines
the volume of your voice heard in the PX21 speakers as you speak into
the mic. Since the PX21 has a built-in mic monitor, you should turn this
volume slider down to minimum or mute it. Or, if you want to hear more
of your voice in the headset, turn up this volume to the desired setting.
Keep in mind that increasing this volume will also increase the sound
level picked up by the mic, so you will hear more ambient sounds as well
as your voice.
9. Go back to the Sounds and Audio Devices dialog
box and click on the Volume button in the Sound Recording section to activate the mic recording volume
slider (shown here). This determines how loud your
voice will sound when you speak to others online.
Set the slider to about 50%. If you find that your
voice isn’t loud enough, move the slider up (or move
it down if your voice is too loud.)
10. Position the mic several inches away from your
mouth so it doesn’t overload when you speak. Try
balancing the mic position and the volume setting
for optimum voice level.
11. After you’re done setting up the proper levels,
go back to the Sounds and Audio Devices dialog box
and set the default audio devices for playback and
recording back to their original settings if you don’t
want the PX21 USB headset to be the default device
for Windows sounds.
12. Close the open dialog boxes and the PX21 USB headset should now be
ready for use in chat programs such as Skype®, Ventrilo™, Teamspeak®, etc.
Page 9
Windows Vista® & Windows 7 Setup Procedure
[Windows 7-specific instructions are in
italics]
1. Insert the 3.5mm green plug into the
sound card or headphone output. This
connects the stereo output signal to the
PX21 amplifier so you can set the level
with the Game Volume control.
2. Insert the PX21 USB connector into
a USB port. After Windows indicates
that it found a new USB audio device,
click on Start (circular Windows logo) →
Control Panel → [Win7: Hardware and
Sound] → Sound.
3. In the dialog box (shown here), click
the Playback tab, right-click “Turtle
Beach USB Headset” and select “Set as
Default Device”. A green circle with a
check mark will appear to indicate that
this is now your default sound device.
(If the green circle is already indicating
that the PX21 is selected, skip to the
next step).
4. Under the Recording tab, right-click
on “Turtle Beach USB Headset” and select “Set as Default Device” [Win7: and
“Set as Default Communications Device”].
A green circle with a microphone icon
will appear to indicate that this is now
your default communication device. (If
the green circle is already indicating that
the PX21 is selected, skip to the next
step).
5. [Win7: Under the Communications
tab, select “Do Nothing”].
6. Under the Playback tab, double-click
on “USB Audio Device” to bring up the
Speakers Properties mixer panel.
7. Click on the Levels tab.
8. Set the Speakers slider to maximum.
This, along with the Chat dial on the PX21
amplifier, will determine the level of chat
you hear in the PX21.
Page 10
Windows Vista & Windows 7 Setup Procedure (cont’d)
9. The Microphone slider in this mixer
panel determines the volume of your voice
heard in the PX21 speakers as you speak
into the mic. Since the PX21 has a built-in
mic monitor, you can adjust this level to
your liking. (We recommend you set it
below 10%). Click OK to go back to the
general Sound control panel.
10. Under the Recording tab, double-click
on “Turtle Beach USB Headset” to bring
up the
Microphone Properties mixer panel.
11. Click on the Levels tab, which will
bring up the Microphone volume slider.
This determines how loud your voice will
sound when you speak to others online. Try balancing the mic
position and volume setting for the optimum voice level. (We recommend you
set this at 25%).
12. Close the open dialog boxes and the PX21 USB headset should now be
ready for use in chat programs such as Skype®, Ventrilo™, Teamspeak®, etc.
Connecting the PX21 to a Mac
The PX21 connects to a Mac with its 3.5mm audio plug and USB connector,
allowing you to control the game and chat volume independently just as you
would on an XBOX or PS3.
The 3.5mm connection is used for sound card audio which can be controlled
by the Game volume on the PX21 amplifier.
The USB connection is used for mic and chat signals and appears as “Turtle
Beach USB Headset” in the Mac O/S. This lets you assign the PX21 mic and
chat in your game software as a USB audio device. You can set the microphone and chat levels independently with the Mac mixer, as described in the
next section. After configuring these volume settings, you can set the chat
level with the Chat volume control on the PX21 amplifier.
Step 1
Step 2
Connect the green 3.5mm
audio plug to the sound card
line output on your Mac.
Connect the PX21 USB
plug into a USB socket
on your Mac.
Expander
Bass
Mic Mute
Chat
Boost
Chat
Game
Page 11
Mac® Setup Procedure
1. Insert the green 3.5mm
plug into the sound card
or headphone line output.
This connects the stereo
audio output to the PX21
amplifier so you can set
the level with the Game
volume control.
2. Insert the PX21 USB
connector into a USB port.
The PX21 should be automatically recognized as
a new USB audio device
and be designated as the
default audio device and
microphone.
3. Click on the Apple® menu icon and go to System Preferences → Sound.
4. Select the Output tab
and make sure that “Turtle
Beach USB Headset” is designated as the default audio
device. If not, select it now.
5. Set the Output volume
slider on the bottom of the
screen to max. This, along
with the Chat volume control
on the PX21 amplifier, will
determine the level of chat
you hear in the PX21.
6. Select the Input tab and
make sure that “Turtle
Beach USB Headset” is
designated as the default
microphone. If not, select it now.
7. You can adjust the volume level of the PX21 microphone with the Input
volume slider, which determines how loud others will hear your voice. Set it
at about 75%, but be sure to test the level to ensure that your voice can be
heard by others. If you find that your voice isn’t loud enough, move the slider
up (or move the slider down if your voice is too loud).
8. Close the open dialog boxes and the PX21 USB headset should now be
ready for use in chat programs such as Skype®, Ventrilo™, Teamspeak®, etc.
Page 12
Using the Amplifier
Expander
Mic Mute
Indicator
LED
Stereo
Expander
Switch
Bass Boost Level
Bass
Mic Mute
Switch
Mic Mute
Game
at
Ch ost
Bo
Chat Boost
Indicator LED
XBOX LIVE® Jack
(Mic output to
XBOX controller)
Chat
Incoming
Chat
Volume
Game Audio
Volume
Mic Mute LED
Turns RED when the mic is muted and GREEN when the mic is on.
Mic Mute Switch
When “ON”, the microphone is muted so you won’t be heard by other players
online.
Expander Switch
When “ON”, the Expander widens the stereo sound field so you can hear
more of the sounds on the left and right sides and less in the middle. This
can help you hear distant sound cues in the game.
Bass Boost
Sets the intensity of bass boost level applied to the game audio.
Chat Boost™ LED
The intensity of this blue LED indicates the amount of Chat Boost applied
to the chat signal. The LED intensity increases as Chat Boost increases the
level of teammates’ voices in response to louder game sound.
Chat Volume
Sets the minimum level of incoming chat from other players on the PlayStation Network. The Chat Boost feature will automatically increase this volume
as the game sound increases, as indicated by the blue LED intensity.
Game Audio Volume
Sets the game sound level.
XBOX LIVE Jack:
When using the PX21 with an XBOX 360, connect the included XBOX LIVE
talkback cable from this jack to the XBOX controller for XBOX LIVE chat.
Mic Monitor (not shown)
When the mic is not muted, you’ll hear yourself speak in the headphones, so
you won’t shout as much when talking online.
Page 13