1
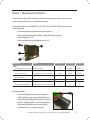
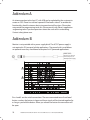
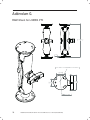
Mariner
LX0801PTI/ LX1201PTI/ LX1501PTI
IP-65 Touch Monitors
USER’S GUIDE
www.planar.com
The information contained in this document is subject to change without notice. This document
contains proprietary information that is protected by copyright. All rights are reserved. No part of
this document may be reproduced, translated to another language or stored in a retrieval system,
or transmitted by any means, electronic, mechanical, photocopying, recording, or otherwise,
without prior written permission.
Windows® is a registered trademark of Microsoft, Inc.
Other brands or product names are trademarks of their respective holders.
Important Recycle Instruction:
LCD Lamp(s) inside this product contain mercury. This product may contain other
electronic waste that can be hazardous if not disposed of properly. Recycle or dispose
in accordance with local, state, or federal Laws. For more information, contact the
Electronic Industries Alliance at HYPERLINK “http://WWW.EIAE.ORG”
For lamp specific disposal information check WWW.LAMPRECYCLE.ORG.
2
LX0801PTI/ LX1201PTI/ LX1501PTI - IP-65 Touch Monitors User’s Guide (020-0982-00A)
Table of Contents
Usage Notice
Precautions .................................................................................................................................... 5
In a Watercraft or Vehicle ...................................................................................................... 5
Cleaning the Monitor ............................................................................................................. 5
Introduction
About the Product ...................................................................................................................... 6
Front View .................................................................................................................................. 6
Rear View with Connector Information ........................................................................... 7
Features....................................................................................................................................... 8
Package Overview....................................................................................................................... 9
Installation
Before Installing .........................................................................................................................10
Step 1 - Mounting the Monitor ........................................................................................11
Step 2 - Connecting the Monitor .....................................................................................12
Step 3 - IRtouch Software Installation ...........................................................................13
User Controls
Front Panel Controls .................................................................................................................17
Turning the Monitor On and Off ..........................................................................................18
Using the Touchscreen ............................................................................................................18
Navigating the Touchscreen..................................................................................................18
Cleaning the Monitor ...............................................................................................................18
Appendix
Troubleshooting the Monitor ...............................................................................................20
Specifications ............................................................................................................................21
LX0801PTI/ LX1201PTI/ LX1501PTI - IP-65 Touch Monitors User’s Guide (020-0982-00A)
3
Addendum A .................................................................................................................................... 24
USB Control of OSD Functions............................................................................................... 24
Addendum B ................................................................................................................................... 24
Wiring the IP-67 sealed field installable connector manufactured by LTW
(p/n LTWCD-07 BFFA-LL 7001) .......................................................................... .................... 24
Addendum C ................................................................................................................................... 25
Mechanical Drawing for LX0801 PTI- (not available at time of print) ...................... 25
Addendum D ................................................................................................................................... 25
Mechanical Drawing for LX1201PTI ..................................................................................... 25
Addendum E .................................................................................................................................... 26
Mechanical Drawing for LX1501PTI ..................................................................................... 26
Addendum F .................................................................................................................................... 27
CPU Power Switch Scheme ..................................................................................................... 27
Direct 8-30 VDC Power Scheme ............................................................................................ 27
Addendum G ................................................................................................................................... 28
RAM Mount for LX0801PTI ...................................................................................................... 28
Addendum H ................................................................................................................................... 29
Frequently Asked Questions .................................................................................................. 29
Support and Service ...................................................................................................................... 30
4
LX0801PTI/ LX1201PTI/ LX1501PTI - IP-65 Touch Monitors User’s Guide (020-0982-00A)
Usage Notice
!
WARNING – Please do not open or disassemble the product as this may
cause electric shock. Doing so will void the warranty.
!
ATTENTION – Do not plug the touchscreen in yet! Install the touchscreen
driver first!
Precautions
To maximize the life and safe use of your unit, always be sure to follow the
warnings, precautions and maintenance recommendations in this user’s guide.
In a Watercraft or Vehicle:
• The monitor should be visible to the driver only if it is used for navigation, or
system control. Care should be taken to ensure distraction does not occur.
• Review all applicable federal, state and local laws and regulations to make sure
the monitor is used properly and safely.
• Avoid using the monitor for extended times while the charging system is not
running, or the monitor could drain the watercraft’s battery.
Cleaning the Monitor:
• Use a soft cloth moistened with mild detergent, isopropyl alcohol, or window
cleaners to clean the display housing.
• Never use abrasive cleaners, waxes or solvents to clean the unit.
LX0801PTI/ LX1201PTI/ LX1501PTI - IP-65 Touch Monitors User’s Guide (020-0982-00A)
5
Introduction
About Planar’s Mariner Touch Monitors
The LX0801PTI, LX1201PTI and LX1501PTI are high-performance, rugged touch
monitors intended for demanding environments, such as those aboard a watercraft.
The monitors feature a AMLCD TFT display with IR touchscreen, bright enough to
be read in daylight. The monitors include several mounting points for front or rear
mounting. The monitors are to be powered directly from circuit breaker protected
and switched 8-32 VDC power aboard the watercraft. The metal enclosure is IP-65,
designed to withstand liquid and dust intrusion. An optional cosmetic bezel is
included with each monitor.
1
3
2
Front Views:
1. AMLCD TFT with Touchscreen
2. Auxiliary power switch
3. Brightness adjust/auto sync buttons
6
LX0801PTI/ LX1201PTI/ LX1501PTI - IP-65 Touch Monitors User’s Guide (020-0982-00A)
1
2
3
Rear View (Descriptions):
1. USB port (Type B) for connecting the touchscreen to the remote computer
2. VGA Signal Input
3. 8-32 VDC Internally Regulated Power Input
4. Modular, removable connector plate for customizing I/O (not available on 12"
model at time of print)
Mating Connectors (sourced from http://www.ltw-tech.com):
USB Cable Assembly: 1 to 5 meter available. LTWWUB-20BFM-A7Axx (01, 02,
...05 for meter length)
VGA: The VGA connector located inside the monitor is waterproof.
The connector style is standard 15-pin VGA.
DC Power Connector Only: LTWCD-07BFFA-LL 7001
DC Cable Assembly: LTWCD07AFFM-LL7Axx (01, 02, ... 99 meter length)
LX0801PTI/ LX1201PTI/ LX1501PTI - IP-65 Touch Monitors User’s Guide (020-0982-00A)
7
Features
• Brightness control allows you to easily adjust the display to match the
ambient light, from full sunlight to night.
• The monitor’s TFT display is optically bonded to the Touchscreen to
increase contrast ratio. Increased contrast ratio makes it easier to
read information displayed on the monitor.
• The monitor’s autosync function eliminates the need for adjusting the
monitor for the best image - the monitor automatically makes any needed
adjustments whenever it is powered up or the display mode is changed.
• The monitor supports standard VGA signal input:
• LX0801PTI is 800 x 600 SVGA (native) and 640 x 480.
• LX1201PTI and LX1501PTI are 1024 x 768 XGA (native), 800 x 600 and
640 x 480.
• The monitor’s IP-65 enclosure protects from splashed water and dust. It
is designed to withstand shock and vibration for greater endurance and
reliability.
• There are several mounting point features incorporated in the design of
the enclosure to enable installation flexibility.
Note: The LX0801PTI/LX1201PTI/LX1501PTI monitors do not have OSD controls
available from the front buttons. All OSD commands can be controlled via USB
cable from the host CPU (see Addendum A).
8
LX0801PTI/ LX1201PTI/ LX1501PTI - IP-65 Touch Monitors User’s Guide (020-0982-00A)
Package Overview
The following items are shipped with the display. If any of these items are not in the
shipping container, please contact Planar.
LX080PTI/ LX1201PTI/ LX1501PTI
Quick Start Guide
2M Power Cord
Touch Monitor
(Bezel is attached for shipping.)
Note: Mounting hardware (M4 Screws), mounting brackets, power supply,
USB and video cables are sold separately.
Software drivers can be downloaded from www.Planar.com/downloads
LX0801PTI/ LX1201PTI/ LX1501PTI - IP-65 Touch Monitors User’s Guide (020-0982-00A)
9
Installation
Before Installing
Keep the following in mind while installing the monitor:
• The monitor should be visible to the driver only if it is used for navigation,
system control or vehicle information. If the monitor will be used for other
purposes, it should be installed in such a way that it will only operate while the
watercraft is not moving.
• Review all applicable federal, state and local laws and regulations to make sure
the monitor is used properly and safely.
• The installed monitor must not interfere with the driver’s vision.
Installing the monitor consists of three steps:
1. Attaching the monitor using one of the mounting interfaces built into the
monitor’s enclosure.
2. Connecting the monitor to the computer and power source.
3. Installing the touchscreen driver software.
10
LX0801PTI/ LX1201PTI/ LX1501PTI - IP-65 Touch Monitors User’s Guide (020-0982-00A)
Step 1 - Mounting the Monitor
The back and sides of the monitor include mounting points that you can use to
mount the monitor as your installation requires.
Mounting holes on the LX0801PTI, LX1201PTI and LX1501PTI allow the monitor
to be mounted :
• Front mounted using corner mounting holes (1)
• Rear mounted using either VESA, 3 hole RAM style, or edge
mounting holes (2, 3)
• Side mounted using variegated bosses (4)
1
2
4
3
Mounting
Details
LX0801PTI
LX1201PTI LX1501PTI
Front
Non-Tapped Holes in Flange Clearance for M4
n/a
4 Holes
6 Holes
Rear
VESA 4 Hole Pattern
Accepts M4 x .07 up to 8mm depth
75mm
100mm
100mm
3 Hole RAM Mount Style
(Addendum G)
Accepts M4 x .07 up to 8mm depth
(0.91 radius, 120°)
n/a
n/a
Edge of Rear Casting
Accepts M4 x .07 up to 8mm depth
n/a
8 Holes
4 Holes
Accepts M8 x 1.25 up to 8mm depth
n/a
Yes
n/a
Side
Variegated Mounting Boss
NOTE: Planar does not supply fasteners.
Removing Bezel:
• If you are flange mounting the monitor, it
will be necessary to remove the decorative
bezel from the enclosure. As shown, insert a
narrow straight blade screw driver between
the bezel and enclosure near one of the
friction points. Pry upwards gently.
LX0801PTI/ LX1201PTI/ LX1501PTI - IP-65 Touch Monitors User’s Guide (020-0982-00A)
11
Step 2 - Connecting the Monitor
Once the monitor is mounted in place, connect it to the computer (or other
video source) and the regulated DC power supply as follows. Planar does not supply
a power supply. The monitor is intended to be powered from the watercraft’s DC
power system. Power to the monitor (and CPU) is hard switched from the line power
that should be protected by a magnetic hydraulic circuit breaker. DO NOT connect
the USB cable at this time!
Note: This procedure refers to connections to and from the computer.
However, depending on your particular hardware configuration, these
connections may be to a dock or other device rather than directly to
the computer.
1. Install IRtouch software on computer.
2. As needed, route any data and power cables from the computer to the
monitor.
3. Make sure the computer is turned off . Connect video cable and USB cable.
4. Connect to the monitor’s power supply.
Note: Use a appropriately sized fuse in line to the power source. Also, to
prevent the watercraft’s battery from draining in standby mode, you
should install a device that shuts off power to the monitor while the
monitor is inactive. (An example is Lind Electronic’s Vehicle Battery
Voltage Shutdown Timer - www.lindeletronic.com).
12VDC system: 4A slow blow fuse
24VDC system: 2A slow blow fuse
5. Turn on power to the computer and monitor. The monitor then turns on as
soon as it receives a video signal from the computer, and its LED turns green.
Also, the first time the monitor is powered up, it automatically displays a test
pattern of repeating colored screens (black, white, red, green, and blue) until a
video signal is detected.
Note: For best results, adjust the display mode of the computer to a resolution
of 800 x 600 (LX0801PTI) or 1024 x 768 (LX1201PTI and LX1501PTI) and a
refresh rate of 60 Hz.
12
LX0801PTI/ LX1201PTI/ LX1501PTI - IP-65 Touch Monitors User’s Guide (020-0982-00A)
Step 3 - IRtouch Software Installation
!
IMPORTANT – Do not plug in the touchscreen yet! Install the driver first.
1. Run IRtouch driver setup
2. Accept user agreement
3. Install in default location
LX0801PTI/ LX1201PTI/ LX1501PTI - IP-65 Touch Monitors User’s Guide (020-0982-00A)
13
4. Click Install
5. Click continue, you can trust Planar and IRtouch
6. Click on Finish
Attach the Planar monitor to the system or install the computer to a
docking station. Attach the USB cable. After the USB cable from the
monitor is attached to the computer it will recognize the touchscreen for
the first time.
14
LX0801PTI/ LX1201PTI/ LX1501PTI - IP-65 Touch Monitors User’s Guide (020-0982-00A)
7. Continue
8. Click Finish
9. Click the IRtouch icon located on your desktop to calibrate the touch
monitor.
10. Click Calibrate
LX0801PTI/ LX1201PTI/ LX1501PTI - IP-65 Touch Monitors User’s Guide (020-0982-00A)
15
11. Set Modes
When used in rugged environments with software written for touchscreens,
you may find it easier to use the ‘click on release’ radio button.
12. Beep
You can set the computer to beep on touch activation if needed.
16
LX0801PTI/ LX1201PTI/ LX1501PTI - IP-65 Touch Monitors User’s Guide (020-0982-00A)
User Controls
Front Panel Controls
3
2
1
CONTROL
FUNCTION
Auxiliary Power Switch
Turns the CPU off and sends signal to host PC through
power cable.
Brightness Adjust Switches
Enables brightness adjustment by depressing
one or the other button. Depressing both buttons
simultaneously enables auto sync of the monitor to
the video source.
Touchscreen
Enables user to control software and computer with a
touch
Note: The Mariner design does not have a power switch that turns off the power to
the monitor. This is because the vast majority of marine installations utilize a
circuit breaker to turn power on/off to electrical devices.
LX0801PTI/ LX1201PTI/ LX1501PTI - IP-65 Touch Monitors User’s Guide (020-0982-00A)
17
Turning the Monitor On and Off
The monitor’s power button can control power to the display and CPU. It is
not designed to electrically isolate the monitor or CPU from the supply. Use
an appropriately sized (4A slow blow 12VDC/2A slow blow 24VDC) magnetic
hydraulic circuit breaker to switch line power on/off.
Note: Be sure to configure the computer’s power options, including how the
computer responds, when the button is pressed. See Windows on-line
help for details. The monitor goes into standby whenever the computer is
put into sleep or into hibernation.
Using the Touchscreen
The touchscreen allows you to operate the computer by touching
the screen with a finger or stylus, rather than using a mouse or keyboard.
Navigating the Touchscreen
• To click an item, tap the item once.
• To double-click an item, tap the item twice rapidly.
• To drag an item, touch the item, and then drag it along the screen to the
new location.
• To move the cursor, touch the screen and move the cursor as needed.
Cleaning the Monitor
Clean the monitor’s touchscreen periodically to keep the display image bright
and sharp, and to keep the touchscreen functions working properly.
• Always turn off the monitor before cleaning.
• Clean the touchscreen with a dry soft cloth. If this does not clean
the screen adequately, preferably use Sparkle or Glass X cleaners.
18
LX0801PTI/ LX1201PTI/ LX1501PTI - IP-65 Touch Monitors User’s Guide (020-0982-00A)
If these optimal cleaners are not available use water or mild glass or window cleaner
(that does not contain ammonia) applied to the cloth and not to the display.
• Clean the monitor housing with a soft cloth moistened with mild
detergent.
• Never apply abrasive cleaners, waxes or solvents to the monitor.
LX0801PTI/ LX1201PTI/ LX1501PTI - IP-65 Touch Monitors User’s Guide (020-0982-00A)
19
Appendix
Troubleshooting the Monitor
If you are experiencing trouble with the monitor, refer to the following. If the
problem persists, please contact your local dealer or our service center.
Problem: No image appears on screen
• Make sure the brightness is not turned all the way down.
• Make sure all data and power cables are properly connected to the
monitor and to the computer and power supply.
• Make sure the pins on the cables and connectors are not crooked or
broken.
• Make sure the computer is functioning properly, and has not entered
power-saving mode. (You may also want to disable the computer’s
power-saving feature.)
Problem: Partial image or incorrectly displayed image
• Make sure the computer’s image resolution is set to one of these
resolutions: 1024 x 768 (XGA) (LX1201PTI only), 800 x 600 (SVGA) or 640
x 480 (VGA).
Problem: Image is scrolling
• Check and make sure the VGA signal cable (or adapter) is securely
connected at both ends.
• Initiate an auto-sync to solve the problem.
Problem: The monitor does not appear to respond to the touchscreen
• Make sure the USB cable to the computer is securely connected at both
ends.
20
LX0801PTI/ LX1201PTI/ LX1501PTI - IP-65 Touch Monitors User’s Guide (020-0982-00A)
Specifications
Parameter
LX1501PTI - 15"
Display Type
Full Color TFT AMLCD
Display Viewing Area
304 (w) x 228 (h) mm
Diagonal Viewing Area
15" (381 mm)
Display Color
262 K (6 bit/color); 16.7 m (8 bit)
Resolution
1024 (H) x 768 (V) pixels XGA
Contrast Ratio
650:1 (typical)
Response Time
25 ms (on/off )
Luminance
1200 Nits (typical)
Horizontal Viewing Angle (CR>5)
80° (right), 80° (left)
Vertical Viewing Angle (CR>5)
80° (down), 70° (up)
Video Input
VGA
Backlight
6 CCFLs
Backlight Adjustment
0-100% dimmable
Backlight Inverter
Pizeoelectric, dims to off
Power Consumption
<45 Watts (total), 4.2W standby typical with USB connected;
3.6W standby typical without USB.
Touch screen
Infrared, 4096 points of resolution
Touch screen Interface
USB
Cover Glass
AG etched, direct bonded
Operating Survival Temp Range
-40° C to + 60° C
Operating Temperature
-20° C to + 60° C
Storage Temperature
-20° C to + 80° C
Shock
30 Gs, Half Sine Wave, 11 ms
Vibration, Endurance
10-500 Hz, 2 Gs rms, 1hr/axis
Vibration, Operating
10-500 Hz, 2 Gs rms, 1hr/axis
Humidity
90% RH @ 40° C, Non-condensing
Emission
EN 55022, EN6100-3-2, -3 (targeted standards at time of printing)
Immunity
IEC 6100-4-2, -3, -4, -5, -6, -8, -11: 1995
(targeted standards at time of printing)
Reverse Polarity Protection
Protected
Regulatory and Safety
FCC Class A, CE, UL/CUL, TUV
Enclosure Including Front Bezel
IP-65 (Waterproof )
Input/Outputs
Power On/Off Button
Dimming/Auto Sync rocker switch
Watertight USB “B” Type
Watertight VGA 15-Pin
Watertight Power Connector (LTW p/n LTWCD-07BFFA-LL7001
is field installable mating connector)
Weight with Plastic Bezel
12.35 lbs (5.62 kg)
LX0801PTI/ LX1201PTI/ LX1501PTI - IP-65 Touch Monitors User’s Guide (020-0982-00A)
21
Parameter
LX1201PTI - 12.1"
Display Type
Full Color TFT AMLCD
Display Viewing Area
246 (w) x 184.5 (h) mm
Diagonal Viewing Area
12.1" (307 mm)
Display Color
262 K (6 bit/color); 16.7 m (8 bit)
Resolution
1024 (H) x 768 (V) pixels XGA
Contrast Ratio
650:1 (typical)
Response Time
25 ms (on/off )
Luminance
>800 Nits (typical)
Horizontal Viewing Angle (CR>5)
65° (right), 65° (left) (CR>1)
Vertical Viewing Angle (CR>5)
80° (down), 70° (up) (CR>1)
Video Input
VGA
Backlight
4 CCFLs
Backlight Adjustment
0-100% dimmable
Backlight Inverter
Pizeoelectric, dims to off
Power Consumption
<30 Watts (total), 4.2W standby typical with USB connected;
3.6W standby typical without USB.
Touch screen
Infrared, 4096 points of resolution
Touch screen Interface
USB
Cover Glass
AG etched, direct bonded
Operating Survival Temp Range
-40° C to + 60° C
Operating Temperature
-20° C to + 60° C
Storage Temperature
-20° C to + 80° C
Shock
18 Gs, SAE J1455
Vibration, Endurance
100-1100 Hz, 4 Gs rms, 1hr/axis
Vibration, Operating
5-150 Hz, 4 Gs rms, 1hr/axis
Humidity
95% RH, Non-condensing
Emission
-
Immunity
-
Reverse Polarity Protection
Protected
Regulatory and Safety
FCC Class A, CE, UL/CUL, TUV
Enclosure Including Front Bezel
IP-65 (Waterproof )
Input/Outputs
Power On/Off Button
Dimming/Auto Sync rocker switch
Watertight USB “B” Type
Watertight VGA 15-Pin
Watertight Power Connector (LTW p/n LTWCD-07BFFA-LL7001
is field installable mating connector)
Weight with Plastic Bezel
8.65 lbs (3.92 kg)
22
LX0801PTI/ LX1201PTI/ LX1501PTI - IP-65 Touch Monitors User’s Guide (020-0982-00A)
Parameter
LX0801PTI - 8.4"
Display Type
Full Color TFT AMLCD
Display Viewing Area
170 (w) x 127 (h) mm
Diagonal Viewing Area
8.4" (213 mm)
Display Color
262 K (6 bit/color); 16.7 m (8 bit)
Resolution
800 (H) x 600 (V) SVGA
Contrast Ratio
650:1 (typical)
Response Time
-
Luminance
700 Nits (typical)
Horizontal Viewing Angle (CR>5)
80° (right), 80° (left)
Vertical Viewing Angle (CR>5)
60° (down), 80° (up)
Video Input
VGA
Backlight
2 CCFLs
Backlight Adjustment
0-100% dimmable
Backlight Inverter
Pizeoelectric, dims to off
Power Consumption
<15 Watts (total), 4.2W standby typical with USB connected;
3.6W standby typical without USB.
Touch screen
Infrared, 4096 points of resolution
Touch screen Interface
USB
Cover Glass
AG etched, direct bonded
Operating Survival Temp Range
-40° C to + 70° C
Operating Temperature
-20° C to + 60° C
Storage Temperature
-20° C to + 85° C
Shock
18 Gs, SAE J1455
Vibration, Endurance
100-1100 Hz, 4 Gs rms, 1hr/axis
Vibration, Operating
5-150 Hz, 4 Gs rms, 1hr/axis
Humidity
95% RH, Non-condensing
Emission
-
Immunity
-
Reverse Polarity Protection
Protected
Regulatory and Safety
FCC Class A, CE, UL/CUL, TUV
Enclosure Including Front Bezel
IP-65 (Waterproof )
Input/Outputs
Power On/Off Button
Dimming/Auto Sync rocker switch
Watertight USB “B” Type
Watertight VGA 15-Pin
Watertight Power Connector (LTW p/n LTWCD-07BFFA-LL7001
is field installable mating connector)
Weight with Plastic Bezel
4.8 lbs (2.2 kg)
LX0801PTI/ LX1201PTI/ LX1501PTI - IP-65 Touch Monitors User’s Guide (020-0982-00A)
23
Addendum A
An interconnection to the host PC with USB can be exploited by the customer to
create an OSD. Planar has utilized a powerful Pixelworks video IC to enable this
functionality should customers desire increased control functions. Planar does
not provide the programming to do this. Please consult with Planar’s application
engineering team if you have questions about the scale of this undertaking.
Contact [email protected].
Addendum B
Monitor is not provided with a power supply brick. The AC/DC power supply is
not required in DC powered vehicle applications. The power brick is available as
an optional accessory should one be required in AC powered applications.
Power source:
DC power or optional
universal input (110240VAC) AC/DC supply.
Pins 4 and 5 are the switch connections. These are connected to our front bezel
button so when the button is depressed these signals will be shorted together for
as long as you hold the button. When you release the button the connection will
be open.
24
LX0801PTI/ LX1201PTI/ LX1501PTI - IP-65 Touch Monitors User’s Guide (020-0982-00A)
Addendum C
Note, this manual has been published prior to the release of LX0801PTI, please
consult factory for additional information.
Addendum D
325
247 (TOUCH SCREEN OPENING)
262
BRIGHNESS
CONTROL
186
(TOUCH
SCREEN
OPENING)
35
61
75
REMOTE CPU POWER SWITCH
(NOT DISPLAY POWER)
142
25
8X M4x0.7
MOUNTING HOLES
7MM MIN THREAD
DEPTH
275.0
112
4X M4x0.7
MOUNTING HOLES
7MM MIN THREAD
DEPTH
100.0
2X M8.0x1.25
10MM MIN THREAD
DEPTH
210.0
FEATURE ALLOWS
FOR TILTING AND
LOCK DOWN
MOUNTING. SEE
CAD DATA.
100.0
135.0
75.0
A
81
26
67
TOUCH SCREEN
CONNECTOR
USB TYPE B
LTWUB-20PMFP-SC8002
POSSIBLE MATING CABLES
LTWUB-20BFM-A7A02 (2m LONG)
LTWUB-20BFM-A7A05 (5m LONG)
VGA CONNECTOR
LTWHDB-15PFFP-SA8001
POSSIBLE MATING CABLES
LTWHDB-15AMMM-SL7A02 (2m LONG)
LTWHDB-15AMMM-SL7A05 (5m LONG)
FIELD INSTALLABLE CONNECTOR
LTWHDB-15BMMA-SL7001
LOCKING POWER
INPUT CONNECTOR
LTWCD-07PMMS-LC7001
POSSIBLE MATING CABLE
LTWCD-07AFFM-LL7A02 (2m LONG)
FIELD INSTALLABLE CONNECTOR
LTWCD-07BFFA-LL7001
LX0801PTI/ LX1201PTI/ LX1501PTI - IP-65 Touch Monitors User’s Guide (020-0982-00A)
25
Addendum E
392
307 (TOUCH SCREEN OPENING)
317
BRIGHNESS
CONTROL
231
(TOUCH
SCREEN
OPENING)
64
90
104
REMOTE CPU POWER SWITCH
(NOT DISPLAY POWER)
171
28
4X M4X0.7
MOUNTING HOLES
5MM MIN THREAD
DEPTH
336.0
146
4X M4X0.7
MOUNTING HOLES
5.5MM MIN THREAD
DEPTH
100.0
100.0
260
A
128
28
75
TOUCH SCREEN
CONNECTOR
USB TYPE B
LTWUB-20PMFP-SC8002
POSSIBLE MATING CABLES
LTWUB-20BFM-A7A02 (2m LONG)
LTWUB-20BFM-A7A05 (5m LONG)
26
VGA CONNECTOR
LTWHDB-15PFFP-SA8001
POSSIBLE MATING CABLES
LTWHDB-15AMMM-SL7A02 (2m LONG)
LTWHDB-15AMMM-SL7A05 (5m LONG)
FIELD INSTALLABLE CONNECTOR
LTWHDB-15BMMA-SL7001
LOCKING POWER
INPUT CONNECTOR
LTWCD-07PMMS-LC7001
POSSIBLE MATING CABLES
LTWCD-07AFFM-LL7A02 (2m LONG)
FIELD INSTALLABLE CONNECTOR
LTWCD-07BFFA-LL7001
LX0801PTI/ LX1201PTI/ LX1501PTI - IP-65 Touch Monitors User’s Guide (020-0982-00A)
Addendum F
CPU Power Switch Scheme
Direct 8-30 VDC Power Scheme
Pin
Wire Color
Definition
1
Blue
8-30 VDC to Invertor
3
Yellow
8-30 VDC to Invertor
6
Green
8-30 VDC to Video Board
2
Orange
Ground to Invertor
7
White
Ground to Video Board
LX0801PTI/ LX1201PTI/ LX1501PTI - IP-65 Touch Monitors User’s Guide (020-0982-00A)
27
Addendum G
RAM Mount for LX0801 PTI
7.35 REF.
0.22
0.91 RAD. 120 DEGREES 3 PLACES
1.50
2.49
1.19
2.44 REF.
28
LX0801PTI/ LX1201PTI/ LX1501PTI - IP-65 Touch Monitors User’s Guide (020-0982-00A)
Addendum H
Frequently Asked Questions
Q1: I want to be able to turn power off to the monitor on/off with a switch. I do
not want the monitor to be in stand-by power mode because it draws power; and,
I don’t want to use a Vehicle Battery Voltage Shutdown Timer mentioned on page
12 of this manual. Can I tie the inverter power and video power together in my wire
harness to switch the power?
A1: Yes, Pins 1, 3 and 6 can be tied together. Pins 2 and 7 can be tied together.
Q2: In Addendum F, does pin 3 have to be connected to pin 1?
A2: No pin 3 was reserved to provide more current capacity for future display family
growth in either size or brightness.
LX0801PTI/ LX1201PTI/ LX1501PTI - IP-65 Touch Monitors User’s Guide (020-0982-00A)
29
Support and Service
Planar is a US company based in Beaverton, Oregon and Espoo, Finland, with a
world-wide sales distribution network. Full application engineering support and
service are available to make the integration of Planar displays as simple and quick
as possible for our customers.
RMA Procedure: For a Returned Material Authorization number, please contact Planar
Systems, Inc. with the model number(s) and serial number(s). When returning goods
for repair, please include a brief description of the problem, and mark the outside of
the shipping container with the RMA number.
Planar Systems, Inc.
Customer Service
24x7 Online Technical Support: http://www.planar.com/support
Email: [email protected]
Americas Support
1195 NW Compton Drive
Beaverton, OR 97006-1992
Tel: 1-866-PLANAR-1 (752-6271) (US only)
1-503-748-5799 (outside the US)
Hours: M-F, 8am - 8pm Eastern Time | 5am - 5pm Pacific Time
Europe and Asia-Pacific Support
Olarinluoma 9 PO Box 46
FIN-02201 Espoo, Finland
Tel: +358-9-420-01
Hours: M-F, 7am - 4pm CET
© 2009 Planar Systems, Inc. 2/09 Planar is a registered trademark of Planar Systems, Inc.
Other brands and names are the property of their respective owners.
Technical information in this document is subject to change without notice.
Document No. 020-0982-00A
30
LX0801PTI/ LX1201PTI/ LX1501PTI - IP-65 Touch Monitors User’s Guide (020-0982-00A)