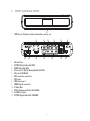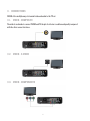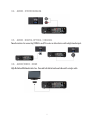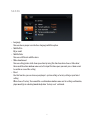
1
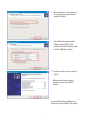
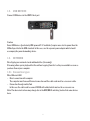
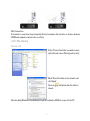
User Manual
PRECAUTIONS
We strongly recommend reading the points below before operating this product.
≥≥ Back up the data periodically to another safe media. Under no circumstances there is any liability
regarding to data damage or loss in a HDD.
≥≥ Do not place the player near devices that emit strong magnetic fields. It may cause data damage
or loss on the HDD.
≥≥ Do not disassemble or remodel the device. It may cause damage and/or data loss to the player.
≥≥ Do not power off the device while a file is playing.
≥≥ Do not let the player drop or shock: the HDD may suffer unrecoverable data loss or even render it
unusable.
≥≥ Do not use the device under heavy moisture or wet conditions. If any liquid gets in contact with
P4350 unplug the power right away.
≥≥ Do not touch P4350 with wet hands. It may cause electric shock.
≥≥ The power outlet shall be installed near the equipment and shall be easily accessible.
≥≥ In hot environments take care of the temperature reached by P4350 because it can overheat if
used for long time. The device may stop to preserve integrity in such conditions but if you force
P4350 to continue working it may cause damage and/or data loss to the unit.
1.
2.
3.
4.
5.
6.
7.
8.
Media................................................................................................................................................................ 4
1.1. Internal hard disk................................................................................................................................... 4
1.1.1. Drive Installation
4
1.1.2. Connection with computer
5
1.1.3. Device detection
5
Windows 98SE
5
Windows Me/2000/XP/Vista, Mac OS X, Linux
5
1.1.4. Partitioning and Formatting Hard Disk Drive
6
Windows 2000/XP
6
Windows Vista
9
1.2. USB Devices..........................................................................................................................................12
1.3. Network.................................................................................................................................................12
1.3.1. Connection types
12
1.3.2. File sharing
13
Windows XP
13
Windows Vista
14
Front and back views......................................................................................................................................15
Connections....................................................................................................................................................16
3.1. Video - Composite.................................................................................................................................16
3.2. Video - S-Video......................................................................................................................................16
3.3. Video - Components..............................................................................................................................16
3.4. Audio - Stereo analog...........................................................................................................................17
3.5. Audio - Digital optical / coaxial............................................................................................................17
3.6. Audio/Video - HDMI..............................................................................................................................17
Remote Control...............................................................................................................................................18
Main Menu......................................................................................................................................................19
5.1. Hard disk...............................................................................................................................................19
5.2. Network.................................................................................................................................................19
5.3. USB Disk................................................................................................................................................19
5.4. Setup.....................................................................................................................................................19
5.4.1. A/V (Audio/video Settings)
20
5.4.2.Etc
21
5.4.3.Network
22
5.4.4.Exit
22
Firmware upgrade..........................................................................................................................................22
Troubleshooting.............................................................................................................................................23
Specifications................................................................................................................................................. 24
1. MEDIA
1.1. INTERNAL HARD DISK
Follow step-by-step the points below for a successful setup. Notice that some steps may vary
depending on the operating system.
1.1.1. Drive Installation
Unplug P4350 from mains supply before starting the hard disk installation.
1. Press the lateral buttons at the same time
to slide out the hard disk tray.
2. Fit the hard disk inside the bracket in the
right position.
3. Turn the two latches to secure the hard
disk in place.
4. Connect the SATA cables and slide in
carefully the hard disk tray to the original
position. Make sure that the lateral
buttons are properly adjusted.
4
1.1.2. Connection with computer
P4350 can cummunicate at USB1.1 (12Mbps) or USB2.0 (480Mbps) speed with the computer. It is
recommended to use USB2.0 which allows faster transfer rates. If your computer has a mix of USB1.1
and USB2.0 ports read the corresponding manual to be able to select the appropriate port.
1.1.3. Device detection
Windows 98SE
In Windows 98SE, install the device driver included in the CD-ROM.
You can also download the driver at www.energysistem.com.
1. Run setup.exe file before connecting P4350.
2. Reboot after finishing installation.
3. Connect P4350 to the computer. An ‘Add New Hardware’ procedure will start; follow the
suggested steps.
4. Check that the hard disk drive inside the player is listed on the ‘Device Manager’ tab.
Windows Me/2000/XP/Vista, Mac OS X, Linux
This operating systems have built-in support for external USB hard disks so you don’t need to install
any driver.
To prevent file system corruption remember to follow the correct steps when disconnecting P4350
from the computer:
≥≥ Windows: Use the ‘Safely remove hardware’ procedure.
≥≥ Mac OS: Discard the corresponding Desktop icon into Trash Bin before disconnecting P4350 from
USB port.
5
1.1.4. Partitioning and Formatting Hard Disk Drive
Windows 2000/XP
Note: There are slight changes in this procedure depending on the operating system version.
1. Select [Start>Control
Panel>Management Tools>Computer
Management] and then [Disk Management] under [Storage] section.
2. In the list of connected disks locate the
one that corresponds to P4350.
3. Activate the disk using MBR partition
table (GUID partition table is not supported) if it is not already activated..
To create a FAT32 partition:
4. Create a new partition by right-clicking
an unallocated space in the disk and
select [New partition] from the menu
that appears.
6
5. ‘New Partition Wizard’ will show. Click
[Next] to continue.
6. Select [Primary Partition] and click
[Next] to continue.
7. Enter the desired partition size and click
[Next] to continue.
7
8. Assign a drive letter to the partition (you
can accept the letter suggested by the
wizard), click [Next].
9. Select [Format this partition with the
following settings]; FAT32 as [File
system] and then check [Perform a quick
format]. Click [Next] to continue.
10. Check the settings are correct and click
[Finish].
Windows will perform the requested
operations to create the new FAT32
partition.
To create a NTFS partition, follow the steps
4-10 but at step 9 select NTFS as [File system].
8
Windows Vista
1. Right click on the ‘Computer’ icon in
your desktop and select ’Manage’.
2. At the ‘Computer Management’ window
select ‘Storage > Disk Management’.
3. Select the hard disk that refers to
P4350 on the right side panel.
4. If necessary, activate the hard disk
right-clicking on ‘Disk n *’.
9
5. Right click the hard disk bar and select
‘New Simple Volume’.
6. The ‘New Simple Volume Wizard’ will
start. Click ‘Next’ to continue.
7. Specify the desired partition size.
8. Assign a drive letter to the partition
(you can accept the letter suggested by
the wizard). Click ‘Next’ to continue.
10
9. In this step leave all the default values
unchanged and click ‘Next’ to continue.
10. Click ‘Finish’ to start the actual
formatting.
11. When the formatting is over the text
‘Healthy (Primary Partition)’ will be
shown confirming that the disk is
ready to use.
11
1.2. USB DEVICES
Connect USB devices to the USB2.0 host port.
Caution
Some USB devices (particularly USB-powered 2.5” hard disks) require more electric power than the
500mA specified in the USB standard. In this case, use the separate power adapter which should
accompany the power-demanding device.
1.3. NETWORK
Directly play your network-stored multimedia files (streaming).
Streaming allows you to playback the files without copying them first so they are available as soon as
you have them at your computer.
1.3.1. Connection types
Wired Ethernet LAN
≥≥ Direct connection with computer
The computer must have an Ethernet connection and the cable used must be a crossover cable.
≥≥ Connection through switch/hub
In this case the cable used to connect P4350 with a hub/switch must not be a crossover one.
Note: The above instructions may change due to the MDI/MDI-X switching feature that some devices
have.
12
Wi-Fi Connection
If the wireless connection drops frequently then try to minimize the obstacles or distance between
P4350 and computer or wireless Access Point.
1.3.2.File sharing
Windows XP
At the PC select the folder you want to share,
right click and choose ‘Sharing and security’.
Mark ‘Share this folder on the network’ and
click ‘Apply’
The icon
shared.
will inform that the folder is
Note: disabling Windows Firewall may be required to allow the P4350 to connect to the PC.
13
Windows Vista
Click on ‘Start’ > ‘Control Panel’
Click on ‘Network and Internet’ > ‘Network and Sharing Center’
Configure the following options in ‘Sharing and Discovery’.
Network discovery: Enabled
File sharing: Enabled
Public folder sharing: Enabled (read only)
Password protected sharing: Disabled
Once configured, place the files you want to play in the public folder so P4350 can have access to
them.
14
2. FRONT AND BACK VIEWS
1
1. LCD Screen. Displays status information, menus, etc.
7
8
1
2
9
10
3
4
11
1. Exhaust Fan.
2. S/PDIF Digital Audio Out RCA.
3. CVBS Video Out RCA.
4. Stereo (Left / Right) Analog Audio Out RCA.
5. Ethernet LAN RJ45.
6. Wi-Fi antenna connector.
7. DC Power.
8. USB device port.
9. HDMI Type A connector.
10. S-Video Out.
11. YPbPr Component Video Out 3xRCA.
12. 2x USB host port.
13. S/PDIF Digital Audio Out TOSLINK.
15
5
12
6
13
3. CONNECTIONS
P4350 offers multiple ways to transmit video and audio to the TV set.
3.1. VIDEO - COMPOSITE
The widest used mode to connect P4350 and TV despite its inferior resolution and quality compared
with the other connection types.
3.2. VIDEO - S-VIDEO
3.3. VIDEO - COMPONENTS
16
3.4. AUDIO - STEREO ANALOG
3.5. AUDIO - DIGITAL OPTICAL / COAXIAL
Two alternatives for connecting P4350 to an A/V receiver or other devices with a digital audio input.
3.6. AUDIO/VIDEO - HDMI
High-Definition Multimedia Interface. Transmit both digital audio and video with a single cable.
17
4. REMOTE CONTROL
1.
2.
3.
4.
1
2 3
17
18 19
4
5
20
6
21
7
22
8 9
23
10
24
11 12
25 26
13 14
27 28
15 16
29 30
Power. Power On/Off.
HDD. Hard disk contents access.
PC. Browse the network-stored multimedia files.
Number keys. Enter numbers and characters for various menu
items and options.
5. Mute. Mute sound on/off.
6. Play/Pause. Start of pause the playback.
7. OK. Select a menu or confirm an option.
8. Volume. Adjusts volumen.
9. Home. Main menu.
10. Search. Fast forward/backward at selectable speed.
11. Subtitle. Select between available subtitles.
12. Audio. Select between available audio tracks.
13. Zoom. Zoom in or out the image.
14. Repeat. Change among repeat options.
15. Bookmark. Save a bookmark to resume playing at that point
later. To resume press this button while browsing the folder
where the file is stored.
16. Language. Change the OSD language.
17. Setup. Access Setup menu.
18. USB. Browse the contents of the USB-connected external
devices.
19. Function. Change between uppercase, lowercase and other
characters.
20. Goto. Jump to a desired time position during the playback.
21. Stop/Back. Stop the current playback or go back one step.
22. Arrow buttons. Navigation and option selection within menus.
23. Sync. Synchronize the video and subtitles.
24. Skip. Next/Previous file or page.
25. Menu. While playing DVD go to main manu.
26. Title. While playing DVD go to main title.
27. Angle. While playing DVD change the camera angle (if available)
28. Info. Display file information.
29. Picture. Adjust brightness, contrast and color. Change each
option by using left and right arrow buttons.
30. TV out. Change between the different video output modes.
18
5. MAIN MENU
5.1. HARD DISK
Press OK button in the remote control to access the internal hard disk contents. After selecting the
desired partition you can browse and play your files.
5.2. NETWORK
This option allows you to search and play your multimedia files through your network. The player will
show you a list of the shared computers available in the network. Press OK in the remote control to
confirm your selection and browse the shared files and folders.
5.3. USB DISK
Press OK button to access the devices connected through the USB host ports to play multimedia files
from pen drives, hard disks, etc.
5.4. SETUP
To enter Setup menu select ‘Setup’ at the Main menu and press ‘Ok’ or press ‘Setup’ on remote.
19
5.4.1.A/V (Audio/video Settings)
≥≥ TV Standard
Your can choose PAL or NTSC TV output systems when choosing this items.
≥≥ A/V Output
You can choose proper TV output among HDMI, C/S Video, HD YPbPr
When change one TV output, there would be a window for changing confirmation comes out,
choose ‘Yes’ to continue output changing, choose ‘No’ to cancel output changing.
Remark: Once you choose one TV output, change your TV setting accordingly, for example, you
choose HDMI as TV output, then you also need choose ‘HDMI’ output accordingly.
≥≥ HDMI
Choose between the following resolutions: 576p(480p), 720p, 1080i, 1080p.
≥≥ HD YPbPr
Choose between the following resolutions: 576p(480p), 720p, 1080i.
≥≥ Display
You can choose among following options to find your desired TV display.
4:3 Letterbox: This aspect ratio displays the content based on its horizontal length. Black horizontal bars are placed at the top and bottom of the screen to be displayed in a wide mode.
4:3 Pan-scan: This aspect ratio displays the content based on its vertical length. It fills up the
screen, but some portion of the left and right side of the image are lost.
16:9: image output in the aspect ratio of 16:9
≥≥ Audio Out
Use this option you can set your Audio output by choosing: ‘Analog’(Analog 2 channel audio
output) or ‘Digital’ (Digital audio signals through the optical or coaxial output terminal)
20
5.4.2.Etc
≥≥ Language
You can choose proper user interface language with this option.
≥≥ Subtitle Size
Big or small.
≥≥ Subtitle Color
You can set different subtitle colors.
≥≥ Slide show timeout
You can setting picture slide show space time by using this function, when choose ‘slide show’,
there would be a time window comes out, after input the time space you want, press ‘down arrow’
to confirm or cancel the setting.
≥≥ Reset
Use this function, you can choose your player’s system setting as factory setting or your latest
setting.
When choose ‘Factory’, there would be a confirmation window comes out for setting confirmation,
player would go to rebooting immediately when ‘factory reset’ confirmed.
21
5.4.3.Network
If you choose ‘Wired’ make sure that P4350 is properly connected to an Ethernet LAN.
If you choose ‘Wireless’ make sure that a Wi-Fi network is available.
≥≥ Wired
You can configure the parameters manually or automatically.
Auto: the IP configuration is automatically provided by a DHCP server.
Manual: the IP configuration must be provided by user.
≥≥ Wi-Fi
Select an Access Point from the available networks list and press Ok to confirm.
If the Wi-Fi connection is encrypted then enter the password using the remote control. Use
‘Function’ button to change between numbers, uppercase and lowercase.
You can configure the IP parameters manually or automatically.
5.4.4.Exit
Select this option to go back to main menu.
6. FIRMWARE UPGRADE
P4350 can be upgraded to allow system improvements in the future.
Download the latest firmware version from http://www.energysistem.com.
Copy the file to a USB storage device or to the P4350 internal hard disk.
Use the file browser to select the firmware file and press ‘Ok’. Confirm that you want to upgrade and
don’t power off P4350 until the process finishes. When completed the unit will automatically reboot.
WARNING: Do not switch off the device while the firmware upgrading is taking place, in this case the
P4350 will become unusable and the official warranty will be cancelled.
22
7. TROUBLESHOOTING
Problem
What to do
When the unit is on, nothing appears on the
screen or the screen is shaking.
When the video output mode is not properly
set, nothing may appear on the screen, the
screen may be in monochrome, or the screen
may be shaking.
Press “TV OUT” button of the remote controller slowly and change the output mode until
the video output mode is properly set.
The PLAYER is PAL or NTSC mode, please
check the TV Output (NTSC/PAL)
While playing a movie file, its subtitle is not
shown.
If the name of a movie file does not match to
the name of a subtitle file, no subtitle can be
shown.
In the case of multiple subtitles, if there is no
first subtitle, subtitle cannot be shown.
In this case, using the [SUBTITLE] button,
select the second subtitle file.
While playing a movie, there is no audio output. In the SETUP menu, check if the audio output
mode is properly set.
Check the volume level.
Check if the [MUTE] function is activated.
Playback of network-stored files does not
work.
Check if shared computer’s firewall is disabled
or configured to allow player access.
Check that the network cable is properly
connected.
Check that the folders containing the multimedia files you want to play are correctly shared.
23
8. SPECIFICATIONS
Supported
formats
Video
MKV (H.264, VC-1)
IFO, VOB, ISO, DAT, MPG, TS, MP4 (MPEG1/2/4)
AVI (DivX, Xvid)
ASF, WMV
Audio
AAC, M4A, MP3, WMA, WAV, PCM, OGG, AC3, FLAC
Pictures
JPEG, BMP, GIF, PNG
Subtitles
SMI, SUB, SRT
Audio outputs
HDMI, stereo analog (RCA) and digital S/PDIF (coaxial and optical)
Video outputs
HDMI (up to 1080p), Components YPbPr (up to 1080i),
S-Video, Composite (RCA)
Connections
2 USB2.0 host ports
1 USB2.0 device port
Ethernet LAN (10/100 Mbps)
WLAN 802.11g
Hard disk
SATAII. FAT32 / NTFS. Up to 1 TB capacity.
Power
12V 3.5A
Supported operating
systems
Windows98SE/ME/2000/XP/Vista,
MacOS 9.x/X, Linux 2.4 or later
Note: due to the great number of container format/audio and video encoding available possibilities it’s
impossible to ensure the support for all of them. In case that a file is not playable you can transcode it
into a supported format.
24
WARRANTY
Energy Sistem Soyntec S.A. warrants its products to be free from defects in materials and workmanship at the time of purchase.
The warranty period is 36 months from the date of purchase.
WARRANTY PROCEDURE
≥≥ Visit the Support section at http://support.energysistem.com and select your product to view the
FAQ (Frequently Asked Questions). The solution to your problem is very likely to have been already
published there. You will also be able to download user manuals, user guides, drivers and updates.
≥≥ If you cannot find an appropriate solution in the Support section, you may send us your enquiry or
warranty service request by email: [email protected]
≥≥ Alternatively, you may prefer to contact the distributor from which you purchased the product,
presenting the purchase receipt or invoice.
Specifications are subject to change without notice.
© 2009 by Energy Sistem®. All rights reserved.
TRADEMARKS.
All company, brand and product names are trademarks or registered trademarks of their respective
companies.
DECLARATION OF CONFORMITY
Manufacturer Name: Energy Sistem Soyntec S. A.
Address: Pol. Ind. Finestrat – c/ Calpe, 1 – 03509 Finestrat Alicante
Tel: 902 388 388
Fax: 902 119 034
NIF: A53107488
We declare under our own exclusive responsibility that the product:
Energy Sistem® Multimedia Player Energy™ P4350
Is in compliance with the essential directives, norms and standards of the European Union 89/336/
EEC (EMC Directive).
Manufacturing country: China
25