1
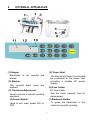
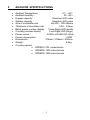
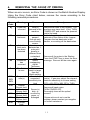
C500 Series CURRENCY COUNTER USERS GUIDE (Version 1.0 Edition– Initial Issue: April 2006) 1 FORWARD This Users Guide has been compiled to provide complete instructions for operating the machine. Before starting, please read this document thoroughly to familiarise yourself with all the functions and operations of the unit. Thank you. CONTENTS - COVER PAGE 1 - FORWARD / CONTENTS (This Page) 2 1 SAFETY INSTRUCTIONS 3 2 EXTERNAL APPEARANCE 4 3 MACHINE SPECIFICATIONS 6 4 MACHINE OPERATION 7 5 CLEANING AND MAINTENANCE 11 6 REMOVING THE CAUSE OF ERRORS 12 7 ACCESSORIES SUPPLIED 13 2 1. SAFETY INSTRUCTIONS WARNING! This Currency Counter will start counting automatically under certain circumstances. Consequently, for your safety, it is very important that you always follow these simple precautions:- The machine apply optical sensors. Please keep the instrument out of direct sunlight and away from any equipment that generates magnetic fields; Do not wear loose clothing or jewellery whilst operating the Currency Counter; Do make sure that your hair does not touch the Currency Counter; Do not touch the counted currency in the Stacker area until after the machine stops processing; Turn OFF external mains power before performing maintenance or undertaking error corrections that require you to put your hand(s) within the machine; Do not operate the Currency Counter if you, or it, are damp. Operating the Currency Counter under wet or damp conditions can lead to an electrical shock hazard that might result in serious injury, or death; Use only the same type and rating when replacing a Fuse. Using an incorrect Fuse can result in a potential fire hazard if a higher rating fuse is used; Ensure that both the machine and the domestic mains supply system are of the same voltage. An incorrect supply voltage could lead to a potential fire hazard being created. 3 2. EXTERNAL APPEARANCE (1) Hopper (5) Power Inlet Banknotes to be counted are placed. The Electrical Power Cord should be connected to the power inlet providing a reliable AC power supply. (2) Stacker The counted bank notes are stacked. (6) Fuse holder AC fuse inside. (3) Thickness Adjustment Use the same capacity fuse for replacement. Used to ensure a smooth counting operation. (7) Banknote Guider (4) Power Switch To guide the banknotes in the centre for smooth counting. Used to turn main power ON, or OFF. 4 (8) Display - ADD key By this key the ADD function is selected, or cleared. LEDs display. (9) Keyboard A set of numerical and multi function keys. Used to preset batch sizes (up to 3 digits) and the detection function. - Code key Use to select the multi function key or the number key. When Code key is ON, the multi function key is selected. And the number key is available when the code key is OFF. (10) Density Indicator Three steps of the density sense. (Refer to page 6 for more information). (11) Count Display - Speed key Use to set the counting speed. Used to display the counting results (up to 4 digits). (12) Preset display Used to display the preset batch number and/or the Error messages (up to 3 digits). (13) Key descriptions - UV key (Option) When “Code” key is ON, the key “1” is used to set the UV function ON, or OFF and select the UV detection sensitivity. - C Key Use to CLEAR the batch number and counting number display. - MG Key (Option) When “code” key is ON, the key “4” is used to set the Magnetic response sensitivity. - DEN key By this Key, the reference level for two sheet (Double Note) detection can be changed according to the degree of density of the notes to be counted (refer to page 6 for more information) - DD Key (Option) When “code” key is ON, the key “7” is use to set the Size detection function. 5 3. MACHINE SPECIFICATIONS Ambient Temperature: 0℃~40℃ Ambient Humidity : 30~80% Maximum 200 notes Hopper capacity : Stacker capacity : Maximum 200 notes Size of countable note: 50x100~100x185mm Thickness of countable note: 0.06~0.2mm Batch preset number display : Three Digits LED (small) Counting number display: Four Digits LED (large) AC96V~AC240V,50~60Hz Power source : Power consumption : ≤50W Dimensions : 276mm×238mm×250mm 4.8kg Weight : Counting speed: SPEED1=700 notes/minute SPEED2=1200 notes/minute SPEED3=1600 notes/minute 6 4. MACHINE OPERATION BEFORE TURN ON THE MACHINE, PLEASE MAKE SURE THE POWER CORD IS GOOD CONNECTION AND PROPER GROUNDING! Turn the Power Switch ON. Ensure the Hopper is empty. Turn the Power Switch ON, the Currency Counter will automatically start running for about 1 Second, (providing no banknote is in the Hopper), upon finishing machine self-diagnostic tests, the machine will show ‘0’ in the 4-digit display area and ‘100’ in the 3-digit display – These show that the machine is ready to begin counting. If an Error does occur, the machine will display the relative Error Message, (see page 11 for details), although this is most often caused by a blocked optical sensor. Principle causes for this blockage are by a piece of paper, or dust accumulation. Please refer to the Cleaning and Maintenance section, page 10, to follow the actions required. Whenever completed cleaning, please restart the machine again. Check the two note Density (Double Detection) level and select an optimum setting. Three Density (Double Detection) levels are available with this machine, all of which are manually selected. Be sure to select an appropriate density level to ensure the machine work normally. The density level settings that you selected will be memorized, in the unit, and will be restored as the last settings when power is restarted Change the Density level by pressing the DEN Level Key as follows in case the error message "Ed" is displayed frequently. ----- For notes that are stained or printed dark, set the level indicator to illuminate in the darker position. For notes that are new, or lightly printed, set the indicator to illuminate in the lighter position. MISCOUNTING IS POTENTIALLY POSSIBLE IF YOU DO NOT HAVE THE CORRECT DENSITY SETTING LEVEL SELECTED. 7 Select the Count Mode. This model machine can work in two ways – In ‘Free Count’ mode and ‘Batch Count’ mode. The Count mode can be selected by setting the batch number. - Free Count Mode. In this mode, the machine counts all notes in the Hopper without stopping. This count mode will be set in case the 'blank' is selected on the Batch Number Display by pressing the “C” Key. - Batch Count Mode. In this mode, the machine counts out a batch of notes that you have preset. This Count mode will be set by selecting a desired number on the Batch Number Display. Before beginning the count, turn off the “code” key and used the number Key Pad to set the desired number, and then begin counting normally. Notes: The next count session will be started automatically when you remove the counted batch of notes from the Stacker. If the counting stops in the case when the preset number has not been reached, whilst all the notes have been counted, just refill the Hopper. The machine will continue counting automatically. ADDition counting function. Under the ADDition function, the accumulative total is shown on the Counting Number Display. Press the ADD Key to select this function with the ADDition indicator lit. To clear this function, press the ADD Key once again. This clears the ADD indicator. Setting the Thickness Adjustment Screw. The Thickness adjustment Screw is set at the default position by the factory. However, it must be slowly and carefully adjusted in the following manner. Large movements should not be necessary:- 8 If the Ec (Chain) or the Ed (Double) Error message occurs frequently, slowly and carefully turn the Thickness Adjustment Screw in a counter-clockwise direction (loosen). If the feeding operation does not go smoothly, slowly and carefully turn the Thickness Adjustment Screw clockwise (tighten). Counterfeit Detection Functions (Optional). Throughout these optional detection functions, the machine will stop when a counterfeit note is detected. Ultraviolet (UV) Detection Function (Optional). A counterfeit note that generates extra fluorescence, when under the UV light source, can be detected if this function is selected. The machine will stop with the Error message CF1 shown on the Batch Number Display under this condition. The UV Detection Function can be selected by press the UV Key when the “code” key is ON. the sensitivity of the UV function can be selected at the same time. Notes: Three different UV sensitivities can be selected on this model, U-3 is the highest and U-1 is the lowest sensitivity. Sequentially pressing the UV key will select the sensitivity. The machine will stop whenever a suspected counterfeit note is detected, take the suspect note out from the Stacker for detailed checking. Press the START key to clear the Error message and recount all of the notes once again. MG Detection Function (Optional). Through the MG function, the unit can detect suspected counterfeit notes that are lacking the magnetic ink, or metallic thread properties. When a suspected counterfeit is detected, the machine will stop with the Error Message CF2 displayed. The MG Detection function is enabled by pressing the MG key when the “code” key is ON, and a small indicator will also illuminate. To disable the 9 MG Detection, press the MG key once again, the light will also extinguish. Note: When the machine stops whenever a suspected counterfeit note is detected, take the suspect note out from the Stacker for detailed checking. Press the START key to clear the Error message and recount all of the notes once again. Thread (THD) Detection Function – Euro Currency Only (Optional). The machine can detect suspected counterfeit notes that do not have the correct security thread features. When a suspected bank note is detected, the machine will stop and display the CF3 Error message. The Thread detection function is selected by pressing the THD key when the “code” key is ON. To disable the Thread Detection feature, press the THD key once again, the indicator extinguishes. Start Counting. For trouble-free counting, perform these simple sequential steps before use: Select the appropriate machine settings for the notes that to be counted; Remove and retain, if required, all clips, rubber bands, paper bands and tags from the notes; Fan the bundle of bank notes to loosen them - This is especially important with new motes; Feed the notes correctly, in accordance with the bank note Drop Operation illustration placed on the top of the unit. Please ensure you put smaller sized notes at the centre of the Hopper. 10 5. CLEANING AND MAINTENANCE Many of the sensors that applied on this machine are optical devices. These are used to detect the presence of notes in the Hopper, notes in the Stacker, or are used in the bank note counting process. Consequently, paper particles, dust, dirt, etc., may cause miscounting or, in a serious condition, failure of the start-up internal self-testing procedures. Notes: NEVER attempt cleaning the machine when machine is power on. Always totally disconnect the unit from the mains supply. Do NOT use chemicals for cleaning the machine. To keep the machine in good condition, it is necessary to clean all Ideally, cleaning is the sensors with a clean, dry brush. recommended at the end of each working day. The Top Cover of the unit, carrying the bank note drop/loading illustration, can be removed for access/cleaning. Only ever attempt this with electrical power removed from the machine. No parts of this unit are maintainable by the user. The use of any oils, or greases, on any of the feed mechanism rubber component parts, could seriously effect the operation of the unit and must be avoided at all costs. 11 6. REMOVING THE CAUSE OF ERRORS When an error occurs, an Error Code is shown on the Batch Number Display. Using the Error Code chart below, remove the cause according to the following remedial procedures. Error Code Ej Meaning Cause Remedy A jam has occurred Note(s) jammed in the machine EH Half –size banknote Ed A double bank note has been detected banknote passed through only one counting sensor 2 notes are detected as 1; note print density is different from a standard note Notes overlapping: Adjust Thickness The count result is larger than the Batch setting Counterfeit suspected; sensitivity too high Remove the notes in the Hopper. The machine may clear itself. If not, TURN POWER OFF and remove the jammed note(s) by hand. Make sure guiding the small size banknote in the centre of the hopper. Compare the last banknote in the stacker, re-counting all the banknotes. Ec Chainnote has occurred Eo The Batch is over CF1 CF2 CF3 Suspected note(s) E10 Hopper Sensor fault Stacker Sensor fault Left Count Sensor fault Right Count Sensor fault Encoder fault E11 E20 E21 E30 Sensor(s) dirty, or covered by paper, or damaged Remove all the notes in the Stacker. Press the START key to clear the Error message. Recount all the notes again. Remove and check the suspected note(s). If genuine, adjust the relevant detection sensitivity to a lower setting. (CF1 = UV; CF2 = MG; CF3 = THD). Remove all bank notes. TURN POWER OFF. Thoroughly clean all the optical sensors. If these actions do not cure the problem, please contact your supplier for further assistance. 12 7. ACCESSORIES SUPPLIED Power Cord Users Guide 1 item. 1 booklet. *** In the interests of our ongoing policy of continual product improvement, specifications are subject to change without prior notice. *** 13