1
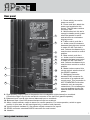
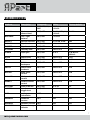
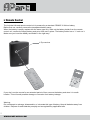
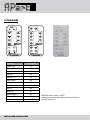
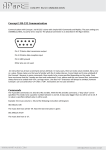
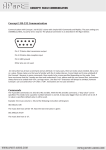
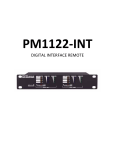
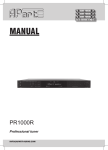
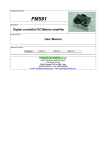
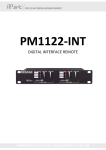
MANUAL
SDQ5Pir
[email protected]
Features
The APart SDQ5Pir powered loudspeaker set is a versatile and very compact, easy to use, plug and play
sound system. It consists of an amplified loudspeaker with a 5.25” woofer, a high frequency unit and a
second linkable passive loudspeaker, powered by the second amplifier built into the active speaker. The
speakers are magnetically shielded.
The speakers can be remote controlled via the included infrared remote control, RS232 serial port or an
optional wall control panel with or without local input. The auto power off function switches off the power
amplifier when no audio signal is present for a certain time. This time window can be adjusted using RS232
commands.
Further benefits are: presettable maximum level, dual inputs: unbalanced on minijack and balanced on
euroblock + additional input via optional wall control unit. All inputs can be gain adjusted, used individually or
mixed together (except optional wall control panel local input source : this input can not be mixed with the A
or B or A+B inputs).
The automatic power on function will power up the speaker automatically from the standby position when
a sufficiently strong audio signal is present. The threshold can be adjusted via RS232 control to suit your
needs.
• Active 2 way bass-reflex speaker system
• Ideal for monitor, Audio-Video applications, multimedia applications
• Powerfull HiFi 5.25” woofer and 1” tweeter
• Mounting brackets, IR remote control and power cord included
• 2 x 30 watts RMS output power, 200 Watts PMPO dynamic
• Enhanced bass response by DTB reflex tuning
• Multifunction led indicator: standby (orange), on (green), overload (red), off (led not lit)
• Hi-Q balanced inputs
• Stereo inputs on standard 3.2 mm mini stereo jack, compatible with headphone outputs and line
inputs (Computer, MP3 players)
• Input sources A, B or via optional wall panel
• Inputs A and B can be mixed together or selected individually by infrared remote control or RS232
• Magnetically shielded
• Stylish design, suited for placement in corners
• Very high efficiency, high output
• Standby mode for low power consumption
• Controllable via infrared remote (included), RS232, wall panels (optional)
• RS232 control for increased integration in automated audio systems using standard 9 pin
serial cable.
• RJ45 remote wall panel connector (not compatible with computer networks or other types
of remote control cabling)
These speakers have been carefully packed at the factory. Open the carton box and remove the speakers
from the packing. Do not use sharp objects. Place the speakers on a flat surface. The mounting brackets,
infrared remote control unit, power cord and speaker interconnection wire are included in the packing,
When the product shows signs of damage caused by transportation, contact your dealer immediately.
Damage due to transport and rough handling is not covered by the manufacturers warranty.
The SDQ5Pir complies with CE regulations.
2
WWW.APART-AUDIO.COM
Rear panel
1
2
3
4
8
9
5
10
6
12
11
14
13
7
1. Power switch: turn mains
power on and off.
2. Power cord inlet: attach the
power cord supplied to this
socket. The inlet also contains
the mains fuse.
3. Multifunction led: this led is
orange in standby mode, green
when the speaker is active
and red when an overload or
clipping occurs.
4. Treble control: push the +
or - button once to increase or
decrease the treble tone control
in steps of 2 dB. Push both +
and - buttons simultaneously to
reset the tone control to neutral
position.
5. Bass control: push the +
or - button once to increase or
decrease the bass tone control
in steps of 2 dB. Push both +
and - buttons simultaneously to
reset the tone control to neutral
position.
6. Master volume control: this
volume control sets the level of
the SDQ5Pir speaker.
7. Wall panel connector:
standard RJ45 connector for
connection of an optional wall
control panel. This connection is
NOT COMPATIBLE with other
networks, such as computer
networks etc. Do not attempt to
connect anything else but the
optional SDQ5Pir wall control
panels.
8. Right speaker output: output to the passive slave loudspeaker (right channel) on euroblock.
Connect the Right LS out to the euroblock connector of the slave unit (passive speaker).
9. Balanced input: input B right channel balanced input on euroblock.
10. Balanced input: input B left channel balanced input on euroblock.
11. Mono / stereo selector: switch to stereo for normal operation. For mono operation, switch to upper
position. In this case, the left input signal only is used on both channels.
12. Input A minijack: standard 3.2 mm stereo minijack connector for input A.
13. RS232 connector: standard SUB D9 connector for serial control.
14. Heatsink.
3
[email protected]
RS232 communication
Communication with SDQ5Pir via RS232 is done with simple ASCII Commands and Replies. The port
settings are 19200 Baudrate, 8 databits, no parity and 1 stop bit. The physical connection is as described
below:
Standard 9 pin serial cable, wired straight through (no null modem cable !!!). Maximum wire length
depends on cable quality and influence from external interference.
Pin 2: TX data: data transmission output
Pin 3: RX data: data reception input
Pin 5: GND: ground
Other pins are not used.
NOTE: when the unit is in standby mode, it may not respond to the first command sent to the unit, unless
you send the command “SET STANDBY OFF”. If you want to send any other command while the unit is in
standby mode, it will wake up from standby and reply “STANDBY OFF”. After that, resend the command
and it will be executed.
An instruction has at least a command and an attribute. In many cases, there are extra values needed,
like a source lettre or a value. From here we assume that you are familiar with RS232 communication
protocols and connections. If not, please read the user manual of your control device first.
Instructions always have to be ended with <CR>, carriage return. Line feed <LF> characters will always be
omitted, however SDQ5Pir can use (and echo) <LF> after a <CR>. Instructions are not case sensitive!
The 4 possible commands are: SET, GET, INC and DEC. With the INC and DEC command, a “step value”
can be specified. See the table below for details (in the value column).
Operating Settings:
SDQLVL is the volume level of the speaker system. Possible values are: OFF (mute) or any value between
-63 (lowest) and 0 (highest volume level). E.g. you want to set the volume to -20: SET SDQLVL -20 <CR>
The unit will reply: SDQLVL -20
MAXLVL is the maximum allowed volume level. E.g. if you don’t want anyone to set the SDQ level higher
than -10, set the MAXLVL parameter to -10. All volume related commands will ALWAYS be related to the
MAXLVL setting. E.g. if the MAXLVL is -10 and you enter the command SET SDQLVL -20, the SDQ5Pir
will set the level relative to the MAXLVL, which was -10.
Please note that the absolute maximum number of volume steps is limited to 64 steps. 1 volume step
corresponds to 1.25 dB.
The MAXLVL parameter is therefore considered as the master volume. If you want to mute the speaker,
you can set the MAXLVL parameter to OFF.
BALANCE sets the balance between left and right channel. Possible values vary between -31 and 31.
Equalizer:
EQBASS sets the level of the bass.
EQTREB sets the level of the treble.
The value must be between -14 and 14 in steps of 2. If a different value is used (e.g. “5”), it will be
changed to the closest match.
4
WWW.APART-AUDIO.COM
Configuration Settings:
SELECT is input source selection, a possible command could look like this: “Set select AB<CR>”. In this
case, both inputs A and B will be mixed together by the SDQ5Pir unit. Possible values are A, B, AB or
WI. WI is the local input of the optional waal control
IPGAIN is input gain. Each source input has its own gain setting so the source (A, B or WI) needs to
be specified. The value can be between 0 and 3 in steps of 1. If an invalid value is used or no source
is specified, “ERROR: Value Invalid!<CR>” will be replied. Otherwise, the reply will be “Command
Executed!<CR>”
A command to set the input gain of source A to 1 looks like this: SET IPGAIN A 1<CR>
AUPTRG: auto power trigger level. Range from 0 to 30. Higher values will increase the trigger level.
RS-232 Settings:
All RS-232 settings are binary values, they can be ON or OFF.
If ECHO is on, all received characters are echoed back. This can be handy when programs like
hyperterminal are used.
LF is Line Feed. Line Feed is an ASCII character (0x0A) which is sometimes used to let the cursor jump
to the next line. SDQ5Pir always omits the line feed character. However, when LF is on, there will be put
<LF> character behind each <CR> character. This is both the case for echoing as for messages sent by
SDQ5Pir. Please take a look to following example: in both cases, the user sends the following string: “get
sdqlvl<CR>”.
With ECHO on and LF off, this will be returned by SDQ5Pir :
“get sdqlvl<CR>” (command)
“SDQLVL -16<CR>” (reply)
In case both ECHO and LF are on, it will be like this:
“get sdqlvl<CR><LF>”
“SDQLVL -16<CR><LF>”
BS is Back Space. This is also an ASCII character. In case BS and ECHO is on, SDQ5Pir will reply
<BS><SP><BS> each time when a <BS> is received. <SP> is the space character. This setting is only
intended to have a “nice” text when used with programs like Hyperterminal.
VALFB means value feedback. Possible values are on or off. When value feedback in on, the SDQ5Pir
will reply its setting after a value has been changed, such as SDQLVL.
Version information:
HWVRSN will return the hardware version number: GET HWVRSN<CR>
SWVRSN will return the hardware version number: GET SWVRSN<CR>
Control settings:
BACKCT: set the controls at the back of the unit on or off. NOTE: when set to off, you can NOT operate
the unit from the back panel controls !!!
WALLCT: set the control of the optional wall control panel on or off.
IRRMCT: set the control by infrared remote on or off.
AUTOPW: set the time for the auto power off function. When no audio signals are detected, the speaker
will go to standby mode after the AUTOPW time has elapsed. When set to 0, the AUTOPW function in
not active. Values between 0 and 30 can be specified. 0 = inactive, 1 = auto power off after 1 minute
etc...Default value is 15 minutes.
5
[email protected]
Restore Factory Settings:
The factory defaults are shown in the RS232 commands table. In order to restore the factory default
settings, enter the following command: SET RESTORE ON<CR>
This function can also be executed without using RS232 commands. In that case, power off the speaker.
While pushing BASS + and - buttons on the rear panel simultaneously, power up the speaker with the
power switch. The multifunction led will be orange. Release the BASS + and - buttons one second after
powering up. All factory defaults will be restored.
Standby:
The SDQ5Pir can be switched to Standby mode with the IR remote control or with the “SET STANDBY
ON<CR>” instruction. Leaving Standby mode can also be done with IR remote controller or the “SET
STANDBY OFF<CR>” instruction. If an RS232 instruction is sent when the amplifier is in Standby mode
or during power on, and the amplifier is not ready, it will answer “STANDBY ON”. Please wait until the
speaker is operational (green led at the back is lit) and resend the instruction.
6
WWW.APART-AUDIO.COM
RS232 COMMANDS
Attribute
Description
Commands
Value
Factory default
SDQLVL
Volume level
GET, SET, INC,
DEC
OFF (-64)
-63 to 0
0
MAXLVL
Maximum
allowed level
GET, SET
BACK, OFF (-64)
-63 to 0
BACK
BALANCE
Left - right
balance
GET, SET
-31 to 31
0
SELECT
Source selection
GET, SET
A, B, AB, or WI
AB
EQBASS
Equalizer bass
GET, SET
-14 to 14
0
EQTREB
Equalizer treble
GET, SET
-14 to 14
0
STANDBY
Standby state
GET, SET
ON or OFF
OFF
IPGAIN
Input gain
GET, SET
0 to 3
A,B,WI at 0
AB at 2
ECHO
RS232 echo
GET, SET
ON or OFF
OFF
LF
RS232 line feed
GET, SET
ON or OFF
OFF
BS
RS232
backspace
GET, SET
ON or OFF
ON
VALFB
RS232 value
feedback
GET, SET
ON or OFF
ON
BACKCT
Back panel
control
GET, SET
ON or OFF
ON
WALLCT
Wall panel
control
GET, SET
ON or OFF
ON
IRRMCT
Infrared remote
control
GET, SET
ON or OFF
ON
AUTOPW
Auto power off
GET, SET
0 to 30
15
AUPTRG
Auto power
trigger level
GET, SET
0 to 9
1
INFO
settings
information
GET
NA
NA
HWVRSN
Hardware
version
GET
NA
NA
SWVRSN
Software version
GET
NA
NA
RESTORE
Restore factory
defaults
SET
ON
NA
7
[email protected]
ir Remote Control
The included infrared remote control unit is powered by a standard CR2025 3V lithium battery.
Before first use, carefully remove the transparent battery saver.
When the battery is empty, replace with the same type only. Slide out the battery holder from the remote
control unit, remove the empty battery and put a fresh one in place. The battery holder has a “+” mark on it.
Make sure you insert the battery and holder in the right way !
ir Eye receiver
If you don’t use the remote for an extended period of time, remove the battery and store it in a safe
location. This will avoid possible damage or corrosion from battery leakage.
Warning:
Do not attempt to recharge, disassemble, or incinerate this type of battery. Keep all batteries away from
children. Dispose of used batteries promptly and as regulated by applicable laws.
8
WWW.APART-AUDIO.COM
ir Commands
Function
ir COMMAND
Power ON
12
Power STANDBY
1A
Input A
01
Input B
04
Input A + B
07
Input WALL
0A
Level UP
03
Level Down
06
MUTE
09
Bass UP
0C
Bass DOWN
00
Treble UP
0D
Treble Down
0F
SDQ5Pir device code is “807F”
Infrared commands have been coded according to
the NEC® protocol
9
[email protected]
Technical specifications
Speaker type
2 way bass reflex, active
Input impedance minijack input A
5 k ohm
Input sensitivity minijack input A
500 mV
Input impedance balanced input B
22 k ohm
Input sensitivity balanced input B
500 mV
Tone control bass
+- 14 dB @ 100 Hz in 2 dB steps
Tone control treble
+- 14 dB @ 10 kHz in 2 dB steps
Balance control
+- 31 steps ; 1.25 dB per step
Input gain adjustment
0 to 3 ; + 3.75 dB per step
Output power
2 x 30 watts RMS
Frequency range
45 - 20000 Hz
THD
<0.07%
S/N ratio
>90 dB
Power supply
230 VAC / 80 VA max
Fuse rating
1 AT/250V
Dimensions h x w x d (mm)
252 x 182 x 170
Net weight
2.85 kg (active) ; 1.75 kg (slave)
shipping weight
6.2 kg (1 set)
shipping dimensions
270 x 210 x 440
accessories supplied
Power cord, bracket, manual, infrared remote
control unit, connection wire
Remote control unit battery type
lithium CR2025 3v
operating temperature
-10 to +40° C
relative humidity
10 to 90% non condensing
10
WWW.APART-AUDIO.COM
Important safety instructions
•
•
•
•
•
•
•
•
•
•
•
•
•
•
•
•
Please check the carton box for any kind of damage on reception of the goods. In case of a
damaged carton, please contact your dealer before opening the carton.
Read all documentation before operating your equipment.
Keep all documentation for future reference.
Save the carton and packing material even if the equipment has arrived in good condition.
Should you ever need to ship the unit, use only the original factory packing.
Do not spill water or other liquids into or on the unit.
Make sure power outlets conform to the power requirements listed on the back of the unit.
Do not use the unit if the electrical power cord is frayed or broken.
Always operate the unit with the AC ground wire connected to the electrical system ground.
Have gain controls on amplifiers turned down during power-up to prevent speaker damage
if there are high signal levels at the inputs.
Do not connect the inputs / outputs of amplifiers or consoles to any other voltage source,
such as a battery, mains source, or power supply, regardless of whether the amplifier or console is
turned on or off.
Power down & disconnect units from mains voltage before making connections.
Do not use the unit near stoves, heat registers, radiators, or other heat producing devices.
Do not remove the cover. Removing the cover will expose you to potentially dangerous voltages.
Do not drive the inputs with a signal level higher than that required to drive equipment to full output.
In case of mal-function this device should be serviced by qualified service personnel only.
11
[email protected]
Company names, product names, and names of formats etc. are the trademarks or
registered trademarks of their respective owners.
© 2009 APart-Audio specifications subject to change without notice.
12
WWW.APART-AUDIO.COM