1
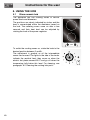
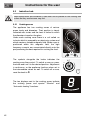
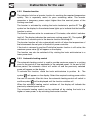
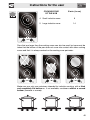
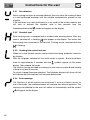
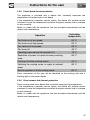
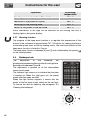
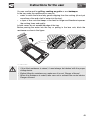
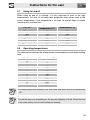
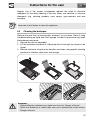
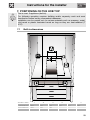
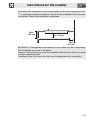
Contents
1.
2.
3.
4.
5.
6.
7.
INSTRUCTIONS FOR USE ......................................................................... 34
SAFETY PRECAUTIONS ............................................................................ 36
ENVIRONMENTAL RESPONSIBILITY ........................................................ 38
KNOW YOUR APPLIANCE.......................................................................... 39
USING THE HOB......................................................................................... 40
CLEANING AND MAINTENANCE ............................................................... 56
POSITIONING ON THE HOB TOP.............................................................. 59
THESE INSTRUCTIONS ARE VALID FOR THOSE COUNTRIES IDENTIFIED BY THE
SYMBOLS REPORTED ON THE COVER OF THIS MANUAL.
INSTRUCTIONS FOR THE USER: these instructions contain user
recommendations, a description of the controls and the correct
procedures for cleaning and maintenance of the appliance.
INSTRUCTIONS FOR THE INSTALLER: these are intended for the qualified
technician who must install the appliance, set it functioning and carry out
an inspection test.
@
Further information about the products can be found at www.smeg.com
33
General instructions
1. INSTRUCTIONS FOR USE
THIS MANUAL CONSTITUTES AN INTEGRAL PART OF THE APPLIANCE. THIS
MANUAL CONSTITUTES AN INTEGRAL PART OF THE APPLIANCE. IT SHOULD BE
KEPT INTACT AND AT HAND FOR THE APPLIANCE’S ENTIRE LIFE CYCLE.
IT IS IMPORTANT TO CAREFULLY READ THIS MANUAL AND ALL THE
INSTRUCTIONS CONTAINED HEREIN BEFORE USING THE APPLIANCE.
INSTALLATION MUST BE CARRIED OUT BY COMPETENT PERSONS IN
ACCORDANCE WITH THE REGULATIONS IN FORCE. THIS APPLIANCE IS
INTENDED FOR HOUSEHOLD USE AND COMPLIES WITH THE EEC DIRECTIVES
CURRENTLY IN FORCE. THE APPLIANCE HAS BEEN BUILT TO CARRY OUT THE
FOLLOWING FUNCTIONS: COOKING FOOD; IT IS CONSIDERED UNSUITABLE FOR
ANY OTHER USE.
THE MANUFACTURER CANNOT BE HELD LIABLE FOR USE OTHER THAN AS
INDICATED.
IF THE APPLIANCE IS INSTALLED ON BOATS OR IN CARAVANS, DO NOT USE IT AS
A ROOM HEATER.
DO NOT USE THIS APPLIANCE FOR HEATING ROOMS.
THIS APPLIANCE IS MARKED ACCORDING TO EUROPEAN DIRECTIVE 2002/96/EC
ON WASTE ELECTRICAL AND ELECTRONIC EQUIPMENT (WEEE).
THIS DIRECTIVE DEFINES THE STANDARDS FOR THE COLLECTION AND
RECYCLING OF WASTE ELECTRICAL AND ELECTRONIC EQUIPMENT APPLICABLE
THROUGHOUT THE EUROPEAN UNION.
THE IDENTIFICATION PLATE WITH THE TECHNICAL DATA, SERIAL NUMBER AND
BRAND NAME HAS BEEN VISIBLY AFFIXED TO THE APPLIANCE.
DO NOT REMOVE THIS PLATE FOR ANY REASON.
BEFORE OPERATING THE APPLIANCE ALL PROTECTIVE COVERS MUST BE
REMOVED.
SUITABLE HEAT-PROOF GLOVES SHOULD BE WORN FOR ALL OPERATIONS.
DO NOT USE STEEL SPONGES AND SHARP SCRAPERS AS THEY WILL
DAMAGE THE SURFACE.
USE NORMAL NON-ABRASIVE PRODUCTS, INCLUDING WOODEN OR
PLASTIC UTENSILS IF NECESSARY. RINSE THOROUGHLY AND DRY
USING A SOFT CLOTH OR A MICROFIBRE CLOTH.
34
General instructions
DO NOT LEAVE THE APPLIANCE UNATTENDED DURING COOKING PROCESSES
WHERE FATS OR OILS COULD BE RELEASED.
FATS AND OILS MAY CATCH FIRE.
ALWAYS CHECK THAT THE CONTROL KNOBS ARE IN THE
WHEN YOU FINISH USING THE APPLIANCE
O
(OFF) POSITION
NEVER PLACE PANS WITH BOTTOMS WHICH ARE NOT PERFECTLY FLAT AND
SMOOTH ON THE COOKING HOB PAN STANDS.
NEVER USE PANS WHICH PROJECT BEYOND THE OUTSIDE EDGE OF THE HOB.
DO NOT OBSTRUCT VENTILATION OPENINGS AND HEAT DISPERSAL SLITS.
(ONLY FOR GLASS CERAMIC MODELS)
TAKE CARE NOT TO SPILL SUGAR OR SWEET MIXTURES ON THE HOB
WHILE COOKING OR TO PLACE MATERIALS OR SUBSTANCES WHICH
COULD MELT ON IT (PLASTIC OR TINFOIL). IF THIS HAPPENS, TO AVOID
DAMAGE TO THE SURFACE, TURN OFF THE HEAT IMMEDIATELY AND
CLEAN THE SURFACE WITH THE SCRAPER PROVIDED WHILE THE PLATE IS STILL
WARM. IF THE GLASS CERAMIC HOB IS NOT CLEANED IMMEDIATELY, THERE IS A
RISK THAT INCRUSTATIONS WILL BE LEFT THAT ARE IMPOSSIBLE TO REMOVE
ONCE THE HOB HAS COOLED.
35
General instructions
2. SAFETY PRECAUTIONS
REFER TO THE INSTALLATION INSTRUCTIONS FOR THE SAFETY REGULATIONS
FOR ELECTRIC OR GAS APPLIANCES AND VENTILATION FUNCTIONS.
IN YOUR INTERESTS AND FOR YOUR SAFETY THE LAW REQUIRES THAT THE
INSTALLATION AND SERVICING OF ALL ELECTRICAL APPLIANCES IS CARRIED
OUT BY QUALIFIED PERSONNEL IN ACCORDANCE WITH THE REGULATIONS IN
FORCE.
OUR APPROVED INSTALLERS GUARANTEE A SATISFACTORY JOB.
GAS OR ELECTRICAL APPLIANCES MUST ALWAYS BE DISCONNECTED BY
SUITABLY SKILLED PEOPLE.
BEFORE CONNECTING THE APPLIANCE TO THE POWER GRID, CHECK THE DATA
ON THE PLATE AGAINST THE DATA FOR THE GRID ITSELF.
THE IDENTIFICATION PLATE CONTAINING THE TECHNICAL DATA, SERIAL NUMBER
AND
BRAND NAME IS IN A VISIBLE POSITION UNDER THE CASING.
DO NOT REMOVE THIS PLATE ON THE CASING FOR ANY REASON.
BEFORE CARRYING OUT INSTALLATION/MAINTENANCE WORK, MAKE SURE THAT
THE APPLIANCE IS NOT CONNECTED TO THE POWER GRID.
THE PLUG TO BE CONNECTED TO THE POWER SUPPLY CABLE AND ITS SOCKET
MUST BE OF THE SAME TYPE AND CONFORM TO THE REGULATIONS IN FORCE.
THE SOCKET MUST BE ACCESSIBLE AFTER THE APPLIANCE HAS BEEN BUILT IN.
NEVER DISCONNECT THE PLUG BY PULLING ON THE CABLE.
IF THE POWER SUPPLY CABLE IS DAMAGED, CONTACT THE TECHNICAL SUPPORT
SERVICE IMMEDIATELY AND THEY WILL REPLACE IT.
IT IS OBLIGATORY FOR ALL ELECTRICAL EQUIPMENT TO BE EARTHED
ACCORDING TO THE METHODS LAID DOWN BY SAFETY REGULATIONS.
IMMEDIATELY AFTER INSTALLATION, CARRY OUT A BRIEF INSPECTION TEST,
FOLLOWING THE INSTRUCTIONS BELOW. SHOULD THE APPLIANCE NOT
FUNCTION, DISCONNECT IT FROM THE ELECTRICITY SUPPLY AND CALL THE
NEAREST TECHNICAL SUPPORT CENTRE.
NEVER ATTEMPT TO REPAIR THE APPLIANCE.
DURING USE THE APPLIANCE BECOMES VERY HOT. BE CAREFUL NOT TO TOUCH
THE HEATING ELEMENTS.
THIS APPLIANCE MAY NOT BE USED BY PEOPLE (INCLUDING CHILDREN) OF
REDUCED PHYSICAL AND MENTAL CAPACITY, OR LACKING IN EXPERIENCE IN
THE USE OF ELECTRICAL APPLIANCES, UNLESS THEY ARE SUPERVISED OR
INSTRUCTED BY ADULTS RESPONSIBLE FOR THEIR SAFETY.
36
General instructions
DO NOT LET CHILDREN GO NEAR THE APPLIANCE WHEN IT IS IN OPERATION OR
PLAY WITH IT AT ANY TIME.
DO NOT INSERT POINTED METAL OBJECTS (CUTLERY OR UTENSILS) INTO THE
SLITS IN THE APPLIANCE.
DO NOT USE STEAM JETS FOR CLEANING THE APPLIANCE.
THE STEAM COULD REACH THE ELECTRONICS, DAMAGING THEM AND CAUSING
SHORT-CIRCUITS.
DO NOT MODIFY THIS APPLIANCE.
FAT AND OIL CAN CATCH FIRE IF THEY OVERHEAT. YOU ARE THEREFORE
RECOMMENDED NOT TO LEAVE THE HOB WHILE PREPARING FOODS
CONTAINING OIL OR FAT. IF FAT OR OIL CATCHES FIRE, NEVER PUT WATER ON IT.
COVER THE PAN AND SWITCH OFF THE COOKING ZONE.
AS SOON AS YOU NOTICE A FRACTURE OR A CRACK ON THE SURFACE OF THE
GLASS CERAMIC HOB, SWITCH THE APPLIANCE OFF AND CONTACT AN
AUTHORISED TECHNICAL ASSISTANCE CENTRE.
DO NOT SPRAY ANY SPRAY PRODUCTS NEAR THE ELECTRICAL APPLIANCE
WHILE IT IS IN OPERATION.
DO NOT USE SPRAY PRODUCTS WHILE THE PRODUCT IS STILL HOT.
USERS OF PACEMAKERS OR SIMILAR DEVICES MUST ENSURE THAT THE
OPERATION OF THEIR DEVICES WILL NOT BE AFFECTED BY THE INDUCTION
FIELD, WHICH HAS A FREQUENCY RANGE OF 20-50 KHZ.
IN CONFORMITY WITH THE PROVISIONS REGARDING ELECTROMAGNETIC
COMPATIBILITY, THE ELECTROMAGNETIC INDUCTION COOKING HOB COMES
UNDER GROUP 2 AND CLASS B.
The manufacturer cannot be held liable for damage to persons or things caused
by failure to observe the above instructions, by interference with any part of the
appliance or by the use of non-original spare parts.
37
Instructions for disposal
3. ENVIRONMENTAL RESPONSIBILITY
3.1
Our environmental responsibility
Pursuant to Directives 2002/95/EC, 2002/96/EC and 2003/108/EC relating to
the reduction of the use of hazardous substances in electrical and electronic
appliances, as well as to the disposal of refuse, the crossed out bin symbol on
the appliance indicates that at the end of the useful life of the product, it must be
collected separately from other refuse. Therefore, at the end of the product's
working life, the user must deliver it to the appropriate differentiated collection
centres for electrical and electronic waste, or deliver it back to the retailer when
purchasing an equivalent product, on a one-for-one basis. Adequate
differentiated collection for the subsequent forwarding of the decommissioned
product to recycling, processing and ecologically compatible disposal
contributes to avoiding possible negative effects on the environment and on
health, and promotes recycling of the appliance's constituent materials. Illicit
disposal of the product by the user will lead to the application of administrative
sanctions.
The product does not contain substances in quantities sufficient to be
considered hazardous to health and the environment, in accordance with
current European directives.
3.2
Your environmental responsibility
Our product's packing is made of non-polluting materials, which are therefore
compatible with the environment and recyclable. Please help by disposing of the
packaging correctly. You can obtain the addresses of collection, recycling and
disposal centres from your retailer or from the competent local organisations.
Do not discard the packaging or any part of it, or leave it unattended. It can
constitute a suffocation hazard for children, especially the plastic bags.
Your old appliance also needs to be disposed of correctly.
Important: hand over your appliance to the local agency authorised for the
collection of electrical appliances no longer in use. Correct disposal enables
intelligent recovery of valuable materials.
Before disposing of your appliance it is important to remove doors and leave
shelves in the same position as for use, to ensure that children cannot
accidentally become trapped inside during play. It is also necessary to cut the
connecting cable to the power grid, removing it along with the plug.
38
Instructions for the user
4. KNOW YOUR APPLIANCE
2
5
6
8
1
3
9
4
9
1
2
8
7
3
6
5
4
1
2
8
7
3
6
5
4
1
2
3
4
3
9
1
2
8
7
3
6
Small glass ceramic hot
plate
Large glass ceramic hot
plate
Residual
lights
heat
indicator
Small induction hot plate
5
6
7
8
5
4
7
50°
P
100°
200°
160°
50°
P
100°
200°
160°
Large induction hot plate
Barbeque resistance
Barbeque resistance
thermostat light
Teppan yaki plate
Before using the electric plates or the barbecue (if included) for the first time,
pre-heat them to the maximum temperature long enough to burn off any
manufacturing oily residues which could give the food a bad smell.
39
Instructions for the user
5. USING THE HOB
5.1
Glass ceramic hob
The appliance has two cooking zones of various
power levels and diameters.
The positions are clearly indicated by circles and the
heat is concentrated within the diameters traced on
the hob. The radiating zones come on after a few
seconds and their heat level can be adjusted by
rotating the knob of the power regulator.
9
2
7
3
6
To switch the cooking zones on, rotate the knob to the
desired position between 1 and 9..
The adjustment is gradual so all the intermediate
zones can be used. The lights to the side of the knobs
indicate the residual heat: they come on when the
electric hot plates exceed 50°C and go off when the
temperature falls below this level. For cleaning, see
paragraph "6.2 Cleaning the cooking hob parts".
40
9
1
8
5
4
1
2
8
7
3
6
5
4
Instructions for the user
5.1.1 Cooking guidelines
The table below shows the power values which can be set, with the relative type
of food alongside. Settings may vary depending on the amount of food and
personal taste.
Knob Position
1
2-3
4-5
6
7-8
9
Suitable kind of cooking
To melt butter, chocolate or similar products.
To heat food, keep small amounts of water on the boil,
and whip up sauces with egg yolk or butter.
To heat solid or liquid food, keep water on the boil, thaw
deep-frozen food, cook omelettes of 2 or 3 eggs, fruit and
vegetables, various cooking processes.
To stew meat, fish and vegetables, simmer food, make
jams, etc.
To roast meat, fish, steaks and liver; to sauté meat, fish,
eggs, etc.
To deep-fry potatoes, etc., or bring water to the boil
rapidly.
For best cooking results and energy saving, only use containers suitable for
electric cooking:
•
•
The bases of containers must be very thick, perfectly flat and clean and dry.
The hob must also be clean and dry.
Do not use cast iron saucepans or saucepans with a rough base, as they
may scratch the cooking surface.
The diameter of the base of the saucepans must be equal to the diameter of the
circle outlining the cooking zone. If not, energy will be wasted.
41
Instructions for the user
5.2
Induction hob
Metal objects such as silverware or lids must not be placed on the cooking hob
surface as they can become very hot.
5.2.1 Cooking zones
The appliance has two cooking zones of various
power levels and diameters. Their position is clearly
indicated with circles and the heat is limited to within
the diameters traced on the glass.
Under each cooking zone there is a coil called an
inductor which is powered by an electronic system and
which creates a variable magnetic field. When a pan is
positioned within this magnetic field, the high
frequency currents are concentrated directly onto the
pan producing the heat required for cooking the food.
The symbols alongside the knobs indicates the
cooking zone they control. To switch a zone on, press
the knob and turn it to the desired position. Adjustment
is continuous, so the appliance functions when set to
the intermediate values as well. To switch off a zone,
reset the knob to 0.
The two displays next to the cooking zones indicate
the cooking power and special “Booster” and
“Automatic heating” functions.
42
Instructions for the user
5.2.2 Booster function
The induction hob has a booster function for reaching the required temperature
quickly. This is especially useful for pans containing water. The booster
generates a temporary power output higher than the nominal power of the
cooking zone itself.
The booster is activated by rotating the knob clockwise to position P. The
symbol on the display for the selected zone lights up to indicate that the booster
function is active.
The booster remains active for a maximum of 10 minutes, after which it switches
itself off. The display indicates the maximum cooking power [9] . The symbol
will flash for 3 seconds prior to the booster function switching off.
The booster function will also automatically switch off when the temperature of
the hob exceeds the set point of the built-in power controller.
If the knob is returned to position P while the booster function is still active, the
maximum power value [9] will appear on the display.
The function can also be switched off by rotating the knob anticlockwise to a
lower power level.
5.2.3 Automatic heating control
The automatic heating control is used to provide maximum power to a cooking
zone for the period of time applicable to the selected power. At the end of this
time period, the automatic control will switch off and the previously selected
power will appear on the display.
To activate this function, rotate the knob anticlockwise to position A . The
symbol
will appear on the display. Select the required cooking power within
the next 10 seconds. After this time, the automatic heating control will switch in
and the symbol
will be displayed until the function switches off.
When the automatic heating control switches off, the display will indicate the
previously selected power value.
The automatic heating control can be switched off by rotating the knob to a
higher or lower power, or by activating the booster function.
43
Instructions for the user
5.2.4 Operating power settings
Below is provided a table with the maximum power consumptions of the
hotplates.
Zone Number
Zone Diameter
1
210 mm.
2
140 mm.
Power consumed
Normal operation:
1850 W
With booster function
2500 W
Normal operation:
1400 W
With booster function
1800 W
Before using the hob for the first time, pre-heat it to the maximum temperature
long enough to burn any manufacturing oily residues which could give the food
unpleasant odours.
5.3
Cookware
Appliances of this type require special cookware to be able to work.
In fact, the cookware must have an iron or steel/iron bottom to generate the
magnetic field necessary for it to be heated up.
Recipients made of the following are not suitable:
• glass
• ceramic:
• terracotta
• steel, aluminium or copper without a magnetic bottom
To see whether the pan is suitable, bring a magnet close to the bottom: if it is
attracted, the pan is suitable for induction cooking. If you do not have a magnet,
you can put a small amount of water in the recipient, place it on a cooking zone
and start the hotplate. If, instead of the power symbol, the
symbol appears, it
means the pan is not suitable or is not positioned correctly.
The pans used for cooking must have a minimum diameter to guarantee proper
functioning.
Below is a table with the minimum diameters for pans according to the cooking
zone.
44
Instructions for the user
5
COOKING ZONE
OF THE HOB
Ø min. (in cm)
4
Small induction zone
9
5
Large induction zone
14
4
Pans that are larger than the cooking zones can also be used, but care must be
taken that the bottom of the pan does not come into contact with other cooking
zones and that it is always centred on the cooking zone perimeter.
Make sure you only use containers intended for induction cooking, with a thick
and completely flat bottom or, if not available, containers without a curved
bottom (concave or convex).
45
Instructions for the user
5.3.1 Pan detection
Every cooking zone has a cookware detector that only starts the cooking if there
is a well positioned container with the suitable characteristics present on the
hotplate.
If the container is not well positioned or is not made of the correct material and
still tries to activate the hotplate, after a few seconds from the
hotplatesactivation,the'
symbol will appear on the display.
5.3.2 Residual heat
Each cooking zone is equipped with a residual heat warning device. After any
zone is switched off, a flashing
may appear on the display. This warns that
the cooking zone concerned is still very hot. Cooking can be restarted while the
is flashing.
5.3.3 Cooking hob control lock-out
When not in use, the hob controls can be locked from being accidently turned on
by children.
With the hotplates switched off turn both knobs to symbol A and hold them
there for approximately 2 seconds until the
symbols appear on the power
display. Then release the knobs.
The function can be activated by rotating just one knob to symbol A and holding
it there for at least 5 seconds.
To unlock it repeat the same operation: The hotplates displays will show a 0 that
will indicate that the hotplates lock has been deactivated.
5.3.4 Error message
The functions of all the controls are monitored. If an error situation occurs for
one of the knobs, the unaffected zones will continue their normal operation. The
cooking zone affected by the error will switch off automatically and the symbol
will appear on the display.
46
Instructions for the user
5.3.5 Circuit board thermal protection
The appliance is provided with a device that constantly measures the
temperature of the electronic circuit board.
If the temperature surpasses certain values, the device will activate certain
functions to lower the temperature and allow the glass ceramic hob to continue
to work correctly.
Below is a table with the operations that are activated automatically and the
relative start temperature:
Operation
Activating
temperature
Fan turns on at low speed
50° C
Fan turns on at high speed
60° C
Fan returns to low speed
55° C
Fan turns off
45° C
Operating power reduced from booster to 9
76° C
Reduction of power of a point for every cooking
zone
85° C
Turning off all the cooking zones
90° C
Switching the cooking zones on again at reduced
power
85° C
Normal operation of all the cooking zones
80° C
Every intervention of this type will be identified on the cooking hob with a
flashing light on the power display.
5.3.6 Glass ceramic hob thermal protection
Every cooking zone has a device that constantly measures the temperature.
If the temperature surpasses certain values, the device will activate certain
functions to lower the temperature and allow the glass ceramic hob to continue
to work correctly.
Below is a table with the operations that are activated automatically and the
relative start temperature:
47
Instructions for the user
Operation
Activating
temperature
Operating power reduced from Power to 9
250° C
Reduction of the power of a point
280° C
Switching off the cooking zone
300° C
Return of the power to the set value
250° C
Every intervention of this type will be identified on the cooking hob with a
flashing light on the power display.
5.3.7 Warming function
The purpose of the keep warm function is to regulate the temperature of the
bottom of the cookware to approximately 70?. This allows for keeping food warm
at the ideal power level, as well as heating slowly. The maximum duration of the
keep warm function is limited to 2 hours.
The keep warm function is between [0] and [1] and is indicated by the symbol
on the cooking zones.
5.4
Barbeque hob
The
adjustment
of
the
barbeque
hot
platespowerisdoneusingthecontrolknob,turningittothe
desiredpositionbetween'1 and 9.
The adjustment is gradual so all the intermediate
zones can be used.
The indicator light comes on to indicate that the plate
is heating up. When this light goes out, the preset
power level has been reached.
When the light flashes regularly it means that the
power of the hot plate is kept steady on the set level.
To remove the rack for cleaning, see paragraph “6.3
Cleaning the barbeque”
9
1
2
8
7
3
6
48
5
4
Instructions for the user
You can use the rack for grilling, cooking au gratin or as a barbeque.
In the tray under the resistance you can put:
• water to catch the fat and any grease dripping from the cooking (do not put
more than a litre and a half of water into the tray),
• a layer of lava rock that keeps in the heat for longer and therefore improves
the cooking times and quality.
In both cases, do not exceed the edge of the tray.
Before pouring the water into the tray or putting in the lava rock, block the
resistance as show in the figure.
WARNING!
• if the tilted resistance is raised, it must always be blocked with the proper
sliding device.
• Before lifting the resistance up, make sure it is cool. Danger of burns!
• When the resistance is raised, take care not to activate the control device.
Danger of burns!
49
Instructions for the user
5.5
Teppan yaki hob
This hob enables food to be cooked or heated directly on the plate, with or
without oil. This kind of cooking uses temperatures that never exceed the smoke
points of the food (i.e. the temperatures at which food starts to burn) and very
rapid cooking times.
Saucepans or other cookware can also been used, but the time taken to reach
the required temperature is naturally longer. Further information on using
cookware can be found in paragraph “5.9 Precautions when using the teppan
yaki plate”.
The appliance has two cooking zones of equal power
levels and diameters. They are positioned roughly at
the front half and the rear half of the plate.
Under each cooking zone there is a coil called
inductor which is powered by an electronic system
and which creates a variable magnetic field. When
the teppan yaki plate is positioned within this
magnetic field, the high frequency currents are
concentrated directly onto the plate producing the
heat required for heating and cooking the food.
50°
P
100°
200°
160°
The symbol adjacent to the knobs indicates the
cooking zone they control. To switch a zone on, turn
the knob to the desired position. Adjustment is
continuous, so the appliance functions when set to
the intermediate values as well. To switch off a zone,
reset the knob to 0.
5.6
Display
The two displays at the side of the knobs provide
information on the power levels, heating and cooling
of the plate, as well as the special “Booster” function.
The displays show the temperature levels, from 1 to 9.
Correspondence between the temperature level and
the nominal value is indicated in the values table in
paragraph ”5.8 Operating temperatures”.
50
50°
P
100°
200°
160°
Instructions for the user
5.6.1 Heating
Setting the knob to a higher value than the
original value starts the heating phase.
While a cooking zone is heating the display
alternates between the adjacent symbols
and darkness (roughly every second).
5.6.2 Cooling
Regolando la manopola ad un valore
minore di quello di partenza si avvierà la
fase di raffreddamento. Durante il
raffreddamento di una zona cottura sul
display verranno visualizzati in modo
alternato (ogni secondo circa) i simboli a fianco, compresa una fase di
oscuramento.
5.6.3 Reaching the temperature
When the cooking zone reaches the set temperature, the adjacent
symbol is displayed continuously for about 5 seconds.
5.6.4 Alternation of symbol display
While the temperature level is being adjusted, and for about 5 seconds after the
last adjustment, the display shows the selected level (from 1 to 9). Then,
depending on whether the plate is to heat or cool, the sequences of zone
heating or cooling symbols are displayed. Once the temperature is reached, the
symbol
, appears for about 5 seconds, after which the temperature level is
displayed.
51
Instructions for the user
5.6.5 Booster function
The induction hob has a booster function for rapidly reaching temperatures. This
is recommended for saucepans and frying pans containing water. This booster
temporarily boosts the power thus exceeding also the nominal output of the
zone.
The booster is activated by turning the knob clockwise to position P. The symbol
appears on the relevant cooking zone display when the booster is on.
The booster remains active for up to 10 minutes and then switches off. The
display indicates the maximum cooking value [9]. During the last 3 seconds of
the booster function, the symbol
flashes to indicate it is about to switch off.
The booster function will also switch off automatically if the hob becomes
excessively hot or the integrated power control is triggered.
If the knob is again turned to position P while the booster is already on, the
display indicates the maximum power value [9].
The function can be switched off by turning the knob anticlockwise to a lower
power level.
5.6.6 Residual heat
Each cooking zone is equipped with a residual heat warning device. After any
zone is switched off, a flashing
may appear on the display. This warns that
the cooking zone concerned is still very hot. Cooking may be resumed while
is flashing.
5.6.7 Hob controls lock-out
When not in use, the hob controls can be locked to prevent children turning
them on by accident.
With the hotplates switched off, turn and hold both knobs to symbol
about 2 seconds until the power symbol
for
appears on the displays. Then
release the knobs.
The function can also be activated by turning and holding one knob to symbol
for at least 5 seconds.
To unlock it repeat the same operation: the hotplate’s displays will show a 0 that
will indicate that the hotplate’s lock has been deactivated.
52
Instructions for the user
5.7
Using fat and oil
When using fat and oil in cooking, it is very important to cook at the right
temperatures. Fat and oil will keep their properties intact when used at the
correct temperature. If the temperature is too high, fat and oil begin to smoke
(smoke point) and then burn.
Fat - oil
Butter
Lard
Beef fat
Olive oil
Sunflower oil
Peanut oil
5.8
Maximum
temperature (°C)
130
170
180
180
200
200
Smoke point (°C)
150
200
210
200
220
235
Operating temperatures
The table below indicates the temperatures corresponding to each plate heating
level
Position
0
1
2
3
4
5
6
7
8
9
Temperature (°C)
50
80
100
130
160
180
200
220
230
The temperatures are indicative; the real value may differ from that indicated by
± 10°.
The data given in the table are indicative and apply to a pre-heated appliance.
The values may vary depending on the type and quantity of food. Place the food
on the plate solely once it has finished pre-heating.
53
Instructions for the user
5.8.1 Teppan yaki thermal protection
Every cooking zone has a device that constantly measures the temperature. If
the temperature surpasses certain values, the device will activate certain
functions to lower the temperature and allow the teppan yaki plate to continue to
work correctly. Below is a table with the operations that are activated
automatically and the relative start temperature:
Operation
Activating
temperature
Operating power reduced from Power to 9
250° C
Reduction of the power by one point
280° C
Switching off the cooking zone
300° C
Return of the power to the set value
250° C
Every intervention of this type will be identified on the cooking hob with a
flashing light on the power displays.
5.8.2 Circuit board thermal protection
The appliance is equipped with a device that constantly measures the
temperature of the electronic circuit board. If the temperature surpasses certain
values, the device will activate certain functions to lower the temperature and
allow the teppan yaki plate to continue to work correctly. Below is a table with the
operations that are activated automatically and the relative start temperature:
Operation
Activating
temperature
Fan turns on at low speed
50° C
Fan turns on at high speed
60° C
Fan returns to low speed
55° C
Fan turns off
45° C
Operating power reduced from booster to 9
76° C
Reduction of power by one point for every cooking
zone
85° C
Turning off all the cooking zones
90° C
Switching the cooking zones on again at reduced power
85° C
Normal operation of all the cooking zones
80° C
Every intervention of this type will be identified on the cooking hob with a
flashing light on the power displays.
54
Instructions for the user
5.9
Precautions when using the teppan yaki plate
If using saucepans to cook food, you should know that:
• the hob is not designed to cook food using saucepans or cookware. Energy
consumption and dispersion will therefore be much higher than normal use;
• the diameter of the cookware used must not exceed the dimensions of the
plate;
• the cookware used must be positioned within the limits of the plate;
• each pan used must be made entirely of metal and have no plastic parts.
The high temperatures reached may melt any plastic parts.
Despite the steel cooking surface being very tough and smooth, traces of wear
may appear over time and with normal use. This will not however affect the
performance of the plate. Slight yellowing of the steel surface is entirely normal.
Do not use knives to cut food on the cooking surface to avoid scratching it. Use
a spatula to turn food over, not pointed utensils. These precautions help prevent
scratches or dents appearing on the teppan yaki plate.
55
Instructions for the user
6. CLEANING AND MAINTENANCE
Before performing any operations requiring access to powered parts, switch off
the power supply to the appliance
NEVER USE A STEAM JET FOR CLEANING THE APPLIANCE.
6.1
Cleaning stainless steel
To keep stainless steel in good condition it should be cleaned regularly after
use. Let it cool first.
6.1.1 Ordinary daily cleaning
To clean and preserve the stainless steel surfaces, use only specific products
that do not contain abrasives or chlorine-based acids.
How to use: pour the product onto a damp cloth and wipe the surface, rinse
thoroughly and dry with a soft cloth or chamois leather.
6.1.2 Food stains or residues
Do not use metallic sponges or sharp scrapers as they will damage
the surface.
Use ordinary non-abrasive products for steel, with the aid of wooden
or plastic utensils if necessary.
Rinse thoroughly and dry with a soft cloth or chamois leather.
6.2
Cleaning the cooking hob parts
The glass ceramic hob should be regularly cleaned, preferably after every use,
once the residual heat warning lights have gone off.
Smudges from aluminium-based pans can be easily
cleaned off with a cloth dampened in vinegar. Remove
any burnt residues after cooking with the scraper
provided; rinse with water and wipe dry with a clean
cloth.
56
Instructions for the user
Regular use of the scraper considerably reduces the need for chemical
detergents for the daily cleaning of the hob. Never use abrasive or corrosive
detergents (e.g. cleaning powders, oven sprays, spot-removers and wire
sponges).
Never use a jet of steam to clean the appliance.
6.3
Cleaning the barbeque
Remove the rack from its housing after allowing it to cool down. Clean it using
standard washing up liquid and a soft sponge. In order to remove the tray under
the barbeque resistance:
1 Remove the rack as described.
2 Lift the resistance and block it, sliding the hold to the right (as shown in the
figure).
3 Remove the basin using the two handles and clean using specific cleaning
products for stainless steel and a soft sponge.
*
WARNING:
• Before lifting the resistance up, make sure it is cool. Danger of burns!
• When the resistance is raised, take care not to activate the control device.
Danger of burns!
57
Instructions for the user
6.4
Cleaning the teppan yaki plate
The appliance should be cleaned after every use; otherwise food residue left to
dry on the hob can be very difficult to remove.
Do not clean the appliance while it is still hot; wait for it to cool down for at least
15 minutes.
Remove the larger incrustations using a spatula. To facilitate cleaning, we
recommend using ice cubes with a little washing up detergent. Clean off the
residue after leaving it to soften for up to 1 hour.
WARNING:
Do not pour water onto the hot appliance, as water vapour and boiling splashes
can cause injury.
Whitish stains may occur on the cooking surface, depending on the type of food
cooked. These stains can be removed using lemon juice, vinegar or a gentle
lime-scale remover. Never use detergents that contain abrasives or chlorinebased acids. Then wipe with a damp cloth.
Clean the edge of the appliance using a damp cloth or sponge and washing up
detergent.
Do not hit or scratch the surface with the spatula. Dry everything thoroughly
once it is clean.
Do not use steel or metal scouring pads, metal brushes or the like.
After cleaning manually and before the hob is used again, take care to have
completely removed any detergent residue.
6.4.1 Assisted cleaning
The teppan yaki plate also has an additional cleaning function. Switch on the
appliance by turning both knobs to the assisted cleaning function
the surface using a damp cloth.
58
. Clean
Instructions for the installer
7. POSITIONING ON THE HOB TOP
This is a cat. 3 appliance (built-in).
The following operation requires building and/or carpentry work and must
therefore be carried out by a competent tradesman.
Installation can be carried out on various materials such as masonry, metal,
solid wood or plastic laminated wood as long as they are heat-resistant (T
90°C).
7.1
Built-in dimensions
A
H
C
E
B
D
DISTANCES
A
B
MINIMUM 292 mm. 494 mm.
MAXIMUM 292 mm. 494 mm.
D
C
20 mm.
70 mm.
D
110 mm.
-
E
50 mm.
-
H
750 mm.
-
59
Instructions for the installer
7.2
Fixing to the supporting structure
Carefully position the supplied insulating seal
on the outer edge of the hole on the top hob,
as indicated in the figure alongside. Try and
make it stick to the whole surface by applying
light hand pressure.
The seal must be placed at a distance of 3-4
mm from the edge of the hole in the top.
Carry out this operation by supporting the hob
on the isolating seal and using screws and
clamping brackets to fix the hob to the
support structure, in order to obtain the
complete flatness.
Carefully trim the surplus away from edge
beyond the seal.
60
3-4
mm
Instructions for the installer
Precautions: the temperature of the inside surface of the hob may exceed 125°
C. To avoid any hazardous situations, access to the underside of the hob must
be restricted. Refer to the installation instructions.
Max
150 mm
Min. 20 mm
Max
100 mm
IMPORTANT: if the appliance is mounted on a unit, make sure that a separating
shelf is installed, as shown in the figure.
However, if the appliance is on an oven installed under the hob, there is no need
to install a separating shelf.
If installed on top of an oven, the latter must be equipped with a cooling fan.
61
Instructions for the installer
7.3
Electrical connection
Make sure that the voltage and capacity of the power line conform to the data
shown on the plate located under the casing. Do not remove this plate for any
reason.
The plug at the end of the supply cable and the wall socket must be of the same
type and must conform to the applicable legislation on electrical installations.
Make sure that the supply line is suitably earthed.
Fit power line with an omnipolar circuit breaker with a contact opening gap equal
to or greater than 3 mm in an easily accessible position close to the hob.
Avoid the use of adapters and shunts.
If the power cable is replaced, the crosssection of wires in the new cable must be
no less than 1.5 mm2 (3 x 0.1.5 cable),
remembering that the end for connection to
the appliance must have an earth wire
(yellow/green) which is
at least 20 mm longer. Only use a H05V2V2-F or similar resistance cable to the
maximum temperature of 90°C. Its replacement must be carried out be a
specialised technician who must carry out the network connection following the
diagram below.
L = brown
N = blue
= yellow/green
The manufacturer cannot be held liable for damage to persons or things caused
by non-observance of the above directions or by interference with any part of
the appliance.
62