1
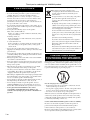
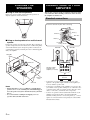
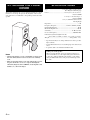
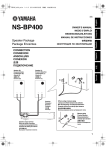
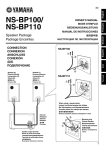
TG
NS-F700
Speaker
Enceinte
OWNER’S MANUAL
MODE D’EMPLOI
BEDIENUNGSANLEITUNG
MANUAL DE INSTRUCCIONES
Thank you for selecting this YAMAHA product.
PRECAUTIONS
Read this before using the speaker.
• To assure the finest performance, please read this manual
carefully. Keep it in a safe place for future reference.
• Install the speaker in a cool, dry, clean place - away from
windows, heat sources, sources of excessive vibration, dust,
moisture and cold. Avoid sources of electrical noise
(transformers, motors). To prevent fire or electrical shock, do
not expose this unit to rain or water.
• To prevent the enclosure from warping or discoloring, do not
place the speaker where it will be exposed to direct sunlight or
excessive humidity.
• Do not place the following objects on the speaker:
Glass, china, small metallic etc.
If glass, etc., falls as a result of vibration and breaks, it may
cause personal injury.
A burning candle, etc.
If the candle falls as a result of vibrations, it may cause fire
and personal injury.
A vessel with water in it
If the vessel falls as a result of vibrations and water spills, it
may cause damage to the speaker, and/or you may get an
electric shock.
• Do not place the speaker where foreign material such as
dripping water. It might cause fire, damage to this unit, and/or
personal injury.
• Do not place the speaker where it is liable to be knocked over
or struck by falling objects. Stable placement will also ensure
better sound performance.
• Placing the speaker on the same shelf or rack as the turntable
can result in acoustical feedback.
• Never put a hand or a foreign object into the port located on the
rear of the speaker, as this might cause personal injury and/or
damage to the speaker.
• When moving the speaker, do not hold the port, as it might
cause personal injury and/or damage to the speaker.
• Any time you notice distortion, reduce the volume control on
your amplifier. Never allow your amplifier to be driven into
“clipping.” Otherwise the speaker may be damaged.
• When using an amplifier with a rated output power higher than
the nominal input power of the speaker, care should be taken
never to exceed the speaker’s maximum input.
• Do not attempt to clean the speaker with chemical solvents, as
this might damage the finish. Use a clean, dry cloth.
• Do not attempt to modify or repair the speaker. Contact
qualified YAMAHA service personnel when any service is
needed. The cabinet should never be opened for any reasons.
• Secure placement and installation is the owner’s
responsibility. YAMAHA shall not be liable for any
accident caused by improper placement or installation of
speakers.
Information for Users on Collection and Disposal of Old Equipment
This symbol on the products, packaging, and/or
accompanying documents means that used electrical and
electronic products should not be mixed with general
household waste.
For proper treatment, recovery and recycling of old products,
please take them to applicable collection points, in
accordance with your national legislation and the Directives
2002/96/EC.
By disposing of these products correctly, you will help to save
valuable resources and prevent any potential negative effects
on human health and the environment which could otherwise
arise from inappropriate waste handling.
For more information about collection and recycling of old
products, please contact your local municipality, your waste
disposal service or the point of sale where you purchased the
items.
[For business users in the European Union]
If you wish to discard electrical and electronic equipment,
please contact your dealer or supplier for further information.
[Information on Disposal in other Countries outside the
European Union]
This symbol is only valid in the European Union. If you wish
to discard these items, please contact your local authorities or
dealer and ask for the correct method of disposal.
PRECAUTIONS WHEN
POSITIONING THE SPEAKERS
The speaker is constructed with the majority of the weight located
in its upper portion, and is thus susceptible to falling over if proper
care is not taken to insure its stability. If the speaker falls over, it
may damage the speaker or be the cause of injury (or even death)
to person and/or damage to personal property.
For safe and proper use of the speaker:
• Position the speaker in a location that is solid, level, smooth,
and low (with respect to the floor).
• Do not push or apply pressure to the side of the speaker when
moving, or lean objects against the side of the speaker.
• Do not sit on or set objects on top of the speaker.
Vibrations or jolts associated with earthquakes and other phenomena or
activities may cause the speaker to fall over. For safety reasons, using
commercially available products that increase stability of the speaker is
recommended (metal fittings or chains, etc.).
Use the stands included with the speaker to increase stability:
Be sure to use the stands regardless of where the speaker is
positioned. Attaching the stands included with the speaker
reinforces the base of the speaker so as not to fall over.
Please be cautioned that even though the stands are connected, this
does not guarantee that the speaker will not fall over.
i En
SUPPLIED ACCESSORIES
■Procedure
1
Put the 6 mm (1/4”) screw through the large hole in the stand,
and screw it into the speaker at one of the outside holes in the
base of the speaker.
At this time, screw it in loosely so that the stand can still be
moved.
2
Put the 4 mm (3/16”) wood screw through the other hole in the
stand, and screw it into the other hole in the base of the
speaker.
3
4
5
Tighten both of the screws firmly.
After unpacking, check that the following parts are contained.
(L)
(R)
Stand (R × 2, L × 2)
Wood screw
(4mm (3/16”)) × 4
Screw
(6mm (1/4”)) × 4
Attach a pad to the bottom of the end portion of the stand.
Attach the other stands to the other corners of the base of the
speaker in the same way and confirm that all 4 stands have
been firmly attached.
Pad × 4
Pad
ATTACHING THE STANDS
When placing the speakers, be sure to use the stands to increase
stability.
Screw (6mm (1/4”))
Wood screw (4mm (3/16”))
Notes
• Make sure to have another person support it.
• Pay extra attention to avoid scratching on the speaker’s
surface.
• Place the speaker on a supporting surface (height of 7 cm
(2-3/4”) or more). Use a blanket or a cushion on it to avoid
scratching.
• The provided stands are in two types. Two stands are for the
right side and others are for the left side. Attach each stand
to the proper position on the bottom of the speaker by
following the figure below.
• To attach the stands to the speaker, be sure to lay down the
speaker with the side facing up.
Note
(R)
(L)
Back
Be carefully not to apply force to the side of the speaker,
otherwise the speaker may fall causing damage to the speaker
or personal injury.
Front
(R)
English
(L)
View from the bottom of the speaker
Use the 8 specified holes located on the base of the speaker.
1 En
PLACING THE
SPEAKERS
CONNECTIONS TO YOUR
AMPLIFIER
■Using as 2ch stereo speakers
Better stereo images will be obtained when the speakers are
slightly angled in towards the listeners.
This speaker system is capable of standard connections and biwire connection. Before making connections, make sure that
the amplifier is switched off.
Standard connections
Leave the short bars in place when connecting.
Tighten
Loosen
Red (+)
Short bar
Bare wire
■Using as front speakers in a multi channel
system
Position the speakers on both sides of the TV. The positioning of
speakers is important, since this dictates the overall sound quality
of the multi channel system. Set up the speakers on the basis of
your listening position by following the owner’s manual supplied
with your amplifier.
Black (–)
Insulation
coating
NS-F700
NS-F700
NS-F700
Subwoofer
SPEAKERS
R
L
A
Speakers output
terminals of the
amplifier (or receiver)
Center
Surround
back
Surround
Notes
• Placing this unit too close to a CRT TV set might impair
picture color or create a buzzing noise. Should this happen,
move the speaker away (more than 20 cm (7-7/8”)) from the
TV set.
• To avoid accidents resulting from tripping over loose
speaker cables, fix them to the floor.
2 En
+
–
–
+
B
Amplifier or
Receiver
• Connect the screw-type input terminals at the rear of the
speakers to the speaker output terminals of the amplifier (or
receiver) with the speaker cable.
• Connect the (+) terminals on the amplifier (or receiver) to the
(+) terminal of each speaker, making sure to confirm the colorcoded wire of the cable at each end. Use the other wire of the
cable to connect the (–) terminals of the components.
• Connect one speaker to the left (marked L) terminals of your
amplifier, and another speaker to the right (marked R)
terminals, making sure not to reverse the polarity (+, –). If one
speaker is connected with reversed polarity the sound will be
unnatural and lack bass.
■How to connect
■About Bi-Wire Connection
1
2
This speaker system is capable of bi-wire connection. To connect
the speaker to the output terminals of the amplifier (or receiver),
two pairs of cables for each of mid-range/woofer and tweeter used
instead of standard connections.
Loosen the knob.
Remove 10 mm (3/8”) of insulation from each end of the
cables, and twist the exposed conductors together neatly and
tightly, as shown below.
This type of connection decreases the modulation distortion
caused by electric resistance of the cables and driving current of
the speakers.
10 mm
(3/8 ”)
Consequently, purer sound quality can be expected.
Good
3
4
To utilize bi-wire connection, remove the short bars from the
terminals first, and then connect the mid-range/woofer and tweeter
to the amplifier separately using two pairs of cables.
No Good
Insert the bare wire.
Tighten the knob and secure the cables.
Test the firmness of the connection by pulling lightly on the
cables at the terminal.
■When using a banana plug
Note
Do not take off this cover unless using a banana plug.
Notes
Banana plug
• Do not let the bare speaker wires touch each other as this
could damage the speaker or the amplifier, or both.
• Do not insert the insulation into the hole. Sound may not be
produced.
Bi-wire connection
Cover
Remove the short bars before connecting.
Tweeter
terminals
Red (+)
Black (–)
1
2
3
Short bar
Mid-range/woofer
terminals
NS-F700(R)
Tighten the terminal knob.
Remove the cover by pulling it toward you.
Simply insert the banana plug into the terminal.
Note
NS-F700(L)
NS-F700(R)
NS-F700(L)
Use a suitable instrument to remove the cover. Removing it
with your bare hands may hurt your fingertips.
SPEAKERS
SPEAKERS
R
R
A
+
+
L
L
–
–
Amplifier or
Receiver
–
–
+
B
+
Amplifier or
Receiver
English
Both SPEAKERS A and B should be selected.
3 En
ATTACHING THE FRONT
COVER
The speaker and the front cover are packed separately. To attach
the front cover, line up the projections (magnets) on the reverse
side of the front cover with their corresponding screw heads on the
speaker.
SPECIFICATIONS
Type .........................................3-way bass reflex speaker system
Non-Magnetic shielding type
Driver .............................................16 cm (6.5”) cone woofer × 1
Advanced PMD
13 cm (5”) cone mid-range × 1
Advanced PMD
3 cm (1”) aluminum dome tweeter
DC diaphragm
Impedance ............................................................................... 6 Ω
Frequency Response ............................ 45 Hz to 50 kHz (-10 dB)
Nominal Input Power........................................................... 40 W
Maximum Input Power ...................................................... 160 W
Sensitivity ........................................................... 89 dB/2.83 V/m
Crossover Frequency ..............................................700 Hz/4 kHz
Dimensions (with stands)(W × H × D)
.. 354 × 1012 × 374 mm (13-15/16” × 39-13/16” × 14-3/4”)
Weight........................................................... 25 kg (55 lbs. 2 oz.)
• Specifications subject to change without notice due to product
improvements.
• Care should be taken not to exceed the input power values noted
above.
• A speaker cable is not included with this model.
Taking care of the speaker
Notes
• When removing the cover, be careful that you don’t touch
the drive units, and don’t exert excessive force with any
tools.
• There are magnets on the reverse side of the front cover. Do
not place the front cover close to objects that might be
affected by magnets, such as CRT TV, clock, magnetic card,
diskette, etc., after removing it.
4 En
When you wipe this unit, do not use chemical solvents (e.g.,
alcohol or thinners, etc.): this might damage the finish. Use
a clean, dry cloth. For difficult soils, dampen a soft cloth in
detergent diluted with water, wring it out, and then wipe with
the cloth.
Limited Guarantee for European Economic Area (EEA) and Switzerland
Thank you for having chosen a Yamaha product. In the unlikely event that your Yamaha product needs guarantee service, please contact the dealer from
whom it was purchased. If you experience any difficulty, please contact Yamaha representative office in your country. You can find full details on our
website (http://www.yamaha-hifi.com/ or http://www.yamaha-uk.com/ for U.K. resident).
The product is guaranteed to be free from defects in workmanship or materials for a period of two years from the date of the original purchase. Yamaha
undertakes, subject to the conditions listed below, to have the faulty product or any part(s) repaired, or replaced at Yamaha’s discretion, without any charge
for parts or labour. Yamaha reserves the right to replace a product with that of a similar kind and/or value and condition, where a model has been
discontinued or is considered uneconomic to repair.
Conditions
1. The original invoice or sales receipt (showing date of purchase, product code and dealer’s name) MUST accompany the defective product, along with a
statement detailing the fault. In the absence of this clear proof of purchase, Yamaha reserves the right to refuse to provide free of charge service and the
product may be returned at the customer’s expense.
2. The product MUST have been purchased from an AUTHORISED Yamaha dealer within the European Economic Area (EEA) or Switzerland.
3. The product must not have been the subject of any modifications or alterations, unless authorised in writing by Yamaha.
4. The following are excluded from this guarantee:
a. Periodic maintenance and repair or replacement of parts due to normal wear and tear.
b. Damage resulting from:
(1) Repairs performed by the customer himself or by an unauthorised third party.
(2) Inadequate packaging or mishandling, when the product is in transit from the customer. Please note that it is the customer’s responsibility to
ensure the product is adequately packaged when returning the product for repair.
(3) Misuse, including but not limited to (a) failure to use the product for its normal purpose or in accordance with Yamaha’s instructions on the
proper use, maintenance and storage, and (b) installation or use of the product in a manner inconsistent with the technical or safety standards in
force in the country where it is used.
(4) Accidents, lightning, water, fire, improper ventilation, battery leakage or any cause beyond Yamaha’s control.
(5) Defects of the system into which this product is incorporated and/or incompatibility with third party products.
(6) Use of a product imported into the EEA and/or Switzerland, not by Yamaha, where that product does not conform to the technical or safety
standards of the country of use and/or to the standard specification of a product sold by Yamaha in the EEA and/or Switzerland.
(7) Non AV (Audio Visual) related products.
(Products subject to “Yamaha AV Guarantee Statement” are defined in our website at http://www.yamaha-hifi.com/ or
http://www.yamaha-uk.com/ for U.K. resident.)
5. Where the guarantee differs between the country of purchase and the country of use of the product, the guarantee of the country of use shall apply.
6. Yamaha may not be held responsible for any losses or damages, whether direct, consequential or otherwise, save for the repair or replacement of the
product.
7. Please backup any custom settings or data, as Yamaha may not be held responsible for any alteration or loss to such settings or data.
8. This guarantee does not affect the consumer’s statutory rights under applicable national laws in force or the consumer’s rights against the dealer arising
from their sales/purchase contract.
English
5 En
УСТАНОВКА ПЕРЕДНЕЙ
КРЫШКИ
ТЕХНИЧЕСКИЕ
ХАРАКТЕРИСТИКИ
Передняя крышка запакована отдельно от акустической
системы. Чтобы установить переднюю крышку,
совместите выступающие части (магниты) на задней
части передней крышки с соответствующими головками
винтов на акустической системе.
Тип ...... 3-полосная басоотражающая акустическая система
Немагнитный тип защиты
Динамики......1 низкочастотный динамик конического типа
диаметром 16 см
Усовершенствованная технология PMD
1 среднечастотный динамик конического типа
диаметром 13 см
Усовершенствованная технология PMD
высокочастотный динамик с алюминиевым куполом
диаметром 3 см
мембрана постоянного тока
Импеданс .............................................................................. 6 Ω
Частотная характеристика ............ 45 Гц – 50 кГц (-10 дБ)
Номинальная входная мощность ................................ 40 Вт
Максимальная входная мощность ............................ 160 Вт
Чувствительность ........................................... 89 дБ/2,83 В/м
Частота разделения каналов........................... 700 Гц/4 кГц
Габариты (со стойками)(Ш × В × Г)
............................................................ 354 × 1012 × 374 мм
Вес....................................................................................... 25 кг
Примечания
• При снятии крышки не касайтесь динамиков и не
прилагайте излишних усилий в случае использования
инструментов.
• С обратной стороны передней крышки установлены
магниты. После снятия передней крышки не
располагайте ее близко к предметам, чувствительным
к магнитному полю, например телевизор, часы,
магнитные карты, дискеты и т.д.
• Технические характеристики могут изменяться без
предварительного уведомления из-за
усовершенствования продукта.
• Не превышайте указанных выше значений входной
мощности.
• Акустический кабель не входит в комплект поставки.
Уход за акустической системой
Не применяйте химические составы для очистки
акустической системы (например, спирт,
растворители и т.д.): это может повредить
отделочное покрытие. Используйте чистую сухую
ткань. Для устранения сложных загрязнений
смочите мягкую ткань в разбавленном водой
чистящем средстве, отожмите ее и протрите место
загрязнения.
Информация для пользователей по сбору и утилизации старой аппаратуры
Этот знак на аппаратуре, упаковках и в сопроводительных документах указывают на то, что подержанные
электрические и электронные приборы не должны выбрасываться вместе с обычным домашним мусором.
Для правильной обработки, хранения и утилизации старой аппаратуры, пожалуйста сдавайте их в
соответствующие сборные пункты, согласно вашему национальному законодательству и директив 2002/96/EC.
При правильном отделении этих товаров, вы помогаете сохранять ценные ресурсы и предотвращать вредное
влияние на здоровье людей и окружающую среду, которое может возникнуть из-за несоответствующего
обращения с отходами.
За более подробной информацией о сборе и утилизации старых товаров пожалуйста обращайтесь в вашу
локальную администрацию, в ваш приёмный пункт или в магазин где вы приобрели эти товары.
[Для представителей компаний в Европейском Союзе]
Если вы хотите избавиться от электрической или электронной аппаратуры, пожалуйста обратитесь к вашему
продавцу или поставщику за полной информацией.
[Информация по утилизации в других странах за пределами Европейского Союза]
Этот знак действителен только на территории Европейского Союза. Если вы хотите избавиться от этих
предметов, пожалуйста обратитесь в вашу локальную администрацию или продавцу и спросите о правильном
способе утилизации.
4
©2008
RuYamaha Corporation All rights reserved.
Printed in Indonesia
WP15000-1