1
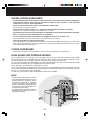
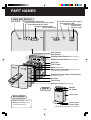
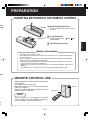
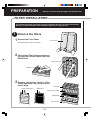
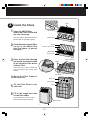
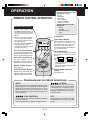
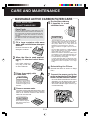
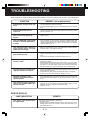
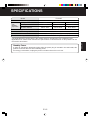
R
ESPAÑOL
ITALIANO
*Plasmacluster is a trademark of Sharp Corporation.
PURIFICATORE DELL'ARIA
MANUALE OPERATIVO
LUCHTREINIGER
GEBRUIKSAANWIJZING
NEDERLANDS
Free standing type
Freistehende Ausführung
Type mobile
Tipo vertical sin soporte
Modello strutturalmente indipendente
Vrijstaand type
‚ÍÎÓÔÒ˝Ó˘Ó ÚÊÎÍ
PURIFICADOR DE AIRE
MANUAL DE USO
Õ”Ÿ’Œˇ””·ÀÃ◊À◊›‘÷
—Œ¤”Õ”’Ã◊Õ” –” ú¤Ã–‘Œœ◊œ‡ÀÀ
—ŒÃäÀ⁄
PURIFICATEUR D'AIR
MANUEL D'UTILISATION
DEUTSCH
LUFTREINIGER
BEDIENUNGSANLEITUNG
FRANÇAIS
AIR PURIFIER
OPERATION MANUAL
ENGLISH
FU-440E
ENGLISH
Plasmacluster Ion Control
The unit controls the ratio of negative ions
and positive ions depending on the condition of the room.
• Clean Mode
Approximately the same numbers of positive and negative ions are discharged.
This mode is effective for reducing some
airborne mold.
• Ion Control Mode
Plenty of negative ions exist in natural
surroundings such as waterfalls or forests.
In this mode, negative ions will be released in an increased rate, in order to
bring the room air close to this natural
environment.
• AUTO Plasmacluster Ion Mode
The unit will switch between Clean Mode
and Ion Control Mode automatically depending on the amount of impurities in the
air detected by the dust and odor sensors.
• Filters
1) Pre-Filter
It collects large particles.
2) Washable Active Carbon Filter
Its deodorizing performance can be
maintained by washing.
3) HEPA (High Efficiency
Particulate Air) Filter with
Microbial Control Filter
High-efficiency particle collection including pollen and dust.
CONTENTS
IMPORTANT SAFETY INSTRUCTIONS .... E-2
• WARNING .................................................... E-2
• CAUTIONS CONCERNING OPERATION ... E-2
• REMOTE CONTROL LIMITATIONS ............ E-2
• INSTALLATION GUIDELINES ..................... E-3
• FILTER GUIDELINES .................................. E-3
• HOW SHARP AIR PURIFIER WORKS ........ E-3
PART NAMES .......................................... E-4
• MAIN UNIT DISPLAY ................................... E-4
• INCLUDED ................................................... E-4
• BACK ........................................................... E-4
PREPARATION........................................ E-5
• INSERTING BATTERIES
IN THE REMOTE CONTROL ...................... E-5
• REMOTE CONTROL USE ........................... E-5
• FILTER INSTALLATION ............................... E-6
OPERATION ............................................ E-8
• MAIN UNIT OPERATION ............................. E-8
• REMOTE CONTROL OPERATION .......... E-10
CARE AND MAINTENANCE ................. E-11
• MAIN UNIT ................................................. E-11
• ODOR SENSOR / DUST SENSOR ........... E-11
• PRE-FILTER .............................................. E-11
• WASHABLE ACTIVE CARBON
FILTER CARE ........................................... E-12
• FILTER REPLACEMENT
GUIDELINES ............................................ E-13
TROUBLE SHOOTING .......................... E-14
SPECIFICATIONS ................................. E-15
INFORMATION ON PROPER DISPOSAL ... E-16
This apparatus complies with the
requirements of Council Directives
89/336/EEC and 73/23/EEC as
amended by Council Directive 93/
68/EEC.
Thank you for purchasing the SHARP Air Purifier. Please read this manual carefully for the correct
usage information. Before using this product, be sure to read the section: “Important Safety Instructions.”
After reading this manual, retain it in a convenient location for future reference.
E-1
ENGLISH
FEATURES
IMPORTANT SAFETY INSTRUCTIONS
When using electrical appliances, basic safety precautions should be followed, including the
following:
WARNING - To reduce the risk of electrical shock, fire or injury to persons:
• Read all instructions before using the air purifier.
• Use only a 220-240 volt outlet.
• Do not use the air purifier if the power cord or plug is damaged or the connection to the wall
outlet is loose.
• Periodically remove dust from the power plug.
• Do not insert fingers or foreign objects into the intake or air outlet.
• When removing the power plug, always hold the plug and never pull the cord.
Electrical shock and/or fire from short circuit may occur as result.
• Do not use this air purifier near gas appliances or fireplaces.
• Remove the power plug from the wall outlet before cleaning the unit and when not using the
unit.
Electrical shock from bad insulation and / or fire from short circuit may occur as a result.
• If the power cord is damaged, it must be replaced by the manufacturer, its service agent,
Sharp authorized servicers or similarly qualified persons in order to avoid a hazard.
• Do not operate when using aerosol insecticides or in rooms where there is oily residue, incense,
sparks from lit cigarettes, chemical fumes in the air or in very high humidity condition such as a
bathroom.
• Use care when cleaning the air purifier. Strong corrosive cleansers may damage the exterior.
• Only Sharp Authorized Servicers should service this air purifier. Contact the nearest Servicer for any
problems, adjustments, or repairs.
• The batteries must be removed from the remote control before disposal, and the batteries must be
disposed of safely.
CAUTIONS CONCERNING OPERATION
• Do not block the intake and air outlet.
• Do not use the unit near or on hot objects, such as range or where it may come into contact with
steam.
• Always hold the handle on the back of the main unit when moving it.
Holding the front panel when carrying may cause it to detach, thus dropping the unit and resulting in
bodily injury.
• Do not operate the unit without the filter.
Not only it does not improve filter performance, it may cause electric shock or malfunction.
• Clean the exterior with a soft cloth only.
The unit surface may be damaged or cracked.
In addition, the sensor may malfunction as a result.
REMOTE CONTROL LIMITATIONS
DO NOT USE THE REMOTE CONTROL IN THE FOLLOWING LOCATIONS:
• Any location where there is inverter lighting equipment or electronic spontaneous lighting
equipment
The remote control may become inoperative. In this case, move away from such lighting equipment
or change direction.
• Location exposed to direct sunlight or fluorescent.
The unit may not receive signals from the remote control.
E-2
• During the operation of the product, please place the unit at least 2m away from equipments
which involve electric wave such as televisions, radios or wave clocks, in case electrical
interference occurs to such equipments.
• Avoid a location where the sensors are exposed to direct wind.
The unit may not operate properly.
• Avoid locations where curtains, etc., come into contact with the intake or air outlet.
Curtains, etc., may become dirty or a malfunction may occur.
• Avoid locations where the unit is exposed to condensation, due to drastic temperature changes.
• Place on a stable surface with sufficient air circulation.
• Do not install when there is generation of lampblack, such as in a kitchen, etc.
The unit surface may crack or the sensor may malfunction as a result.
• Leave at least 60cm of space from the wall.
The wall behind the air outlet may become dirty as time passes. When using the unit for extensive
period in the same location, use a vinyl sheet, etc., to prevent the wall from becoming dirty. In addition, periodically clean the wall, etc.
FILTER GUIDELINES
• Follow the instructions in this manual for correct care and maintenance of the filters.
HOW SHARP AIR PURIFIER WORKS
An air purifier draws in room air from its air intake, lets the air pass through an Active Carbon Filter
(Deodorizing Filter) and a HEPA Filter (dust collection filter) inside of the unit, then discharges the air
from its air outlet. The air purifier repeats this process by moving its internal fan.
As air passes through, the HEPA Filter can remove dust particles. The Active Carbon Filter gradually
absorbs odor elements as they repeatedly pass through the filter.
(Odor elements are absorbed by HEPA Filter as well.)
Some odor ingredients absorbed by the filters may become separated and may be discharged through
the air outlet and result in additional odor. Depending on the usage environment, this odor may become
strong in a shorter period than expected.
In this case, purchase the optional replacement filter kit FZ-440SEF.
NOTE
• The air purifier is designed to remove
air-suspended dust and odor, but not
harmful gases (for example, carbon
monoxide contained in cigarette
smoke). If the odor sources still exist,
it cannot completely remove the odor.
(for example, odors from construction
materials and pet odors).
• It is suggested to open the window a
bit when you are smoking in order to
facilitate ventilation.
E-3
ENGLISH
INSTALLATION GUIDELINES
PART NAMES
MAIN UNIT DISPLAY
Odor Sensor
OFF Timer Display Indicator Lights
AUTO Operation Indicator Light
QUICK CLEAN operation Indicator Light
Filter Indicator Light
Remote Control Receiver
Pollen Mode Indicator Light
Plasmacluster
Fan Speed Indicator Lights
Indicator Light
CLEAN-SIGN Light
Odor Sensor
Dust Sensor
POWER ON/OFF Button See Page E-8
MODE Selection Button See Page E-8
Main Unit
Filter Frame
Band See Page E-7
HEPA Filter (blue/white) See Page E-7,13
(with Microbial Control Filter )
Washable Active Carbon Filter (black)
See Page E-7,12,13
Pre-Filter
Front Panel
Remote Control See Page E-10
BACK
Handle
Air Outlet
Date Label
INCLUDED
Remote Control (1 unit)
Battery (AA battery x 2 )
Power Cord
Power Plug
• Operation manual
(shape of plug depends on country)
E-4
PREPARATION
INSERTING BATTERIES IN THE REMOTE CONTROL
uster
Light
8
8
the back cover
1 Remove
Press and slide the back cover to
remove.
batteries
2 Insert
Insert batteries with
and
as
shown below.
ENGLISH
3 Close the back cover
Battery Information
• The battery life is about 1 year.
• The batteries for this remote control are for initial use only . Change the batteries
when necessary.
• Incorrect usage of the batteries may cause battery fluid leakage and/or damage.
Take care of the following when handling:
• When replacing the batteries, replace both batteries with new ones of the same
type. (Use 2 AA manganese batteries.)
• When not using the unit or remote control for an extended period, remove the
batteries.
• The batteries are for initial use only and may be depleted within 1 year.
ack)
REMOTE CONTROL USE
• Operate with the remote control facing the main
unit receiver.
• The signal range is about 7m.
• Make sure there are no objects blocking the
path of the signal.
• A beep sound will be heard from the main unit
when a signal is received.
NOTE
• Avoid dropping or damaging the remote
control, using in a high humidity condition, in
direct sunlight or near a heat source.
d
g
E-5
Receiver
Transmitter
PREPARATION
Be sure to remove the power plug from the wall outlet.
FILTER INSTALLATION
To maintain the quality of the filters, they are installed in the main unit within plastic bags.
Be sure to remove the filters from the plastic bags before using the unit.
1
Remove the filters
1 Remove the Front Panel.
Front Panel
Pull the bottom of the Front Panel.
out the Filter Frame and remove
2 Pull
the Pre-Filter, Active Carbon Filter and
HEPA Filter.
Filter Frame
Pre-Filter
the Active Carbon Filter
3 Remove
(black) and HEPA Filter (blue) from the
plastic bags.
Active Carbon Filter
Pre-Filter
HEPA Filter
Active Carbon Filter
HEPA Filter
Filter Frame
E-6
outlet.
2
Tabs
Install the filters
the HEPA Filter
1 Place
within the Filter Frame with
HEPA Filter
the tabs facing up.
Do not install the filter backwards or
the unit will not operate properly.
with the bands (2 places)
facing up.
ENGLISH
the Active Carbon Filter
2 Place
on top of the HEPA Filter
Filter Frame
Band
Active Carbon Filter
HEPA Filter
Filter Frame
the Pre-filter through
3 Place
the bands (2 places) located
Tabs (4 places)
Band
in the corners of the Active
Carbon Filter.
Insert the tabs of the pre-filter into
the associated holes of the Filter
Frame.
4
Holes
Mount the Filter Frame to
the main unit.
Main unit
Filter Frame
Band
the Front Panel to the
5 Fix
main unit.
in the usage start date
6 Fill
on the Date Label.
Use the date as a guide for the
Filter Replacement schedule.
Date Label
E-7
OPERATION
Main Unit Controls
•
•
•
•
•
•
MAIN UNIT OPERATION
Plasmacluster Indicator Light
Filter Indicator Light
Clean-Sign Light
AUTO
QUICK CLEAN
POLLEN
SILENT
MEDIUM
MAX
MODE Selection Button
Power ON/OFF Button
1
Power ON/OFF Button
• Used to start operation (short beep) and stop operation (long beep)
• Plasmacluster Indicator Light and Fan Speed Indicator Light turn on/off.
• Unless unplug the power cord, the operation starts in the previous mode the unit
was operated in.
2
MODE Selection Button
• The operation mode can be switched.
AUTO operation
The fan speed is automatically switched
(HIGH*, MEDIUM, SILENT) depending
on the amount of impurities in the air.
The sensors detect the impurities for
efficient air purification.
MAX operation
The unit will operate at a fan
speed of MAX.
QUICK CLEAN operation
The unit will operate at HIGH* fan speed
for 15 minutes, then will operate at Auto
operation.
The operation mode is effective when
quick removal of impurities in the air is
desired.
MEDIUM operation
The unit will operate at a fan
speed of MEDIUM.
POLLEN mode operation
SILENT operation
The unit will operate at HIGH* fan speed
for 10 minutes, then will alternate
between MEDIUM and HIGH* for 20
minutes.
10 minutes: HIGH fan speed
The unit will operate quietly
using minimal air intake.
* HIGH fan speed is an intermediate speed between MEDIUM
and MAX.
20 minutes: MEDIUM fan speed
20 minutes: HIGH fan speed
E-8
DETERMINING THE BASE IMPURITY RATE
For the first 30 seconds after the power plug is inserted into the wall outlet,
the unit will check the conditions of the air. If operation is set to ON during this
time, the CLEAN-SIGN LIGHT will alternately flash in green, orange and red.
PLASMACLUSTER INDICATOR LIGHT
Plasmacluster ion operation is selected using the remote control.
Blue light
Green light
When the Plasmacluster ion operation is in the Ion Control Mode, or in
AUTO Plasmacluster Ion Mode and the air in the room is clean, this light will
activate and the unit will operate in Ion Control Mode.
Light off
There are no Plasmacluster ions being generated.
• The light can be turned off by using the ‘Lights ON/OFF Button’ on the
Remote Control. In this case, Plasmacluster ions are generated.
(Please turn off the light when not required.) (See Page E-10)
CLEAN-SIGN LIGHT
The color changes according to the air condition.
Clean (Green)
Slightly Impure (Orange) Very Impure (Red)
ABOUT THE CLEAN-SIGN
• The condition of the CLEAN-SIGN depends on the room air condition
detected by the Dust and Odor Sensors when the plug is inserted into the wall
outlet.
• It is possible to have a green CLEAN-SIGN with impurities in the air at the
time that the air purifier was just introduced to the room environment. After
a while, however, the base impurity rate will be adjusted to detect room air
condition correctly.
• Use the Lights ON/OFF Button on the remote control to turn off the Indicator light.
FILTER INDICATOR LIGHT
Clean the Active Carbon Filter when the Filter Indicator Light activates.
(The indicator light will activate in about 2 months, when using the unit 24
hours daily.) (See Page E-12)
E-9
ENGLISH
When the Plasmacluster ion operation is in Clean Mode, or in AUTO
Plasmacluster Ion Mode and the air in the room is impure, the light will
activate and the unit will operate in Clean Mode.
OPERATION
REMOTE CONTROL OPERATION
POWER ON/OFF Button
• When you press the
POWER ON/OFF Button, a
short beep will sound and
operation will start in AUTO
Mode.
• Unless unplug the power
cord, the operation starts in
the previous mode the unit
was operated in.
• To stop, press the POWER
ON/OFF Button again.
A long beep will sound and
operation will stop.
Transmitter
Filter Reset Button
When the Washable Active Carbon Filter is cleaned and
reinserted into the main unit,
press the Filter Reset Button.
The Filter Indicator light will then
go out with a beep.
Auto (Fan Speed) Button
Off Timer Button
The fan speed switches automatically depending on the
amount of impurities in the air.
The set time switches every time
the button is pressed as shown
below.
Manual (Fan Speed) Button
The fan speed can be
switched among Silent,
MEDIUM and MAX settings.
Operations available with
the Remote Control
• AUTO
• MANUAL
• POLLEN
• OFF TIMER
• QUICK CLEAN
• LIGHTS ON/OFF
Plasmacluster Ion mode
selections
• AUTO
• CLEAN
• ION CONTROL
• OFF
Plasmacluster
1 hour
4hours
Cancel
8 hours
• The indicator light shows the
remaining time.
• The unit will stop operation when
the timer is up.
QUICK CLEAN Button
See page E-8
Pollen Mode Operation
Button
LIGHTS ON/OFF Button
Switches the Plasmacluster
Indicator Light and CLEANSIGN Light either ON or OFF.
See Page E-8
Plasmacluster Ion Mode Selections
(CLEAN)
AUTO
When pressed, the unit will switch between Clean
Mode and the Ion Control Mode automatically depending on the amount of impurities in the air as
detected by the dust and odor sensors. Clean
Mode will operate for 1 minute when the Auto function is selected.
(ION CONTROL)
When pressed, the unit will constantly operate in the Clean Mode,
in which the same numbers of positive and negative ions are discharged. The Plasmacluster Indicator Light is blue.
OFF
When pressed, the unit will constantly operate in
Ion Control Mode.
The Plasmacluster Ion Indicator Light is green.
E-10
The generation of ions will cease and
the Plasmacluster Indicator Light will
go out.
CARE AND MAINTENANCE
To maintain optimum performance of this air purifier, please clean the unit including
the sensor and filters periodically.
When cleaning the unit, be sure to unplug the power cord, and never handle the plug
with wet hands. Electrical shock and/or bodily injury may occur as a result.
Odor Sensor
Dust Sensor
Main Unit
HEPA Filter
Active Carbon Filter
Pre Filter
MAIN UNIT
To prevent dirt or stains on the main unit, clean as often as necessary. If stains are allowed to
remain, they may become hard to clean.
Wipe with a dry, soft cloth
For stubborn stains or dirt, use a soft cloth dampened with warm water.
Do not use volatile fluids
Benzene, paint thinner, polishing powder, etc., may damage the surface.
Do not use detergents
Detergent ingredients may damage the unit.
Keep the unit away from water
DUST/ODOR SENSORS
The sensitivity of the sensors will become
unstable if the odor or dust sensor is dirty
or blocked. Remove dust from the surfaces of the sensor openings using a
vacuum cleaner.
Hole of odor sensor
Hole of dust sensor
PRE-FILTER
As shown in a figure, clean the top
surface of the Pre- Filter lightly with a
vacuum cleaner.
When Pre- Filter is very dirty, wash it with
water added a mild kichen detergent and
dry Pre-Filter well in the shade.
Pre-Filter
E-11
ENGLISH
Do not wash the HEPA Filter.
Washing will not improve filter performance, and
it may even cause electric or malfunction.
CARE AND MAINTENANCE
WASHABLE ACTIVE CARBON FILTER CARE
the filter outdoors
5 Dry
if possible in a well
HAND WASH ONLY!
DO NOT TUMBLE DRY!
ventilated area.
Care Cycle
When the Filter Indicator Light lights up, this
indicates that the filter needs to be cleaned. If
the unit is kept on 24 hours a day then the Filter Indicator Light will activate in about 2
months.
The Filter Indicator Light is for reference. Clean
the filter as often as necessary when odor
persists.
CAUTION
Fill a large container with warm
1 and
water, add a mild kitchen detergent
stir.
Dilute as indicated on the
detergent container.
the filter to soak approxi2 Allow
mately 30 minutes before washing.
If the filter surface is
very dirty, scrub with
an old toothbrush.
• The wet filter is heavy. Fix it securely for
drying to make sure it does not fall down.
• The filter takes longer to dry in winter, on
rainy days. Wash it on a day when the
weather is good and dry it in the sun.
Move it indoors at night to prevent freezing.
• Dry the filter outdoors in a well ventilated
area. If dried indoors, the water dripping
off the filter may soil your floor.
• Make sure that the activated carbon has
not shifted to one side inside the filter. If it
has, distribute it evenly with your fingers.
• Let the filter dry thoroughly.
If used while the filter is still moist, then
the air that is exhausted from the main unit
will have an odor. It may take 1 or 2 days
to dry.
6 Reinstalling the Filters.
Reinstall the filters as shown on Page
E-6,7
thoroughly with
3 Rinse
clean water
Connect the power cord to the
7 outlet
and press the Filter Reset
Button on the Remote Control.
CAUTION
• Once the Filter Reset Button has been
activated, you will hear a beep sound
that means the unit has been reset.
• The Filter indicator light will then go
out automatically.
If rinsing in a container,
be sure to rinse 3 to 4
times so that the odor is
rinsed thoroughly from
the filter.
4 Remove excess water
The filter will be saturated with water after
rinsing. To decrease drying time, wrap the
filter in an old thick towel so that excess
water can be removed.
CAUTION
Some carbon may adhere to the towel, but it
is harmless.
E-12
FILTER REPLACEMENT GUIDELINES
Depending on the usage environment, air outlet odor may become strong
after several months.
If dust or odors cannot be removed easily, replace the filters.
(Refer to HOW SHARP AIR PURIFIER WORKS E-3)
Guide for filter replacement timing
• The following filter life and replacement period is based on the condition of smoking 10
cigarettes per day and the dust collection/deodorization power is reduced by half compared
with that of new filters.
We recommend to replace the filters more frequently if the product is used in a condition
significantly severer than normal household use.
About 5 years after opening
About 5 years after opening
ENGLISH
• HEPA Filter (with Microbial Control Filter)
• Active Carbon Filter
REPLACING THE FILTERS
1
2
See page E-6,7 for directions on how
to install the filters when replacing.
3
Fill in the usage start date of the filters
on the Date Label.
After replacing the filters:
Be sure to press the Filter Reset Button on the
Remote Control with the power cord connected to the
outlet.
A short beep will be heard and the operation hours
stored in the memory will be reset.
The Filter Indicator Light will then go out automatically.
Replacement Filters
Model: FZ-440SEF
• HEPA Filter (with Microbial Control Filter): 1 unit
• Active Carbon Filter: 1 unit
Please consult your dealer for purchase of
replacement filters.
Date Label
Disposal of Filters
Please dispose of replaced filters according to the local disposal laws and regulations.
HEPA Filter (with Microbial Control Filter) materials:
• Filter: Polypropylene
• Frame: Polyester
• Microbial Control Filter: Polypropylene, Polyethylene
Active Carbon Filter Materials:
• Deodorizer: Activated charcoal
• Net: Polypropylene 60%, Polyester 40%
E-13
TROUBLESHOOTING
Before calling for repair, please review the list below, since the problem may not be a unit malfunction.
SYMPTOM
REMEDY (not a malfunction)
The Remote Control does not
work
• Have the batteries been depleted?
• Are the batteries inserted correctly?
• Is a fluorescent lighting in the room flickering due to service
life?
Odors and smoke are not
removed
• Clean or Replace the filters if they appear to be heavily soiled.
(Refer to E-12,E-13)
The CLEAN-SIGN Light lights
green even when the air is
impure
• The air could be impure at the time the unit was plugged in.
(Refer to E-9)
The CLEAN-SIGN Light lights
orange or red even when the air
is clean
• The sensitivity of the sensors become unstable when the
opening of the odor sensor or dust sensor is dirty or is clogged.
Clean the dust around the sensor opening using a vacuum
cleaner. (Refer to E-11)
The Plasmacluster Indicator
Light remains green (or blue)
and does not change
• When in Clean Mode ( or Ion Control Mode), the Plasmacluster
Indicator Light color will not change.
A clicking or ticking sound is
heard from the unit
• Clicking sound is emitted when the unit is in the Ion Control
Mode, and ticking sound is emitted when the unit is generating
ions.
If the sound is irritating, set the unit away from you.
The discharged air has an
aroma or odor.
• Check to see if the filters are heavily soiled.
Replace the filters.
• Plasmacluster Air Purifiers emit small traces of ozone which
may produce an odor. The amount of ozone emitted by the ion
generator is very little which is below the safety levels set by
the IEC 60335-2-65, and it is harmless to the human body.
The unit does not operate when
cigarette smoke is in the air.
• Is the unit installed in a location that is difficult for the sensor to
detect cigarette smoke?
• Are the dust or odor sensor openings blocked or clogged?
(In this case, clean the openings.) (Refer to E-11)
The Filter Indicator Light
remains activated even after
replacing filter.
• After replacing filters, connect the power cord to an outlet and
press the Filter Reset Button on the remote control. (Refer to
E-12)
The Plasmacluster Indicator
Light or the CLEAN-SIGN Light
will not activate.
• Check to see if the Lights OFF Mode on the Remote Control is
selected. If so, then press the Lights ON/OFF Button on the
Remote Control to activate the indicator light.
(Refer to E-10)
ERROR DISPLAY
LAMP INDICATION
The “Silent” Fan Speed Indicator Light blinks.
REMEDY
Fan motor disconnected or abnormal.
Operation stops.
• Pressing the POWER ON/OFF button will reset the error
display, but if error occurs again, contact the shop where you
purchased the unit.
E-14
SPECIFICATIONS
Fan
Speed
Operation
Model
Power supply
Fan speed level
Rated power
Air Flow Volume
Applicable floor surface
Cord Length
Dimensions
Weight
FU-440E
MAX
32 W
240 m3/hour
220-240V 50/60Hz
MEDIUM
9W
120 m3/hour
SILENT
3.0 W
30 m3/hour
~31m2*
2.5m
415mm(W)x200mm(D)x585mm(H)
6.7kg
Standby Power
In order to operate the electrical circuits while the power plug is inserted in the wall outlet, this
product consumes about 0.7W of standby power.
For energy conservation, unplug the power cord when the unit is not in use.
E-15
ENGLISH
* The applicable floor surface area is the surface area for operating the unit in MAX fan level.
• Applicable floor surface area indicates the space where a certain amount of dust particle can be
removed in 30 minutes.
A. Information on Disposal for Users (private households)
1. In the European Union
Attention: If you want to dispose of this equipment, please do not use the ordinary dust
bin!
Attention: Your product is
marked with this symbol. It
means that used electrical
and electronic products
should not be mixed with
general household waste.
There is a separate
collection system for these
products.
Used electrical and electronic equipment must be treated separately and in
accordance with legislation that requires proper treatment, recovery and recycling of
used electrical and electronic equipment.
Following the implementation by member states, private households within the EU
states may return their used electrical and electronic equipment to designated
collection facilities free of charge*. In some countries* your local retailer may also
take back your old product free of charge if you purchase a similar new one.
*) Please contact your local authority for further details.
If your used electrical or electronic equipment has batteries or accumulators, please
dispose of these separately beforehand according to local requirements.
By disposing of this product correctly you will help ensure that the waste undergoes
the necessary treatment, recovery and recycling and thus prevent potential negative
effects on the environment and human health which could otherwise arise due to
inappropriate waste handling.
2. In other Countries outside the EU
If you wish to discard this product, please contact your local authorities and ask for the
correct method of disposal.
For Switzerland: Used electrical or electronic equipment can be returned free of
charge to the dealer, even if you don’t purchase a new product. Further collection
facilities are listed on the homepage of www.swico.ch or www.sens.ch.
B. Information on Disposal for Business Users.
1. In the European Union
If the product is used for business purposes and you want to discard it:
Please contact your SHARP dealer who will inform you about the take-back of the
product. You might be charged for the costs arising from take-back and recycling.
Small products (and small amounts) might be taken back by your local collection
facilities.
For Spain: Please contact the established collection system or your local authority for
take-back of your used products.
2. In other Countries outside the EU
If you wish to discard of this product, please contact your local authorities and ask for
the correct method of disposal.
E-16
SERVICE PROCEDURE / SERVICE VORGEHENSWEISE
SERVICE PROCEDURE - ONLY EFFECTIVE IN GERMANY
Dear SHARP customer,
SHARP machines are proprietary articles which are produced with precision and care according
to most modern production methods.
In case of proper handling and with considering of the instruction book, this machine will serve
you well for a long time.
Of course, a defect cannot be ruled out.
If your appliance has a warrantyable defect in the period of warranty, please contact your dealer,
where you bought the appliance. This dealer is your only contact person for any claim of warranty.
As proof for repairs during Warranty period, you need the invoice of the machine.
Please bring your defect appliances also to your dealer (where you bought the appliance) when
the warranty period is over.
SHARP ELECTRONICS (EUROPE) GMBH
Parts & Technical Service
SERVICE VORGEHENSWEISE - GILT NUR FÜR DEUTSCHLAND
Lieber SHARP-Kunde
SHARP- Geräte sind Markenartikel, die mit Präzision und Sorgfalt nach modernen
Fertigungsmethoden hergestellt werden.
Bei sachgemäser Handhabung und unter Beachtung der Bedienungsanleitung wird lhnen lhr
Gerät lange Zeit gute Dienste leisten.
Das Auftreten von Fehlern ist aber nie auszuschließen.
Sollte lhr Gerät während der Gewährleistungsfrist einen gewährleistungspflichtigen Mangel
aufweisen, so wenden Sie sich bitte an den Handelsbetrieb, bei dem Sie dieses Gerät erworben
haben, denn dieser ist lhr alleiniger Ansprechpartner für jegliche Gewährleistungsansprüche.
Als Nachweis im Gewährleistungsfall dient lhr Kaufbeleg.
Sollte sich nach Ablauf der Gewährlelstrungsfrist ein Fehier des Gerätes zeigen, so wenden Sie
sich bitte auch in diesem Fall an den Handelsbetrieb, bei dem Sie dieses Gerät erworben
haben.
SHARP ELECTRONICS (EUROPE) GMBH
Parts & Technical Service
SHARP CORPORATION
OSAKA, JAPAN
Printed in China
TINS-A148KKRZ 05B- 2