1
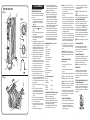
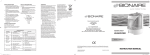
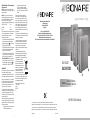
INSTALLATION OF A PLUG – Applicable to U.K. and Ireland. NOTE: If you are in any doubt about wiring and the installation of the plug. Please contact a qualified electrician. • the appliance has not been altered in any way or subjected to damage, misuse, abuse, repair or alteration by a person other than a person authorised by Holmes. Faults that occur through, improper use, damage, abuse, use with incorrect voltage, acts of nature, events beyond the control of Holmes, repair or alteration by a person other than a person authorised by Holmes or failure to follow instructions for use are not covered by this guarantee. Additionally, normal wear and tear, including, but not limited to, minor discoloration and scratches are not covered by this guarantee. NOTE: If a 13A 3-pin plug is fitted, it must be an ASTA approved plug, conforming to the BS1363 standard. Replacement 13 amp fuse must also be BSI or ASTA approved. The wires in this mains lead are coloured as such: GREEN & YELLOW - Earth BROWN - Live BLUE - Neutral Please note that the colour of these mains wires may not correspond with the colour markings that identify the terminals in your plug. Please proceed as follows: • The wire which is coloured GREEN & YELLOW must be connected to the terminal which is marked with the letter E ( ) or is coloured GREEN, or GREEN &YELLOW. • The BROWN coloured wire must be connected to the pin terminal, which is marked with the letter L (Live) or is coloured RED. • The BLUE coloured wire must be connected to the pin terminal which is marked with the letter N (Neutral) or is coloured BLACK. • DO NOT CONNECT either of these wires to the earth terminal in the plug. The earth terminal is marked with the letter E ( ) or is coloured GREEN, or GREEN & YELLOW. pure indoor living Holmes Products (Europe) Ltd. 1 Francis Grove London SW19 4DT England Fax: +44 (0)20 8947 8272 Email: [email protected] UK - Filter Sales Order Line - 0870 759 9000 Website address: www.bionaire.com UK - Free phone Customer Service Helpline – 0800 052 3615 The rights under this guarantee shall only apply to the original purchaser and shall not extend to commercial or communal use. If your appliance includes a country-specific guarantee or warranty insert please refer to the terms and conditions of such guarantee or warranty in place of this guarantee or contact your local authorized dealer for more information. This marking indicates that this product should not be disposed with other household wastes and should be disposed separately throughout the EU. To prevent possible harm to the environment or human health from uncontrolled waste disposal due to the presence of hazardous substances within the product, recycle it responsibly to promote the sustainable reuse of materials and resources. To return your used device, please use the return and collection systems available to you or contact the retailer where the product was purchased. They can take this product for environmentally safe recycling. GUARANTEE Please keep your receipt as this will be required for any claims under this guarantee. This appliance is guaranteed for 5 years after your purchase as described in this document. During this guaranteed period, if in the unlikely event the appliance no longer functions due to a design or manufacturing fault, please take it back to the place of purchase, with your till receipt and a copy of this guarantee. OIL FILLED RADIATORS MODELS# Holmes Products (Europe) Limited 1 Francis Grove London SW19 4DT UK The rights and benefits under this guarantee are additional to your statutory rights, which are not affected by this guarantee. Only Holmes Products (Europe) Ltd. (“Holmes”) has the right to change these terms. Holmes undertakes within the guarantee period to repair or replace the appliance, or any part of appliance found to be not working properly free of charge provided that: © 2010 Sunbeam Products, Inc. doing business as Jarden Consumer Solutions. All rights reserved. Distributed by Holmes Products (Europe) Ltd., 1 Francis Grove, London SW19 4DT, United Kingdom. Printed in PRC • you promptly notify the place of purchase or Holmes of the problem; and © 2010 Sunbeam Products, Inc. faisant affaires sous le nom de Jarden Consumer Solutions. Tous droits réservés. Distribué par Holmes Products (Europe) Ltd., 1 Francis Grove, London SW19 4DT, United Kingdom. Imprimé en RPC SPR-060210 4 P/N: 138183 OH1503, BOH2003, B BOH2003B, BOH2503 INSTRUCTION MANUAL BOH1503/2003/2503 Fig. 1 A B Fig. 2 C H 1 2 3 I 1 2 3 D J E L G O F Fig. 3 G L K M N O 18.The heater cannot be used adjacent to curtains or combustible material. Curtains or combustible material may be burned if the heater was installed incorrectly. 19.This appliance is not intended for use by persons (including children) with reduced physical, sensory or mental capabilities, or lack of experience and knowledge, unless they have been given supervision or instruction concerning use of the appliance by a person responsible for their safety. Children should be supervised to ensure that they do not play with the appliance. 20.This heater is filled with a precise quantity of special oil. Repairs requiring opening of the oil container are only to be made by the manufacturer or his service agent who should be contacted if there is an oil leak; 21When scrapping the heater, follow the regulations concerning the disposal of oil. U.K. and IRELAND PLEASE READ AND SAVE THESE IMPORTANT INSTRUCTIONS When using electrical appliances, basic safety precautions should always be taken including the following: 1. Before connecting the heater, check that the voltage indicated on the rating plate corresponds to the main voltage in your home/office. 2. WARNING: In order to avoid overheating, do not cover the heater ( ) Reference to product. 3. DO NOT position the heater directly under a power socket. 4. DO NOT use this heater in the immediate surroundings of a bath, a shower or a swimming pool. 5. If the supply cord or plug is damaged, it must be replaced by the manufacturer or its service agent or similarly qualified person in order to avoid hazard. The heater contains no user serviceable parts. Should the product suffer damage or breakdown, it must be returned to the manufacturer or their service agent. 6. Under the environment with electrical fast transient, the product may malfunction. 7. DO NOT use this heater with a programmer, timer or any other device that switches the heater on automatically, since a fire risk exists if the heater is covered or positioned incorrectly. 8. Only touch the heater with dry hands. 9. DO NOT use this heater outdoors. 10.DO NOT position where it can be touched by children, especially the very young. 11.Allow a safe area around the heater away from furniture or other objects; at least 50 cm from the top and sides and 200 cm at the front. The heater is to be placed at least 3m from water source. 12.DO NOT use this heater when it is lying on its side. 13.DO NOT use the heater in rooms with explosive gas (e.g. petrol) or while using, oxygen, inflammable glue or solvent (e.g. when gluing or varnishing parquet floors, PVC etc.) 14.DO NOT insert any objects into the heater. 15.Keep the mains cord at a safe distance from the main body of the heater. 16.If overheating should occur, the built-in overheating safety device will switch off the heater. 17.DO NOT place the cord under a rug. DESCRIPTIONS (See Fig. 1, 2 & 3) A. Heated Fins B. Vents C. Pull down handle D. Front Panel E. Cord Storage. F. Power cord G. Front castor assembly H. Thermostat Knob I. Power light J. Control Knob K. Front wing nut L. Castor M. Rear Castor assembly N. Rear wing nut 0. U bolt Technical Specifications BOH1503 Wattage: 1500W BOH2003/B Wattage: 2000W BOH2503 Wattage: 2500W ASSEMBLY INSTRUCTIONS (See Fig. 3) Please make sure the heater has not been plugged into any electricity outlet. Carefully remove heater from box. Some accessories are packed internally. Please make sure you have all of the following accessories prior to throwing away packaging. 2 Castor assemblies with four castors (M, G & L), and 2 U Bolts with wing nuts (O, K, N). 2 Note: This unit is for FLOOR USE ONLY. 1. Turn the heater upside down and you will see 2 U bolt’s (O) with wing nuts over the first and last joint of the heater. 2. Unscrew the wing nuts (N & K) from the U-bolts (O). 3. Start with the front of the unit and place one hole of the front castor assembly (G) to the L shape of the U-bolt (O) and the other hole of the castor assembly into the other end of the U-bolt, then screw on the wing nut (K). 4. Repeat step 3 for the rear castor assembly, using wing nut (N) instead of wing nut (K) and rear castor assemblies (M). 5. BOH1503 ONLY. Use your hand to press the four casters (L) onto the four axis of the two foot plates until you hear them click into place. Use your hand to turn the castors and if the move smoothly they have been installed properly. 6. After installation of the front and rear castor assemblies and the castors turn the heater the right way up: the heater is now ready for use. NOTE: BOH1503 ONLY. Make sure when assembling the castor assemblies and castors that they are pointing outwards for maximum stability. 3. The control will now automatically maintain the pre-set temperature level by turning the heater ON and OFF. NOTE: The Power light will remain lit during operation. NOTE: It is normal for the heater to cycle ON and OFF as it maintains the preset temperature. FROST GUARD INSTRUCTION Plug the heater in, then select the highest heat setting (3), then turn thermostat knob to the lowest temperature position ( ) the temperature will be maintained at 5° C, thus the heater will be in the off status unless the room temperature is lower than 5° C. If the room temperature is lower than 5° C, the heater will automatically start working and will keep turning on & off all the time, maintaining its ambient temperature of 5° C. NOTE: Unit must be unplugged for it to be fully off. TIP OVER PROTECTION When the unit is accidentally knocked over, or tilts on one side at more than a 45° angle; it will instantly shut off. To reset, simply place the heater in an upright position. TRANSPORTING THE UNIT Locate the pull down handle (C) above the control panel. Pull down to release and then grasp the handle. Pull the unit using the handle ensuring that all castors are in contact with the floor. OPERATING INSTRUCTIONS (See Fig. 1 & 2) 1. Set the unit to the OFF (O) position. NOTE: Do not use handle to lift the product . 2. Plug in heater. STORAGE TIPS If the heater is not required for long periods, for example during the summer, it should be stored at room temperature; in a dry place and preferably covered to prevent the accumulation of dust and dirt. 3. S et the Thermostat Knob (H) all the way to the right. 4. Turn the Control Knob (J) to desired level of heat. BOH1503: 1 = 700W, 2= 800W, 3= 1500W BOH2003/B: 1= 900W, 2= 1100W, 3= 2000W FITTING A REPLACEMENT PLUG FOR U.K. AND IRELAND ONLY. If the plug is not suitable for the socket outlets in your home, it can be removed and replaced by a plug of the correct type. For correct type and correct installation please refer to “Installation of a plug” below. BOH2503: 1= 1200W, 2= 1300W, 3= 2500W NOTE: When the heater is in use, it is normal that the heater cycles ON and OFF, this is to maintain your desired temperature. After using the heater, turn the Control Knob (J) to “0” position, turn the Thermostat Knob (H) to lowest temperature position and unplug the heater from the socket. SETTING THE THERMOSTAT 1. Set the Thermostat control all the way to max. 2. W hen the desired temperature/comfort level is reached, turn the thermostat control anti-clockwise to a lower position or until the heater stops operating. 3