1
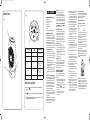
BFH261/265IUK07EM1.qxd
6/8/07
9:28 AM
GUARANTEE
PLEASE KEEP YOUR RECEIPT AS THIS WILL
BE REQUIRED FOR ANY CLAIMS UNDER
THIS GUARANTEE.
• This product is guaranteed for 2 years.
• In the unlikely event of breakdown, please
take it back to the place of purchase, with
your till receipt and a copy of this guarantee.
• The rights and benefits under this guarantee
are additional to your statutory rights which
are not affected by this guarantee.
• The manufacturer undertakes within the
specific period, to repair or replace free of
charge, any part of the appliance found to be
defective provided that:
• We are promptly informed of the defect.
• The appliance has not been altered in any
way or subjected to misuse or repair by a
person other than a person authorised by the
manufacturer.
• No rights are given under this guarantee to a
person acquiring the appliance second hand
or for commercial or communal uses
• Any repaired or replaced appliance will be
guaranteed on these terms for the remaining
portion of the guarantee.
THIS PRODUCT IS MANUFACTURED TO
COMPLY WITH THE E.E.C. DIRECTIVES
73/23/EEC, 89/336/EEC AND 98/37/EEC.
Waste electrical products
should not be disposed of
with Household waste.
Please recycle where
facilities exist.
Check on the following
website for further recycling
and WEEE information:
www.bionaire.com or e-mail
[email protected]
Page 1
FAN
heater
BFH261
BFH265
Holmes Products (Europe) Ltd
1 Francis Grove
London SW19 4DT
England
Fax: +44 (0)20 8947 8272
Email: [email protected]
Website address: www.bionaire.com
UK - Free phone Customer Service Helpline – 0800 052 3615
© 2007 Sunbeam Products, Inc. doing business as Jarden Consumer Solutions. All Rights Reserved.
9100020007773
BFH261/265IUK07EM1
INSTRUCTION MANUAL
BFH261/265IUK07EM1.qxd
6/8/07
9:28 AM
Page 5
U.K. and IRELAND
BFH261/265
Fig.2
GENERAL DESCRIPTION (FIG. 1-2)
A. Power Light
B. Pre-Set Temperature Lights
C. Low Power
D. High Power
E. Mode/Off Control
F. Base
G. Oscillation Button ( For BFH265 only )
Fig.1
A
B
D
E
C
PRESS
TEMPERATURE
1
II
HIGH (2 kW)
2
I
LOW (1 kW)
3-7
II
HIGH (2 kW)
16°C, 18°C, 20°C,
22°C, 24°C
8 - 12
I
LOW (1 kW)
16°C, 18°C, 20°C,
22°C, 24°C
13
O/Off
O/Off
F
G (BFH265)
ADDITIONAL FEATURES:
1. Press & hold
at any time to turn the heater off. Heater will save the
last setting in memory.
2. Press
to turn heater on and heater will recall the last setting in memory.
3. Select the desired thermostat setting. The heater will cycle ON and OFF
as it maintains the preset temperature.
OPERATING INSTRUCTIONS
Your heater is equipped with a technologically
advanced 1TouchTM electronic thermostat. You
can set the heater to run continuously in manual
mode or set the 1TouchTM Thermostat to your
desired temperature setting. The 1TouchTM
thermostat will automatically turn the heater ON
or OFF to maintain the preset comfort level. The
comfort level ranges between 16ºC and 24ºC.
Manual Mode Instructions
1. Plug the heater into the wall socket.
2. To start the heater, push the MODE/OFF (E)
button once for the HIGH manual setting.
3. Press the button again for the LOW manual
setting.
4. To stop the unit, press and hold the
MODE/OFF button for three seconds or keep
pressing the button until all the temperature
indicator lights are OFF.
NOTE: The Power Light (A) will remain lit
during operation. In Manual Mode, only the
LOW (C) or HIGH (D) indicator lights will be
lit.
1TOUCHTM Thermostat Instructions
To take advantage of the 1TouchTM Thermostat
continue to press the MODE/OFF button until
the desired temperature is set in either the
HIGH or LOW setting. When ambient
temperature rises above the set temperature,
the heater will stop. When the ambient
temperature drops below the set temperature,
the heater will turn on automatically.
NOTE: When the 1TouchTM thermostat is set,
either the HIGH (D) or LOW (C) indicator lights,
and the Set Temperature Light (B) will remain lit
during operation.
NOTE: It is normal for the heater to cycle ON
and OFF as it maintains the preset temperature.
To prevent the unit from cycling, you need to
raise the thermostat setting.
NOTE: 1TouchTM has memory. The 1TouchTM
thermostat will remember the previous
temperature setting after the unit has been
turned off by holding the MODE/OFF button for
3 seconds. However, if the unit is unplugged,
the 1TouchTM thermostat will be reset and will no
longer remember the previous temperature setting.
Oscillation Instructions (BFH265 only)
Press
button (G) to start and
button
(G) again to stop oscillation.
AUTO SAFETY SHUT-OFF
This heater is equipped with a technologically
advanced, safety system that requires the user
to reset the heater if there is a potential
overheat situation. When a potential overheat
temperature is reached, the system will
automatically shut the heater off. It can only
resume operation when the user resets the unit.
To reset the heater
1. Press the MODE/OFF button for two
seconds or keep pressing the button until all
the temperature indicator lights are OFF.
2. Unplug the heater and wait for 30 minutes for
the unit to cool down.
3. After the 30 minutes, plug the unit in again
and operate normally.
Safety Back-Up Fuse
In the unlikely case the heater does not respond to
an overheat situation, the safety back-up fuse will
engage. In this case, the heater will not reset.
Please contact your local service number on the
back of the manual for advice.
PLEASE READ AND SAVE THESE
IMPORTANT INSTRUCTIONS
When using electrical appliances, basic safety
precautions should always be taken including
the following:
1. Before connecting the heater, check that the
voltage indicated on the rating plate corresponds
to the main voltage in your home/office.
2. WARNING: In order to avoid overheating, do
not cover the heater .
3. DO NOT position the heater directly under a
power socket.
4. Do not use this heater in the immediate
surroundings of a bath, a shower or a
swimming pool.
5. If the supply cord or plug is damaged, it must
be replaced by the manufacturer or its
service agent or similarly qualified person in
order to avoid hazard. The heater contains
no user serviceable parts. Should the product
suffer damage or breakdown, it must be returned
to the manufacturer or their service agent.
6. Under the environment with electrical fast
transient, the product may malfunction and
require user to reset the product.
7. Do not use this heater with a programmer,
timer or any other device that switches the
heater on automatically, since a fire risk
exists if the heater is covered or positioned
incorrectly.
8. Only touch the heater with dry hands.
9. DO NOT position where it can be touched by
children, especially the very young.
10.DO NOT use this heater outdoors.
11. Allow a safe area around the heater away
from furniture or other objects; at least 50 cm
from the top and sides and 200 cm at the
front.
12.Do not use this heater when it is lying on its
side.
13.DO NOT use the heater in rooms with
explosive gas (e.g. petrol) or while using
inflammable glue or solvent (e.g. when gluing
or varnishing parquet floors, PVC etc.).
14.DO NOT insert any objects into the heater.
15.Keep the mains cord at a safe distance from
the main body of the heater.
16.If overheating should occur, the built-in
overheating safety device will switch off the
heater.
17.Do not place the cord under a rug.
18.The heater is to be installed so that switches
and other controls cannot be touched by a
person in the bath.
19.Avoid the use of an extension cord because
it may cause the heater to overheat.
20.CAUTION: In order to avoid a hazard due
to inadvertent resetting of the thermal cutout,
this appliance must not be supplied through
an external switching device, such as a timer,
or connected to a circuit that is regularly
switched on and off by the utility.
For U.K. and Ireland only:
If the plug is not suitable for the socket outlets in
your home, it can be removed and replaced by
a plug of the correct type. Please refer to
"Installation of a plug" below.
INSTALLATION OF A PLUG
Applicable to U.K. and Ireland
The wires in the mains lead are coloured as
such:
BROWN
LIVE
BLUE
NEUTRAL
Please note that the colour of these mains wires
may not correspond with the colour markings
that identify the terminals in your plug. Please
proceed as follows:
The BROWN coloured wire must be connected
to the terminal, which is marked with the letter
"L" or is coloured RED.
The BLUE coloured wire must be connected to
the terminal, which is marked with the letter "N"
or is coloured BLACK.
DO NOT CONNECT either of these wires to the
earth terminal in the plug. The earth terminal
plug is marked with the letter "E", or with the
earth symbol
or coloured GREEN and
YELLOW.
13 amp
NOTE: If the terminals in the plug are not
marked or if you are unsure or in doubt about
the installation of the plug please contact a
qualified electrician. If a 13A 3-pin plug is fitted,
it must be an ASTA approved plug, conforming
to BS1363 standard. Replacement 13A fuses
must be BSI or ASTA BS1362 approved.