1
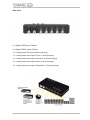
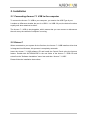
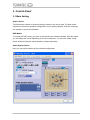
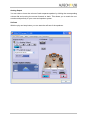
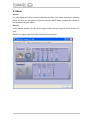
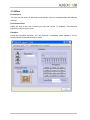
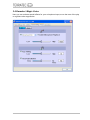
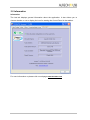
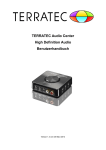
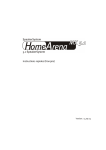
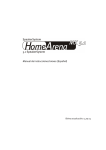
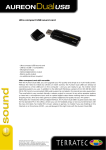
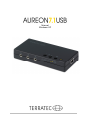
Manual
Windows XP
Version 30/09/2010
CE Declaration
We:
TERRATEC Electronic GmbH, Herrenpfad 38, D-41334 Nettetal, Germany
hereby declare that the product:
Aureon 7.1 USB
to which this declaration refers are in compliance with the following standards or standardizing documents:
1. EN55022: 2006
2. EN55024: 1998 + A1: 2001+ A2: 2003
The following are the stipulated operating and environmental conditions for said compliance:
residential, business and commercial environments and small-company environments.
This declaration is based on:
Test report(s) of the EMC testing laboratory
The information in this document is subject to change without notice and shall not be deemed as a warranty by
the seller. No warranties, express or implied, are made with regard to the quality, suitability or accuracy of this
document. The manufacturer reserves the right to change the contents of this document and/or the associated
products at any time without the provision of prior notice to specific persons or organizations. The manufacturer shall not be held liable for damages of any kind arising from the use, or the inability to use this product or
its documentation, even if the possibility of such damage is known. The information in this document is subject
to copyright. All rights are reserved. No part of this manual may be reproduced or transmitted in any form or for
any purpose without the express written permission of the copyright holders. Product and brand names contained in this document are used for identification purposes only. All registered trademarks, product designations or brand names used in this document are the registered property of their respective owners.
©TERRATEC Electronic GmbH, 1994-2010. All rights reserved (30/09/2010).
2
Inhalt
1. Introduction...................................................................................................................... 4
1.1 Package Content ....................................................................................................... 4
1.2 Layout of the Aureon 7.1 USB ................................................................................... 5
2. Installation ....................................................................................................................... 7
2.1 Connecting Aureon 7.1 USB to the computer ............................................................ 7
2.2 Drivers? ...................................................................................................................... 7
3. Control-Panel .................................................................................................................. 8
3.1 Main Setting ............................................................................................................... 8
3.2 Mixer ........................................................................................................................ 10
3.3 Effect ........................................................................................................................ 11
3.4 Karaoke / Magic Voice ............................................................................................. 12
3.5 Information ............................................................................................................... 13
3
1. Introduction
1.1 Package Content
Start by making sure that nothing is missing.
The scope of delivery includes at least the following:
•
1 USB sound card Aureon 7.1 USB
•
1 USB cable (1.8m)
•
1 optical cable (1.8m)
•
1 Software CD
•
1 Quick Start Guide
•
1 Customer service card
4
1.2 Layout of the Aureon 7.1 USB
Front View
1 – Analog Headphone stereo line output (3.5mm jack plug)
2 – Analog Microphone input (3.5mm jack plug)
3 – Analog Microphone input (3.5mm jack plug)
4 – USB port
5 – Volume up
6 – Volume down
7 – Mute
5
Rear View
8 – Digital S/PDIF input (Toslink)
9 – Digital S/PDIF output (Toslink)
10 – Analog stereo line input (3.5mm jack plug)
11 – Analog stereo line output “Front” (3.5mm jack plug)
12 – Analog stereo line output “Surround” (3.5mm jack plug)
13 – Analog stereo line output “Rear” (3.5mm jack plug)
14 – Analog stereo line output “Center/Sub” (3.5mm jack plug)
6
2. Installation
2.1 Connecting Aureon 7.1 USB to the computer
To connect the Aureon 7.1 USB to your computer, you need a free USB Type A port.
It makes no difference whether the port is a USB 1.1 or USB 2.0 port; the device functions
equally well when attached to either.
The Aureon 7.1 USB is hot-pluggable, which means that you can connect or disconnect
the unit at any time while the computer is running.
2.2 Drivers?
When connected to your system for the first time, the Aureon 7.1 USB installs a driver that
is integrated into Windows; this process is completely automatic.
Insert the Aureon 7.1 USB software CD and install the Control Panel using the Autorun
feature. Double-click AUTORUN.EXE in the root folder of the Aureon 7.1 USB CD and
select first the "Software Installation" menu item and then “Aureon 7.1 USB”.
Please follow the installation instructions.
7
3. Control-Panel
3.1 Main Setting
Output device
This defines the number of channels that go directly to the sound card. For best sound
experience choose the speaker-configuration of your audio-playback. Click the configuration symbol to get more information.
DSP-Modus
To access the DSP mode, you have to activate the two switches labelled. With this mode
you can adjust the sound depending on the circumstances. You can also switch virtual
boxes, without having the actual speaker to adjust physically.
Audio System Status
Here you can see the status of the selected configuration.
8
Analog Output
You can raise or lower the volume of each separate speaker by clicking the corresponding
volume dial and moving the mouse forwards or back. This allows you to match the surround sound perfectly to your room and speaker system.
Self test
With the play and stop button you can start the self test of the speakers.
9
3.2 Mixer
Volume
You can adjust the volume of each individual input here. The faders controls the different
inputs and give you the ability to mute one using the MUTE button or adjust the volume of
the speakers using the faders.
Record
In the Record window you can set the signal source that you want to record and its volume.
S/PDIF is a digital signal that does not allow volume control.
10
3.3 Effect
Environment
You can use this menu to simulate sound effects. Have fun experimenting with different
settings!
Environment Size
Select the size of the room in which you have set up the 7.1 speakers. This selection
adjusts the volume to the room.
Equalizer
Using the integrated equalizer, you can increase or attenuate audio signals in 10 frequency bands to emphasize bass or treble.
11
3.4 Karaoke / Magic Voice
Here you can activate special effects for your microphone input, move the tone of the play
or regulate voice suppression.
12
3.5 Information
Information
The last tab displays general information about the application. It also allows you to
choose whether or not to display the icon for starting the Control Panel in the taskbar.
For more information on please visit our webpage www.terratec.com
13