1
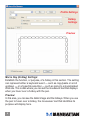
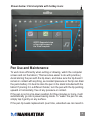
Graphics
tablet
user
manual
Model 177405
MAN-177405-UM-1109-01
introduction
Thank you for purchasing this MANHATTAN ® Graphics Tablet, Model
177405.
Offering a flexible way to work with Adobe PhotoShop, Illustrator and
Flash, Corel Painter, Autodesk Maya and 3D Studio Max, Pro/E and
other popular software applications, it’s more precise and intuitive than
a traditional keyboard and mouse combination, as every point on the
tablet has a corresponding location on your monitor screen.
The lightweight RF wireless pen — with 1,024 pressure sensitivity levels
and tilt — enables the creation of computer graphics, technical drawings
and other digital documents in a way that’s more natural and instinctive.
Two programmable buttons are easily customized to suit users and
project requirements. Automatic power-save reduces battery drain and
keeps both devices ready for use. An integrated menu strip contains
built-in hotkeys for on-tablet control of common menu commands and
application functions for an uninterrupted workflow, and a transparent
overlay protects the active area and secures documents for tracing.
Additional features:
• Compatible with Windows and Mac systems
• Includes Macro Key Manager, Free Notes, Office Ink, Power Presenter
RE II and ULEAD PhotoImpact 12 SE software
• Lifetime Warranty
System Requirements
• Windows 2000/XP/Vista/7; or Mac OS X 10.2.8 or above
• Pentium III equivalent or higher; 256 MB hard disk space and 128 MB
RAM recommended
Package Contents
• Graphics Tablet, A5 / 5.25 x 8.75 in.
• RF wireless pen with AAA battery and pen holder
• Macro Key Manager, Free Notes, Office Ink and Power Presenter RE
II (for Windows 2000/XP/Vista) and ULEAD PhotoImpact 12 SE
• User manual, hotkey templates, driver and software CDs
3
FCC Compliance Statement
This equipment has been tested and found to comply with the limits for a
Class B digital device, pursuant to Part 15 of FCC Rules. These limits are
designed to provide reasonable protection against harmful interference
when the equipment is operated in a residential installation. This equipment
generates, uses and can radiate radio frequency energy and if not installed
and used in accordance with the instruction manual may cause harmful
interference to radio communications. However, there is no guarantee
that interference will not occur in a particular installation.
If this equipment causes harmful interference to radio or television
reception, which can be determined by turning the equipment off and on,
the user is encouraged to try to correct the interference by one or more
of the following measures:
• Reorient the receiving antenna.
• Increase the separation between the equipment and receiver.
• Connect the equipment into an outlet on a circuit different from that to
which the receiver is connected.
Changes or modifications not expressly approved by the party responsible
for compliance can void the user’s authority to operate the equipment.
This product is equipped with a shielded cable. Extension cable, if used,
must be shielded in order to comply with the emission limits. Operation
of this device is subject to the following conditions: 1) This device may
not cause harmful interference, and 2) This device must accept any
interference received, including interference that may cause undesired
operation.
CE Compliance Statement
This product complies with all the requirements of the EMC Directive
89/336/EEC. This product has been tested and found to comply with:
• lEN55022 (CISPR 22) — Electromagnetic interference
• lEN50082-1 (IEC801-2, IEC801-3, IEC801-4) — Electromagnetic immunity
• lEN60950 (IEC60950) — Product safety
4
installation
Hardware / Initial Setup
1.Use the included USB cable to connect the Graphics Tablet to a USB
port on your PC. NOTE: For Windows 2000 & XP, install the Macro
Key Manager program first (from the included “For PC” CD), before
connecting the device.
2.Check that the Activity LED at the top-right of the tablet is blinking to
indicate a valid connection.
3.Insert the included AAA battery in the wireless pen by unscrewing the
top of the pen to open the battery
compartment and placing the
battery with the positive
end toward the pen tip
(bottom), as shown.
Re-assemble the
pen and place it in the included pen holder.
Driver Installation
For Windows:
1.Insert the included installation CD (“For PC”) in your CD-ROM drive.
2.After the setup screen displays, select the first item to be installed and
follow the on-screen instructions to complete the installation. NOTE:
If the installation doesn’t begin automatically, you can start it manually
by double-clicking My Computer and then selecting “CD-ROM Driver”
and “Setup.exe.”
For Mac:
1.Install the included “For Mac” CD, unzip the driver and save the files
to your hard drive.
2.In the Applications menu, select the Pen Pad program.
3.If you’re logged in as an administrator, an Authentication window will
prompt you to enter a name and password. Click “OK” when done.
4.When the Pen Pad Introduction screen displays, click “Continue.”
5.On the next screen (below), select “Easy Install” from the drop-down
menu and click “Install.”
5
6.When the next (Finish
Up) screen displays,
click “Restart.”
7. With OS 10.4 and above,
once you reboot, a
security screen prompts
you to fix the security
setting. Click “Fix.”
operation
Basic Startup
For Windows:
1.Click on the Macro Key Manager icon at the bottom-right of your
desktop system tray. (The tablet icon will appear when the USB cable
is plugged in.) NOTE: The Graphics Tablet works as a Plug and Play
device with Windows Vista/7; that is, basic operation is possible
without loading any additional applications. However, operation is
much more efficient and productive when the Macro Key Manager
program is installed. For information about Windows Vista/7 hand writing recognition features, refer to your Window OS instructions.
2.As mentioned in Initial Setup, check that the Activity LED at the top right of the tablet is blinking to indicate a valid connection.
3.Moving the pen tip over the working (preview) area of the tablet should
result in matching movement of the cursor on the screen.
6
When you install Macro Key Manager with Windows Vista, a “Do you want to
install Virtual Device?” prompt is likely to appear. Virtual Device is a program
that supports Windows’ inking function. If you need this function for your MS
Office application, click “Yes”; if you don’t need the function, click “No.”
Virtual Device installation may prevent you from launching some online or 3D
games. If this is the case, un-install Macro Key Manager, then re-install it and
click “No” when the “Do you want to install Virtual Device?” prompt appears.
For Mac:
1.In the Applications menu, select the Pen Pad program.
2.As mentioned in Initial Setup, check that the Activity LED at the top right of the tablet is blinking to indicate a valid connection.
3.Moving the pen tip over the working (Preview) area of the tablet should
result in matching movement of the cursor on the screen.
Macro Key Manager
Opening the Macro Key Manager program presents you with an on-screen
control panel featuring three operational sections (top to bottom, shown
on the next page): Profile Settings, Macro Key (commonly referred to as
“hotkeys”) Settings and Preview (the active/working area).
Three hotkey templates are also provided (XP, Vista and Mac; shown
below) that can be placed beneath the tablet’s transparent overlay, each
with several fixed and pre-configured (default) hotkeys that cannot be
modified. NOTE: If these default settings aren’t exactly what you need
or prefer, you can use the remaining definable hotkeys to create your
own profiles, as detailed below.
Profile Settings:
1.Click “New” to create and name a hotkey profile, which is a short
sequence of keyboard keys that serves as a shortcut to opening files, .
running programs, selecting Internet services, etc.
2.If a profile is being set for a particular software application, click the
browser icon
to display all the installed programs and select the
desired program.
3. Click “OK” to complete the setting of the profile.
7
Profile Settings
Hotkey
Settings
Preview
Macro Key (Hotkey) Settings:
Establish the function, or purpose, of a hotkey in this section. The setting
can represent either a keyboard event — such as copy/paste or scroll
up/down — or a hyperlink selection — such as going to a bookmarked
Web site. This is also where you can set the mouseover text that displays
when you hover over a hotkey with the pen.
Preview:
In this area, you can see the tablet image and the hotkeys. When you use
the pen to hover over a hotkey, the mouseover text that identifies its
purpose will display here.
8
Shown below: Vista template with hotkey icons
NOTE: Expanded view
of top-right corner of
the Vista template.
Pen Use and Maintenance
To work more efficiently when writing or drawing, watch the computer
screen and not the tablet. (This becomes easier to do with practice.)
Avoid storing the pen with the tip down, and make sure the tip doesn’t
remain in contact with anything, as constant pressure on the tip can drain
the pen’s battery. It’s best to store the pen in the stand included with the
tablet: If placing it in a different holder, turn the pen with the tip pointing
upward or horizontally, free of any pressure or contact.
If the pen is not in a tip-down position for three minutes or more, it will
automatically go into a power-saving mode. To “wake” the pen for use,
simply tap it gently on any surface.
If the pen tip needs replacement (over time, extended use can result in
9
erratic response), remove it with a pair of tweezers and insert one of the
included replacement tips.
Double-tapping:
For best results when double-tapping the pen (equivalent to double-clicking
a mouse), keep the tip on the tablet’s surface. Otherwise, lift the pen tip as
little as possible before the second tap.
Scrolling/panning:
This special function lets you scroll through a document — without using
the scroll bar — by simply holding the pen over the tablet, particularly
convenient when browsing Web pages, examining images larger than the
computer screen and panning a spreadsheet.
Pen scrolling works with most Microsoft applications (including Internet
Explorer, Word, Excel, PowerPoint and Access) and with many others,
though the function’s “behavior” varies somewhat from one application
to another. Some applications, for example, will allow scrolling in all
directions while others will only scroll up and down; some will scroll
smoothly while others tend to be “jumpy.”
10
specifications
Standards and Certifications
• USB 1.1; CE; FCC
General
• Technology: electromagnetic induction
• Active area: A5 / 13.3 x 22.2 cm, 295 sq. cm (5.25 x 8.75 in., 46 sq. in.)
• Coordinate resolution: 79 lpmm (2,000 lpi)
• Data report rate: at least 100 rps
• Reading height: up to 15 mm (0.6 in.)
• Input current: 70 mA (maximum)
• Compatible with 2000/XP/Vista/7 and Mac OS X 10.2.8 or above
• Hotkey templates for XP, Vista and Mac included
• System requirements: Pentium III equivalent or higher; 256 MB hard
disk space and 128 MB RAM recommended
• LED indicator: Activity
• Cable: USB type A, 1.5 m (4.9 ft.)
• 26.8 x 21.8 x 0.9 cm (10.5 x 8.6 x 0.35 in.); 487.6 g (17.2 oz.)
RF Wireless Pen with Power Save
• 2 buttons, programmable
• Pen pressure sensitivity: 1,024 levels
• Pen tilt range: ±60° from vertical (detectable)
• Accuracy: ±0.25 mm (0.01 in.)
• Power: AAA battery, included
• 23 g (0.8 oz.); with stand, 54 g (1.9 oz.)
Software
• Macro Key Manager, Free Notes, Office Ink and Power Presenter RE II
(for Windows 2000/XP/Vista) and ULEAD PhotoImpact 12 SE
Package Contents
• Graphics Tablet, A5 / 5.25 x 8.75 in.
• Hotkey templates for XP, Mac and Vista
• RF wireless pen with holder and 2 replacement tips
• AAA battery
• User manual, hotkey templates, driver and software (see above) CDs
11
MANHATTAN offers a complete line
of PC Components, Peripherals, Cables and Accessories.
Ask your local computer dealer for more information
or visit us online at
®
www.manhattan-products.com
Copyright © MANHATTAN
All products mentioned are trademarks or registered trademarks of their respective owners.