1
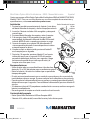
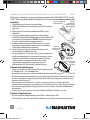
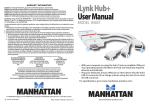
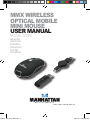
MMX Wireless
Optical Mobile
Mini Mouse
user manual
Model 176811
English
Deutsch
Español
FRANçAIS
POLSKI
italiano
176811_05_man_ML.indd 1
MAN-176811-UM-ML-0907-05
5/27/10 3:08:55 PM
MMX Wireless Optical Mobile Mini Mouse • User Manual
English
Thank you for purchasing the MANHATTAN® MMX Wireless Optical Mobile Mini Mouse,
Model 176811. To view a datasheet with a full list of features and specifications, go to
www.manhattan-products.com.
Installation
Receiver Out button
Cover
release
1. Press the battery compartment cover (just behind the Receiver
Out button) and slide the cover back to remove it.
2. Insert the two included AAA rechargeable batteries and replace
the cover.
3. Press the Receiver Out button and remove the receiver.
4. If the Low Power LED flashes, charge the mouse by connecting
it to the computer using the included retractable USB cable.
NOTE: The mouse can be used while it charges.
5. Plug the receiver into a USB port on the computer. The
operating system will detect the new device and
ID
automatically install the driver(s).
buttons
6. Using a pin or similar object, press the ID button on the
receiver for a full second.
7. Within 10 seconds, press the ID button on the underside
of the mouse for a full second. The LED on the receiver will
flash rapidly for a few seconds and then remain lit, indicating
that the mouse and receiver are ready for use.
Operating Tips
•
•
•
•
•
•
Receiver
Receiver
LED
Low
Power
LED
Operate the mouse on a white or light-colored surface
within 1.5 m (5 ft.) of the receiver for optimal performance.
Remove the batteries if the mouse will not be used for an
USB port
extended period of time.
The mouse automatically enters a sleep mode after a period of inactivity to save power. Press any key or scroll to wake it.
To disconnect power to the mouse, press and hold the ID button on the underside of the mouse for 3 seconds. To restore power, press the ID button again.
If the Low Battery LED flashes when the mouse is moved, change or re-charge the
batteries immediately.
Remember to store the receiver in the mouse when it’s not being used.
Package Contents
• USB MMX Wireless Optical Mobile Mouse with Receiver
• (2) AAA rechargeable batteries and retractable cable reel
• User manual and carrying bag
2
ENGLISH
176811_05_man_ML.indd 2
5/27/10 3:08:57 PM
MMX Optische Mini Travel Funk-Maus • Handbuch
Deutsch
Vielen Dank für den Kauf der MMX Optischen Mini Travel Funk-Maus von MANHATTAN®,
Modell 176811. Das Datenblatt mit einer vollständigen Liste aller Eigenschaften und
Spezifikationen finden Sie unter www.manhattan-products.com.
Installation
Empfänger-Auswerfen-Taste
Abdeckungsverschluss
1. Halten Sie die Akkuabdeckung gedrückt, (unterhalb der
Empfänger-Auswerfen-Taste) und schieben Sie sie nach hinten,
um sie zu entfernen.
2. Setzen Sie beide beiliegenden AAA-Akkus ein und dann die
Abdeckung wieder auf.
3. Halten Sie die Empfänger-Auswerfen-Taste gedrückt und entfernen
Sie den Empfänger.
4. Blinkt die Akku-LED, laden Sie die Maus auf, indem Sie sie über
das beiliegende einziehbare USB-Kabel an den PC anschließen.
HINWEIS: Die Maus kann während des Ladevorgangs
ID verwendet werden.
Tasten
5. Schließen Sie den Empfänger an einen USB-Port Ihres
Computers an. Das Betriebssystem erkennt das neue Gerät
und installiert den passenden Treiber automatisch.
6. Mit Hilfe einer Büroklammer oder ähnlichem, halten Sie die
ID-Taste des Empfängers eine Sekunde lang gedrückt.
7. Innerhalb von 10 Sekunden halten Sie nun die ID-Taste an
der Unterseite der Maus eine Sekunde gedrückt. Die LED
am Empfänger blinkt ein paar Sekunden lang und bleibt
dann erleuchtet, um anzuzeigen, dass Maus und
Empfänger betriebsbereit sind.
Empfänger
EmpfängerLED
Bedienungstipps
•
•
•
•
•
•
AkkuLED
USBPort
Für optimale Leistung, verwenden Sie die Maus auf einer vom Empfänger entfernt.
Entfernen Sie die Akkus bei längerer Nichtverwendungder Maus.
Nach einiger Zeit der Inaktivität schaltet die Maus in den Sleep-Modus, um Energie zu
sparen. Drücken Sie eine Taste oder bewegen Sie das Mausrad, um sie zu reaktivieren.
Um die Stromversorgung der Maus zu trennen, halten Sie die ID-Taste auf der Unterseite
3 Sekunden gedrückt. Um die Stromversorgung wiederherzustellen, drücken Sie die
ID-Taste erneut.
Blinkt die Akku-LED während des Betriebs, wechseln oder laden Sie die Akkus möglichst
zeitnah.
Verstauen Sie den Empfänger in der Maus, wenn Sie ihn nicht verwenden.
Lieferumfang
• MMX Optische Mini Travel Funk-Maus mit Empfänger
• (2) AAA Batterien, ausziehbare Kabeltrommel, Handbuch und Travel Bag
176811_05_man_ML.indd 3
DEUTSCH
3
5/27/10 3:08:59 PM
Mini Ratón Óptico Móvil Inalámbrico - MMX • Manual del usuario Español
Gracias por comprar el Mini Ratón Optico Movil Inalámbrico MMX de MANHATTAN® MMX,
Modelo 176811. Para ver una ficha técnica con una lista completa de caracteristicas y
especificaciones, visite www.manhattan-products.com.
Instalación
Botón liberador del receptor
Liberar
cubierta
1. Presione la tapa del compartimiento de baterias (justo detras
del botón liberador de receptor) y deslice la tapa para retirarla.
2. Inserte las 2 baterias incluidas AAA recargables y coloque de
nuevo la tapa.
3. Presioneel botón liberador de receptor y retire el receptor.
4. Si la energia es baja el LED parpadeará, cargue el ratón
conectandolo al ordenador utilizando el cable USB rectratil
incluido. NOTA: El ratón se puede usar mientras se carga.
5. Conecte el receptor en un puerto USB del ordenador. El
sistema operativo detectará el nuevo dispositivo e instalara
automaticamente los drivers.
Botón
ID
6. Usando un clip ó un objeto similar, presione el botón ID
en el receptor por un segundo.
7. Dentro los 10 segundos, presione el botón ID en la parte
inferior del mouse por un segundo. El LED del receptor
parpaderá rápidamente durante unos segundos y luego
permanece encendido lo que inidica que el ratón y el
receptor estan listos para su uso.
Recomendaciones
•
•
•
•
•
•
Receptor
LED receptor
LED de
batería
baja
Utilice el ratón sobre una superficie blanca ó de color claro
dentro de 1,5 m (5 ft.) del receptor para un rendimiento optimo.
Retire las baterias si el ratón no se utilizará por un periodo de
Puerto
tiempo prolongado.
USB
El ratón entra automaticamente en un modo de espera despues de un periodo de inactividad para ahorrar energia. Presione cualquier tecla o desplácese para activarlo.
Para desconectar la alimentacón del mouse, presione y mantenga presionado botón ID debajo del mouse por 3 segundos. Para restablecer la alimentación, presione el botón ID otra vez.
Si la bateria esta baja el LED parpadeara cuando el ratón se mueve, cambie o recargue la baterias inmediatamente.
Recuerde guardar el receptor en el ratón cuando no lo esté usando.
Contenido del paquete
• Ratón Óptico Móvil Inalámbrico USB con Receptor MMX
• 2 baterías AAA, cable retráctil, manual del usuario y bolsa de transporte
4
español
176811_05_man_ML.indd 4
5/27/10 3:09:00 PM
Souris optique sans fil miniature MMX • Manuel de l’utilisateur Français.
Merci d’avoir acheté la Souris optique sans fil miniature MMX de MANHATTAN®, modèle
176811. Pour la fiche technique avec une liste complète de fonctions et spécifications,
visitez www.manhattan-products.com.
Installation
Bouton Éjecter Récepteur
1. Enlevez le couvercle au dessus de la souris en le pressant et
poussant (près du bouton Éjecter Récepteur) en même temps.
2. Insérez les deux piles AAA rechargeables (inclus) et replacez le
couvercle.
3. Appuyez sur le bouton Éjecter Récepteur et sortez le récepteur.
4. Si la DEL de batterie faible clignote, chargez la souris en la
connectant à l’ordinateur par le câble USB rétractable. NOTE: La
souris peut être utilisée pendant qu’elle charge.
5. Connectez le récepteur à un port USB de votre ordinateur. Le
système d’exploitation identifie le nouvel appareil et
Boutons
installe le pilote automatiquement.
ID
6. Utilisez un trombone ou un objet similaire pour presser
le bouton ID sur le récepteur une seconde entière.
7. En l’espace de 10 secondes, pressez le bouton ID au dessous
de la souris une seconde entière. La DEL de récepteur clignote
quelques secondes et puis reste allumée, indiquant que la
souris et le récepteur sont prêts à l’emploi.
Operating Tips
•
•
•
•
•
•
Ouverture du
compartiment
Récepteur
le
DEL de
récepteur
DEL de
batterie
faible
Utilisez la souris sur une surface blanche ou claire pas plus
loin que 1,5 m (5 ft.) du récepteur pour la performance
optimale.
Port USB
Sortez les piles quand la souris n’est pas utilisée plus longtemps.
La fonction “Sleep” éteint la souris après une certaine période d’inactivité pour économiser la batterie. Cliquez ou défilez afin de réactiver la souris.
Afin de déconnecter l’alimentation à la souris, pressez le bouton ID au dessous de la souris 3 secondes. Afin de la reconnecter, pressez le bouton ID à nouveau.
Si la DEL de batterie faible clignote pendant l’utilisation, changez ou rechargez les piles
immédiatement.
Quand la souris n’est pas utilisée, logez le récepteur dans le compartiment.
Contenu du pack
• Souris optique sans fil avec récepteur USB MMX
• 2 piles AAA et câble rétractable
• Manuel de l’utilisateur et pochette de transport
176811_05_man_ML.indd 5
FRANçAIS
5
5/27/10 3:09:02 PM
Myszka optyczna bezprzewodowa mini MMX • Instrukcja Użytkownika
Polski
Dziękujemy za zakup Myszki optycznej bezprzewodowej Mini MMX MANHATTAN®, Model
176811. Pełna specyfikacja produktu dostępna jest na stronie www.manhattan-products.com.
Instalacja
Przycisk
Przycisk zwalniania
zwalniający
odbiornika USB
blokadę pokrywy
akumulatorów
1. Zdejmij pokrywę kieszeni na akumulatory.
2. Włóż dwa naładowane akumulatory typu AAA i zamknij
pokrywę.
3. Wciśnij przycisk zwalniania odbiornika USB i wysuń
odbiornik.
4. Jeśli miga dioda niskiego poziomu zasilania, należy
naładować akumulatory podłączając myszkę kablem USB
(w zestawie) do komputera. UWAGA: Można korzystać z
myszki w trakcie ładowania akumulatorów.
5. Podłącz odbiornik do portu USB komputera. System
operacyjny automatycznie wykryje nowe urządzenie
Przyciski
i zainstaluje odpowiednie sterowniki.
synchronizacji
połączenia
6. Wciśnij i przytrzymaj przez około sekundę przycisk
synchronizacji na odbiorniku USB.
7. W ciągu kolejnych 10 sekund, wciśnij i przytrzymaj przez
około sekundę przycisk synchronizacji znajdujący się na
spodzie myszki. Dioda na odbiorniku powinna zacząć
szybko migać, a następnie zaświecić się na stałe,
sygnalizując ustanowienie połączenia myszki z
odbiornikiem USB. Myszka jest gotowa do pracy.
Odbiornik
USB
Dioda
odbiornika
Dioda niskiego
poziomu
zasilania
Zalecenia eksploatacyjne
• Zaleca się używać myszkę na białej lub jasnej powierzchni
w odległości do 1,5 m od odbiornika.
Port USB
• Wyjmij akumulatory, jeśli myszka nie będzie używana przez dłuższy czas.
• Myszka automatycznie przechodzi w tryb uśpienia po określonym czasie nieaktywności,
w celu oszczędzania energii. Aby powrócić do normalnego trybu pracy, należy wcisnąć
dowolny przycisk myszki.
• Aby wyłączyć zasilanie myszki, wciśnij i przytrzymaj przez 3 sekundy przycisk
synchronizacji umieszczony na spodzie myszki. Powtórz czynność, aby włączyć zasilanie.
• Jeśli zaczyna migać dioda niskiego poziomu zasilania, należy niezwłocznie doładować
akumulatory.
• Jeśli myszka nie jest używana, schowaj odbiornik USB do szufladki w myszce.
Zawartość opakowania
• Myszka optyczna bezprzewodowa mini MMX z odbiornikiem USB
• 2 akumulatory typu AAA, kabel USB do ładowania, instrukcja użytkownika, pokrowiec
6
POLSKI
176811_05_man_ML.indd 6
5/27/10 3:09:03 PM
MMX mini mouse ottico wireless • Manuale d’istruzione
Italiano
Grazie per aver scelto il Mini Mouse Ottico Wireless MANHATTAN®, Modello 176811.
Per prendere visione della scheda tecnica con la lista completa delle caratteristiche e
delle specifiche, visitate il sito www.manhattan-products.com.
Installazione
Tasto di rilascio
ricevitore
Copertura
sganciabile
1. Premere il coperchio del compartimento batterie (appena
sotto il tasto che permette la fuoriuscita del ricevitore) e farlo
scivolare per rimuoverlo.
2. Inserire le due batterie ricaricabili AAA incluse e rimettere a
posto il coperchio.
3. Premere il tasto per la fuoriuscita del ricevitore e rimuovere quest’ultimo.
4. Se il LED Low Power lampeggia, ricaricare il mouse collegandolo al
computer usando il cavo USB retrattile.
NOTA: Il mouse può essere usato mentre si ricarica.
5. Inserire il ricevitore in una porta USB del computer. Il sistema
Tasti
operativo rileverà la periferica e automaticamente installerà
ID
i driver.
6. Usando uno spillo o un simile oggetto appuntito, premere il
tasto ID sul ricevitore per un secondo pieno.
7. Entro 10 secondi, premere il tasto ID nella parte inferiore del
mouse per un secondo pieno. Il LED sul ricevitore lampeggerà
rapidamente per alcuni secondi e quindi rimarrà acceso,
indicando che il mouse e il ricevitore sono pronti per l’uso.
Ricevitore
LED del
ricevitore
LED
batterie
scariche
Consigli d’uso
• Utilizzare il mouse su una superficie bianca o di colore chiaro
entro una distanza di 1.5 m dal ricevitore per prestazioni ottimali.
Porta USB
• Rimuovere le batterie se il mouse rimane inutilizzato per un lungo periodo.
• Il mouse automaticamente entra in modalità sleep dopo un periodo di inattività per
permettere il risparmio energetico. Premere qualsiasi tasto o lo scroll per riprendere l’attività.
• Per scollegare l’alimentazione del mouse, tenere premuto il tasto ID sulla parte inferiore
del mouse per 3 secondi. Per ristabilire l’alimentazione, premere il tasto ID di nuovo.
• Se il LED indicante la batteria scarica lampeggia quando il mouse viene mosso, sostituire
o ricaricare le batterie immediatamente.
• Ricordarsi di riporre il ricevitore nel mouse quando quest’ultimo non è in uso.
Contenuto della confezione
• Mini Mouse Ottico Wireless USB con Ricevitore
• (2) batterie ricaricabili AAA e cavo retrattile
• Manuale d’istruzione e borsetta per il trasporto
176811_05_man_ML.indd 7
ITALIANO
7
5/27/10 3:09:05 PM
WASTE ELECTRICAL & ELECTRONIC EQUIPMENT
Disposal of Electric and Electronic Equipment
(applicable in the European Union and other European countries with separate collection systems)
ENGLISH
This symbol on the product or its packaging indicates that this product shall not be treated as household waste.
Instead, it should be taken to an applicable collection point for the recycling of electrical and
electronic equipment. By ensuring this product is disposed of correctly, you will help prevent
potential negative consequences to the environment and human health, which could otherwise
be caused by inappropriate waste handling of this product. If your equipment contains easily
removable batteries or accumulators, dispose of these separately according to your local
requirements. The recycling of materials will help to conserve natural resources. For more
detailed information about recycling of this product, contact your local city office, your household waste
disposal service or the shop where you purchased this product. In countries outside of the EU: If you wish
to discard this product, contact your local authorities and ask for the correct manner of disposal.
deutsch
Dieses auf dem Produkt oder der Verpackung angebrachte Symbol zeigt an, dass dieses Produkt nicht mit
dem Hausmüll entsorgt werden darf. In Übereinstimmung mit der Richtlinie 2002/96/EG des Europäischen
Parlaments und des Rates über Elektro- und Elektronik-Altgeräte (WEEE) darf dieses Elektrogerät nicht
im normalen Hausmüll oder dem Gelben Sack entsorgt werden. Wenn Sie dieses Produkt entsorgen
möchten, bringen Sie es bitte zur Verkaufsstelle zurück oder zum Recycling-Sammelpunkt Ihrer Gemeinde.
ESPAñOL
Este símbolo en el producto o su embalaje indica que el producto no debe tratarse como residuo doméstico.
De conformidad con la Directiva 2002/96/CE de la UE sobre residuos de aparatos eléctricos y electrónicos
(RAEEI), este producto eléctrico no puede desecha se con el resto de residuos no clasificados. Deshágase
de este producto devolviéndolo al punta de venta o a un punta de recogida municipal para su reciclaje.
FRANçAIS
Ce symbole sur Ie produit ou son emballage signifie que ce produit ne doit pas être traité comme un
déchet ménager. Conformément à la Directive 2002/96/EC sur les déchets d’équipements électriques
et électroniques (DEEE), ce produit électrique ne doit en aucun cas être mis au rebut sous forme de
déchet municipal non trié. Veuillez vous débarrasser de ce produit en Ie renvoyant à son point
de vente ou au point de ramassage local dans votre municipalité, à des fins de recyclage.
Italiano
Questo simbolo sui prodotto o sulla relativa confezione indica che il prodotto non va trattato come un rifiuto
domestico. In ottemperanza alla Direttiva UE 2002/96/EC sui rifiuti di apparecchiature elettriche ed
elettroniche (RAEEI), questa prodotto elettrico non deve essere smaltito come rifiuto municipale misto. Si
prega di smaltire il prodotto riportandolo al punto vendita o al punto di raccolta municipale locale per un
opportuno riciclaggio.
Polski
Jeśli na produkcie lub jego opakowaniu umieszczono ten symbol, wówczas w czasie utylizacji nie wolno
wyrzucać tego produktu wraz z odpadami komunalnymi. Zgodnie z Dyrektywą Nr 2002/96/WE w sprawie
zużytego sprzętu elektrycznego i elektronicznego (WEEE), niniejszego produktu elektrycznego nie wolno
usuwać jako nie posortowanego odpadu komunalnego. Prosimy o usuniecie niniejszego produktu
poprzez jego zwrot do punktu zakupu lub oddanie do miejscowego komunalnego punktu zbiórki
odpadów przeznaczonych do recyklingu.
8
176811_05_man_ML.indd 8
5/27/10 3:09:06 PM
WARRANTY INFORMATION
english — For warranty information, go to www.manhattan-products.com/warranty.
deutsch — Garantieinformationen finden Sie unter www.manhattan-products.com/warranty.
ESPAñOL — Si desea obtener información sobre la garantía, visite
www.manhattan-products.com/warranty.
www.manhattan-products.com/warranty.
www.manhattan-products.com/warranty.
FRANçAIS — Pour consulter les informations sur la garantie, visitez
Polski — Informacje dotyczące gwarancji znajdują się na stronie
Italiano — Per informazioni sulla garanzia, accedere a www.manhattan-products.com/warranty.
EN MéXICO: Poliza de Garantia MANHATTAN — Datos del importador y responsable ante el consumidor
IC Intracom México, S.A. de C.V. • Av. Interceptor Poniente # 73, Col. Parque Industrial La Joya, Cuautitlan
Izcalli, Estado de México, C.P. 54730, México. • Tel. (55)1500-4500
La presente garantía cubre los siguientes productos contra cualquier defecto de fabricación en sus
materiales y mano de obra.
A. Garantizamos los productos de limpieza, aire comprimido y consumibles, por 60 dias a partir de la fecha
de entrega, o por el tiempo en que se agote totalmente su contenido por su propia función de uso,
lo que suceda primero.
B. Garantizamos los productos con partes moviles por 3 años.
C. Garantizamos los demas productos por 5 años (productos sin partes moviles), bajo las siguientes
condiciones:
1. Todos los productos a que se refiere esta garantía, ampara su cambio físico, sin ningún cargo para
el consumidor.
2. El comercializador no tiene talleres de servicio, debido a que los productos que se garantizan no
cuentan con reparaciones, ni refacciones, ya que su garantía es de cambio físico.
3. La garantía cubre exclusivamente aquellas partes, equipos o sub-ensambles que hayan sido instaladas
defábrica y no incluye en ningún caso el equipo adicional o cualesquiera que hayan sido adicionados
al mismo por el usuario o distribuidor.
Para hacer efectiva esta garantía bastara con presentar el producto al distribuidor en el domicilio donde
fue adquirido o en el domicilio de IC Intracom México, S.A. de C.V., junto con los accesorios contenidos
en su empaque, acompañado de su póliza debidamente llenada y sellada por la casa vendedora
(indispensable el sello y fecha de compra) donde lo adquirió, o bien, la factura o ticket de
compra original donde se mencione claramente el modelo, numero de serie (cuando aplique) y
fecha de adquisición. Esta garantia no es valida en los siguientes casos: Si el producto se hubiese
utilizado en condiciones distintas a las normales; si el producto no ha sido operado conforme a los
instructivos de uso; ó si el producto ha sido alterado o tratado de ser reparado por el consumidor ó
terceras personas.
176811_05_man_ML.indd 9
9
5/27/10 3:09:07 PM
FEDERAL COMMUNICATIONS COMMISSION
REGULATORY STATEMENT
FCC Class B
This equipment has been tested and found to comply with the limits for a Class B digital device,
pursuant to Part 15 of Federal Communications Commission (FCC) Rules. These limits are designed
to provide reasonable protection against harmful interference in a residential installation. This
equipment generates, uses and can radiate radio frequency energy, and if not installed and used
in accordance with the instructions may cause harmful interference to radio communications.
However, there is no guarantee that interference will not occur in a particular installation. If this
equipment does cause harmful interference to radio or television reception, which can be determined
by turning the equipment off and on, the user is encouraged to try to correct the interference by one or
more of the following measures:
• Reorient or relocate the receiving antenna.
• Increase the separation between the equipment and the receiver.
• Connect the equipment to an outlet on a circuit different from the receiver.
• Consult the dealer or an experienced radio/TV technician for help.
R&TTE
english
This device complies with the requirements of the R&TTE Directive 1999/5/EC.
deutsch
Dieses Gerät enspricht der Direktive R&TTE Direktive 1999/5/EC.
ESPAñOL
Este dispositivo cumple con los requerimientos de la Directiva R&TTE 1999/5/EC.
FRANçAIS
Cet appareil satisfait aux exigences de la directive R&TTE 1999/5/CE.
Polski
Urządzenie spełnia wymagania dyrektywy R&TTE 1999/5/EC.
Italiano
Questo dispositivo è conforme alla Direttiva 1999/5/EC R&TTE.
10
176811_05_man_ML.indd 10
5/27/10 3:09:07 PM
176811_05_man_ML.indd 11
5/27/10 3:09:08 PM
MANHATTAN® offers a complete line of PC Components,
Peripherals, Cables and Accessories. Ask your local computer dealer for more information
or visit www.manhattan-products.com.
All products mentioned are trademarks or registered trademarks of their respective owners.
MANHATTAN® bietet ein vollständiges Sortiment an PC-Komponenten, Peripherie, Kabel
und Zubehör. Weitere Informationen erhalten Sie von Ihrem Händler oder auf
www.manhattan-products.com.
Alle genannten Produkt- oder Firmennamen sind eingetragene Marken oder Marken der
jeweiligen Firmen.
MANHATTAN® ofrece una línea completa Componentes para PC, Periféricos, Cables y
Accesorios. Consulte a su distribuidor local para más información ó visitenos
www.manhattan-products.com.
Todos los productos mencionados son marcas comerciales o marcas registradas de sus
respectivos propietarios.
MANHATTAN® offre un assortiment complet de composants de PC, des périphériques,
des câbles et des accessoires
www.manhattan-products.com.
Tous les produits mentionnés sont des marques commerciales ou des marques déposées
de leurs propriétaires respectifs.
MANHATTAN® to kompletna linia Komponentów PC, Peryferiów, Kabli oraz Akcesoriów.
Poproś lokalnego dealera o więcej informacji lub odwiedź stronę
www.manhattan-products.com.pl.
Wszystkie nazwy handlowe i towarów są nazwami i znakami towarowymi
zastrzeżonymi odpowiednich firm odnośnych właścicieli.
MANHATTAN® offre una linea completa di componenti per PC, periferiche, cavi e accessori.
Chiedi maggiori informazioni al tuo rivenditore di computer o visita il sito
www.manhattan-products.com.
Tutti i prodotti sopracitati sono marchi di fabbrica o marchi registrati depositati dai proprietari.
176811_05_man_ML.indd 12
Copyright © MANHATTAN
5/27/10 3:09:08 PM