1
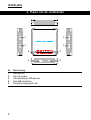
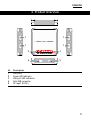
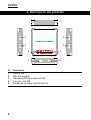
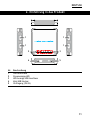
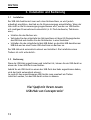
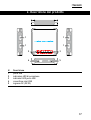
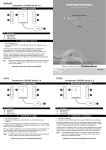
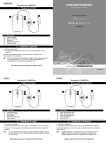
NEDERLANDS
Conceptronic C4USB2BL
Gebruiksaanwijzing
Gefeliciteerd met uw nieuwe
Conceptronic USB hub
In deze gebruiksaanwijzing vindt u stap-voor-stap instructies voor het gebruik
van de Conceptronic USB hub.
Als u meer informatie of ondersteuning voor uw product nodig heeft, kunt u het
beste naar onze Service & Support website op www.conceptronic.net gaan en
een van de volgende mogelijkheden kiezen:
• FAQ
• Downloads
• Contact
: Database met veel gestelde vragen
: Gebruiksaanwijzingen, stuurprogramma's, firmware en
overige downloads
: Contact opnemen met Conceptronic Support
Voor algemene informatie over Conceptronic producten gaat u naar de
Conceptronic website op www.conceptronic.net.
1. Inhoud verpakking
U vindt de volgende items in de verpakking van de Conceptronic USB hub:
•
•
•
•
•
Conceptronic C4USB2BL USB hub
Netvoeding 5V gelijkstroom, 2A
Kabel mini-USB naar USB
Deze gebruiksaanwijzing
Garantiekaart en boekje CE-verklaring
1
NEDERLANDS
2. Plaats van de onderdelen
1
1
1
1
2
3
4
5
Nr.
Beschrijving
1
2
3
4
5
USB poorten
Aan/uit lampje
Indicatielampjes USB poorten
Mini-USB aansluiting
Gelijkstroomingang (5 volt)
2
NEDERLANDS
3. Installatie en gebruik
3.1 Installatie
De USB hub kan zonder netvoeding werken, maar we raden u sterk aan deze
toch te gebruiken. Als u de netvoeding niet gebruikt, worden alleen USB
apparaten ondersteund die weinig stroom gebruiken (zoals flashgeheugenstations, toetsenborden, enz).
• Zet uw computer aan.
• Sluit de meegeleverde netvoeding aan op de DC gelijkstroomingang van de
USB hub en op een stopcontact.
• Sluit de meegeleverde USB/mini-USB kabel aan op de mini-USB poort van de
hub en op een vrije USB poort van uw computer.
De USB hub wordt automatisch herkend en geïnstalleerd. Installatie van
stuurprogramma's is niet nodig.
3.2
Gebruik
Nadat de USB hub is aangesloten en geïnstalleerd, kunt u uw USB apparaten
aansluiten op de vrije USB poorten.
Wanneer u een USB apparaat op een van de vrije USB poorten van de hub
aansluit, wordt dat apparaat automatisch herkend.
Afhankelijk van het aangesloten USB apparaat kan het nodig zijn om
aanvullende stuurprogramma's te installeren.
Veel plezier met uw
Conceptronic USB hub!
3
ENGLISH
Conceptronic C4USB2BL
User Manual
Congratulations on the purchase of your
Conceptronic USB hub.
This user manual gives you a step-by-step explanation of how to connect and use
the Conceptronic USB hub.
When you need more information or support for your product, we advise you to
visit our Service & Support website at www.conceptronic.net/support and
select one of the following options:
• FAQ
• Downloads
• Contact
: Frequently Asked Questions database
: Manuals, Drivers, Firmware and more downloads
: Contact Conceptronic Support
For general information about Conceptronic products visit the Conceptronic
website at www.conceptronic.net.
1. Package contents
The following items are present in the package of the Conceptronic USB hub:
•
•
•
•
•
4
Conceptronic C4USB2BL USB hub
Power supply 5V DC, 2A
Mini-USB to USB cable
This user manual
Warranty card & CE declaration booklet
ENGLISH
2. Product Overview
1
1
1
1
2
3
4
5
Nr
Description
1
2
3
4
5
USB ports
Power LED indicator
USB port LED indicators
Mini-USB connector
DC input (5V DC)
5
ENGLISH
3. Installation & usage
3.1
Installation
The USB hub can work without a power supply, but it is strongly recommended
to use the power supply. When you are not using the power supply only low
power USB devices are supported. (Like flash drives, keyboards, etc).
• Turn on your computer.
• Connect the included power supply to the DC input connector of the USB hub
and to a free wall outlet.
• Connect the included mini-USB to USB cable to the mini-USB port of the USB
hub and to a free USB port on your computer.
The USB hub will be recognized and installed automatically. No driver
installation is required.
3.2
Usage
When the USB hub is connected and installed, you can connect a USB device to
one of the free USB ports.
When you connect a USB device to one of the free USB ports on the USB hub, the
connected device will be recognized automatically.
Depending on your USB device you might need to install a driver for the USB
device.
Enjoy the use of your
Conceptronic USB hub !
6
ESPAÑOL
C4USB2BL de Conceptronic
Manual de usuario
Felicidades por la compra de su
hub USB de Conceptronic.
Este manual del usuario le ofrece una descripción paso a paso acerca de cómo
utilizar el hub USB de Conceptronic.
Si necesita más información o soporte técnico acerca de su producto, le
recomendamos que visite nuestra página web de Servicio y Soporte
www.conceptronic.net/support y seleccione una de las siguientes opciones:
• FAQ
• Descargas
• Contacto
: Base de datos con las preguntas más frecuentes (FAQ)
: Manuales, drivers, firmware y otras descargas
: Contactar con el servicio técnico de Conceptronic
Para información general sobre los productos de Conceptronic, visite la página
web de Conceptronic www.conceptronic.net.
1. Contenido del paquete
El paquete del hub USB de Conceptronic incluye los elementos siguientes:
•
•
•
•
•
Hub USB C4USB2BL de Conceptronic.
Fuente de alimentación (5V CC, 2 A).
Cable mini-USB a USB.
Este manual de usuario.
Tarjeta de garantía y folleto de declaración de conformidad de la CE.
7
ESPAÑOL
2. Descripción del producto
1
1
1
1
2
3
4
5
Nº
Descripción
1
2
3
4
5
Puertos USB
LED de encendido
Indicadores LED de los puertos USB
Conector mini-USB
Entrada de corriente continua (5V CC)
8
ESPAÑOL
3. Instalación y utilización
3.1 Instalación
El hub USB puede funcionar sin alimentación eléctrica, pero se recomienda
encarecidamente utilizarlo con la fuente de alimentación incluida. Si no lo
conecta a alimentación eléctrica, sólo podrá utilizarlo con dispositivos USB de
bajo voltaje (como por ejemplo memorias flash USB, teclados, etc.)
• Encienda el ordenador.
• Conecte la fuente de alimentación incluida a la entrada de corriente CC del
hub USB y a un enchufe de pared disponible.
• Conecte el cable adaptador de USB a Mini-USB incluido al puerto Mini-USB del
hub USB y a un puerto USB libre en su ordenador.
El ordenador detectará e instalará el hub USB automáticamente. No se necesita
instalar ningún driver.
3.2
Utilización
Una vez conectado e instalado el hub USB, puede empezar a utilizarlo
conectando dispositivos USB a los puertos USB disponibles.
Cuando conecte un dispositivo USB a uno de los puertos disponibles del hub USB,
dicho dispositivo será detectado automáticamente.
Dependiendo del dispositivo USB que utilice, puede que tenga que instalar los
drivers de dicho dispositivo.
¡Disfrute del uso de su
hub USB de Conceptronic!
9
DEUTSCH
Conceptronic C4USB2BL
Bedienungsanleitung
Wir gratulieren Ihnen zum Erwerb Ihres neuen
Conceptronic USB-Hub
In dieser Bedienungsanleitung wird Ihnen Schritt für Schritt gezeigt, wie der
Conceptronic USB-Hub angeschlossen und verwendet wird.
Wenn Sie weitere Informationen oder Support für Ihr Produkt benötigen,
besuchen Sie unsere Service & Support-Website unter
www.conceptronic.net/support und wählen Sie eine der folgenden Optionen:
• FAQ
• Downloads
• Kontakt
: Datenbank mit häufig gestellten Fragen
: Anleitungen, Treiber, Firmware und weitere Downloads
: Kontakt mit dem Conceptronic-Support
Allgemeine Informationen über Conceptronic-Produkte finden Sie auf der
Conceptronic-Website unter www.conceptronic.net.
1. Verpackungsinhalt
Der Lieferumfang des Conceptronic USB-Hub enthält die folgenden Teile:
•
•
•
•
•
Conceptronic C4USB2BL USB-Hub
Netzteil 5 V GS, 2A
Mini-USB-Kabel
Bedienungsanleitung
Garantiekarte und Broschüre mit CE-Erklärung
10
DEUTSCH
2. Einführung in das Produkt
1
1
1
1
2
3
4
5
Nr.
Beschreibung
1
2
3
4
5
USB-Anschlüsse
Stromanzeige-LED
LED-Anzeige USB-Anschluss
Mini-USB-Stecker
GS-Eingang (5V GS)
11
DEUTSCH
3. Installation und Bedienung
3.1
Installation
Der USB-Hub funktioniert zwar auch ohne Netzanschluss, es wird jedoch
unbedingt empfohlen, den Hub an die Stromversorgung anzuschließen. Wenn der
Hub nicht an die Stromversorgung angeschlossen wird, werden nur USB-Geräte
mit niedrigem Stromverbrauch unterstützt (z. B. Flash-Laufwerke, Tastaturen
usw.).
• Schalten Sie den Rechner ein.
• Verbinden Sie den mitgelieferten Netzanschluss mit dem GS-Eingangsstecker
des USB-Hub und stecken Sie den Netzstecker in eine Steckdose.
• Schließen Sie das mitgelieferte Mini-USB-Kabel an den Mini-USB-Anschluss am
USB-Hub und an einen freien USB-Anschluss am Rechner an.
Der USB-Hub wird automatisch erkannt und installiert. Die Installation eines
Treibers ist nicht erforderlich.
3.2
Bedienung
Wenn der USB-Hub angeschlossen und installiert ist, können Sie ein USB-Gerät an
einem der freien USB-Ports anschließen.
Sobald Sie ein USB-Gerät an einem der USB-Ports des Hubs angeschlossen haben,
wird das Gerät automatisch erkannt.
Je nach Art des angeschlossenen USB-Geräts muss eventuell ein Treiber
installiert werden, um das USB-Gerät nutzen zu können.
Viel Spaß mit Ihrem neuen
USB-Hub von Conceptronic!
12
FRANÇAIS
C4USB2BL de Conceptronic
Manuel d’utilisation
Félicitations pour l’achat de votre hub USB de
Conceptronic
Ce guide d'installation rapide vous explique étape par étape comment installer
et utiliser votre hub USB de Conceptronic.
Pour plus d'informations ou pour obtenir de l'aide concernant votre produit, nous
vous conseillons de visiter notre site web de Service et support technique sur
www.conceptronic.net/support et de sélectionner l'une des options suivantes :
• FAQ
: Foire aux Questions
• Téléchargements : Manuels, drivers, microprogramme et autres
téléchargements
• Contact
: Pour contacter le Service de Support technique de
Conceptronic
Pour plus d'informations générales concernant les produits Conceptronic, visitez
le site web de Conceptronic www.conceptronic.net.
1. Contenu du coffret
Les éléments suivants sont fournis dans le paquet avec le hub USB de
Conceptronic :
•
•
•
•
•
Hub USB C4USB2BL de Conceptronic
Alimentation électrique 5 V DC, 2 A
Câble mini-USB vers USB
Le présent manuel d’utilisation
Carte de garantie et brochure de déclaration CE
13
FRANÇAIS
2. Explication du produit
1
1
1
1
2
3
4
5
Nº
Description
1
2
3
4
5
Ports USB
Voyant LED d’alimentation électrique
Voyants LED des ports USB
Connecteur mini-USB
Entrée de l’alimentation électrique (5 V DC)
14
FRANÇAIS
3. Installation & utilisation
3.1
Installation
Le hub USB peut fonctionner sans alimentation électrique même s’il est
vivement recommandé d’utiliser cette dernière. Si vous n’utilisez pas
d’alimentation électrique, seuls les dispositifs USB à faible consommation
d’énergie peuvent être connectés (comme des clefs flash, des claviers, etc.).
• Allumez votre ordinateur.
• Branchez l’alimentation électrique fournie à l’entrée d’alimentation
électrique DC du hub USB et l’autre extrémité à une prise de courant
disponible.
• Connectez le câble mini-USB vers USB fourni au port mini-USB du hub USB et
l’autre extrémité à un port USB disponible de votre ordinateur.
Le hub USB sera automatiquement détecté et installé par votre ordinateur.
Aucun driver n’est à installer.
3.2
Utilisation
Dès que le hub USB est connecté et installé, vous pouvez connecter un dispositif
USB à chacun des ports USB disponibles.
Lorsque vous connectez un dispositif USB à l’un des ports USB disponibles du hub
USB, ce dispositif sera automatiquement détecté.
En fonction du type de dispositif USB connecté, vous aurez peut-être à installer
le driver correspondant.
Vous pouvez dès à présent utiliser
votre hub USB de Conceptronic !
15
ITALIANO
Conceptronic C4USB2BL
Manuale d’uso
Complimenti per aver acquistato l’hub USB
Conceptronic.
Il presente manuale illustra passo dopo passo come collegare e usare l’hub USB
Conceptronic.
Per ulteriori informazioni o assistenza relativamente al prodotto, consultare il
sito Service & Support all’indirizzo www.conceptronic.net/support,
selezionando una delle seguenti opzioni:
• FAQ
• Download
• Contact
: Archivio delle risposte alle domande più frequenti
: Manuali, driver, firmware e altri prodotti scaricabili
: Contatta il servizio di assistenza Conceptronic
Per ricevere informazioni generali sui prodotti Conceptronic, visitare il sito Web
di Conceptronic all’indirizzo www.conceptronic.net
1. Contenuto della confezione
La confezione dell’hub USB Conceptronic contiene le seguenti unità:
•
•
•
•
•
Hub USB C4USB2BL Conceptronic
Alimentazione elettrica da 5V DC, 2A
Mini-USB per cavo USB
Il presente manuale d’uso
Certificato di garanzia e libretto dichiarazione di conformità CE
16
ITALIANO
2. Descrizione del prodotto
1
1
1
1
2
3
4
5
N
Descrizione
1
2
3
4
5
porte USB
indicatore LED di accensione
indicatori LED porta USB
connettore mini-USB
ingresso DC (5V DC)
17
ITALIANO
3. Installazione e uso
3.1
Installazione
Benché sia sempre raccomandabile utilizzare l’hub USB con l’alimentazione
elettrica, quest’ultimo può funzionare anche senza. In assenza di alimentazione
elettrica, il sistema supporta solo dispositivi USB a bassa tensione (per. es. flash
drive, tastiere, ecc.).
• Accendere il computer.
• Collegare l'alimentazione elettrica in dotazione al connettore di ingresso DC
dell’hub USB, e a una presa a muro libera.
• Collegare il mini-USB per cavo USB presente nella confezione alla mini-porta
USB dell’hub USB e a una porta USB libera del computer.
L’hub USB verrà riconosciuto e automaticamente installato. Non è richiesta
l’installazione di alcun driver.
3.2
Uso
Una volta collegato e installato l’hub USB, è possibile collegare un dispositivo
USB a una delle porte USB libere.
Quando si collega un dispositivo USB a una delle porte USB libere dell’hub USB,
il dispositivo connesso verrà riconosciuto automaticamente.
Alcuni dispositivi USB possono richiedere l’installazione di un driver specifico per
il dispositivo USB che si sta utilizzando.
Buon uso dell’hub USB Conceptronic !
18
PORTUGUÊS
Conceptronic C4USB2BL
Manual do utilizador
Parabéns pela compra do seu
hub USB da Conceptronic.
Este manual de utilizador fornece-lhe uma explicação passo-a-passo sobre como
ligar e usar o hub USB da Conceptronic.
Se precisar de mais informação ou suporte para o seu produto, aconselhamo-lo a
visitar a nossa página Web Service & Support em
www.conceptronic.net/support e a seleccionar uma das seguintes opções:
• FAQ
• Downloads
• Contact
: Base de dados das Perguntas Mais Frequentes
: Manuais, controladores, firmware e mais transferências
: Contacte o suporte da Conceptronic
Para informações gerais sobre os produtos da Conceptronic visite a página Web
da Conceptronic em www.conceptronic.net.
1. Conteúdo da embalagem
Existem os seguintes elementos na embalagem do hub USB da Conceptronic:
•
•
•
•
•
Hub USB C4USB2BL da Conceptronic
Fonte de alimentação 5V CC, 2A
Cabo Mini USB para USB
Este manual do utilizador
Garantia e Declaração de conformidade CE
19
PORTUGUÊS
2. O produto
1
1
1
1
2
3
4
5
Nº
Descrição
1
2
3
4
5
Portas USB
Indicador LED de alimentação
Indicadores LED de porta USB
Ficha Mini-USB
Entrada CC (5 V CC)
20
PORTUGUÊS
3. Instalação e utilização
3.1 Instalação
O hub USB pode funcionar sem uma fonte de alimentação, mas recomenda-se
vivamente que a fonte de alimentação seja usada. Quando não estiver a usar a
fonte de alimentação apenas são suportados dispositivos USB de baixa energia.
(como unidades flash, teclados, etc.)
• Ligue o seu computador.
• Ligue a fonte de alimentação incluída na embalagem à entrada CC do hub
USB e a uma tomada que esteja livre.
• Ligue o cabo mini-USB para USB incluído à porta mini-USB do hub USB e a uma
porta USB livre do seu computador.
O hub USB é automaticamente reconhecido e instalado. Não é necessária a
instalação de qualquer controlador.
3.2
Utilização
Quando o hub USB estiver ligado e instalado, pode ligar um dispositivo USB a
uma das portas USB que esteja livre.
Quando ligar um dispositivo USB a uma das portas USB do hub USB, o dispositivo
ligado vai ser automaticamente reconhecido.
Dependendo do seu dispositivo USB, pode precisar de instalar um controlador
para o mesmo.
Divirta-se com o seu
hub USB da Conceptronic!
21