1
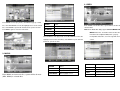
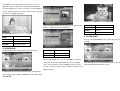
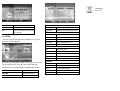
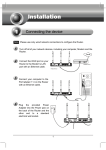
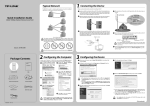
BMP-001
Quick Installation Guide
Package Contents
Remote control keys and operations
Function
Description
Direction keys
Move the highlight square cursor
ENTER
Selection key
Execute the selected function
RETURN
Return key
Go to previous layer
MENU
Control key
1. Multimedia player (VIDEO/ AUDIO/ PHOTO)
YCbCr
YCbCr output
Switch output to Y Pr/Cr Pb/Cb
After entering PHOTO, system will list all images in
2. Calendar 3. Alarm clock
Video
Video output
Switch output to RCA composite
selected drive, you can browse all directories in this drive.
VGA
VGA output
Switch output to VGA
1. Media Box main unit
3. QIG
2. Remote control
4. AV cable 5. Power adapter
Main interface and functions
Key
UP/DOWN/
LEFT/RIGHT
Power interface: DC 5V/1.5A
Main functions:
Input interface:
Switch USB/Card or switch
control bar
Main menu
While connect the power adapter, audio cable(RCA L&R),
video cable(RCA composite or Y Pr/Cr Pb/Cb or VGA), and
insert USB/Card, then power on, select proper output, then
1. IR receiver
2. USB2.0 port
3. 4in1card reader (SD, MMC, MS(Pro), XD)
Output interface
main menu will show on the screen, you can use remote
control to operate this system. Media Box will detect
whether the USB drive or memory card is inserted on this
device and indicate on the top right corner of the screen.
1.Video interface : RCA composite video jack,
Component video jack (Y Pr/Cr Pb/Cb), VGA port
2. Audio interface : RCA audio jack(L&R), Earphone jack
Power interface
1. Power Jack 2. Power switch 3. Power LED indicator
Notice: The Media Box supports FAT32 file system for first logic
partition
1.PHOTO
Enter PHOTO to view images in the USB drive/memory
card, this device supports JPEG/BMP/GIF formats.
ENTER
Select
RETURN
Goto previous layer
UP/DOWN
Move cursor
LEFT
Switch to music/slide show
RIGHT
Thumbnail mode
MENU
Switch USB/Card
3. VIDEO
Click ENTER to enter play mode, click MENU to pop-up control
bar, click LEFT/RIGHT to move the highlight cursor on the control
bar, click ENTER to push down the button for specific function.
Click MENU again to close the control bar.
ENTER
Select
RETURN
Goto previous layer
UP/DOWN
Move cursor
LEFT
Switch to music/slide show
MENU
Switch USB/Card
Enter VIDEO to view video files, system will list all video files in
selected drive
Notice: The Media Box only support standard MPEG1/ MPEG2/
MPEG4 video files, and audio format of video file
included must be mp3 or wma, when you play
Click ENTER to enter play mode, click LEFT/RIGHT to move the
incompatible video files, error message will show on the
highlight cursor on the control bar, click ENTER to push down the
screen.
button for specific function.
2. MUSIC
Enter MUSIC to view music files, system will list all music
(MP3, WMA) in selected drive
ENTER
Select
RETURN
Goto previous layer
UP/DOWN
Adjust volume level
LEFT/RIGHT
Move highlight cursor
ENTER
Select
RETURN
Goto previous layer
UP/DOWN
Move cursor
LEFT
Switch to music/slide show
MENU
Switch USB/Card
Click ENTER to enter play mode, in play mode you can click
MENU to switch the control bar on, then click LEFT/RIGHT to
move the highlight cursor on the control bar, and click ENTER to
execute specific function. If you want to switch off the control bar
at any time, click MENU key again.
After selecting a photo, you will enter step 2 stage, please
MENU
Switch control bar on/ off
choose a music file, then click ENTER.
LEFT/ RIGHT
Move highlight cursor
ENTER
Select
RETURN
Goto previous layer
MENU
Switch control bar on/ off
5. CLOCK/DATE
LEFT/ RIGHT
Move highlight cursor
You can enter CLOCK/DATE to see system clock and perpetual
ENTER
Select
calendar.
RETURN
Goto previous layer
4. SLIDE SHOW
SLIDE SHOW interface supports play music with photos.
ENTER
Select
RETURN
Goto previous layer
UP/DOWN
Move cursor
While SLIDE SHOW starts, you can click MENU to switch the
control bar on, then click LEFT/RIGHT to move the highlight
Click ENTER to enter CLOCK/DATE interface, the clock
cursor on the control bar, and click ENTER to execute specific
and calendar will show on the screen.
function. If you want to switch off the control bar at any time, click
MENU key again.
Click ENTER to enter slide show interface, you will enter
step 1 stage, please choose a photo file in your drive, then
click ENTER.
3100554400
Version 1.0
LEFT/RIGHT
Browse month in calendar
Photo
RETURN
Goto previous layer
Effect
Select photo transition effect
UP
Enter setup interface to modify
Frequency
Set photo changing interval time
time and date
Video
6. SETUP
Brightness
Adjust brightness level
Contrast
Adjust contrast level
You can enter SETUP interface to modify every system
Hue
Adjust hue level
parameters of media box.
Saturation
Adjust saturation level
Sharpness
Adjust sharpness level
Clock
After you enter SETUP interface, four categories will show
on the left of screen, you can move cursor and click
ENTER to set every parameters detailed of the system.
Date
Set current date
Alarm
Set alarm time
Time
Set current time
Power on
Set auto power on time
Power off
Set auto power off time
System
TV system
Select TV standard, NTSC or PAL
OSD Language Select OSD language
Video
Select display format
ENTER
Select /Set
Default
Restore default setting
RETURN
Goto previous layer
S/W Version
Show firmware version
UP/DOWN/LEFT/RIGHT
Move cursor