1
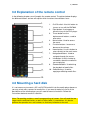
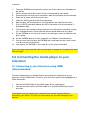
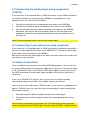
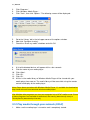
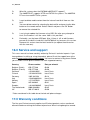
EM7080 - hdMEDIA RT
2 | ENGLISH
EM7080 - hdMEDIA RT
Warnings and points of attention
Repairing of the product should be done by qualified Eminent staff!
Table of contents
1.0 Introduction .............................................................................................................. 3
1.1 Functions and features ........................................................................................ 3
1.2 Packing contents ................................................................................................. 3
2.0 Explanation of the media player .............................................................................. 4
3.0 Explanation of the remote control ............................................................................ 5
4.0 Mounting a hard disk ............................................................................................... 5
5.0 Connecting the media player to your television ....................................................... 6
5.1 Connecting to your television using HDMI (Recommended) ............................... 6
5.2 Connecting the media player using component (Y/Pb/Pr) ................................... 7
5.3 Connecting to your television using composite.................................................... 7
5.4 Audio Connections ............................................................................................... 7
5.5 Connecting to your network ................................................................................. 8
6.0 Setting up the media player ..................................................................................... 8
6.1 Formatting a new hard disk (optional) ................................................................. 8
6.2 Language settings ............................................................................................... 9
6.3 Video settings ...................................................................................................... 9
6.4 Photo settings ...................................................................................................... 9
6.5 Setting up sound .................................................................................................. 9
6.6 Network setup .................................................................................................... 10
7.0 Copying data or media files using USB ................................................................. 10
8.0 Copying data or media files to the built-in hard disk using ‘File Copy’................... 11
9.0 Playing Media ........................................................................................................ 12
9.1 Blu-Ray ISO ....................................................................................................... 12
9.2 DVD playback .................................................................................................... 13
9.2.1 DVD ISO ......................................................................................................... 13
9.2.2 DVD Video_Ts ................................................................................................ 13
9.3 Playing other video formats ............................................................................... 13
9.4 Playing music and other audio........................................................................... 14
9.5 Playing photos and images................................................................................ 14
9.6 Playing video and audio from an external (USB) DVD player ........................... 15
10.0 Play Media through your network ........................................................................ 15
10.1 Turning your computer into a UPnP server (Windows) ................................... 15
10.2 Play media through your network (UPnP) ....................................................... 16
10.3 Play media through your network (Samba) ..................................................... 17
11.0 Samba server of the EM7080 .............................................................................. 17
11.1 Activating the Samba server ............................................................................ 17
11.2 Using the Samba server .................................................................................. 18
3 | ENGLISH
12.1 Setting up your router (EM4551) for the Bit torrent module ............................. 18
12.2 Using the Bit torrent module ............................................................................ 19
13.0 The NZB module of the EM7080 ......................................................................... 19
13.1 Setting up the NZBget module......................................................................... 19
13.2 Using the NZBget module ................................................................................ 20
14.0 Other functions..................................................................................................... 20
15.0 Frequently asked questions ................................................................................. 21
16.0 Service and support ............................................................................................. 22
17.0 Warranty conditions ............................................................................................. 22
18.0 Declaration of Conformity .................................................................................... 23
1.0 Introduction
Congratulations with the purchase of this high-quality Eminent product! This product
has undergone extensive testing by Eminent’s technical experts. Should you
experience any problems with this product, you are covered by a five-year Eminent
warranty. Please keep this manual and the receipt in a safe place.
Register your product now on www.eminent-online.com and receive product updates!
1.1 Functions and features
The Eminent EM7080 hdMEDIA RT turns your living room into a movie theatre.
Thanks to the HDMI 1.3 support, you can not only enjoy your movies in crystal clear
Full HD, but the sound experience is also state-of-the-art: The hdMEDIA RT supports
stereo, ÀC3, WMA, AAC, DTS, and DTS-HD down mix . Because the EM7080 is very
user friendly, it is fun and easy to watch your movies in Full HD!
You can build a 3,5 “ SATA hard disk into the unit so that you have more than enough
disk space for all your media files. And, in case you do run out of space, simply
connect a USB memory stick, hard disk or external (e)SATA hard disk for even more
storage space! Use other USB devices like digital camera’s, camcorders and (most)
portable music players to enjoy the EM7080 hdMEDIA RT. The EM7080 hdMEDIA RT
even supports external USB DVD-ROM drives!
1.2 Packing contents
The following parts need to be present in the package:
•
•
•
•
•
•
EM7080 HD media player
Power supply
HDMI cable
USB A-B cable
Optical cable
Composite cable
4 | ENGLISH
•
•
Remote control
User Manual
2.0 Explanation of the media player
The media player has the following connections on the back of the casing:
1.
2.
3.
4.
5.
6.
7.
8.
Network connection. Connect your network cable to this connection.
HDMI 1.3 connection. Use this connection to connect the hdMEDIA RT to the
HDMI connection on your television.
Component connection. Use these connections to connect the hdMEDIA RT to
the component connections on your television.
Composite connections. Use these connections to connect the hdMEDIA RT to
the composite connections your television
Optical (Toslink) connection. Use this connection to connect your receiver to the
hdMEDIA RT.
USB host. USB connection used to connect the hdMEDIA RT to your computer.
Power connection. Used to connect the power supply.
On/off switch. Use this switch to turn on or turn off the hdMEDIA RT.
At the front of the case you will find two USB ports for harddisks and memory sticks,
and one (e)SATA port for external disks.
5 | ENGLISH
3.0 Explanation of the remote control
In the following chapter, we will explain the remote control. The picture below displays
the different buttons and we will explain which functions these buttons have.
1.
On/Off switch. Use this button to
turn on or turn off the EM7080.
2. Eject button. Use to open or
close the tray of the DVD player.
3. These button are the
alphanumeric buttons, used to
enter data.
4. Menu button. Used to access
the menu.
5. Function buttons. Increase or
decrease the volume.
6. Home button. Use this button to
return directly to the main menu.
7. Navigation buttons. Used to
navigate through the menus.
8. Info button. Use this button to
see details about the media file
you are playing.
9. Standard buttons. Used during
the playback of media files.
10. Selection keys. Used for
copying or deleting media files.
4.0 Mounting a hard disk
It is not necessary to mount a 3,5 inch SATA hard disk into the media player because
you can select many sources for media files. If you want to make full use of all the
possibilities of the media player you will need to mount a hard disk. Follow the
instructions below to mount a hard disk:
Note: The packing contains a small transparent bag of screws. You will need the two
large screws contained inside, as well a Philips head (+) screwdriver. It is best to
perform the operation on a soft surface, to avoid any scratches to the unit.
6 | ENGLISH
1.
Take your EM7080 and remove the screws on all four corners on the bottom of
the device.
2. Gently remove the lid. Be careful, the fan is connected to main board!
3. Disconnect the fan from the fan connector. Note the orientation of the connector.
4. Place the lid safely out of the way for now.
5. Lower the SATA hard disk into the media player.
6. Note the grey SATA connector on the main board, and slide the disk into it.
7. Push the SATA hard disk towards the SATA connector until the connection is
locked down tight.
8. The hard disk will now be resting on two pins that will hold the hard disk in place
if it is aligned correctly. Do not hold the device upside down from this point!
9. Put the EM7080 on its side, and screw in the two larger screws to hold the hard
disk in place.
10. Put the EM7080 back on its feet, and place the lid back in closed position.
11. You can now safely flip over the EM7080 and screw back the four small screws
in all four corners of the device.
12. You’re done, the EM7080 is now ready to use the internal hard disk.
If you are using a new hard disk, then use the steps in chapter 6.1 to prepare the hard
disk for usage.
5.0 Connecting the media player to your
television
5.1 Connecting to your television using HDMI
(Recommended)
The best image quality can be obtained by connecting the media player to your
television using a HDMI cable. Of course, your television needs to be equipped with a
HDMI connection.
1.
2.
Connect the HDMI cable to the HDMI output of the media player.
Connect the other side of the HDMI cable to an available HDMI input of your
television.
Note: Make sure your media player and television are both turned off before
connecting your cables. This way you can prevent any possible damage to your
devices.
7 | ENGLISH
5.2 Connecting the media player using component
(Y/Pb/Pr)
If your television is not equipped with an HDMI connection, or your HDMI connections
are already occupied, you can connect the EM7080 using component. Using
component, you can also use HD resolutions.
1.
2.
3.
Connect the red plug to the red component connection on the EM7080.
Connect the blue plug to the blue component connection on the EM7080.
Connect the green plug to the green component connection on the EM7080.
Afterwards, connect the red, blue and green plugs on the other side of the
component cable to the corresponding component input connections on your
television set.
Note! The red component cinch is not an audio output cable!
5.3 Connecting to your television using composite
If your television is not equipped with an HDMI connection or component connections,
you can use the composite connection on the hdMEDIA RT. Connect the yellow plug
to the yellow cinch connection on the EM7080.
Now you can connect the yellow plug on the other side of the cable to the yellow cinch
connection on your television.
5.4 Audio Connections
There are different ways to enjoy the sound the EM7080 produces. You can connect
the red and white plugs of the ‘composite’ cable to your television or receiver to create
a ‘2.0’ stereo effect. If your television has HDMI audio support, you can make use of
the HDMI cable order to receive both image and digital sound on your television, in
stereo only.
If you use a (certified) DTS receiver, then you can enjoy true digital sound by
connecting the player over HDMI 1.3 to a digital input on your receiver.
You can also use the media player’s SPDIF output. If your receiver is equipped with a
optical (TOSLINK) input, then you can enjoy the media player’s digital sound during
movie and music play.
1.
2.
Connect the optical cable to the optical output of the media player.
Connect the other side of the optical cable to the corresponding input of your
receiver.
Note: Because of bandwidth requirements, the TOSLINK optical output cannot be
used to transport the raw DTS-HD signal. You will require a HDMI 1.3 digital receiver
8 | ENGLISH
to enjoy DTS-HD sounds. Audio with DTS-HD tracks will be played back as DTS-Core
audio over TOSLINK.
5.5 Connecting to your network
The media player also has the capability to be connected to your network by using the
media player’s 100Mbps network connection. Doing so, you can retrieve media from
your network or your NAS (For example: The Eminent NAS type EM4071 or EM4072)
and play these media files through the media player on your television.
1.
2.
Connect a network cable to the media player’s network connection.
Connect the other side of the connection cable to a network connection of your
router, modem or switch.
In order to use the media player’s networking capabilities you have to setup the media
player for network usage. These steps can be found in chapter 6.6.
6.0 Setting up the media player
Before using, you have to setup the media player. Of course, it is very convenient to
be able to use the preferred language, and be able to setup the media player for
network usage. If you have a High Definition television which is connected by HDMI,
you can setup the media player in order to play the media contents on high resolution
(Both video and sound). Of course, there are many other settings to change on the
media player. We will explain these settings in the next chapters.
As soon as the media player has started for the first time, the media player will ask
you to fill in a few items like the language and the LAN setup . Simply press the
‘Return’ button on the remote control a few times to navigate to the main menu.
6.1 Formatting a new hard disk (optional)
1.
2.
3.
4.
5.
6.
7.
8.
Use the arrow keys to navigate to ‘Setup’ and press the ‘OK’ button on the
remote control.
Navigate to ‘System’.
Select ‘HDD format’ and press the ‘OK’ button.
Select ‘HDD1’ and press the ‘OK’ button.
You will see a warning on your screen. Select ‘OK’ and press the ‘OK’ button.
Select ‘Format’. Select ‘OK’ and pres the ‘OK’ button.
The formatting can take some time, be patient!
After formatting, you will see a notification, telling you that formatting the hard
disk has been completed. Press the ‘OK’ button.
9 | ENGLISH
6.2 Language settings
1.
2.
3.
4.
5.
Use the arrow keys on the remote control to navigate to ‘Setup’ and press the
‘OK’ key on the remote control.
Navigate to ‘System’.
Select ‘Menu Language’ and press the ‘OK’ button. Use the arrow keys to select
the desired language at the right side of the menu.
Once the desired language is selected, press the ‘OK’ button to save the this
setting.
Press the ‘HOME’ button to return to the main menu.
6.3 Video settings
1.
2.
3.
4.
5.
6.
Use the arrow keys on the remote control to navigate to ‘Setup’ and press the
‘OK’ key on the remote control.
Navigate to ‘Video’ and use the arrow keys to navigate to ‘TV System’ and press
the ‘OK’ button.
Use the arrow keys to select the desired resolution and refresh rate and then
press the ‘OK’ button. The new resolution will be set.
Navigate to ‘Aspect Ratio’ and press the ‘OK’ button.
Use the arrow keys to select the desired aspect ratio. Select ’16:9’ if you have a
wide screen television and press the ‘OK’ button.
Press the ‘Home’ button to return to the main menu.
6.4 Photo settings
The EM7080 can display photos and images. You can also setup the EM7080 for a
slideshow and the corresponding visual effects.
1.
2.
3.
4.
Navigate to ‘Setup’ and press the ‘OK’ button on the remote control.
Navigate to ‘MISC’ and use the arrow keys to navigate to ‘Slide Show Timing’
and press the ‘OK’ button.
Select the time interval between the images, for example, 5 seconds and press
the ‘OK’ button. This means a new image will appear every 5 seconds.
Select ‘Transition Effect’ and press the ‘OK’ button. Select the desired visual
effect you want to see the moment the media player displays a new image.
Choose ‘All Effect Shuffle’ if you want all available effects to be displayed
randomly the moment the media player displays a new image .
6.5 Setting up sound
1.
2.
3.
Use the arrow keys on the remote control to navigate to ‘Setup’ and press the
‘OK’ key on the remote control.
Navigate to ‘Digital Output’ and press the ‘OK’ button.
Select the desired sound setting and press the ‘OK’ button. If you have
connected the EM7080 using an optical cable, then select SPDIF LCPM or
10 | ENGLISH
4.
SPDIF RAW, if you have only connected the HDMI cable, then select HDMI RAW
which enables the playback of virtually any audio codec.
Press the ‘HOME’ button to return to the main menu.
If you are using a DTS sound system, you can use the ‘RAW’ settings in order to
receive digital sound.
6.6 Network setup
In the following steps we will explain how to setup the media player for network usage.
1.
2.
3.
4.
Use the arrow keys to navigate to ‘Setup’ and press the ‘OK’ button on the
remote control.
Navigate to ‘Network’.
Select ‘Wired Lan Setup’ and press the ‘OK’ button.
You can now select the following methods of connecting:
DHCP IP (automatic obtaining an IP-address):
1. Choose ‘DHCP IP’ if there is a DHCP server in your network which can provide
the media player the correct IP-Address settings. Press the ‘OK’ button on the
remote control.
In 99% a DHCP connection will be suitable.
FIX IP (Fill in a static IP-address):
1. Choose ‘FIX IP’ if there is not a DHCP server in your network which forces you to
fill in the correct IP-Address settings yourself.
2. Press the ‘OK’ button on the remote control to advance in the IP-Address settings
menu.
3. Follow the instructions on the screen to fill in the correct settings. You will need to
fill in an IP-address within the IP range of your network, and, it needs to be an
unique IP-address (It may not be already in use within your network).
4. The subnet mask, gateway and DNS addresses are the same as used in your
network.
5. Press the ‘OK’ button on the remote control. Select ‘CONFIRM’ and press the
‘OK’ key to save the settings.
6. Press the ’Home’ button on the remote control in order to return to the media
player’s main menu.
7.0 Copying data or media files using USB
The EM7080 can also be connected directly to you computer using a USB cable.
There is no need to install any additional software or taking difficult steps. Just
connect the USB cable and start copying!
11 | ENGLISH
1.
2.
3.
4.
5.
Make sure your computer is completely started.
Make sure the media player is turned on and is completely started.
Connect the USB cable to the USB port at the back of the EM7080.
Connect the other side of the USB cable to a free USB port on your computer.
A message will appear on your television: ‘USB Plug-in event Detected’. Select
‘Confirm’ and press the ‘OK’ button.
6. Now use the Windows Explorer on your computer to browse to the local hard
disks.
7. A new hard disk will be found. This is the media player’s hard disk.
8. First, browse the computer’s hard disk to locate the media files you want to copy.
9. Right-click these media files and choose ‘Copy to’ and then choose the media
player’s hard disk.
10. Once the copying of media files has been finished, you can disconnect the USB
cable from the media player.
11. The media player will then automatically return to it’s main menu.
8.0 Copying data or media files to the built-in
hard disk using ‘File Copy’
The EM7080 has the opportunity to copy data from USB devices, network, and
external DVD player to the built-in hard disk. Also, copying from the internal hard disk
to other devices is possible. This way, there is no need to connect the hard disk to
your computer in order to copy media files to your hard disk. Use the following steps to
copy data to your hard disk.
1.
2.
3.
4.
5.
6.
7.
8.
9.
If you want to copy data from a USB device or from an external (e)SATA disk,
then you have to connect the USB device to one of the front USB ports, or in
case you use (e)SATA hard disk, connect the (e)SATA cable to the (e)SATA port.
Use the arrow keys to navigate to ‘File Copy’ and press the ‘OK’ button on the
remote control.
You will now see a ‘Source’ and a ‘Destination’. Here, you can select the source
(left panel) you want to copy media files from, and the destination (right panel)
you want to copy media files to.
In this example we will explain how to copy data from your external USB device
to the internal hard disk.
Select ‘USB’ at the ‘Source’ field and press the ‘OK’ button.
You will be redirected automatically to the ‘Destination’ field. Select the
destination, in this case, the hard disk, or ‘HDD’ and press the ‘OK’ button.
Select the source drive at ‘Source’ and press the ‘OK’ button.
At the source field, select the folder you want to copy. Press the red button on the
remote control to select this folder. The folder will be marked.
Press the right arrow key, you will be direct to the ‘Destination’ field. Press the
‘OK’ button.
12 | ENGLISH
10. You can now select the folder you want to copy to and press the ‘OK’ button, or
you can select ‘NEW DIRECTORY’ and press the ‘OK’ button.
11. If you have selected ‘NEW DIRECTORY’, you can now give a name to the folder
using the remote control. Once you have given the folder the correct name,
navigate to ‘OK’ in the menu and press the ‘OK’ button.
12. Press the right arrow key. You will be asked to ‘COPY’, ‘MOVE’ or ‘CANCEL’.
Select ‘COPY’ and press the ‘OK’ button
13. The notification ‘FileCopy Completed!’ will appear. Press the ‘HOME’ button to
return to the main menu.
You can also use ‘FileCopy’ to copy media files from the internal hard disk to an
external USB and (e)SATA memory stick or hard disk.
9.0 Playing Media
If you have finished setting up the media player and you have connected a USB hard
disk or USB memory stick, you can playback the available media from the connected
USB device, or from the internal hard disk. One of the main features of the media
player is the ability to playback many sorts of video files. ‘Regular’ video files like
.MOV, .MKV, .AVI and DVD ISO’s, VIDEO_TS files and even Blu-Ray files can be
handled by the EM7080.
We will explain how to view or play the different media types.
9.1 Blu-Ray ISO
The EM7080 is able to playback Blu-Ray ISO’s / AVCHD ISO. Use the following steps
to playback these ISO files.
By default, the EM7080 is not able to playback secured commercial Blu-Ray ISO’s.
The EM7080 is however to playback Blu-Ray ISO’s which do not have any form of
security.
1.
2.
3.
4.
5.
6.
7.
Make sure the media player is turned on and has completely started.
Use the arrow keys to navigate to ‘Movies’ and press the ‘OK’ button.
Select the device or source you want to use for video playback. Select ‘HDD’ if
you want to playback video files located on the internal hard disk and press the
‘OK’ button.
Select the hard disk and press the ‘OK’ button.
Select the folder where the Blu-Ray ISO’s is located and press the ‘OK’ button.
The ISO file will be displayed. Select the ISO and press the ‘OK’ button. The
playback of the ISO file will start.
Press the ‘OK’ button again for full screen playback.
13 | ENGLISH
Note: Press the ‘SUBTITLES’ button to see subtitles or change the language of the
subtitles, size of the subtitles, color of the subtitle etc.
Press the ‘MENU’ button to access the menu which allows you to easy access to the
chapter list and subtitle languages.
9.2 DVD playback
9.2.1 DVD ISO
1.
2.
3.
4.
5.
6.
7.
Make sure the media player is turned on and is completely started.
Use the arrow keys to navigate to ‘Movies’ and press the ‘OK’ button.
Select the device or source you want to use for video playback. Select ‘HDD’ if
you want to playback video files located on the internal hard disk and press the
‘OK’ button.
Select the hard disk and press the ‘OK’ button.
Select the folder where the DVD ISO is located and press the ‘OK’ button.
The DVD ISO will be displayed. Select the file and press the ‘OK’ button. The
video file will start to play.
Press the ‘OK’ button again for full screen playback.
Note: Press the ‘SUBTITLES’ button to see subtitles or change the language of the
subtitles. Press the ‘MENU’ button to access the menu of the video file. The ‘MENU’
button also gives you access to the menu which allows you to skip chapters amongst
others.
9.2.2 DVD Video_Ts
1.
2.
3.
4.
5.
6.
7.
Make sure the media player is turned on and is completely started.
Use the arrow keys to navigate to ‘Movies’ and press the ‘OK’ button.
Select the device or source you want to use for video playback. Select ‘HDD’ if
you want to playback video files located on the internal hard disk and press the
‘OK’ button.
Select the hard disk and press the ‘OK’ button.
Select the folder where the video files are located and press the ‘OK’ button.
Select the folder ‘/VIDEO_TS/’ and press the ‘OK’ button.
If there is a ‘VIDEO_TS.IFO’ select this file and press the ‘OK’ button. This IFO
file will direct you to the menu of the DVD. If there is not an IFO file, then select
the correct .VOB file and press the ‘OK’ button to start the playback of the file.
9.3 Playing other video formats
The hdMEDIA RT plays almost all other video formats like .AVI, .MKV etc. Use the
following steps to play other video formats.
14 | ENGLISH
1.
2.
3.
4.
5.
6.
7.
Make sure the media player is turned on and is completely started.
Use the arrow keys to navigate to ‘Movies’ and press the ‘OK’ button.
Select the device or source you want to use for video playback. Select ‘HDD’ if
you want to playback video files located on the internal hard disk and press the
‘OK’ button.
Select the hard disk and press the ‘OK’ button.
Select the folder where the video files are located and press the ‘OK’ button.
The video files will now be shown. Select the video file you want to playback and
press the ‘OK’ button.
The video file will now start to play.
Note: Some MKV files do have subtitles in the MKV file itself. It is possible to add a
SRT subtitle file, but then, the MKV file must not have a subtitle in the MKV itself. SRT
subtitles can only be used without having the subtitles in the MKV itself. You can
always put the SRT file into the MKV container using ‘MKVMERGE’ which you can
download from the internet.
9.4 Playing music and other audio
1.
2.
3.
4.
5.
6.
7.
Make sure the media player is turned on and is completely started.
Use the arrow keys to navigate to the ‘Music’ and press the ‘OK’ button.
Select the device or source you want to use for music or audio playback. Select
‘HDD’ if you want to playback music or audio files located on the internal hard
disk and press the ‘OK’ button.
Select the hard disk and press the ‘OK’ button.
Select the folder where the music or audio files are located and press the ‘OK’
button.
The music or audio files will be displayed. Select the file you want to play and
press the ‘OK’ button. The music or audio files will start to play.
If you have multiple audio files listed, the EM7080 will playback these files once
the selected file has finished playing.
Note: Press the blue button to rename or delete the music or audio file.
Hint: You can playback a Music file and then use the menu of the EM7080. The
selected Music or audio file will be heard as background music.
9.5 Playing photos and images
1.
2.
3.
4.
Make sure the media player is turned on and is completely started.
Use the arrow keys to navigate to ‘Photo’ and press the ‘OK’ button.
Select the device or source you want to use for music or audio playback. Select
‘HDD’ if you want to playback music or audio files located on the internal hard
disk and press the ‘OK’ button.
Select the hard disk and press the ‘OK’ button.
15 | ENGLISH
5.
6.
7.
8.
Select the folder where the images are located and press the ‘OK’ button.
Select the image you want to view and press the ‘OK’ button. An image will
appear on the right side.
Press the ‘OK’ button again to view the image in full screen.
If you have set slideshow settings in the chapter ‘Photo settings’, the slideshow
and corresponding visual effects will start automatically.
9.6 Playing video and audio from an external (USB) DVD
player
You can connect a USB DVD player to the EM7080 hdMEDIA RT. The EM7080 will
recognize the USB DVD player automatically.
1.
2.
3.
4.
5.
6.
7.
Make sure the media player is turned on and is completely started.
Plug-in the DVD player’s USB cable to a USB port on the EM7080 hdMEDIA RT,
the EM7080 will recognize the DVD player automatically.
Insert a DVD disk. Usually, the disk will be played automatically. If not, use the
following steps:
Use the arrow keys to navigate to ‘Movies’ and press the ‘OK’ button.
Select the device or source you want to use for video playback. Select ‘DVD’ if
you want to playback video or audio files located on the DVD-ROM and press the
‘OK’ button.
Select the DVD player and press the ‘OK’ button.
The DVD will start automatically and you will see the DVD menu on your screen
automatically.
10.0 Play Media through your network
Since the EM7080 is equipped with a Samba and UPnP client, you are able to stream
data through the network.
Once your media player is connected to your network, and you have made the correct
network settings, you can play media files through your network. If you want to share
media files on your computer in order to let the media player play these files, you have
to setup your computer as a UPnP server. We will explain how to setup your computer
as a UPnP server using the following steps.
10.1 Turning your computer into a UPnP server (Windows)
Your computer does not share media by default. You will have to install a UPnP media
server on your computer to add this functionality. If you are using Windows XP,
Windows Vista or Windows 7, you can use the built-in UPnP media service of
Windows Media Player 11. If you enable this option, your media player can access the
music library on your computer. Follow the steps below to enable this option:
1.
Click ‘Start’.
16 | ENGLISH
2.
3.
4.
Click ‘Programs’.
Click ‘Windows Media Player ‘.
Click ‘Tools’, then click ‘Options’. The following screen will be displayed:
5.
6.
7.
Go to the ‘Library’ tab in the left upper corner of the options window.
Now click ‘Configure sharing’.
Check the “Share my media” checkbox and click OK.
8.
9.
10.
11.
12.
13.
A list with detected devices will appear within a few seconds.
Click the name of your media player.
Click ‘Allow’.
Click ‘Ok’.
Click ‘Ok’.
All files in the media library of Windows Media Player will be shared with your
media player from now on. The media library will be accessible using the remote
control and display of the media player.
Note: Steps above are taken with Windows Media Player 11, available for download at
http://www.microsoft.com/windows/windowsmedia/player/.
Hint: Multiple other programs can turn your computer into a UPnP media server. Some
of these programs are available for download, like tversity (www.tversity.com) or
Twonkymedia (www.twonkyvision.de).
10.2 Play media through your network (UPnP)
1.
Make sure the media player is turned on and is completely started.
17 | ENGLISH
2.
3.
4.
5.
Use the arrow keys to navigate to ‘Movies’.
Select ‘UPNP’ and press the ‘OK’ button.
Now you will see a list of available (media) servers in your network. Select the
desired UPnP (media) server and press the ‘OK’ button on the remote control.
The available media folders and files will now be displayed.
Select the media folder or file you want play and press the ‘OK’ button on the
remote control to start the playback of the file.
10.3 Play media through your network (Samba)
1.
2.
3.
4.
5.
Make sure your media player is turned on and is completely started.
Use the arrow keys to navigate to ‘Movies’.
Select ‘SAMBA’ and press the ‘OK’ button.
Now you will see a list of available SAMBA and/or file servers. Select the desired
SAMBA or file server and press the ‘OK’ button on the remote control. The
available media folders or files will be displayed.
Select the media folder or file you want to play and press the ‘OK’ button on the
remote control to start the playback of the file.
11.0 Samba server of the EM7080
The EM7080 has a built-in Samba server. Devices which do support the Samba
protocol, can communicate with each other using the network and therefore are able
to exchange data from one device to the other. Using the following steps we will
explain how the EM7080’s Samba server can be used.
11.1 Activating the Samba server
1.
Make sure you have built-in a hard disk in the media player. This mandatory,
the Samba server does require a hard disk.
2. Make sure the media player is started and you can see the media player’s
menu on the screen of your television or monitor.
3. Navigate using the remote control to ‘Setup’ and press the ‘OK’ button on the
remote control.
4. Navigate to ‘System’.
5. Select ‘HDD Format’ and press the ‘OK’ button. Use the instructions shown on
screen.
6. Once the hard disk is formatted, you can shut down the media player using the
remote control. Use the remote control to start the media player again.
7. Navigate to ‘Setup’ and press the ‘OK’ button.
8. Navigate to ‘System’.
9. Select ‘System Info’ and press the ‘OK’ button. If correct, the notification
‘Running’ appears behind ‘Samba Server’.
10. You have successfully activated the Samba server.
18 | ENGLISH
11.2 Using the Samba server
Now you have setup the Samba server, you can now use your computer to access the
media player and transfer data to the media player’s hard disk and transfer data from
the media player’s hard disk to your computer. For this, you need to know the media
player’s IP-address. This IP-address can be found using the menu of the media
player.
1.
2.
3.
4.
5.
6.
Make sure your computer is completely started. Open the Windows explorer.
Fill in the media player’s IP-address on the address bar and then press the
‘Enter’ button on your keyboard.
If correct, the name ‘hdd1’ appears.
Double-click this name. You will see several different folders.
If you want to copy movies from your computer to the media player’s hard disk,
the copy the movies to the ‘movie’ folder.
As soon as copying has been completed, the media player should be able to
playback the copied file on your television.
12.0 Using the Bit torrent module of the EM7080
The EM7080 has a so called Bit torrent module. Using this module, you are able to
download al sorts of media files to the hard disk of the EM7080. Use the following
steps to setup the Bit torrent module for usage.
12.1 Setting up your router (EM4551) for the Bit torrent
module
If you are using a router in your network, you need to open a port in your router’s
firewall before you can use the Bit torrent module. Because there are many brands
and types of routers, we will explain how you can open a port in the firewall of the
Eminent EM4551 wireless N-router. These steps can be used as a guideline for other
routers.
1.
2.
Make sure you know your media player’s IP-address.
Make sure your computer is completely started and open your computer’s web
browser.
3. Fill in the following in the web browser’s address bar: http://192.168.8.1
4. Fill in ‘admin’ at ‘username’.
5. Fill in ’admin’ at ‘password’.
6. Login in to the router’s main menu.
7. Click ‘Setup Tool’.
8. Click “Advanced Setup’.
9. Click ‘NAT/Routing’.
10. Click ‘Port Forwarding’.
11. Make sure the ‘Rule Type’ is set to ‘User Defined’.
12. Fill in ‘Bittorrent’ at ‘Rule Name’.
19 | ENGLISH
13.
14.
15.
16.
17.
18.
At ‘LAN IP Address’ you have to fill in the media player’s IP-address.
Select ‘TCP’ at ‘Protocol’.
Fill in ‘6881~6881’ at ‘External Port’.
Fill in ‘6881~6881’ at ‘Internal Port’.
Click ‘Add’. If correct, the new rule will displayed at the lower part of the screen.
Make sure the name of the rule is marked, and click ‘Run’ to activate this rule.
Your router has now been configured for using the Bit torrent module.
12.2 Using the Bit torrent module
1.
2.
3.
4.
5.
6.
7.
8.
9.
Fill in the media player’s IP-address on the address bar. For example:
http://IPAddress and press the ‘Enter’ key on your keyboard.
The bit torrent module will automatically be shown on screen.
Wait until the screen is completely loaded.
Click ‘Bittorrent download’.
Click ‘+ Add new torrent’.
Click ’Browse’ and then browse to the torrent file you want to upload to the media
player.
Double-click the torrent file. Click ‘Yes’.
You will now see the name of the torrent file in the menu of the torrent module.
Place a mark at the torrent and click ‘Start’ to start downloading.
Hint: The downloaded files can be found using: \\IPaddress (also see ‘Samba server’)
1. In the folder ‘BT’ you can find the file you have downloaded.
2. If a tr~ mark is shown at the name of the file, it means the file has not yet been
downloaded completely.
13.0 The NZB module of the EM7080
The EM7080 has a built-in Usenet module, called the ‘NZBget’ module. Using this
module, you can download all sorts of media to the hard disk of the media player. The
EM7080 will automatically repair the files (if necessary) and will automatically unpack
the files. As soon as these procedures have been completed, you can playback this
media on your television.
Using the following steps, we will explain how to setup the NZBget module.
13.1 Setting up the NZBget module
1.
2.
3.
4.
Make sure you know your media player’s IP-address. You find this IP-address
using the media player’s menu.
Open the computer’s web browser.
Fill in the IP-address on the web bworser’s address bar, followed by :8080. For
example: http://IPaddress:8080
Click ‘config’ at the left side of the menu.
20 | ENGLISH
5.
6.
Click ‘News-Servers’ at the left side of the menu.
Fill in the name of you news server at ‘Server1.Host’. For example:
news.provider.com.
7. Fill in the username of your new server if required at ‘Server1.Username’.
8. Fill in the password of your newsserver if required at ‘Server1.Password’.
9. Click ‘Save changes’ to save these settings.
10. Click ‘Shutdown’ in the left menu, and wait for 10 seconds.
11. Turn off the media player using the remote control. Use the remote control to
start the media player again.
12. The NZBget module has now been set and is ready to be used.
13.2 Using the NZBget module
Using the following steps, we will explain how to use the NZBget module in order to let
the media player download your media files.
1.
2.
3.
4.
5.
6.
Using http://IPadddress:8080 you will return to the main NZBget menu
In order to upload a NZB file to the media player, click ‘Browse’.
Browse to the NZB file you want to upload. Double-click this file.
Click the ‘Upload File’ button. If the file has been transferred successfully, the
notification ‘File upload OK’ will appear.
The media player will automatically begin to download. It can take up to a minute
before the download will appear at the right side of the screen. You can also click
the ‘refresh’ button below “Server control’.
If there are enough repair files available (.par), the media player will automatically
repair the files if necessary. After repairing. the files will be unpacked
automatically after which the media player will be able to playback these media
files on your television.
Hint: The downloaded files can be found using: \\IPAddress (see ‘Samba server’).
In the folder ‘Download\NZBget\dst’ the downloaded file will be displayed.
14.0 Other functions
Besides the already mentioned functions, there are some functions which are not
mentioned yet. Some of these functions are explained in the following chapter.
Audio
Night Mode: With this function enabled, the sound will be reduced significantly. This
way, you do not disturb other people when using audio. Ideal when using the
hdMEDIA RT while people are asleep.
Video
DNR: Dynamic Noise Reduction, this function removes artifacts and noise for a clear
image.
21 | ENGLISH
System
System Update: Using this function, the current firmware can be updated.
Parental Control: Let’s you set the strictness of the parental control. A password is
required.
HDD Format: Let’s you format the hard drive. Ideal when a new hard drive is installed,
or the data on you current hard disk is corrupted.
MISC
Resume Play: Allows you to resume the media file where you left of. This is handy, in
case you are not able to view the entire movie at once.
Movie Preview: Allows you to see a preview of the movie in a small screen, select .
Press the ‘OK’ button to view the movie in full screen.
15.0 Frequently asked questions
Q:
A1:
A2:
Q:
A:
Q:
A:
Q:
A:
I have connected the media player to my television using a HDMI cable, but
I am not able to see an image. How can I solve this problem?
Most likely, your television is not set to the correct HDMI source yet. If your
television is equipped with multiple HDMI inputs, you have to try-out all
available HDMI sources until you see the media player’s menu.
It is also possible a not supported resolution is set on the EM7080. Press
the ‘TV MODE’ button until you see the EM7080’s menu.
I am playing a file which has digital sound. My television is connected to the
media player using a DVI adapter plug, but I do not hear any sound. How is
this possible?
DVI only delivers image, not sound. If you are using a DVI adapter plug,
make sure you use the optical cable or white and red composite cables for
sound.
The manual mentions the media player’s ability to play almost all media.
What formats and codec’s are supported by the hdMEDIA RT?
The hdMEDIA RT supports the following formats and codec’s:
Video codec’s: WMVHD, AVCHD, H.264, X.264, VC-1, MPEG 1/2/3/4, MKV,
M2TS, TS, ISO, AVI, MOV and many other formats.
Picture formats: HD JPEG, BMP, GIF, TIF, and PNG.
Audio formats: AAC, PCM, DOLBY AC3, DTS, DTS-HD (Pass thru), AC3
and DTS stereo down mix. For an exact list, please check our web page.
The hdMEDIA RT let’s you built-in a hard disk. Is there a limitation to the
size of the hard disk, and is SATA II supported?
The hdMEDIA RT supports SATA I and SATA II hard disks. You can use
hard disks up and to 1.5TB+.
22 | ENGLISH
Q:
A:
What file systems does the EM7080 hdMEDIA RT support?
The hdMEDIA RT supports NTFS and FAT32 file systems. The hdMEDIA
RT can also read EXT3 file systems.
Q:
I want to delete media content from the internal hard disk. How can I do
this?
You can delete content by selecting the desired file and pressing the blue
button on the remote control. Select ‘Delete’ and press the ‘OK’ button
to remove the selected file.
A:
Q:
A:
I am trying to update the firmware using USB. But after every attempt to
flash, the firmware is still the same. How is this possible?
Preferably, use the lower USB port. Also, if there is still an old firmware
present on the built-in hard disk, the EM7080 will try to access this version.
Remove this version from the local hard disk (or replace the old version
with the new one).
16.0 Service and support
This users manual has been carefully written by Eminent’s technical experts. If you
have problems installing or using the product, please fill out the support form at the
website www.eminent-online.com/support. You can also contact us by phone. Below
you will find a list with phone numbers for each supported country.
Country
Belgium (Dutch)
Belgium (French)
Denmark
Finland
Germany
Italy
Norway
Spain
Sweden
The Netherlands
UK
Phone number
070 277 286
070 277 286
+45 69918565
+35 8942415826
1805 982 234
+39 0240042016
+47 21075033
807 080 042
+46 840 309985
0900-3646368
905 871 0013
Rate per minute*
€0.30
€0.30
Local Costs
Local Costs
€0.14
Local Costs
Local Costs
€0.41
Local Costs
€0.45
£0.30
* Rates mentioned in this table do not include cell phone charges.
17.0 Warranty conditions
The five-year Eminent warranty applies to all Eminent products unless mentioned
otherwise before or during the moment of purchase. When having bought a second-
23 | ENGLISH
hand Eminent product the remaining period of warranty is measured from the moment
of purchase by the product’s first owner.
The Eminent warranty applies to all Eminent products and parts inextricably
connected to and/or mounted on the main product. Power supply adapters, batteries,
antennas and all other products not integrated in or directly connected to the main
product and/or products of which, without reasonable doubt, can be assumed that
wear and tear show a different pattern than the main product are not covered by the
Eminent warranty. Products are not covered by the Eminent warranty when subjected
to incorrect/improper use, external influences and/or when opened by parties other
than Eminent.
18.0 Declaration of Conformity
To ensure your safety and compliance of the product with the directives and laws
created by the European Commission you can obtain a copy of the Declaration of
Conformity concerning your product by sending an e-mail message to: [email protected]. You can also send a letter to:
Eminent Computer Supplies
P.O. Box 276
6160 AG Geleen
The Netherlands
Clearly state ‘Declaration of Conformity’ and the article code of the product of which
you would like to obtain a copy of the Declaration of Conformity.
EM7080 | 03-2010