1
WIL668
USER MANUAL
1
Content
1. SAFETY AND PRECAUTIONS ................................................................................................................................... 4
2. CARE AND MAINTENANCE ...................................................................................................................................... 4
3. APPEARANCE ............................................................................................................................................................... 7
4. ICONS IN THE IDLE SCREEN AND LED................................................................................................................. 8
5. KEYPAD DEFINITIONS .............................................................................................................................................. 8
6. GETTING STARTED .................................................................................................................................................. 10
6.1 SIM CARD INSTALLATION ··········································································· 10
6.2 INSTALLING THE BATTERY ········································································· 10
6.3 CHARGING THE BATTERY ·········································································· 10
6.4 SECURITY CODES ····················································································· 11
7. DOCKING STATION................................................................................................................................................... 12
8. YOUR HANDSET ........................................................................................................................................................ 12
8.1 TURN ON ·································································································· 12
8.2 TURN OFF ································································································· 13
8.3 MAKING A CALL ························································································ 13
8.4 ANSWERING A CALL ·················································································· 13
8.5 END A CALL ······························································································ 13
8.6 EMERGENCY SERVICE ··············································································· 13
8.7 CALL RECORDS ························································································ 13
9. IDLE SCREEN ............................................................................................................................................................. 13
10. LIST OF MAIN MENU .............................................................................................................................................. 14
11. REMOTE SMS............................................................................................................................................................ 15
11.1 SET LOVE NUMBER ······················································································ 15
11.2 SET SOS NUMBER······················································································· 15
11.3 ADD NEW ENTRY ························································································· 15
11.4 SET ALARM ······························································································· 15
12. LOVE NUMBER ........................................................................................................................................................ 15
13. ANSWERING MACHINE ......................................................................................................................................... 16
14. REMOTE CONTROL ............................................................................................................................................... 16
14.1 REMOTE ··································································································· 16
14.2 SOS········································································································ 16
15. REMOTE CONTROL SOS BUTTON ..................................................................................................................... 17
16. MESSAGES................................................................................................................................................................. 17
16.1 CREATE ···································································································· 17
16.2 INBOX ······································································································ 17
16.3 DELETE ALL ······························································································ 17
17. PHONEBOOK ............................................................................................................................................................ 17
17.1 VIEW ······································································································· 17
2
17.2 CREATE ···································································································· 18
17.3 DELETE ···································································································· 18
17.4 DELETE ALL ······························································································ 18
17.5 MEMORY STATUS························································································· 18
18. SETTINGS .................................................................................................................................................................. 18
18.1 ALARM ····································································································· 18
18.2 RINGTONE ································································································· 18
18.3 TIME&DATE ······························································································· 19
18.4 LANGUAGE ································································································ 19
18.5 KEYPAD LOCKING ························································································ 19
18.6 HEARING AID ····························································································· 19
19. SHORTCUT KEY ...................................................................................................................................................... 19
19.1 CALENDAR ································································································ 19
19.2 CALCULATOR ····························································································· 20
20. STK (SIM TOOK KITS) ............................................................................................................................................ 20
21. INPUT MODE............................................................................................................................................................. 20
21.1 ENGLISH INPUT MODE ············································································· 20
21.2 FRENCH INPUT MODE ·············································································· 20
21.3 SPANISH INPUT MODE ·············································································· 21
21.4 ITALIAN INPUT MODE ··············································································· 21
21.5 GERMAN INPUT MODE ············································································· 21
21.6 DUTCH INPUT MODE ················································································ 22
21.7 NUMBER INPUT MODE ·············································································· 22
21.8 SYMBOL SELECT MODE ··········································································· 22
3
1. SAFETY AND PRECAUTIONS
Please read these simple guidelines. Not following them may be dangerous or illegal.
Read the complete user guide for further information.
Switch off the phone in the vicinity of chemical plants, gas stations and other locations containing
explosive objects.
Keep the phone far away from children.
When driving, please use the hands free calling device to ensure safety. Please park the
roadside for communication unless in emergency.
car at
Switch off the phone when boarding an airplane and do not switch the phone on during the flight.
Be careful when using the mobile phone in the vicinity of such devices as pacemakers, hearing aids
and other electro-medical equipment, which may be interfered by the mobile phone.
No guarantee for the accessories and parts not produced by the original factory.
Never attempt to disassemble the phone by yourself. Contact the supplier in case of any trouble
with your mobile phone.
Do not recharge the phone without battery being installed.
Charge the phone in well-ventilated environment and keep away from inflammable and high
explosive articles.
To avoid demagnetization, keep the handset away from magnetic substances, such as magnetic
discs or credit cards.
Keep the phone away from liquid. If soaking or erosion occurs, take the battery out and contact the
supplier.
Avoid using the phone in too high or too low temperature environments. Never leave the phone
exposed under direct sunlight, in high humidity or in a dusty environment.
Do not use liquid or a damp cloth with strong detergents to clean the handset.
Wireless phones may be susceptible to interference, which can affect performance。
Use only approved enhancements and batteries. Do not connect incompatible products.
Use only in the normal position as explained in the produce documentation. Do not touch the
antenna unnecessarily.
Ensure the phone is switched on and in service. Enter the emergency number, then press the call
key. Give your location. Do not end the call until given permission to do so
2. CARE AND MAINTENANCE
Battery care
·Your device is powered by a rechargeable battery. When the charge is low, please re-charge the battery.
In order to extend the lifetime of the battery allow the battery to run out of power before recharging.
·Unplug the charger from power source and the phone when not in use. Do not leave the battery
connected to a charger once the battery is full. Overcharging may shorten battery lifetime.
·Extreme temperature can affect the ability of your battery to charge. Battery works only at room
temperature (between 15 and 25°C). If the temperature of the battery is too hot or too cold, the battery will
not charge and can malfunction. Extreme temperatures reduce and cause malfunctions in the battery.
·Use the battery only for intended purpose.
Never use unauthorized charger or battery or that is damaged.
Do not short-circuit the battery. Accidental short-circuiting can occur when a metallic object such as a coin,
clip, or pen causes direct connection of the polarity; (+) and (-) terminals of the battery (metal stripes on
the battery). This might happen, for example, when you have a spare battery or magnetic objects in the
4
vicinity. Short-circuiting the terminals can damage the battery or the connectors.
·Do not leave the battery in very warm or cold places, such as in a closed car in summer or winter.
All of the above suggestions apply to the phone, battery, charger, or any accessory.
If phone or accessories are not working properly, take only to authorised service facilities.
Damaged batteries can damage or ruin components (e.g. Plastics).
• When the phone or accessories return to normal temperature, moisture can form inside and damage
circuit boards.
•Do not attempt to open the phone or accessories other than as instructed in this guide.
•Do not drop, knock, or shake the phone or accessories. Rough handling can break internal circuit boards
and fine mechanics.
•Do not use chemicals, solvents, or detergents to clean the phone or accessories.
•Do not paint the phone or accessories. Paint can clog the moving parts and prevent proper operation.
•Use only the supplied or authorized replacement parts. Unauthorized parts, modifications, or
attachments can damage the phone and may violate regulations governing radio devices.
•Do not dispose of batteries in a fire!
Dispose of batteries according to local regulations. Please recycle when possible. Do not dispose as
household waste.
Mobile phone maintenance
• Keep the device dry. Precipitation, humidity, and all types of liquids or moisture can contain minerals that
will corrode internal parts and circuits. If your device does get wet, remove the battery and allow the
device to dry completely before replacing it.
• Do not use or store the device in dusty, dirty areas to avoid damage to moving parts and components.
• Do not store the phone or accessories in warm areas. High temperatures reduce the life of electronic
devices.
Charging your battery
Your device is powered by a rechargeable battery. The full performance of a new battery is
achieved only after two or three complete charge and discharge cycles. The battery can be charged and
discharged hundreds of times but it will eventually wear out. When the talk and standby times are
noticeably shorter than normal, replace the battery. Use only approved batteries and recharges your
battery only with approved chargers designated for this device.
If a replacement battery is being used for the first time or if the battery has not been used for a long
period, it may be necessary to connect the charger, disconnect it and then reconnect it to begin charging
the battery.
Unplug the charger from the electrical plug and the device when not in use. Do not leave a fully
charged battery connected to a charger, since overcharging may shorten its lifetime. If left unused, a fully
charged battery will lose its charge over time.
If the battery is completely discharged, it may take a few minutes before the charging indicator
appears on the display or before any calls can be made.
Use the battery only for its intended purpose. Never use any charger or battery that is damaged.
Do not short-circuit the battery. Accidental short-circuiting will occur when a metallic object such as
a coin, clip, or pen causes direct connection of the positive (+) and negative (-) terminals of the battery.
(These look like metal strips on the battery.) This might happen, for example, when you carry a spare
battery in your pocket or purse. Short-circuiting the terminals may damage the battery or the connecting
object.
Leaving the battery in hot or cold places, such as in a closed car in summer or winter conditions,
will reduce the capacity and lifetime of the battery. Always try to keep the battery between 15°C and 25°C
(59°F and 77°F). A device with a hot or cold battery may not work temporarily, even when the battery is
fully charged. Battery performance is particularly limited in temperatures well below freezing.
Do not dispose of batteries in a fire as they may explode. Batteries may also explode if damaged.
Dispose of batteries according to local regulations. Please recycle when possible. Do not dispose as
household waste.
Note: Actual operation time of the battery varies according to operation mode, network settings
and call settings.
Note:
5
1. After the phone has run out of battery, we recommend you recharge in time.
2. To ensure safety, do not change the parts and accessories of the battery by yourself or take off the
battery shell.
3. We suggest you only use the original battery supplied with your phone by our company to avoid any
damage to your phone.
4. The temperature range for charging the phone is 0℃-40℃. Do not charge the battery in too high or too
low temperatures.
5. Do not use the mobile phone during charging. Keep the phone away from charger before use.
6. Please don’t keep charging for a long time. Pull out the charger quickly after the battery is fully charged.
6
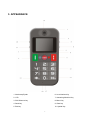
3. APPEARANCE
1. Neck strap Eyelet
6. Love Number Key
2. LCD
7. Answering Machine Key
3. SOS Shortcut key
8. Menu Key
4. Send key
9. Clear key
5. End key
10. Upside Key
7
11. Downside Key
15. Loudspeaker
12. Number Key
16. Microphone
13.*Key
17. USB Socket
14. #Key
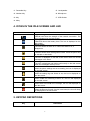
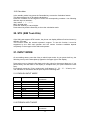
4. ICONS IN THE IDLE SCREEN AND LED
Icon
Functions introduction
Signal strength
Vertical bars show the strength of the network connection. The
icon is displayed on the idle screen.
Battery power
Filled area shows the battery level. The icon is displayed on the
idle screen.
Alarm on/off
The icon shows an alarm is on. When the alarm is off, it
disappears.
Keypad locked
The icon shows when the keypad is locked. Press the pound key
to activate or deactivate.
Unread message
The icon is displayed on the idle screen when there are unread
messages in the inbox.
Messages full
The icon is displayed and blinks continuously on the idle screen
when the messages memory is full.
Silent environment
When the phone settings are set to meeting, the icon is displayed
on the idle screen.
Ring and Vibrate
When the setting ring and vibrate is set, the icon is displayed on
the idle screen.
Answering machine on
When turned the answering machine on, the icon will displayed
on the idle screen.
Unread voice message
When there are unread voice message, the icon will displayed on
the idle screen.
Remote Control
When the Remote Control function is activated, the icon will keep
on displayed on the idle screen.
5. KEYPAD DEFINITIONS
Key
Definitions
8
Menu Key
In the standby mode, press the key to access the menu.
Clear key
In the menu, press the key back to the previous interface.
In the editing mode, press the key to delete characters.
Love Number Key
Short press: Enter the Love Numbers menu.
Long press: Activate cycle love number dialing.
Answering Machine
In the standby mode, press the key to access the menu.
SOS Shortcut Key
Press to dial SOS.
The SOS order can be activated by press and hold the SOS
shortcut key at least 2 seconds when keypad is locked.
End Key ( Red Key)
End or reject calls
Turn phone on/ off by long press.
③Exit menu system.
Send Key ( Green Key)
Make and answer calls.
Confirm choices in menu.
③During a call: Activate or deactivate loudspeaker
Number Key
Input phone numbers;
For editing SMS message.
Star key
Press the * key to list the symbol chart in the edit mode;
Long press * key to lock or unlock the keypad in the standby
mode.
Pound key
Press the # key to switch the input method in text edit interface;
Long press # key to switch the silent/general mode in the idle
screen.
Upside Key
Increase the volume.
Long press to enter the Calendar.
③ Scroll the menu options.
9
Downside Key
Decrease the volume.
Long press to enter the Calculator.
③Scroll the menu options.
6. GETTING STARTED
6.1 SIM CARD INSTALLATION
Your SIM (Subscriber Identity Module) card contains your phone number, service details,
and phonebook/message memory.
Caution: Do not bend or scratch your SIM card. Avoid exposing your SIM card to static
electricity, water, or dirt.
6.2 INSTALLING THE BATTERY
Note: Please refer to the graphical representation for correct operation and avoid
damages to the battery and contact tag.
6.3 CHARGING THE BATTERY
Insert the charger plug into the phone socket , plug the other end of the charger into the
10
appropriate electrical outlet and the phone will provide a visible or audible indication that
the battery is charging .When the phone is full of charge, press the release tab and
remove the charger.
The battery can be damaged if left at low level for long periods.
To ensure the phone working properly, please use the authorized charger.
6.4 SECURITY CODES
-PIN code
PIN code(Personal identify number)prevents unauthorized use of your phone. The PIN
code usually comes from your service provider along with the SIM card.
If you enter the wrong code three times continuously, the PIN code is locked. To unlock
the PIN code, you need a personal unlocking key (PUK) from your service provider.
—PIN2 code
Some functions, call costs for example, require a second PIN2 code. The PIN2 code
comes from your service provider along with some of the SIM cards, and these functions
are only available when the SIM card supports them.
If you enter the wrong PIN2 code three times, the PIN2 code is locked. To unlock the PIN2
code, you need a personal unblocking key (PUK2) from your service provider.
—Phone code
Activate/Modify/Deactivate Startup password (the length of the password is 4-8 digital
numbers).
If you activate the “Startup password”, you need to enter the password each time you turn
the phone on. If you want to modify the Startup password or deactivate “Startup password”,
you can enter Modify/Deactivate option to set.
11
7. DOCKING STATION
3. Charging cradle
4. Volume wheel
1. Call button
2. SOS button
1. Call button: To answer or to end a call. The call will be automatically in loud speaker
mode.
2. SOS button: SOS call can be activated by pressing the SOS button on the docking
station.
3. Charging cradle /docking station: Insert the battery into the charging cradle of the
docking station, the battery will start charging automatically (shown by red
LED light on the base) When fully charged, the red LED will turn green.
4. Volume wheel: Adjust the volume by turning the small wheel.
8. YOUR HANDSET
8.1 TURN ON
·Press and hold the power key to turn the phone on, the phone LCD illuminates, and
displays power on animation.
Not all menu interfaces, which do not rely on the SIM card, are accessible when SIM card
is not installed or incorrectly installed.
·When the PIN code is activated, the phone will display “Please enter PIN code” at power
on. Input the correct PIN code and press Left soft key to continue.
·If the PIN code is locked, the alert message for inputting PUK code will display in the
screen at power on.
·The phone will search for the network automatically when turned on.
On correct connection to the network, the name of the network and signal strength are
displayed; if the network is not found or registration fails, you can only access emergency
12
calls and other functions that do not require the network.
8.2 TURN OFF
In the standby mode, press and hold the End key for several seconds until the phone
turns off, both in standby or during conversation.
8.3 MAKING A CALL
In idle screen, dial the phone number then press the green key to make the call. Press the
Clear key to delete a digit if necessary or press and hold the Clear key to delete all the
digits.
8.4 ANSWERING A CALL
When you received a call, your phone rings and vibrates and displays an incoming call
message. Press the green key to answer the call.
8.5 END A CALL
Press the red key to end a call or cancel an outgoing call when required.
8.6 EMERGENCY SERVICE
You can call emergency services when SIM card is not inserted.
Contact your service provider to obtain the emergency call function.
8.7 CALL RECORDS
In idle screen, press the green key to view all the call records, you can check the time,
date and number of these calls. Press the green key again to dial the selected record.
9. IDLE SCREEN
After power on the first screen that appears is the idle screen:
The screen shows icons indicating the network status, signal strength, battery level, time,
date and configuration information.
13
10. LIST OF MAIN MENU
In idle screen:
Press the menu key to access the menu. The menu includes items:
(1) Phonebook (2) Messages (3) Remote control (4) Settings
List of menu as below:
Phonebook
View
Create
Delete
Delete all
Memory status
Messages
Create
Inbox
Delete all
Remote control
Remote
SOS
On/Off
Settings
1) Alarm
2) Ringtone
3) Time&Date
4) Language
Incoming call
Message tone
Automatic
English
French
Spanish
Italian
German
Dutch
Finnish
Danish
Swedish
Norwegian
5) Keypad Locking
OFF
5 sec
30 sec
1 min
5 min
6) Hearing aid
On/Off
14
11. REMOTE SMS
It is possible to set below features via remote SMS;
①Love number ②SOS number ③Add numbers in phone book ④Alarm.
Remote SMS Feature Operation:
Write the SMS message as below on another phoneSend the message to the Easycell
phoneUpon receipt of the SMS message the Easycell registers the information
automatically.
11.1 Set Love Number
Edit: AT+L:name:num
[For example:] AT+L:Jack:123456789
-The information to be registered in phone is:
Name: Jack
Number: 123456789
-5 favourite numbers can be stored, when the limit is exceeded, the last number will be
deleted and replaced by the new entry.
11.2 Set SOS Number
Edit: AT+S:name:num
[For example:] AT+S: Police:123123123 Police Number is 123123123
You can save 1 SOS Number only, when you set a new number, the existing number will
be replaced by the new number.
11.3 Add New Entry
Edit: AT+P:name:num
[For example:] AT+T:Jill:345345345 Jill new entry is 345345345
When the limit is reached, you can not add entry anymore.
11.4 Set Alarm
Edit: AT+A:hh:mm:content
[For example:] AT+A: 19:23: Goodbye. The alarm is 19:23. The content is “Goodbye”.
- Time Format must be 24-hour.
- The content: Maximum amount of characters are 20.
Notices:
(1) Name: Maximum amount of character input is 16, when the limit is reached, you can
not set more.
(2) Number: Maximum amount of digits is 20, it can not be empty.
12. LOVE NUMBER
5 love numbers can be recorded.
-Press the love key to enter and browse the number list, up/down key to scroll entries.
-Press the menu key to enter the options:
1. View ①Name Menu key to edit,clear key to delete digits.
15
②Phone number Input the numberMenu key to save Done
2. Delete
3. Send SMS Menu key to start edit, clear key to delete digitsMenu key to confirm
and send.
-Press send key to dial the selected record.
13. ANSWERING MACHINE
-Press Answering Machine Key to enter the menu.
1. Play: (Listen to the incoming voice messages.)
2. Settings: (To set your outgoing voice message.)
Options
⑴On/Off (Press the menu key to set the answering machine on or off)
⑵OGM (Outgoing Message) Play: Listen to the outgoing message.
Re-record: Press the menu key to start recording,
pause or continue, clear key to exit and save.
-When there have unread incoming voice message, the indicator light on the docking
station will keep on, press answering machine key to hear the voice message.
Notice: Please close to the microphone as much as possible when recording outgoing
message.
The time limit of each incoming message is 20 seconds.
Only 1 outgoing message can be creating, if a new one to be created, it will
replace the previous.
14. REMOTE CONTROL
14.1 Remote
Press menu key to set On/Off.
14.2 SOS
When keypad is locked, long press SOS button for 2 seconds can also activate SOS
feature.
SOS Setting (Press up/down key to choose the options below.)
①SOS Number: Input the SOS phone number.
②SMS Status: Press “ * ” or “ # ” to select ON or OFF to activate or deactivate the SMS.
(SMS Status: When a SOS call activated, after the SOS countdown count to 1, the stored
SMS will send automatically to the first contact of the Love Number.)
③SMS Content: Create the SOS message.
◎ Press Clear key to exit and save.
16
15. REMOTE CONTROL SOS BUTTON
1. An incoming call can be answered by pressing the Remote Control SOS button.
2. When the phone is in standby, pressing the remote control SOS button can activate an
SOS call.
Note: In open space, the transmitting distance is about 100 meters.
16. MESSAGES
MESSAGE ICON DESCRIPTION
ICON
DESCRIPTION
Unread SMS
Indicates unread SMS stored in inbox.
Read SMS
Indicates read SMS stored in inbox.
16.1 Create
-Press number key to write a message.
-Press “ * ” to select symbol, “ # ” to switch input method.
-Press the menu key to confirm and send out, clear key to delete digits or exit.
16.2 Inbox
-All the SMS received stored in Inbox.
-The icon of the unread SMS will shows on the screen when a new SMS message
received. Press menu key or green key to read the SMS, time of receipt, date, and sender.
-After reading the SMS, there have 3 options for you to operate of the message.
-Reply
To make a response.
-Delete
To delete the message.
-Edit
To edit the message or forward to others.
16.3 Delete All
Delete all
:
To delete all the messages of the inbox.
17. PHONEBOOK
Store the contacts information in this function.
17.1 View
-Press the menu key to browse the contact’s information, or edit at it.
17
17.2 Create
-Add new entries to the phonebook, press the menu key to create, then press menu key to
confirm or clear key to exit.
17.3 Delete
-Press menu key to confirm delete.
17.4 Delete All
-Delete all the contact records stored in the phone
-Press menu key to confirm, clear key to cancel.
17.5 Memory Status
To shows the memory status of the Phonebook.
-Phone
-SIM
18. SETTINGS
The Settings menu includes items: (1) Alarm (2) Ringtone (3) Time&Date (4) Language
(5) Keypad Locking (6) Hearing Aid
-Press: Menu key or green key to enter menu and options;
Upside or downside Key to scroll in menus;
Clear key back to previous menu;
18.1 Alarm
Press the menu key to enter the alarm setting, clear key to cancel or exit.
-Time
Edit and set the time of the alarm.
-On/Off
Press * key or # key to activate or deactivate the alarm.
-Snooze
Press * key or # key to set the snooze time.
-Mode
Press * key or # key to set the alarm mode: Once/Customized/Everyday.
-Alarm content
Edit the alarm text.
18.2 Ringtone
1. Incoming call
2. Message tone
-Press the Up/Down key to select options.
-Press the Menu key to save.
18
18.3 Time&date
Press the menu key to enter the menu.
1. Time
2. Date
3. Date format
-Press “*” or “#” key to choose date format.
-Press menu key to save.
18.4 Language
Seven languages are available.
Up/Down key to scroll the options, menu key to save.
1. Automatic (It is normally selected according to SIM card provider nation.)
2. English
3. French
4. Spanish
5. Italian
6. German
7. Dutch
8. Finnish
9. Danish
10. Swedish
11. Finnish
18.5 Keypad Locking
Press the upside or downside key to select the automatical lock time of the keypad.
Off/5 sec/30 sec/1 min/5 min/
18.6 Hearing Aid
1. Press the menu key to set the hearing aid on or off.
Note: The hearing aid function only available in the call.
2. In the standby mode, plug in the earphone, long press the Clear key to open the
audiphone.
19. SHORTCUT KEY
19.1 Calendar
In the standby mode, long press the Upside key to enter the Calendar feature.
19
19.2 Calculator
In the standby mode, long press the Downside key to enter the Calculator feature.
This feature allows you to do simple calculations.
Press the numbers on the keypad to enter the corresponding numbers. Use following
direction keys to calculate:
*key: switch + / - / × / ÷
#key: decimal point
Press the clear key to cancel digits.
Press menu key and the Send key to show the calculation result.
20. STK (SIM Took Kits)
If the SIM card supports STK function, the phone can display different first level menu by
different STK card.
This function needs the network operator’s support. To use this function it must be
supported by the SIM card operator and the various functions available depend
completely on the support of the SIM card operator.
21. INPUT MODE
On text editing status, press the # key to switch input mode. As you press the # key, the
following icons (not the descriptions) appear in the upper right of the display.
Press a key once to insert the first letter on the key, twice for the second letter, etc. If you
pause briefly, the last letter in the display is accepted and your phone awaits the next
entry.
For example, press the “2” key continuously, it will appear “A”、“B”、“C”、“2”one by one.
The character or characters can be input as per the following lists:
21.1 ENGLISH INPUT MODE
Key
Uppercase characters
1
2
3
4
5
6
7
8
9
0
,.?!1
ABC2
DEF3
GHI4
JKL5
MNO6
PQRS7
TUV8
WXYZ9
Space or 0
Lowercase
characters
,.?!1
abc2
def3
ghi4
jkl5
mno6
pqrs7
tuv8
wxyz9
Space or 0
21.2 FRENCH INPUT MODE
Key
Uppercase characters
Lowercase
characters
20
1
2
3
4
5
6
7
8
9
0
. , -? ! \@:#$/_1
ABC2ÁÀÇ
DEF3ÉÈ
GHI4ÍÏ
JKL5
MNO6ÑÓÒ
PQRS7
TUVÚÜ8
WXYZ9
Space or 0
. , -? ! \@:#$/_1
abc2áàç
def3éè
ghi4íï
jkl5
mno6ñóò
pqrs7
tuvúü
wxyz9
Space or 0
21.3 SPANISH INPUT MODE
Key
Uppercase characters
1
2
3
4
5
6
7
8
9
0
. , -? ! \@:#$/_1
ABC2ÁÀÇ
DEF3ÉÈ
GHI4ÍÏ
JKL5
MNO6ÑÓÒ
PQRS7
TUVÚÜ8
WXYZ9
space or 0
Lowercase
characters
. , -? ! \@:#$/_1
abc2áàç
def3éè
ghi4íï
jkl5
mno6ñóò
pqrs7
tuvúü
wxyz9
space or 0
21.4 ITALIAN INPUT MODE
Key
Uppercase characters
1
2
3
4
5
6
7
8
9
0
. , -? ! \@:#$/_1
ABC2À
DEF3ÈÉ
GHI4Ì
JKL5
MNO6Ò
PQRS7
TUV8Ù
WXYZ9
space or 0
Lowercase
characters
. , -? ! \@:#$/_1
abc2à
def3èé
ghi4ì
jkl5
mno6ò
pqrs7
tuv8ù
wxyz9
space or 0
21.5 GERMAN INPUT MODE
Key
Uppercase characters
1
2
3
4
5
6
7
. , -? ! \@:#$/_1
ABC2ÄÀ
DEF3É
GHI4
JKL5
MNO6Ö
PQRS7
Lowercase
characters
. , -? ! \@:#$/_1
abc2äà
def3é
ghi4
jkl5
mno6ö
pqrs7
21
8
9
0
TVU8Ü
WXYZ9
space or 0
tuv8ü
wxyz9
space or 0
21.6 DUTCH INPUT MODE
Key
Uppercase characters
1
2
3
4
5
6
7
8
9
0
. , -? ! \@:#$/_1
ABC2ÇÄÁÀÂ
DEF3ËÉÈÊ
GHI4ÏÍÌÎ
JKL5
MNO6ÖÓÒÔ
PQRS7
TUV8ÜÚÛÙ
WXYZ9
space or 0
Lowercase
characters
. , -? ! \@:#$/_1
abc2çäáàâ
def3ëéèê
ghi4ïÍìî
jkl5
mno6öóòô
pqrs7ß
tuv8üúûù
wxyz9
space or 0
21.7 NUMBER INPUT MODE
Press the # key to switch the Entry Mode to Number Entry Mode, and then press the
corresponding number keys.
21.8 SYMBOL SELECT MODE
In each input mode, you can press * key to Insert the following symbols.
Key
Letters
*
, . ‘ ?!” @ ¥ _ ^ { } \ [ ~ ] | # ¤ % & ( )
*+-/:;< = > i § ¿
Press the 2/4/6/8 keys to scroll up/down left and right. Press the left soft key to insert the
symbol.
22