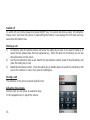
1
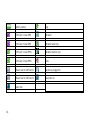
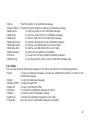
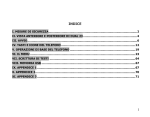
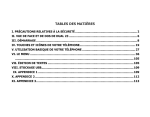
CONTENTS I. SAFETY PRECAUTIONS........................................ ERRORE. IL SEGNALIBRO NON È DEFINITO. II. FRONT AND REAR VIEW OF DUAL 23 ............................................................................. 2 III. GETTING STARTED ........................................................................................................ 6 IV. KEYS AND ICONS OF YOUR PHONE ............................................................................. 11 V. BASIC OPERATIONS OF YOUR PHONE .......................................................................... 17 VI. THE MENU .................................................................................................................... 21 VII. TEXT EDITING ........................................................................................................... 58 VIII. USB STORAGE ........................................................................................................... 60 IX. APPENDIX 1 ................................................................................................................. 60 X. APPENDIX 2 ................................................................................................................... 63 XI. APPENDIX 3 ................................................................................................................. 64 1 I. SAFETY PRECAUTIONS Please read these simple guidelines. Not following them may be dangerous or illegal. Read the complete user guide for further information. Switch off the phone in the vicinity of chemical plants, gas stations and other locations containing explosive objects. Keep the phone far away from children. When driving, please use the hand free calling device to ensure safety. Please park the car at roadside for communication unless in emergency. Switch off the phone when board an airplane and do not switch the phone on during the flight. Be careful when using the mobile phone in the vicinity of such devices as pacemakers, hearing aids and other electro-medical equipment, which may be interfered by the mobile phone. No guarantee for the accessories and parts not produced by the original factory. Never attempt to disassemble the phone by yourself. Contact the supplier in case of any trouble with your mobile phone. 2 Do not recharge the phone without battery being installed. Charge the phone in well-ventilated environment and keep away from inflammable and high explosive articles. To avoid demagnetization, keep the handset away from magnetic substances, such as magnetic discs or credit cards. Keep the phone away from liquid. If soaking or erosion occurs, take the battery out and contact the supplier. Avoid using the phone in too high or too low temperature environments. Never leave the phone exposed under direct sunlight, in high humidity or in a dusty environment. Do not use liquid or a damp cloth with strong detergents to clean the handset. Wireless phones may be susceptible to interference, which can affect performance。 Use only approved accessories and batteries. Use of any unauthorised accessories could damage you or your phone and may be dangerous. Use only in the normal position as explained in the produce documentation. Do not touch the antenna unnecessarily. 3 Ensure the phone is switched on and in service. Enter the emergency number, then press the call key. Give your location. Do not end the call until given permission to do. The unit and the accessories can contain small parts. Keep them out of the reach of small children. SOS: In case of emergency, please dial 112 to search the local network service or the default SOS contact saved. II. FRONT AND REAR VIEW OF DUAL 23 4 5 III. GETTING STARTED Installation of your SIM card The miniDual works with two SIM cards. All functions of the phone work for each SIM. Before installing: Don’t distort or scratch the SIM cards. Avoid contact with electricity, dust or water. Please switch off your phone before installing the SIM cards, remove battery cover and insert the SIM in the designated slots (see picture below): 6 Installation of memory card The phone supports T-FLASH card to expand the memory space. Please install or take out the memory card as per picture below - after shutting down the phone. Tip:The phone supports a memory card with capacity up to 4GB. It is recommended that only the attached standard TF card and other TF cards of well-known brand like SanDisk and Kingston are used. Other TF cards may not be compatible with the phone. Installation of battery Please use original battery and accessories only. Store the battery well if it is not used. Please install the battery when the phone is switched off. 7 Note:Please follow the steps as shown in the picture to prevent damage to the battery contact points. Charge the battery The new battery must be fully charged and discharged several times to reach its best performance. Charge as soon as possible when the power is low as over-discharge may damage your battery. Disconnect the charger and the power supply and then disconnect the mobile phone when the battery is fully charged. Connect your phone to the charger as per drawing. 8 If the phone is switched on when charging, the power level icon at the top right corner of the screen will twinkle and will stop twinkling when the battery is fully charged. If the phone is switch off, an icon will appear on the screen to show the battery is in charging. Note:A little heating while charging is normal. Use of battery 1. Please fully charge the battery before first using the phone. 2. Please ensure you charge the mobile phone at room temperature. 3. Avoid charging over long periods as it reduces the lifetime of the battery. 4. When battery power is low the phone cannot be turned on, keep under charge until the screen resumes indication of power in the battery. 5. Make sure that the standard voltage and power match the voltage and power indicated on the charger. 9 6. 7. 8. 9. 10. 11. During the charging/recharging period, it is best to keep phone turned off. If the battery is not used for long periods, fully charge the battery before use again. The battery can be charged and discharged hundreds of times, but it will eventually wear out. When the talk and standby times are noticeably shorter than normal, replace the battery. If the battery is completely discharged, it may take many minutes before the charging indicator appears on the display or before the phone can be used. Your device is powered by a rechargeable battery. The full performance of a new battery is achieved only after two or three complete charge and discharge cycles. If a replacement battery is being used for the first time or if the battery has not been used for a long period, it maybe necessary to connect, disconnect and then reconnect the charger before charging. PIN PIN1 code: It’s the personal identity number code for unlocking your SIM card. It can prevent others from using your SIM. If your SIM requires a PIN1 code, the screen will display “enter PIN” when switching on your phone. When entering PIN1 code, * will be displayed instead of the numbers you enter. PIN1 code is provided together with your SIM by your network operator. 10 PIN2 code: It’s the personal identity number code required when using special functions such as call charges PUK and PUK2 (8 digits) A PUK is required to change the PIN. To change PIN2, you need to use PUK2 (personal unlock code). If PUK is not provided together with the SIM card, please refer directly to your network provider. W arning:If the PIN code is entered wrongly three times in a row, the SIM card will be locked in. Please consult the network supplier right away for unlocking immediatly. Unauthorized deciphering may cause permanent failure to the SIM card. IV. KEYS AND ICONS OF YOUR PHONE Number 1. Name Function Left soft key Perform the function indicated on the left bottom line of the display Right key Perform the function indicated on the right bottom line of the display i.e back, delete etc. soft 11 2. Dialing key Make or answer a call. In Idle mode, press this key to browse the call history (recently dialed, missed and received calls) 3. End key Press and hold to switch the phone on or off End a call or reject a call In the menu mode return to idle screen. 4. Navigation keys In standby, access the following menus: • Up: video recorder • Down: calender • Right: shortcuts • Left: write message In menu mode, scoll through menu options Move the cursor 5. OK key In standby, when pressing the OK key you access the menu Confirm an operation of any menu 12 6. * key long press the key for power-saving mode on / off 7. # key In stand-by press and hold the # activates or deactivates the Silent mode. 8. Number keys Enter numbers, letters and special characters Long press the number keys 1 to voice mail-box while standby. Long press the number keys 2 to 9 to quick-dial while standby. ☆ ICONS ON THE SCREEN IN STAND-BY Icons Instruction Icons Instruction SIM Card 1 Antenna Call divert activated in SIM card 1 SIM Card 2 Antenna Call divert activated in SIM card 2 13 Battery status Ring SIM Card 1 new SMS Vibration SIM Card 2 new SMS Vibration and ring SIM Card 1 new MMS Vibration before ring SIM Card 2 new MMS Mute Missed call in SIM Card 1 Earphone plugged in Missed call in SIM Card 2 Bluetooth on Alarm set 14 ☆ Incoming Call alert method Your phone has a built-in vibration motor and buzzer which can offer the following modes for incoming calls: Ringing. Change the ringing icon as red one. Vibration Ringing after vibration Vibration and ringing Making a national call The simplest way to make a domestic call is to enter a phone number using the keypad and then simply press the dialing key. If both SIM cards are inserted and dual SIM mode is open, you can chose between SIM card 1 dial and SIM card 2 dialing by pressing dialing keys of SIM 1 or SIM 2. Note: The screen shows a dialing animation. If you’re dialing with SIM card 1, the screen will display “SIM Card 1 Dialing”, and if dialing with SIM card 2, the screen will display “SIM Card 2 Dialing”. The call status will be display on the screen when the call is answered. Press the hang-up key to end the call. Make domestic calls: country code + phone number + dialing key. Making an international call To make an international call, long press or repeatedly short press the 0 key until the symbol “+” is displayed on the screen. This allows you to make an international (e.g. China is +86). Then enter the country code and the complete phone number. The country code is subject to convention, 15 e.g. Germany is 49, Britain is 44 and Sweden is 46, etc. Make international calls: + country code + complete phone number + dialing key. Call extension of a fixed line Some extensions of fixed line phones are not accessible directly. In such a case, you need to dial the host number and then the extension number. Simply insert the letter “P” between the host number and the extension number and you can call the extension. You can input a “P” by long pressing or repeatedly short pressing the 0 key. Call extension of a fixed phone: phone number + P + extension number + dialing key. Make emergency calls In any country where digital GSM is used, you can make an emergency call if your phone has network coverage (to check network coverage see the signal strength indicator bar at the upper corner of the display). If your network operator does not provide roaming service in an area, the screen will display "EMERGENCY CALLS ONLY” With network coverage, you can make emergency calls even if your SIM card is not inserted. In some areas, the 112 (emergency call) service is provided by the network operator. For any irregularity please contact your network provider. IMEI Means: International Mobile Equipment Identity. You can see the bar code label printed with this number on the label inside your phone by turning off your cell phone and removing the battery cover and battery. This number is also stored in the cell phone itself. You can display it by entering "*#06#" in stand-by. 16 V. BASIC OPERATIONS OF YOUR PHONE Switch on Press and hold on “ON/OFF” to switch on your phone. If no password settings are given for your SIM cards and cell phone, the phone will search for a network and register on a network automatically. Once registered the name of the network supplier will be shown on the screen. You can now answer or make a call. If the display indicates “Insert SIM card 1 ”or” Insert SIM card 2” after the start-up, please power off your phone, and check whether your SIM cards have been installed correctly or not. After having inserted your SIM card, the phone will automatically check SIM card for availability, then the display will show the following messages in sequence: 1) 2) 3) 4) 5) 6) 7) “Enter phone lock password” ―― if you enabled the phone lock. “Enter SIM card 1 PIN” ―― if you have enabled the SIM card 1 lock. “Enter SIM card 2 PIN” ―― if you enabled the SIM card 2 lock. “No service” ―― network registration failed, calling is not possible. “Emergency Call” ―― allows to call 112. “Search” ―― the phone is searching a network The screen displays the network operator name –network registration successful. 17 Switch off To switch off your phone please long press ON/OFF key. The screen will show a power off animation. Please never shut down the phone by dismantling the battery it can damage the SIM card and may cause loss information loss. Making a call 1) In stand-by enter the phone number and press the calling key to call. If you want to hang up or cancel the call, please press the hook up/cancel key;When the phone is connected, you can see the call duration on the screen. 2) Use the phonebook to make a call: Search the name/phone number saved in the phonebook, and press the calling key to call. 3) Redial the last phone number:Press the calling key in standby status to search the call history. Roll over to the number or name, then press the calling key. During a call The interface of the phone presents itself like this: Adjusting the volume During a call, you can press up and down keys of the navigation key to adjust the volume. 18 Answering a call To answer a call, press the calling key: To reject a call, press on/off key. If you have applied for calling number identification service, the calling number will show on the screen. If this number has already been stored in the phonebook it will be displayed. If the incoming call is for SIM card 1, “Call to SIM Card 1” will be display above the number / name of the caller. Same for SIM card 2. Speed dial The phone provides 8 speed dialing keys for which you can define the numbers. Long pressing [2 to 9] keys in standby status triggers speed dialing. Long pressing [1] key in standby speed dials your voice mailbox number. <Note>:To speed dial, you have to: 1) allocate a number to the key before 2) press the keys for 2 seconds and more. Sending DTMF signal If you have set up the DTMF signal sending function, you can 19 - you can press the digit key and * and # key of the keypad during the period of conversation, it will be sent out in the form of DTMF signal to the other party. If you haven’t enabled this function, you can't carry out the extension number calling, etc. Call Hold If you have set up call hold, the following menu appears when you click an entry during conversation: Hold: Te m pora rily suspe nd the curre nt conve rsa tion, but the conve rsa tion cha nne l is still connected End: End the curre nt conne ction. Ne w conve rsa tion: Ente r the dia l inte rfa ce , a nd m a ke a nothe r ca ll. Phone book: You ca n e nte r a phone book dire ctory. Information: You can enter messages directory. Mute / re sum e : You ca n switch on/ off m icrophone . Note:Some menu entries just appear under the specific condition, or they need support from the local network, such as: “Hold” and “New conversation”, etc., for detail, please consult your network provider. Non-response event Unread messages and missed call etc. are shown on the display by respective icons. 20 Connecting to voice mailbox Your cell phone allows you to divert incoming calls to your voice mailbox. If you have received a voice mail message you will receive a notice. (the voice mailbox number has to be set up in advance). VI. THE MENU 1. ORGANIZER 1.1 Backup data Phone book backup: You can make a backup of all the phonebooks: Handset, SIM 1 and SIM 2. Restore: You can restore the backup files to your phone. You have the choice between restore by adding or restore by replacing. For further information check the instructions by choosing “Help”. Note: The backup format is “.vcf”. You can refresh the backup through PC but be careful to not change the format, otherwise it can not be restored properly in your phone. 21 1.2 Alarm Alarm function is provided. In this interface you can set alarm time/date/alert types… Once the alarm is triggered: - Press Stop to stop the alarm - press Sleep, the alarm will pause and start again after snooze time-out. Note: The alarm clock also works when the phone is switched off 1.3 Calendar With this function, you can view the calendar, schedule times as well as the following operations: 1.3.1 View today’s schedule: View the settings for today 1.3.2 View all schedules: View your entire planning 1.3.3 Add a schedule: Edit new item for a schedule. 1.3.4 Jump to date: Move the cursor to a specific date. 1.3.5 Go to weekly & monthly view: View the weekly & monthly calendar. 22 1.4 Calculator - Eight operations, i.e. “+”, “-”, “×”, “÷”, “m+”, “m-”, “mc”, and "mr”, are provided. Choose the Clear or press the right soft key to clear items entered. Long press the Clear or long press the right soft key to clear all content. Press the “Ok” to show the result of calculation. Note: The accuracy of this calculator is limited and the calculator Should only be used for simple calculations due to rounding errors . 1.5 E-Book Reader E-book application enables you to read a file stored in phone or memory card in .txt format. Open: To open an E-book. Update: To Update an E-book. System presetting: To set the attributes of an E-book. 23 Information: To view the attributes of a text. Delete: To delete a text. Delete all: To delete all texts. Sort: To sort E-books in a folder. Apply: To apply the settings. Help: To open E-book help description. 1.6 Memo To create a new memo or to view memos set in the schedule. You can also perform View, Add, Edit, Delete, Delete All and jump to date etc. If a reminder is set up for a memo, the cell phone will remind you with a ring and display the contents of the memo. 1.7 World clock View the time zone of different countries in the world by moving the left & right keys. 1.8 Stopwatch Your phone supports ordinary stopwatch and multifunctional stopwatch. You can time, time by lap and view records, etc. 1.9 Currency converter Used for converting currency. 24 2. PHONEBOOK Your phone has a business-card phonebook. For each contact saved in your phone you can add the following information: three phone numbers(mobile phone number, home number and office number), company name, email, fax number, birthday, photo, ring tone, video connect and group (providing five groups: family, friend, important, colleague and others); Contacts saved on SIM can only contain name and phone number. 2.1 Quick search You can quick search the phone book by entering the first letter of the contact’s name, for example: “M” for Martin, Miller etc… 2.2 Search contact You can find the best matched record by entering the name to be searched and then press “Search” in the Phone book. 2.3 Add number You can add a new entry to the phone or SIM card. Description: If picture link, ring link, incoming call group, video connecting are set in a record simultaneously, the incoming call group function will be invalid. 2.4 Batch operation Multi-delete: You can choose several entries and delete them altogether. All backup: All the numbers stored in SIM card 1, SIM card 2 and cell phone can be copied between each other. Delete: You can delete the entries from SIM card & cell phone or delete them one by one. 25 2.5 Setting ☆ Memory status: To view memory space left ☆ Preferred storage: To select the storage directory of the current number. ☆ vCard setting: To edit or send your name cards. ☆ Owner number: To view and edit the own number ☆ SOS number: To edit SOS number of SIM card 1/2.(SOS number needs to be supported by SIM card, consult your network operator for details.) ☆ Caller groups: You can allocate melody, caller picture, video connect and group member, etc. to five different groups. ☆ Caller picture: You can set caller picture to new contact, selected contact or caller group. ☆ Caller ring tone: You can set caller ring tone to new contact, selected contact or caller group. ☆ Caller video: You can set caller video to new contact, selected contact or caller group. 3) CALL CENTER 3.1 Call history SIM card 1/2 call records include: 【Missed calls】: To view the list of missed calls (requiring network service support). 【Received calls】 :To view the list of the last 20 answered calls (requiring network service support) 【Dialed calls】: To view the list of calls you dialed or tried to dial. 【Delete call log】 :To delete recent call history. 26 【Call timers】 Last call: Dialed calls: Received calls: Reset all: To To To To view the duration of the last call. view the duration of all dialed calls. view the duration of all answered calls. reset duration of all calls. Note: The actual call and service time in the service operator's bill may vary. It depends on such factors as network function, accounting rounding-off and tax. For details, please contact your network operator. 【Call cost】: Last call cost: Total cost: Reset cost: Max cost: Requires the support of the network operator. To view the cost of the last call. To view the total cost of all calls. To reset cost record of all calls. (Please enter PIN2 for this function.) To limit the cost within specified amount of pricing unit or currency unit. PIN2 is required for setting the call cost. Price per unit: This function is supported by your network. For details, please contact your network operator. 【SMS counter】:View the quantity record of sent and received message. 【GPRS counter】 : Last sent: To view the volume of data sent during last online session. Last received: To view the volume of data received in last online session. All sent: To view the volume of data sent in all online sessions 27 All received: To view the volume of data received in all online sessions. Reset counter: To reset the GPRS counter. 3.2 Call setting 3.2.1 SIM card I call setting 【Caller ID】:Includes Set by Network, Hide ID, and Send ID. Set by network:The number of the phone will be sent as per the default mode when a call is initiated. Hide ID:The number of the phone will not be sent when a call is initiated. If the system doesn't support this function, it may not make a call. Send ID:The number of the phone will be sent when a call is initiated. Note: This function requires network support. For details, please contact the network operator. 【Call waiting】:To set functions like activate/deactivate and enquiry call waiting. During call holding and making multi-party calls, this function should be activated first, and network support is required for the specific implementation of the function. 【Call divert】:It is a network function that can only be used when you apply for this service of the network operator. The function can divert calls for designated phone number. 28 Name Description Diver all voice calls Network will divert unconditionally all your incoming calls. Divert if unreachable To divert an incoming call when your phone cannot be reached (the phone is either switched off or without network coverage). Divert if no answer To divert an incoming call after a defined time of no reply Divert if busy To divert an incoming call when your line is busy (i.e. with a phone call or internet) Divert all data calls Network will divert all incoming calls (requiring support of network). Cancel all divert Cancel all the divert functions. 【Call barring】 1. Outgoing calls All calls:To restrict all outgoing calls. International calls:To restrict international outgoing calls. International calls except to home PLMN:While you are abroad, you can only call the numbers of the country (where you are) and your home country (= where you service supplier is located). 29 2) Incoming calls: All calls:To restrict all incoming calls. When roaming:To restrict all incoming calls except the numbers from your local service area. 3) Cancel all:For canceling call barring. (Password for barring is required.) 4) Change barring password:Apply to the network for changing the password for call barring. 【Line switching】 :To choose Line 1 or Line 2. 【Close group】 :This function needs the support of network . Consult your network supplier for details. 3.2.2 SIM card 2 call setting As for SIM card I call setting 3.2.3 Auto redial To set the auto redial “On” or “Off”. Redial up to 10 times a number that doesn’t reply. 3.2.4 Speed dial To switch on the speed dialing function, and edit the corresponding speed dial number. If the speed dial is "On", then you can long press the corresponding key (2-9) to dial the number designated to the key in standby . 3.2.5 Call black list 【State】:Open or close the blacklist or red list . 【Black List】:Setting the black list. 30 【Time Split Firewall】:You can set a certain period to enable the firewall. 3.2.6 Connect vibration On / Off function to connect the vibration prompted. 3.2.7 Call time setting Switch on or off the “Call time display”, “Call time reminder” or “Auto quick end”. 3.2.8 SMS reply When this function is on, the RSK will show “SMS reply or not” after you refuse answering a call, and your phone will send default SMS to reply the caller if you choose “yes”; the RSK will show SMS reply or not” after you refuse answering a call in mute, and your phone will send default SMS to reply the caller if you choose “yes” (You can edit the content of the default SMS). 4. SETTINGS 4.1 Shortcuts Setup: 4.1.1 Edit shortcuts: Select any shortcuts and press the left soft key<option>, the following operations can be implement: ☆ Add: To add a new shortcut menu. ☆ Edit: Chose function from the function list to replace the selected shortcut. ☆ Delete: To delete the selected shortcut menu. ☆ Delete all: To delete all shortcut menus set. ☆ Disable: To close all selected shortcut menus. ☆ Change order: To change the order of shortcut menus. 31 4.1.2 Dedicated key: You can appoint the shortcuts of direction keys. Press a key to use the corresponding function under standby interface. 4.2 Display characteristics 4.2.1 Display characteristic (idle menu display) ☆ Wallpaper: Set the background picture for standby screen. ☆ Screen saver: Set Standby on / off screen, and chose the waiting time. ☆ Power on display: Set the animation when power on. ☆ Power off display: Set the animation when power off. ☆ Show Time and date:Can be strated up/ down at the time and date in standby screen ☆ Show owner number:Can be on / off standby at the interface shows that the Phone ID. 4.2.2 Greeting text State:To set the greetings on the main screen when the phone is powered on. Greeting text:Press <edit> to edit the greeting text. 4.2.3 Misc. settings Set the brightness and bright time etc. Enable or disable LCD backlight and check the description of power-saving profile. 4.3 PHONE SETUP 4.3.1 Dual SIM settings: Dual SIM open:Open card 1 and card 2 Only SIM 1 open: Open card 1 only 32 Only SIM 2 open: Open card 2 only Flight mode: Enable flight mode. 4.3.2 Time and date: To set the current time, date and the display format. Set the city:To set the home city. Note: This option needs application together with the auto time renewal, and needs the network support for the operation of auto time and date renewal. Set time/date: To set the current time and date. Set format: To set the time and date display format. Note: It is required to reset the time again if you remove the battery from the cell phone or if the battery has already been exhausted for a very long period 4.3.3 Schedule power on/off:To set for the phone On/Off time. Caution: In particular area (such as airplane compartment) forbidding the use of a cell phone, you shall confirm that the Schedule Power On/Off function is disabled to avoid an accident. 4.3.4 Language: To select the used language for the phone. 4.3.5 Breathlight settings: Enable/disable breathlight (couloured LEDs on outer side of flip phone), LEDs are enlighted and change colour with new message, incoming call…. 4.3.6 Preferred input methods:To set the default input method according to your operation habit. Note: Please consult your network operator or service provider that if provide this service and more information. 4.3.7 UART setup/ Port setting: Connect to SIM card 1 or SIM card 2. 33 4.3.8 Auto update of date and time:Enable or disable auto updating of date and time. 4.4 Network setup Name Description New Search: To search the network again. Network selection Select network: The phone only load the appointing network. When the network can’t work, the phone won’t register other network Search mode: Auto/Manual. Preferred network To select the preferred network. 4.5 Security setup: 4.5.1 SIM card 1/2 security setup 4.5.1.1 SIM card 1/2 lock:To unlock or lock SIM(PIN). 4.5.1.2 Fixed dial:This function may need the support of SIM card and network operator. When this function is activated, you can only dial the fixed numbers in the fixed dial list. To activate the fixed dial, enter the PIN2. 4.5.1.3 Barred dial: To unlock or lock restrictions on all or partial calling functions. (This function 34 requires the support of the SIM card, and SIM card 2 don’t support this function.) 4.5.1.4 Change password:Change the PIN/PIN2 password of SIM card 1. PIN(PIN1) and PIN2 code can be get from your network operator. 4.5.2 Phone lock: This function allows you to lock/unlock your phone. Note: the default password is “1122”. 4.5.3 Change Password: The default password “1122” of phone, message, phonebook, calling records and privacy protection can be changed as the desired password of 4 to 8 digits. 4.5.4 Privacy protection: Including protection for phone book, message and call history. If this function is enabled, corresponding menu or content will be locked. For access, enter the password. Note: The default password is “1122”. You can change the password in the menu of changing password. 4.5.5 SIM hidden: Enable/disable the service SMS hidden in both SIM card 1 and SIM card 2. 4.6 Restore Factory Settings You can restore some settings of the phone to factory settings. To restore the factory settings, enter the password. The default password is “1122”. 5. MESSAGES 5.1 Text message The SMS function is a network service. You may need to apply to the network operator first before you can send and receive a short message. Your cell phone supports the short message sending function. Short messages are sent to network SMS 35 center first and then sent to subscribers. If the subscriber does not turn on the phone or cannot receive messages (storage is full), the network will keep this message temporarily. The keeping period will be determined jointly by the message sending user's setting and the service operator. By using the SMS, the phone can send and receive long messages. Sending long messages may affect the charge for the messages. For details, please contact your service operator. If the memory for messageS is full, a twinkling icon will remind you on the screen. You mobile phone supports dual SIM card so messages in SIM card 1 and 2 are separately stored. The reminders for full memory of SIM card 1 and 2 will also be given separately. In such case, you need to delete at least one message in the memory of the corresponding SIM card to receive a new message. Note:When you send a short message through SMS network, "Message sent" will be displayed on the screen. That is to say, the phone has sent the message to the message center mailbox set by your phone. But that isn't to say, the specified user has received the message. For more detailed information about SMS, please contact your network operator. 5.1.1 Write Message You can create a message in this menu. The phone supports sending a long message having over 70 characters (character number restriction for common text messages). If a message has more than 70 characters, the message will be divided into two or more messages and sent. 36 The following menu option functions by using left key are provided when you are writing a short message: ☆ Select SIM card 1/2:Enter sending method option and send the message. ☆ Insert: 1. Use templates:Select frequently used phases from the template and insert into message editing interface. 2. Insert object:Insert ring tones, picture, images animations and Melody etc. (Needs the support from network service) 3. Insert contact:Enter contacts and insert name and number. (refer to Quick Search in Contacts for searching method) 4. Insert bookmark:Insert the IP address of the website. 5. Insert text message: Insert a selected SMS from the inbox, outbox or draft box. 6. Insert call history: Enter call history and insert a selected call history. ☆ Text format: You can set the font, ☆ Input method: Choose the input method used in message writing. Note:Picture message function can be used only when your network operator or service supplier supports the function. Picture messages can be received and displayed only by the phone featuring picture message function. However, the normal display of some picture messages is supported by the 37 phone. For details, please contact the network operator. 5.1.2 Inbox The received messages are saved in Inbox. You can view all received messages in Inbox. The messages of SIM card 1/2 are separately saved. You can perform the following operations: ☆ View: Read the current short message. ☆ Reply: reply to a received short message. ☆ Delete: To delete the current message. ☆ Get detail: Collect some contents of the current short message, such as the number of user and using website. ☆ Forward: To forward the current message to the other subscriber. ☆ Copy: To copy the current short message or all short messages. ☆ Move: You can transmit all messages between SIM card and phone storage. ☆ Multi-delete: Delete some or all messages. ☆ Chat: Chat with these send SMS. 5.1.3 Sent The messages that have been sent successfully are stored in Outbox, and you can implement the relative operations of the messages. 5.1.4 Drafts The message failed to send will be also stored in drafts box, and relative operations can be implemented. 5.1.5 Trash box 38 The message after filtering will be stored in trash box when the “Message Black List” is on 5.1.6 Templates You can edit, remove the templates. 5.1.7 Text message settings Message setting of SIM card 1/2: You can set some parameters of messages in this menu. Parts of setting menu of SIM card 1/2 are separate. 【Profile setting】 :To set the name of a profile, SMS center number, message validity period, and message type. The SMS center number shall be provided if you want to send a message, Note:The number of the SMS center is provided by the network operator. For details, please contact the network operator. 【Delivery settings】:Enable or disable delivery report and reply directory. Delivery report:The network reports whether the opposite side has received the message and the time received. Reply path:To transfer the reply path to the network terminal. This function requires the support of message center. 【Memory Status】 :Check memory space use of SIM card or mobile phone. 【Storage】:Appoint a directory to save the message (SIM cards or mobile phone). Sort: Sort the short message by time, number or name. SMS black list:Enable or disable the blacklist function. You can enter a number in the blacklist. When the function is enabled, your phone will reject messages coming from that number. 39 - Trash number list: Lists the numbers, messages received will be moved to trash box directly. - Trash content list: List the contents, messages contain will be moved to trash box directly. Setting: Dump trash number and trash content to trash box: Move the messages from either “Trash Number List” or “Trash Content List” to trash box. Dump strange number to trash box: Move the message from strange number to trash box directly. Off: Switch off the “SMS Black List”. 5.2 MMS A multimedia message can content characters, audio clips and pictures. If the size of a multimedia message is over the limit, the phone can not receive this multimedia message. The display effect of multimedia messages may vary with different receiving equipment. Note:You can use this function only when the service is supported by your network operator or service supplier. Only the device featuring multimedia or Email can receive and display a multimedia message. For details, please contact the network operator. 5.2.1 Write message 【To】: Enter the phone number or Email address of the receiver. 【Cc】: Enter the phone number or Email address of the receiver for carbon copy. 【Bcc】: Enter the phone number or Email address of the receiver for blind carbon copy. 【Subject】: Edit the subject of a multimedia message. 【Edit content】: Edit the content of the text of the multimedia message. This includes the following options: 40 ☆ Done: Finish the edition of a multimedia message. ☆ Input method:To select the input method for editing a multimedia message. ☆ Add picture: To insert an image to the multimedia message. ☆ Add audio: To insert an audio file to the multimedia message. ☆ Add video: To insert a video file to the multimedia message. ☆ Add attachment: To insert an attachment to the multimedia message. ☆ Add slide before: To insert a new slide ahead of the current slide. ☆ Add slide after: To insert a new slide behind the current slide. ☆ Add bookmark: To insert the web address of bookmark. ☆ Preview: To preview the currently edited multimedia message. ☆ Slide timing: To set the play time of the current multimedia message slide. 5.2.2 Inbox You can view received multimedia messages in the inbox and perform the following operations: ☆ View: To view a multimedia message, and save the attachment of picture or others in the multimedia message. ☆ Reply: To reply to multimedia message ☆ Reply by SMS: To reply through SMS. ☆ Reply All: To reply to all through MMS. ☆ Forward: To forward the multimedia message to others. ☆ Delete: To delete current multimedia message. ☆ Delete all: To delete all multimedia messages in the inbox. ☆ Template: Store the current multimedia message by template. 41 ☆ Detail: To view the detailed information of the current multimedia message. ☆ Use item: Store or dial the number of the received MMS, and edit new multimedia message. 5.2.3 Outbox You can view a multimedia message failed to be sent. Operation of viewing, forwarding, deleting, deleting all, save as template, viewing message details and using item can be implemented. 5.2.4 Drafts You can save an edited multimedia message in Drafts, Operation of drafts such as viewing, forwarding, deleting, deleting all, storing in template, viewing message details and using item can be implemented. 5.2.5 Templates Up to 5 preset multimedia messages have been set in the phone. Operation of viewing, viewing message details, getting new message from template and using item can be implemented. 5.2.6 MMS setting You can set parameters for MMS or view the memory status in this menu. For detailed information on MMS parameters, please contact your network operator. Compose: 【Compose mode】: Select the compose mode. 【Picture resizing】 : Enable or disable resizing of picture. 【Optimum playing time】: Switch On/Off this function. 【Auto signature】 : Enable or disable auto signature. 【Signature】: Enter signature. Send: 【Validity period】 : Set valid time of the message in Message Center. 【Delivery report】 : Enable/disable delivery report. 42 【Read report】: 【Priority】: 【Slide timing】: 【Delivery time】 : Retrieve: 【Home network】 : 【Roaming network】: 【Read report】: 【Delivery report】 : Enable/disable read report. Set priority to be sent of the multimedia messages. Set play time of each page. Set storage time of the message in Message Center. This setting depends on your network provider and your setting. Immediate, reject, postponed. Same with main network, postponed, reject. Send, not send, inquire. Enable/disable delivery report. Filter:Set “Anonymous sender” and “Advertisement” to allow no return messages. Server profile:You could set MMS Parameter, your network operater should provide the details. Memory status:You can check the phone used rate, used and unused space. 5.3 Chat You have two chatrooms. First set your nickname and number. You can check the chat history from chat page layout, and every message can be sent as one single text message. 5.4 Voice mailbox (SIM card 1/2 voice mailbox) Voice mail server is a network service. You may apply for this service beforehand. For detailed information and voice mail server number, please contact your network operator. Edit:To edit voice mail name and server number. Press OK to store your number. 43 Connect to voice:To dial the voice mail server number stored in your voice mail server number list. Tip: In standby you can call the voice mailbox number by long pressing the key "1" after you have set the voice mailbox number. 5.5 Broadcast message (SIM card 1/2 Cell broadcast) Cell broadcast is a service provided by the network operator to send messages such as weather forecast, traffic status, etc. to all GSM subscribers in a specific area. Note: The realization of the cell broadcast function needs the support of the network. For details, please contact the network operator. 【Receive mode】 : To enable/disable the Broadcast Message. 【Read message】 : When the Broadcast Message has been enabled, the received message can be read after the corresponding server has been enabled. 【Languages】: To enable/disable the all languages of messages received. 【Channel settings】: To select, add, edit or delete channel numbers. 6. MULTIMEDIA 6.1 Audio player Operating systems above WIN2000 do not require a driver. When the phone is connected to PC, it will display the USB interface. Press the option of “Storage device”, then the PC shows the message of found new hardware. The selected music to be copied into “My music” root directory, otherwise it can not be found and played. (The phone only supports the format of Amr and MIDI). 44 Audio Player options: ☆ Play: To play the selected m usic. ☆ Details: To view the detailed inform ation of the selected music. ☆ Add to tone library: To add the selected songs to the tone library for selection. ☆ Refresh list: To update the music play list ☆ Settings: To set parameters for playing music 45 6.2 Camera With this function, you can use the built-in camera of the phone to take a photo, or adjust the camera settings. Photos generated by the camera are in JPG format. If they have been downloaded to your PC, view them with the right software! If the phone has insufficient memory space for new photos, you have to delete photos or other files in the "File Manager" function list to release memory space for new pictures. 【White balance】 : 【Scene mode】: 【Effect settings】 : 【Add frame】: 【Storage】: 【Restore default】 : 46 Adjust the white balance. Setting the scenario mode of the camera. Setting the special effect for photo shooting. Setting the picture frame. To set the storage directory for photos. To restore the factory settings. 6.3 Video Player The following operation can be performed for the selected video file of .avi format: ☆ ☆ ☆ ☆ ☆ ☆ ☆ Play: To play a video file. Send: To transfer a video file to the desired application. Renam e: To renam e a video file. Delete: To delete the selected video file. Delete all: To delete all video files. Sort by: To sort video files by desired method. Storage: To select the storage directory (cell phone or memory card) for a video file. 47 6.4 Video recorder Press the red icon at the bottom of the screen or press OK key to start or pause video recording. The recording time is limited by the memory of the phone or the memory card. Enter the “options”, you can chose the following settings: ☆ ☆ ☆ ☆ ☆ 48 Cam corder settings: Video settings: Effect settings: Storage: Restore default: Setting the related parameters of the recorder Set the parameters of the video to be recorded Set special effect to be applied when recording Chose where to save the file (phone/memory card). Go back to factory settings 6.5 Image viewer The taken photos are stored in the image viewer. Descriptions of image viewer options: ☆ ☆ ☆ ☆ ☆ ☆ ☆ ☆ View: To view a photo. Browse m ode: To select the mode for browsing photos. Transfer: To transfer a photo to another application. Renam e: To rename the selected image or photo. Delete: To delete the selected photo. Delete all: To delete all photos. Sort: To sort photos by the desired method. Preferred storage: To set the storage directory for photos. 49 6.6 Sound recorder To make an audio record, select the “Audio Recorder”. Select "Options" for the selected record file to perform the following operation: ☆ Record: ☆ Play: ☆ Go on recording: ☆ ☆ ☆ ☆ Renam e: Delete: Delete all: Settings: ☆ Send: 50 To make a audio record. To play a selected record file. Append a record to the designated files in the upper directory. (You can only append a record file in .AMR and .AWB format.) To rename the selected record file. To delete the selected record file. To delete all record files. To set the preferred Storage, File Format and Quality for record files. Send a sound file to another application. 6.7 Slide viewer Play the pictures selected from your phone or memory card by slide. 7. FILE MANAGEMENT Phone: Supports memory of 693K Memory card: You can use any T-flash card, but the capacity must be within 4GB. Folders or files in the memory card or the phone can be managed by the files management template. Open: Open the selected folders or memory district. New folder: Establish a new folder. Format: Format the storage. 8. USER PROFILES The function is used for setting up the mobile phone for incoming calls and short messages in different ways under different environments. The profiles available are General, Meeting, Outdoor, Indoor, Headset, Bluetooth and Saving. 51 In each profile, you can set one of the following options: ☆ Tone setup: To set the tone for incoming calls of SIM card 1/2, alarm, power-on (except Bluetooth mode), power-off, messages of SIM card 1/2 and key press. ☆ Volum e: To set the volume of ring tone and key tone. ☆ Alert type: Includes Ring, Vibrate, Vibrate and Ring, Vibrate then Ring ☆ Ring type: To set the ring type, including Single, Repeated and Ascending. ☆ Extra tone: Includes four types, Warning, Error, Camp-on, and Connect. ☆ Answer m ode: Provides any key answer mode. You can switch on the fixed mode by pressing “Start up” after your setting. Note: The phone automatically switches to the Headset mode when the headset is plugged in, and it restores to the previous mode when the headset is unplugged. The phone automatically switches to the Bluetooth mode when the Bluetooth device is connected, and it restores to the previous mode when the device is unconnected. Long press the "#" key when the phone is in the standby state to switch the phone to the Mute mode. Long press it again will restore to the previous mode. 52 9. SERVICES 9.1 WAP This function allows you to visit several services on the Internet through message or network. The services may include entertainment, weather forecast, news, financial information, ring tone download, stock market and other useful information. Some functions are provided by the network provider. You will see different menus according to the services provided by the SIM card. Please contact your network provider for more information. 【Homepage】: Enables WAP connection and visit the home page.. 【Bookmarks】: Visit or edit bookmarks. 【Recent pages】 :Record the recently visited web addresses. 【Offline pages】 : View the saved web pages. 【Input address】 :Provide user-defined web address. 【Push inbox】: Save the PUSH messages received by the phone. 【Settings】: Set parameters of WAP browser. Please consult your network provider for details of the parameters. - Select SIM:Those options include “always inquire, SIM card 1 and SIM card 2”. Edit profile: To edit and enable the profile function. Browser options: To set the waiting time and whether to show images. Display the address 53 - list and select image can be performed. Service message settings: Enable or disable. Clear cache: It may reduce speed of internet connection when there is too much data stored in the cache. Clear cookies: Delete all personal information. Trusted certificates: To view the trusted certificates provided by the system. 9.2 Data account Here you can enter the GSM and GPRS parameters of your network provider. These parameters enable your phone to surf. Please contact your nework provider for the parameters of GSM and GPRS. Please contact your network provider for cost information. 9.3 STK STK is a value added service provided by your network provider. The display of function menu may differ according to different SIM cards. 54 10 FM RADIO 10.1 FM radio You can listen to FM Radio channels by plugging in the earphones. 10.2 Schedule FM record This function allows you to schedule a time and chose a channel for recording a program you like. 11. BLUETOOTH The mobile phone has a built-in bluetooth wireless communication function, the user can connect the phone to other bluetooth devices through the function, such as a bluetooth hands-free device, other phones or a PC which supports bluetooth wireless technology. The bluetooth connection can be applied to exchange information of images, video clip, text, digital name card, etc., you also can talk by the bluetooth handls-free device. Since devices with Bluetooth wireless technology communicate using radio waves, your device and the 55 other device do not need to be in direct line-of-sight. The two devices only need to be within 10 meters (33 feet) of each other, but the connection may be subject to interference from obstructions such as walls or from other electronic devices Features using Bluetooth technology, or allowing such features to run in the background while using other features, increase the demand of battery power and reduces battery lifetime. 【Power】: 【Inquiry audio device】: 【My device】: 【Active device】 : 【Settings】: Activate/deactivate Bluetooth. Search for Bluetooth devices. Display device model when connected. Display the model of online device. Setting the parameters when Bluetooth is connected. Search all Bluetooth devices. When the screen displays the searched device list, choose one device for connecting and pairing. The code needs to be inserted when matching. The device will be listed in the device list after pairing. Notice: if the user wants to establish a connection, the Bluetooth devices must use the same code (default code is 0000). Devices that do not have a user interface can use the factory-set passcode 56 Enable/disable. Change the name displayed of this phone Enable/disable. Set the voice to be transmitted to the phone or to Bluetooth hands-free device when using Bluetooth hands-free device. ☆ Store location:Set the path for saving the file that will be transmitted. ☆ File transmission setting: Set the directory and privilege of the directory. ☆ ☆ ☆ ☆ Visibility: Device name: Authentication: Audio path: 【About】:Introduction of the Bluetooth device. 12. GAMES Provides interesting and classical games. Please refer to help of the game for specific operation. Game settings: Background music: Music effect: Game vibration: Volume: Switch On/Off the background music. Switch On/Off the game music effect. Switch On/Off the vibration in games. Regulate the volume of games. 57 VII. TEXT EDITING Your phone provides you with different text input methods. You can enter texts with your keypad GO TO: Settings > Phone setup > Preset input method to choose a default input method. Input interface - functions of the keys Press corresponding key in the input interface, for example of writing message. - Numeral 1 to 9 is used to edit text contents. - Direction keys:Control the movement of cursor. # key: Switch the input method. * key:Enter the selected of symbol. Hang-up key:Retreat from the edit interface. Enter a word Under smart English input method, continuously press 2 to 9 keys for two or more times. The corresponding word will appear on the screen. For example, if you want to enter “book”, press the numeral keys “2665”, and then select the word “book”. You can press the 0 key to enter a space when you need. Upper/lowercase input You can enter upper/lowercase when you choose the input method “ABC, abc”. Each key is used to input several characters, and you have to press the key continuously until you get the character you need. 58 Input the next character after the movement of the cursor. Here an example: English input method Keypad definition of English input (include capital and small) as below: Key name Number 0 key Number 1 key Number 2 key Number 3 key Number 4 key Number 5 key Number 6 key Number 7 key Number 8 key Number 9 key * key # key: Corresponding English letter or function 0,space Symbol ABC; abc DEF; def GHI; ghi JKL; jkl MNO; mno PQRS; pqrs TUV; tuv WXYZ; wxyz Press * key to enter into symbol input box Switch input method Explanation 59 Entering Numbers Press the corresponding key to input the corresponding number after choose the input method (in write message mode: Options – Input Method – Numeric) or “123”. Symbol input Press * key to into the interface of inputting symbol, when the phone not under the interface of symbol. Transfer direction keys to move the cursor to desired symbol, press OK key to select it. VIII. USB storage Precautions before using: ☆ Please respect procedure for USB equipment connection and disconnection. ☆ Please don't use windows command “format” to format the mobile disk of cell phone; You won’t be able to repair the damages anymore. ☆ USB operation environment:Windows2000 / XP./Vista/Windows7 ☆ Other operating systems, may require the installation of a USB driver for connecting PC and cell phone. IX. Appendix 1 Troubleshooting Failure 60 Possible cause The phone power on fails to Check that the battery is charged; Check that the battery is installed correctly. SIM card error Check whether the SIM card is dirty. If the card is dirty, clean it; Reinstall the SIM card; If the SIM card is damaged, replace the SIM card. Weak signal Check that the signal intensity indicator on the screen. 4 bars indicate a strong signal, and 2 bars or less indicate a weak signal. Call initiation fails 1. Hide Caller ID could be set but the network operator does not support this service; 2、A strong signal interference may exist; 3、You may activate the Call Barring function; 4、You may activate Line 2 but the network operator does not support this service. Battery charge fails 1、The battery may have been excessively discharged. To charge the battery, it is necessary to connect it to a charger for a certain period of time; 2、The battery may be deteriorated. 61 Cannot connect to the network 1、Check whether the signal is too week or wireless interference exists around; 2、Check whether the SIM card is installed correctly, poor connection exists, or the SIM card is damaged. If the SIM card is damaged, please contact the network operator. Photos shot too dark 1、The brightness is set too low; 2、The ambient light is too dark. Photos blurred 1、The object is moving; 2、Your hand shakes when the shutter is pressed. shot too Photos shot distorted are Cannot access service menu the The standby picture is not shown completely 62 The object shot is too near to the lens. The SIM card may not support the service. Maybe the picture is too large. X. Appendix 2 Abbreviations SMS Short Message Service EMS Enhanced Message Service SIM Subscriber Identity Module GSM Global System for Mobile Communication PIN Personal Identity Number PUK PIN Unblocking Key IMEI International Mobile Equipment Identity CB Cell Broadcast GPRS General Packet Radio Service MMS Multimedia Message service 63 XI. Appendix 3 Description of environmental protection Toxic substance or element Accessories Lead (Pb) Mercury (Hg) Cadmium (Cd) Chromium (Cr(VI)) Polybrominated biphenyl (PBB) Polybrominated diphenyl ether (PBDE) Phone X O O O O O Charger Battery Earphone Cable Memory card X X O O O O O O O O O O O O O O O O O O O O O O O O O O O O Packing O O O O O O 64 O: It means that the concentration of this substance is under the limited concentration of standard SJ/T11363-2006. X: It means that the concentration of at least one substance is above the limited concentration of standard SJ/T11363-2006.(This product meets the standard RoHS of Europe; So far, none technology for replacing or reducing the concentrations of electric porcelain, optical glass, steel and cooper alloy exists in the world.) 65