1
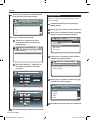
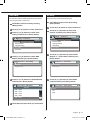
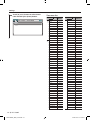
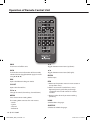
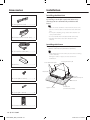
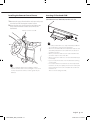
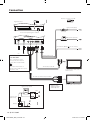
KTC-D600E DIGITAL TV TUNER INSTRUCTION MANUAL © B64-4758-08/00 (E) 1-KTC-D600E_ENG_1018.indd 1 2010-10-18 �� 1:48:47 Contents Safety precautions 3 Notes 3 Basic Operation 4 Function During TV Screen Menu Control Screen Settings 5 System Setting Automatic Search (Searching for currently available station) Manual Search ( Manually Searching Station) My Favorite Channel List Restoring to Factory Default Updating the Software Parental Level Setup Language Setup Time Setup AV Setup Displaying EPG 13 Viewing the Program Guide Operation of Remote Control Unit 14 Preparing the Remote Control Unit Accessories 16 Installation 16 Connection 18 LZ-612IR Operation 19 LZ-612IR Setup1 LZ-612IR Setup2 LZ-612IR Connection 20 System Connection with LZ-612IR Specifications 2 20 Monitor units that can be connected to this unit • • • A group DNX9260BT DNX7260BT DDX8026BT B group DNX520VBT DNX5260BT DNX5260 DDX5026 KVT-526DVD DNX9240BT DNX7240BT DNX5240BT DNX5240 KVT-524DVD KVT-554DVD KVT-54DVDR DDX8024BT DDX8054BT DDX6054 DDX5024 DDX5054 DDX54R DNX8220BT DNX7220 DNX5220BT DNX5220 KVT-522DVD KVT-50DVDR DDX8022BT DDX5022 DDX52R DNX7200 KVT-829DVD KVT-729DVD DDX8029 DDX7029 KOS-V500 KOS-V1000 LZ-612IR C group DDX6029 KVT-827DVD KVT-727DVD KVT-627DVD • • DDX8027 DDX6027 KVT-M707 D group LZ-760R E group Unit with RCA video input MENU and EPG operation depends on the group. • A group Touch the item to select. • B group Use , , , buttons to select the item. • C group Items can be selected using the remote controller KTC-D600E 1-KTC-D600E_ENG_1018.indd 2 2010-10-18 �� 1:48:47 Safety precautions Notes WARNING To prevent injury or fire, take the following precautions: To select TV Type (PAL or NTSC) To prevent a short circuit, never put or leave any metallic objects (such as coins or metal tools) inside the unit. The TV picture display can be divided roughly into two TV formats (PAL and NTSC). They are variable depending on countries and areas. This unit has a function for changing the video format according to the TV type. Please confirm to set the Type switch according to the type of your TV type. Installation Procedure 1 To prevent short circuits, remove the key from the ignition and disconnect the terminal of the battery. 2 Make the proper input and output wire connections for each unit. 3 Connect the wire on the wiring harness. 4 Connect the wiring harness connector to the unit. 5 Install the unit in your car. 6 Reconnect the terminal of the battery. 7 Press the reset button. • Mounting and wiring this product requires skills and experience. For safety’s sake, leave the mounting and wiring work to professionals. • Make sure to ground the unit to a negative 12V DC power supply. • Do not install the unit in a spot exposed to direct sunlight or excessive heat or humidity. Also avoid places with too much dust or the possibility of water splashing. • Do not use your own screws. Use only the screws provided. If you use the wrong screws, you could damage the unit. • Make sure that all wire connections are securely made by inserting jacks until they lock completely. • If your vehicle’s ignition does not have an ACC position, or if the ignition wire is connected to a power source with constant voltage such as a battery wire, the power will not be linked with the ignition (i.e., it will not turn on and off along with the ignition). If you want to link the unit’s power with the ignition, connect the ignition wire to a power source that can be turned on and off with the ignition key. • Use a commercially available conversion connector if the connector does not fit in the vehicle connector. • Insulate unconnected wires with vinyl tape or other similar material. To prevent a short circuit, do not remove the caps on the ends of the unconnected wires or the terminals. • If the fuse blows, first make sure the wires aren’t touching to cause a short circuit, then replace the old fuse with one with the same rating. • After the unit is installed, check whether the brake lamps, blinkers, wipers, etc. on the car are working properly. PAL NTSC Change NTSC/PAL setting only when the device is turned off. How to reset your unit If the unit fails to operate properly, press the Reset button. It is used for the purpose of software update. Reset button English 1-KTC-D600E_ENG_1018.indd 3 3 2010-10-18 �� 1:48:48 Basic Operation (When connected with DNX9260BT A) Various control screens appear in the Digital TV/ Video Source mode. (You can only operate Digital TV with the optional accessory Digital TV Tuner connected). Refer to the user manual for the connected monitor to see basic operations including how to convert to TV. Function During TV Screen Menu Control Screen Basic functions are available even when the TV screen is displayed. Menu Control Screen appears by touching the area shown below. 1 Display the TV screen 2 Operation on the TV screen 1 4 3 2 3 Displays Menu Control Screen. Displays Easy Control Screen. * 3 , 4 Selects a channel. 1 2 * [SCRN], [], [] buttons shown on Easy Control Screen cannot be used. [Menu] S hows Setting Menu Screen. (Refer to page 5) [EPG] Shows EPG (Electric Program Guide) Screen. (Refer to page 13) [], [], [], [] Moves highlight in Setting Menu. [Enter] Executes selected Menu item. [Return] Returns to the previous screen. [Exit] Returns to Digital TV Screen. [Direct] Direct TV control by touching the screen. 4 KTC-D600E 1-KTC-D600E_ENG_1018.indd 4 2010-10-18 �� 1:48:49 Settings You can select following system setting items. Set the system by controlling the touch panel of the monitor. You can also operate the enclosed remote controller in the same way. System Setting Setting item 1 Show Menu Control Screen by touching [Menu] button. 2 Touch [] or [] button to select main item. Main item Setting > Search Search System Channel Preference Automatic Search Manual Search Switching frequency “System Status” Active Antenna DC 3 Touch [] or [] button to select sub item and then press [Enter] button. Setting > Search System “Automatic Search” Search for currently available stations and save them in the Channel List. (page 6) “Manual Search” Search a station by specifying area or channel. (page 6) “Switching frequency” The function is for watching same broadcasting service between several areas. “Enable”/“Disable” “Search Area” The function is used to change a frequency table of each country. “Europe”/“Australia”/“Taiwan” “Active Antenna DC” Active antenna is used, set to “Enable” (supplied to DC 5V). “Enable”/“Disable” “System” Search Area Search Selectable setting/item “Search” Channel Preference Automatic Search Manual Search Switching frequency Search Area Active Antenna DC Sub item 4 Touch [] or [] button to select the value to set and then press [Enter] button. Setting > Switching frequency Enable Disable 5 Touch [Return] button when you are finished. You can view the system information (Hardware, software and system version). “Reset Default” All setting values will be returned to the initial values. (page 8) “Software Update” Display the firmware version and update the firmware. For how to update the firmware, access our web site. (page 8) http://www.kenwood.com/cs/ce/ “Common Interface” You can view the CA card information. Information will be displayed according to the CA card used. “Channel” “Edit Channel” You can additional and edit the favorite channels. (page 7) “Preference” “Parental Control” You can set to censorship level and change to password. (page 9) “Language Setting” You can set to language for menu, Audio and subtitle. (page 10) Menu Language/Audio Language/Subtitle Language: “English”/“German”/“Spanish”/ “Italian”/“Dutch”/“Portugal”/“Finland”/ “French”/“Russian” “Time Setting” You need set to GMT (Greenwich mean time) Offset and Daylight Saving. (page 11) GMT Offset: “–12:00” — “0” — “+12:00” Daylight Saving: “Enable”/“Disable” “A/V Control” You can set to Audio output and Screen Ratio. Audio Outut: “Stereo”/“Left”/“Right” Screen Ratio: “4:3”/“16:9” This function provides 4:3 and 16:9 two ratio for user to select. If your display supports 4:3 screen format and selected channel provides 4:3 format program, select 4:3. (Factory setting: Underlined) English 1-KTC-D600E_ENG_1018.indd 5 5 2010-10-18 �� 1:48:50 Settings Automatic Search (Searching for currently available station) Manual Search ( Manually Searching Station) Search for currently available stations and save them in the Channel List. Search a station by specifying area or channel. 1 Show Menu Control Screen by touching [Menu] button. 2 Touch [] or [] button to select "Search". 3 Touch [] or [] button to select "Automatic Search" and then press [Enter] button. 1 Show Menu Control Screen by touching [Menu] button. 2 Touch [] or [] button to select "Search". 3 Touch [] or [] button to select "Manual Search" and then press [Enter] button. Setting > Search Setting > Search Search System Search Channel Preference System Channel Preference Automatic Search Automatic Search Manual Search Manual Search Switching frequency Switching frequency Search Area Search Area Active Antenna DC Active Antenna DC 4 Touch [] or [] button to select frequency and then press [Enter] button. Setting > Automatic Search Scan Status Found Channels Frequency 177.5 MHz Bandwidth 7MHz Found TV NO 0 Found Radio NO 0 Found Total NO 0 Search > Manual Search Frequency 177.5 MHz (7MHz) 177.5 MHz (8MHz) 184.5 MHz (7MHz) 186.0 MHz (8MHz) 191.5 MHz (7MHz) Channel search is performed and the available channel is saved in the channel list. 5 Touch [Return] button when you are finished. 4 Touch [Return] button when you are finished. • When you perform Automatic Search, the content of the current channel list is discarded and a new list is created. To search for available channels without discarding the content of the current channel list, perform channel search from the Digital TV Screen. 6 • Manual search is for advanced users and offers the ability to search for specific channels. Regular users are recommended to use "Automatic Search". KTC-D600E 1-KTC-D600E_ENG_1018.indd 6 2010-10-18 �� 1:48:51 Favorite Channel List Using remote controller You can additional and erase for TV/RADIO favorite channel list. Additional channel list Move the cursor over area A. Push [] or [] button to select additional channel and then press [ENTER] button. Erasing channel list Move the cursor over area B. Push [] or [] button to select erasing channel and then press [ENTER] button. Selecting TV/Radio channels Push [TV/RADIO] button to select TV / RADIO channel. Selecting the channel from favorite list Move the cursor to area B. Push numeric (1-6) button to select favorite list. (Favorite1~6) 1 Show Menu Control Screen by touching [Menu] button. 2 Touch [] or [] button to select "Channel". 3 Touch [] or [] button to select "Edit Channel" and then press [Enter] button. Setting > Channel Search System Channel Preference Edit Channel Channel > Edit Channel TV 5 Using Direct Touch Touch [ ] button when you are finished. Using remote controller Push [Return] button when you are finished. Favorite 1 1000. 4Music 1000. 4Music 1001. VIVA 1001. VIVA 1003. Virgin1+1 1003. Virgin1+1 1004. Ideal World 1004. Ideal World 1005. Dave ja vu 1005. Dave ja vu B A 4 Using Direct Touch Additional channel list Touch [] or [] button to select additional channel and then press [ ] button. Erasing channel list Touch [] or [] button to select erasing channel and then press [ ] button. Selecting TV/Radio channels Touch [ ] button to select tv channel. Touch [ Selecting the channel from favorite list Touch [] or [] button to select favorite list. (Favorite1~6) ] button to select tv channel. English 1-KTC-D600E_ENG_1018.indd 7 7 2010-10-18 �� 1:48:52 Settings Restoring to Factory Default Updating the Software Restore this unit's settings to factory default. Download the new software from the USB Memory stick and update the software installed in this unit. 1 Show Menu Control Screen by touching [Menu] button. 2 Touch [] or [] button to select "System". 3 Touch [] or [] button to select "Reset Default" and then press [Enter] button. 1 Show Menu Control Screen by touching [Menu] button. 2 Touch [] or [] button to select "System". 3 Touch [] or [] button to select "Software Update" and then press [Enter] button. Setting > System Search System Channel Preference Setting > System Search System Status System Reset Default System Status Software Update Reset Default Common Interface Software Update Channel Preference Common Interface 4 Touch [] or [] button to select "OK" and then press [Enter] button. System > Reset Default 4 Touch [] or [] button to select "OK" and then press [Enter] button. System > Software Update All setting values will be returned to the Initial values. Do you want to reset all setting value? Do you want to software update? OK Chancel OK Chancel 5 Touch [Return] button when you are finished. 5 The device will be turned off and on automatically. Software update will start in a moment from the LOGO screen. The device will be turned off automatically when the update is finished. Press the RESET button once, then the software update process is completed. 8 KTC-D600E 1-KTC-D600E_ENG_1018.indd 8 2010-10-18 �� 1:48:53 Parental Level Setup • Do not turn off the power while update is in progress. • If the power is turned off accidentally during upgrading, turn on the power while keeping the USB stick in the slot. The Update menu will then be activated automatically. 6 Touch [Return] button when you are finished. • This function is only available when the USB Memory stick supports this feature. • When new software is loaded, this might have different functions than the software you are using now. This manual might not be accurate anymore for the new software version. Sets a parental level. 1 Show Menu Control Screen by touching [Menu] button. 2 Touch [] or [] button to select "Preference". 3 Touch [] or [] button to select "Parental Control" and then press [Enter] button. Setting > Preference Search System Channel Preference Parental Control Language Setting Time Setting A/V Control 4 Press the number ([1] – [0]) button on the remote controller to enter password. By default, “0000” is specified. Parental Control > Password 1 2 3 4 5 6 7 8 9 PASSWORD * * * * 0 5 Touch [] or [] button to select "Setting Censorship" and then press [Enter] button. Preference > Parental Control Setting Censorship Change Password English 1-KTC-D600E_ENG_1018.indd 9 9 2010-10-18 �� 1:48:53 Settings 6 Touch [] or [] button to select Parental Level and then press [Enter] button. Parental Control > Setting Censorship Setting Censorship Language Setup Selects a language you use for the Menu, Audio and the Subtitle. 1 Show Menu Control Screen by touching [Menu] button. View all 5 2 Touch [] or [] button to select "Preference". 7 12 3 Touch [] or [] button to select "Language Setting" and then press [Enter] button. 15 When you change the password ... 1 Touch [] or [] button to select "Change Password" and then press [Enter] button. Preference > Parental Control Setting > Preference Search System Channel Preference Parental Control Language Setting Time Setting A/V Control Setting Censorship Change Password 4 Touch [] or [] button to select sub item and then press [Enter] button. Preference > Language Setting 2 Press the number ([1] – [0])button on the remote controller to enter new password. Menu Language Audio Language Subtitle Language Parental Control > Change Password 1 2 3 4 5 6 7 8 9 New Password * * * * 0 5 Touch [] or [] button to select Language and then press [Enter] button. Language Setting > Menu Language Menu Language English Parental Control > Change Password German Spanish 1 2 3 4 5 6 7 8 9 Verify Password * * * * 0 Italian Dutch 6 Touch [Return] button when you are finished. 7 Touch [Return] button when you are finished. 10 KTC-D600E 1-KTC-D600E_ENG_1018.indd 10 2010-10-18 �� 1:48:55 Time Setup AV Setup Set the time zone of GMT (Greenwich mean time) and summer time as necessary. Set the audio and video output mode. 1 Show Menu Control Screen by touching [Menu] button. 2 Touch [] or [] button to select "Preference". 3 Touch [] or [] button to select "Time Setting" and then press [Enter] button. 1 Show Menu Control Screen by touching [Menu] button. 2 Touch [] or [] button to select "Preference". 3 Touch [] or [] button to select "A/V Control" and then press [Enter] button. Setting > Preference Setting > Preference Search System Channel Search Preference System Channel Preference Parental Control Parental Control Language Setting Language Setting Time Setting Time Setting A/V Control A/V Control 4 Touch [] or [] button to select "GMT Offset" and then press [Enter] button. 4 Touch [] or [] button to select "Audio Output" or "Screen Ratio" and then press [Enter] button. Preference > A/V Control Preference > Time Setting GMT Offset Audio Output Daylight Saving Screen Ratio 5 Touch [] or [] button to select GMT time and then press [Enter] button. 5 Touch [] or [] button to select Audio output and then press [Enter] button. A/V Control > Audio Putput Time Setting > GMT Offset GMT Offset Stereo GMT − 02:00 Left GMT − 01:30 Right GMT − 01:00 GMT − 00:30 GMT + 00:00 6 Touch [Return] button when you are finished. English 1-KTC-D600E_ENG_1018.indd 11 11 2010-10-18 �� 1:48:56 Settings 6 Touch [] or [] button to select Screen ratio and then press [Enter] button. 4:3 16:9 Continent Time Difference City Hawaii –10:00 Alaska –9:00 Pacific Time –8:00 Arizona –7:00 Mountain Time –7:00 Central Time –6:00 Eastern time –5:00 Indiana –5:00 Atlantic Time –4:00 Mid-Atlantic –2:00 W.Central Africa +1:00 Abu Dhabi +4:00 Adelaide +9:30 Amman +2:00 Amsterdam +1:00 Anchorage –9:00 Ankara +2:00 Athens +2:00 Atlanta –5:00 Auckland +12:00 Baghdad +3:00 Baku +4:00 Bangkok +7:00 Beijing +8:00 Beirut +2:00 Berlin +1:00 Bogotá –5:00 Brasilia –3:00 Brussels +1:00 Bucharest +2:00 Budapest +1:00 Buenos Aires –3:00 Cairo +2:00 Cape Verde Is. –1:00 Caracas –4:30 Chicago –6:00 Copenhagen +1:00 Denver –7:00 Detroit –5:00 Dhaka +6:00 Ekaterinburg +5:00 Harare +2:00 Helsinki +2:00 Hong Kong +8:00 Islamabad +5:00 Istanbul +2:00 Jakarta +7:00 Jerusalem +2:00 Johannesburg +2:00 Kabul +4:30 Area A/V Control > Screen Ratio Time zone list City Continent Time Difference City Kansas City –6:00 Kingston –5:00 Krasnoyarsk +7:00 Kuala Lumpur +8:00 Kuwait +3:00 Kyiv +2:00 Las Vegas –8:00 Lima –5:00 London +0:00 Los Angeles –8:00 Madrid +1:00 Magadan +11:00 Manila +8:00 Mexico City –6:00 Midway Is. –11:00 Minsk +2:00 Moscow +3:00 Nairobi +3:00 New Caledonia +11:00 New Delhi +5:30 New Orleans –6:00 New York –5:00 Newfoundland –3:30 Novosibirsk +6:00 Nuku’alofa +13:00 Oslo +1:00 Ottawa –5:00 Panama –5:00 Paris +1:00 Prague +1:00 Yangon +6:30 Rome +1:00 San Francisco –8:00 Santiago –4:00 Sarajevo +1:00 Seattle –8:00 Singapore +8:00 St. Petersburg +3:00 Stockholm +1:00 Sydney +10:00 Taipei +8:00 Tehran +3:30 Tokyo +9:00 Toronto –5:00 Tunis +1:00 Vancouver –8:00 Vienna +1:00 Warsaw +1:00 Zagreb +1:00 Zurich +1:00 (GMT) 12 KTC-D600E 1-KTC-D600E_ENG_1018.indd 12 2010-10-18 �� 1:48:57 Displaying EPG Receiving and displaying EPG (Electronic Program Guide) sent together with a program. Viewing the Program Guide You can check the programs on each channel in the EPG (Electronic Program Guide). 1 Show Menu Control Screen by touching [EPG] button. 2 Select the channel or time to display EPG 1000. RTL Television 09:30 ~ 10:00 Die Kinderrzte von St. Marien 10:00 ~ 10:30 Unsere erste gemeinsame Woh... 10:30 ~ 11:00 Mein Garten 11:00 ~ 12:00 Punkt 12 - Das RTL-Mittagsjou... 12:00 ~ 13:00 Die Oliver Geissen Show On the EPG, you can change the displayed channel by touching [] or [] button. (Press [] or [] button when using the remote controller.) Time frame by touching [] or [] button. ( Press [] or [] button when using the remote controller.) 3 Select the channel or time to display Detail EPG Die Kinderrzte von St. Marien Folge 20 Die Doku rund um das Kinderkrankenhaus St. Marien Press [ENTER] after highlighting the program to watch, then the detailed information will be displayed as shown above. 4 Touch [Return] button when you are finished. • A "no data" message will be displayed if the selected channel does not provide EPG data. • It can also be displayed from the Menu Control screen. English 1-KTC-D600E_ENG_1018.indd 13 13 2010-10-18 �� 1:48:57 Next page 3 Operation of Remote Control Unit PWR / To turn on and off this unit. Toggles between menu items (up/down). INFO / To show the carrier information of the currently selected station (toggle between pages in menu using // / ). Toggles between menu items (left/right). EPG Opens the Electronic Program Guide. CH LIST Opens the channels list. CH / Changes channels (channel up, channel down). MENU Press once to enter Setting Menu. The Setting Menu consists of 4 main-menus. – Search – System – Channel – Preference 14 ENTER Verifies input. RTN a. Return to the previous menu in menu screen or escape from menu. b. Return to normal TV mode from a menu. Repeated pressing will take you through all opened menus until normal TV mode is reached. c. Returns to the channel you were watching previously. LANG Switches Menu language. SUBTITLE Switches to Subtitle language. KTC-D600E 1-KTC-D600E_ENG_1018.indd 14 2010-10-18 �� 1:48:57 AUDIO Switches to Audio language. Preparing the Remote Control Unit Pull the battery sheet out from the remote control unit to the direction of the arrow. TELETEXT Switches to teletext. VOL / To adjust volume. Volume mute only works in TV/ Radio mode. MUTE Mutes the sound. Volume mute only works in TV/ Radio mode. 0–9 a. Selects a favorit list. b. Selects a sub-menu item. c. Selects a teletext. Changing the battery of the remote control unit Use a commercially available button battery (CR2025). Insert the battery with the + and – poles aligned properly, following the illustration inside the case. Keep on slide SEEK Searches the network for available channels. Short - Manual Search long - Automatic Search TV/RADIO TV/radio mode Pull out CR2025 (+side) CAUTION • Do not set the remote control in hot places such as on the dashboard. • Lithium battery. Danger of explosion if the battery is incorrectly replaced. Replace only with the same or equivalent type. • The battery pack or batteries shall not be exposed to excessive heat such sunshine, fire or the like. • Keep battery out of reach of children and in original package until ready to use. Dispose of used batteries promptly. If swallowed contact physician immediately. English 1-KTC-D600E_ENG_1018.indd 15 15 2010-10-18 �� 1:48:58 Accessories Installation Installing the Main Unit Wiring harness (6m)............................ 1 Remote Control Sensor (6m)......... 1 The Digital TV Tuner (main unit) can be installed by securing it to the pile carpet with Velcro or by screwing it on to a commercially available audio board. • There are various terminals on the main unit. Leave some space to connect cables on the terminal side of the main unit. • Do not place anything on top of the main unit. This can cause product failure. • Do not install the main unit stacked with other units. • Install the main unit at least 1.5m away from radio antenna. Installing with Screw 1 Use a tapping screw to secure the bracket to the vehicle's audio board (commercial product). TV Interface Cable (6m).................... 1 • When drilling holes in the vehicle, be sure there is nothing on the other side. Damage to cables or pipes can cause accident or malfunction. Screw (M2.6×5mm) Screw (φ4×16mm) Bracket......................................................... 2 Bracket Screw (M2.6×5mm) Screw (M2.6 × 5mm).......................... 4 Bracket Digital TV Tuner Audio board (commercial product) Screw (φ4 × 16mm)............................ 4 Remote Control Unit . ....................... 1 16 KTC-D600E 1-KTC-D600E_ENG_1018.indd 16 2010-10-18 �� 1:48:59 Installing the Remote Control Sensor Inserting CA Card and CAM Paste the remote control sensor to the dashboard. Insert the CA card (Conditional Access card) and CAM (Conditional Access Module) into the card slot. 1 Remove the paper from double-stick tape and paste it on the back of the remote control sensor. 2 Wipe the dirt and oil off from the installation area and paste the remote control sensor to the dashboard. Remote control sensor • Wipe oil and dirt off from the installation surface. • Avoid area where there is direct sunlight or close to TV monitor because the remote control signals may be affected. • CA card (Conditional Access card) and CAM (Conditional Access Module) is optional (sold separately). • When CA card and CAM are inserted in this unit, CA card and CAM protrude from a unit. Take well care about an installation position. • When you insert or draw out a CA card and CAM in the slot of this unit, be sure to ACC OFF. • When you insert or draw out a CA card and CAM, keep it horizontally. • Eject or insert the CA card or CA module before turning on the power. • Do not leave this device inside the car. The temperature inside the car may rise rapidly, and CA card or other parts may be deformed or become unusable due to the heat inside the car. There is also the danger of theft. English 1-KTC-D600E_ENG_1018.indd 17 17 2010-10-18 �� 1:48:59 Connection Remoto control sensor Digital TV Tuner Ignition wire (Red) Fuse (1A) It is used for updating the software. Battery wire (Yellow) Fuse (5A) Ground wire (Black) (To car chassis) Wiring harness • 75Ω/ F connector • For VHF/UHF Up to 2 antennas can be connected to the antenna sockets “ANT A” and “ANT B”. Set "Active Antenna DC" is "Enable" (DC5V ON) when active antenna is used. TV Interface Cable To the Monitor unit such as a DVD receiver. AV Cable (Commercially available) VIDEO: Yellow AUDIO (L): White AUDIO (R): Red Ignition key switch ACC Car fuse box (Main fuse) Car fuse box To AV input of the monitor A B C Battery 18 GND KTC-D600E 1-KTC-D600E_ENG_1018.indd 18 2010-10-18 �� 1:49:00 LZ-612IR Operation LZ-612IR Setup1 LZ-612IR Setup2 1 Enter Select screen mode Touch the display window. 1 Enter Select screen mode Touch the display window. 2 Select the function Touch the function button. 2 Select the function Touch the function button. PAGE MENU PAGE EPG PWR AVIN TV.M CH.L TV/R SEEK RTN ENT MUTE INFO VOL CH VOL CH RTN ENT Display PAGE MENU PWR AVIN MUTE Function Move to the DVB-T Tuner unit Setup Screen 2. Move to Monitor Setting screen . To turn on and off this unit. Change AV1 / AV2 input source. Mutes the sound. Volume mute only works in TV/Radio mode. INFO To show the carrier information of the currently selected station (toggle between pages in menu using ///). VOL/VOL To adjust volume. Volume mute only works in TV/ Radio mode. CH/CH Changes channels (channel up, channel down). RTN a. Return to the previous menu in menu screen or escape from menu. b. Return to normal TV mode from a menu. Repeated pressing will take you through all opened menus until normal TV mode is reached. c. Returns to the channel you were watching previously. ENT Verifies input. 3 Exit DVB-T Tuner unit Control mode Touch the screen except function button. • The relevant OSD is displayed only when the DVB-T Control in <Other Setting> (page 7 In LZ-612IR Manual) is turned on. • You can operate the Kenwood DVB-T Tuner unit connected to the Hideaway box when the DVB-T Control is turned on. Display PAGE EPG TV.M CH.L TV/R SEEK / / RTN ENT Function Move to the DVB-T Tuner unit Setup Screen 1. Opens the Electronic Program Guide. Press once to enter TV Setting Menu. Opens the channels list. TV/radio mode. Searches the network for available channels. Short - Manual Search long - Automatic Search Toggles between menu items (up/down). Toggles between menu items (left/right). a. Return to the previous menu in menu screen or escape from menu. b. Return to normal TV mode from a menu. Repeated pressing will take you through all opened menus until normal TV mode is reached. c. Returns to the channel you were watching previously. Verifies input. 3 Exit DVB-T Tuner unit Control mode Touch the screen except function button. • The relevant OSD is displayed only when the DVB-T Control in <Other Setting> (page 7 In LZ-612IR Manual) is turned on. • You can operate the Kenwood DVB-T Tuner unit connected to the Hideaway box when the DVB-T Control is turned on. English 1-KTC-D600E_ENG_1018.indd 19 19 2010-10-18 �� 1:49:00 LZ-612IR Connection Specifications System Connection with LZ-612IR TV tuner LZ-612IR Hideway Unit Input Frequency VHF : 174 – 230 MHz UHF : 470 – 862 MHz Demodulation Type : QPSK/ 64QAM/ 16QAM Channel Bandwidth : 7/ 8 MHz FFT Size : 2K and 8K KTC-D600E Remote Control Cable Guard Interval : 1/4, 1/8, 1/16, 1/32 Puncture Rate : 1/2, 2/3, 3/4, 5/6, 7/8 Antenna input : 2-ch Diversity Connector Type : F Type × 2 General • Connect the audio/video output of KTC-D600E to “AV2 INPUT” of LZ-612IR. • Use the remote control cable of LZ-612IR to connect the remote input terminal of KTC-D600E and “DVD Remote Out” terminal of LZ-612IR. Operating Voltage (10.5-16V) : 14.4 V Current Consumption : 400 mA Dimensions (W × D × H) (Main unit) : 188 × 144 × 30 mm Operational temperature range : -10°C ~ +60 °C Storage temperature range : -30°C ~ +85 °C Weight : 0.9 kg Specifications subject to change without notice. 20 KTC-D600E 1-KTC-D600E_ENG_1018.indd 20 2010-10-18 �� 1:49:01 Declaration of Conformity with regard to the EMC Directive 2004/108/EC Manufacturer: Kenwood Corporation 2967-3 Ishikawa-machi, Hachioji-shi, Tokyo, 192-8525 Japan EU Representative’s: Kenwood Electronics Europe BV Amsterdamseweg 37, 1422 AC UITHOORN, The Netherlands This Product is not installed by the manufacturer of a vehicle on the production line, nor by the professional importer of a vehicle into an EU Member State. Information on Disposal of Old Electrical and Electronic Equipment and Batteries (applicable for EU countries that have adopted separate waste collection systems) Products and batteries with the symbol (crossed-out wheeled bin) cannot be disposed as household waste. Old electrical and electronic equipment and batteries should be recycled at a facility capable of handling these items and their waste byproducts. Contact your local authority for details in locating a recycle facility nearest to you. Proper recycling and waste disposal will help conserve resources whilst preventing detrimental effects on our health and the environment. Notice: The sign “Pb” below the symbol for batteries indicates that this battery contains lead. For Turkey Bu ürün 26891sayılı Resmi Gazete’de yayımlanan Elektrikli ve Elektronik Eşyalarda Bazı Zararlı Maddelerin Kullanımının Sınırlandırılmasına Dair Yönetmeliğe uygun olarak üretilmiştir. This product complies with Directive,Number 26891 regarding "REGULATION ON THE RESTRICTION OF THE USE OF CERTAIN HAZARDOUS SUBSTANCES IN ELECTRICAL AND ELECTRONIC EQUIPMENT". This symbol mark indicates that Kenwood manufactured this product so as to decrease harmful influence on the environment. DVB is a registered trademark of the DVB Project. English 1-KTC-D600E_ENG_1018.indd 21 21 2010-10-18 �� 1:49:01 7-KTC-D600E_PT_1018.indd 144 2010-10-18 �� 2:00:12

![KTC-D600E - [::] Kenwood ASC](http://vs1.manualzilla.com/store/data/006744326_1-2876e09afb2152baa97f4b20e57200b6-150x150.png)