1
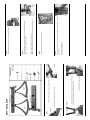
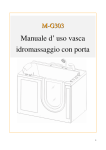
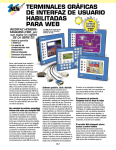
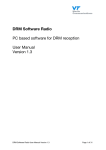
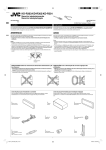
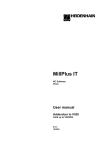
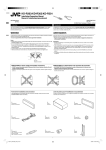
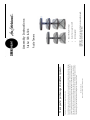
8201 South 48th Street • Phoenix, AZ 85044-5355
OmniMount Systems, Inc.
Every effort has been made to provide accurate and error-free assembly and installation. OmniMount Systems disclaims
liability for any difficulties arising from the interpretation of information contained in these instructions. If OmniMount
products are used for purposes other than their original intent, OmniMount, its distributors and retailers shall not be
held responsible or liable for injuries or property damage, direct, indirect, or consequential, which may arise from the
inability to use this product safely, properly, and in the manner for which it has been designed and manufactured. Warranty does not apply to products which have been lost, damaged by misuse, abuse, or accident.
Specifications are subject to change without prior notice.
Thank you for purchasing an OmniMount product.
Top shelf can be used for LCD TV
Cable management
•
•
IMPORTANT: Consult your dealer if you have any questions regarding the proper assembly of this product.
Unique floating shelf design
•
Audio Towers
Assembly Instructions
Stellar 303 & 304
Fig. 2a
Fig. 1b
Step 1
Install shelf pad on flange. (Fig. 2b)
Install shelf retention screws into flange at rear of shelves. (Fig. 2a)
Note: Set screw should be flush with bracket. (Fig. 2b)
Step 2
Install cable port covers into back post. (Fig. 1b)
Install hex screw into pads on bottom of back post. (Fig. 1a)
Model: G303 & G304
Fig. 2b
Fig. 1a
Fig. 3a
DO NOT OVER TIGHTEN
Insert rear of glass shelves into retention brackets, and tighten retention screw with screwdriver. (Fig. 6)
Step 6
Attach adhesive pads to corners of each shelf. (Fig. 5)
Step 5
Rock the stand to check that it is level and stable.
Note: For unstable condition, un-screw shortest leveling foot until table sits level.
Secure shelf frames to back post with long hex bolts, using supplied hex wrench.
Note: It is easiest to begin with base shelf.
Step 4
Install end caps into foot sections on front of base frame. (Fig. 3)
Step 3
Fig. 6
Fig. 5
Fig. 4