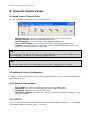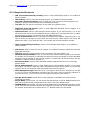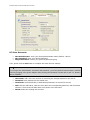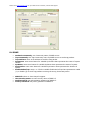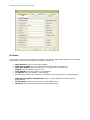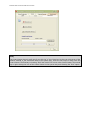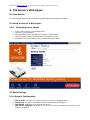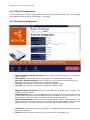
1
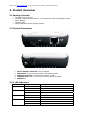
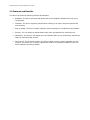
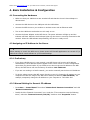
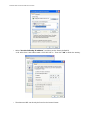
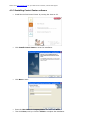
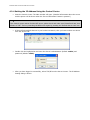
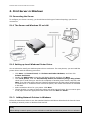
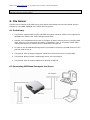
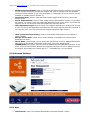
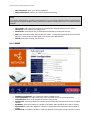
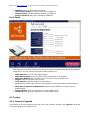
MULTI FUNCTIONAL USB SERVER
LN-309
Full manual
Sitecom Multi Functional USB server LN-309
1. Table of Contents
1. TABLE OF CONTENTS.............................................................................................................................2
2. INTRODUCTION ......................................................................................................................................4
2.1
2.2
THANK YOU .....................................................................................................................................4
ABOUT THIS MANUAL ......................................................................................................................4
3. PRODUCT OVERVIEW ............................................................................................................................5
3.1
PACKAGE CONTENTS .......................................................................................................................5
3.2
PHYSICAL DESCRIPTION...................................................................................................................5
LED INDICATORS .......................................................................................................................5
3.2.1
3.3
FEATURES AND BENEFITS .................................................................................................................6
4. BASIC INSTALLATION & CONFIGURATION.........................................................................................7
4.1
CONNECTING THE HARDWARE .........................................................................................................7
4.2
ASSIGNING AN IP ADDRESS TO THE SERVER .....................................................................................7
4.2.1
PRELIMINARY ............................................................................................................................7
4.2.2
MANUAL SETTING FOR SERVER’S IP ADDRESS ...........................................................................7
4.2.3
INSTALLING CONTROL CENTER SOFTWARE ................................................................................9
4.2.4
SETTING THE IP ADDRESS USING THE CONTROL CENTER ........................................................10
4.2.5
SETTING THE IP ADDRESS USING THE SERVER’S WEB PAGES ..................................................11
5. PRINT SERVER IN WINDOWS...............................................................................................................14
5.1
CONNECTING THE SERVER .............................................................................................................14
5.1.1
THE SERVER AND WINDOWS PC ON LAN................................................................................14
5.1.2
SETTING UP LOCAL WINDOWS PRINTER DRIVER .....................................................................14
5.1.3
ADDING NETWORK PRINTERS IN WINDOWS.............................................................................14
6. FILE SERVER..........................................................................................................................................15
6.1
PRELIMINARY ................................................................................................................................15
6.2
CONNECTING USB MASS STORAGE TO THE SERVER ......................................................................15
6.3
SUPPORTED CODEPAGES ................................................................................................................16
6.3.1
CONFIGURING THE SERVER’S CODEPAGES ...............................................................................16
6.4
ADDING YOUR USB MASS STORAGE DEVICES WITH SECURITY TO YOUR NETWORK .....................16
6.4.1
SETTING UP FILE SERVER USING THE CONTROL CENTER .........................................................16
6.4.2
SETTING UP FILE SERVER USING WEB PAGES ..........................................................................17
6.4.3
SET UP FILE SERVER CONFIGURATION .....................................................................................18
6.4.3.1
SET SMB/CIFS PRINT/FILE SERVER ..................................................................................18
6.4.3.2
SET FTP SERVER ................................................................................................................18
6.4.3.3
STORAGE ACCESS MODE: ..................................................................................................19
6.5
USING SHARED STORAGES BY SMB/CIFS METHOD FOR WINDOWS .............................................19
6.6
USING SHARED STORAGE BY FTP METHODS FOR WINDOWS .........................................................20
7. NETUSB MODE ......................................................................................................................................21
7.1
INTRODUCTION ..............................................................................................................................21
7.2
CONNECT & DISCONNECT..............................................................................................................21
7.3
HOW TO USE ..................................................................................................................................21
7.3.1
REMOTE INSTALLATION ...........................................................................................................21
7.3.2
NETUSB PRINTING USING AUTO-CONNECT PRINTER ..............................................................23
7.3.4
NETUSB SCANNING USING NETWORK SCANNING ...................................................................25
7.3.5
NETUSB MODE FOR USB STORAGE ........................................................................................26
8. USING THE CONTROL CENTER ..........................................................................................................28
Please check www.sitecom.com for up to date drivers & utilities, manuals and support
8.1
8.2
8.2.1
8.2.2
8.2.3
8.3
8.4
8.5
8.6
USING TOOLS OF CONTROL CENTER ..............................................................................................28
SETTING UP SERVER CONFIGURATION ............................................................................................28
GENERAL CONFIGURATION ......................................................................................................28
TCP/IP ....................................................................................................................................28
SUPPORTED PROTOCOLS ..........................................................................................................29
USER ACCOUNTS ...........................................................................................................................30
SNMP ..........................................................................................................................................31
EMAIL ..........................................................................................................................................32
MAINTENANCE ..............................................................................................................................33
9. THE SERVER’S WEB PAGES..................................................................................................................35
9.1
9.2
9.2.1
9.3
9.3.1
9.3.2
9.3.3
9.4
9.4.1
9.4.2
9.4.3
9.5
9.5.1
9.5.2
9.5.3
INTRODUCTION ..............................................................................................................................35
USING THE SERVER’S WEB PAGES .................................................................................................35
DISPLAYING SERVER STATUS ...................................................................................................35
BASIC SETTINGS ............................................................................................................................35
GENERAL CONFIGURATION ......................................................................................................35
TCP/IP CONFIGURATION .........................................................................................................36
PROTOCOLS CONFIGURATION ..................................................................................................36
ADVANCED SETTINGS ....................................................................................................................37
USER ........................................................................................................................................37
SNMP .....................................................................................................................................38
EMAIL ......................................................................................................................................39
TOOLBOX .......................................................................................................................................39
FIRMWARE UPGRADE ...............................................................................................................39
RESTART ..................................................................................................................................40
RESTORE ..................................................................................................................................40
10. RESTORE FACTORY DEFAULTS .........................................................................................................41
10.1
10.2
10.3
USING THE CONTROL CENTER .......................................................................................................41
USING THE SERVER’S WEB PAGES .................................................................................................41
USING INIT BUTTON.......................................................................................................................41
11. UPGRADE FIRMWARE ........................................................................................................................42
11.1
11.2
11.3
USING THE CONTROL CENTER .......................................................................................................42
USING THE SERVER’S WEB PAGES .................................................................................................43
USING THE INIT BUTTON AND THE TFTP CLIENT ...........................................................................43
12. THE INIT BUTTON ...............................................................................................................................44
Sitecom Multi Functional USB server LN-309
2. Introduction
2.1 Thank you
Thank you for buying the Sitecom Multi Functional USB Server LN-309. With this product you will be
able to connect your AIO/MFP (All-In-One/Multifunction Peripheral), printers, USB mass storages (hard
drives, flash drives, and memory card readers), and scanners, to your network, allowing all network
users access to these shared USB devices.
2.2 About this Manual
This manual provides introductory information as well as detailed instructions on how to set up and
manage LN-309 in various network environments.
Note:
To reload the Factory Parameters, you can reset this Server back to Factory Defaults, which will restore
most of the settings. For details, please refer to chapter 10; Restore Factory Defaults.
Note:
Should you require any technical assistance, please contact your product reseller. Or you can visit our
website at http://www.sitecom.com for latest product information. This document is subject to
changes without prior notice.
Please check www.sitecom.com for up to date drivers & utilities, manuals and support
3. Product Overview
3.1 Package Contents
•
•
•
•
•
The MFP Server (LN-309)
CD-Rom (Control Center software, User’s Manual and Quick Installation Guide)
Power Adapter
Warranty Card
Quick Installation Guide (printed manual)
3.2 Physical Description
1.
2.
3.
4.
5.
Power Adaptor Connector: 12V/1A adaptor
Init Button: restore the parameters to the default values
Ethernet Connector: a twisted pair category 5 cable
USB Host Port: USB 1.1/2.0 low, full, and Hi-Speed compliant
Indicators
3.2.1 LED Indicators
Indicators
Power
Link
Status
USB
Color/Behavior
Green
Not lit
Green
Not Lit
Green blinking
Not lit
Green
Green blinking
Not lit
Description
Power On
Power off/System error
Network connected
No physical connection to network
Activity on network
No activity on network
USB device connected
Connected USB device error
No physical connection to USB device
Sitecom Multi Functional USB server LN-309
3.3 Features and Benefits
This Server provides the following features and benefits:
•
Reliability: The Server provides high performance and reliability combined with low power
consumption.
•
Flexibility: The Server supports print/File/Scan sharing in all major computer systems and
environments.
•
Easy to Install: The Server installs, operates, and is managed in a reliable and easy fashion.
•
Security: You can assign an administrator login name and password to restrict access.
•
Monitoring: The Server’s web pages and user software allow you to continuously monitor the
status of connected USB devices.
•
Future Proof: The firmware stored in the Server’s Flash memory can be upgraded over the
network. This allows you to quickly update and enhance its operational features when new
Server software becomes available.
Please check www.sitecom.com for up to date drivers & utilities, manuals and support
4. Basic Installation & Configuration
4.1 Connecting the Hardware
•
Make sure that your USB devices are switched off and that the Server’s Power Adapter is
disconnected.
•
Connect the USB devices to the USB port with the USB cables.
•
Connect the MFP Server to your modem or wireless router with an Ethernet cable.
•
Turn on the USB device and make sure it’s ready to use.
•
Connect the Power Adapter to the MFP Server. The power indicator will light up and the
indicator will flash. When the Link indicator lights up, the Server is correctly connected to the
network. When the USB indicator stops flashing, the Server is ready to use.
4.2 Assigning an IP Address to the Server
Note:
Before starting to search the MFP server, please ensure all Firewall applications are turned off (or
unblock the Control center software in your Firewall settings.
4.2.1 Preliminary
•
If you have a DHCP server in your network, your MFP Server will receive an IP address
automatically. The IP address will then appear in the Control Center or on the configuration
report that you printed earlier. If your DHCP server does not give an IP address to the MFP
Server, the MFP Server will use the Factory IP address: 192.168.0.220.
•
If you are not working in a DHCP network, you need to manually set the Server’s IP address.
•
To do this, please connect the MFP server directly to your PC. Change the IP settings on your
computer to match the range of the MFP server Factory IP address (192.168.0.220). For
example, temporarily change the IP-address on your computer to ‘192.168.0.200’.
4.2.2 Manual Setting for Server’s IP address
•
Press Start -> Control Panel. Then select “Network and Internet Connections” and click
“Network Connections”.
•
Double click the “Network Connection” icon. Under the “This connection uses the following
items”, select the “Internet Protocol (TCP/IP)”. And then click “Properties” button.
Sitecom Multi Functional USB server LN-309
•
Select “Use the following IP address”. And then put the factory default IP
<192.168.0.200> and Subnet mask <255.255.255.0>. Then click “OK” to finish the setting.
•
Then Sitecom MFP can directly be found in the Control Center.
Please check www.sitecom.com for up to date drivers & utilities, manuals and support
4.2.3 Installing Control Center software
•
Install the LN-309 Control Center by running the Autorun CD.
•
Click Install Control Center to start the installation.
•
Click Next to start.
•
•
Enter the User Name & Company Name. And then click Next.
Then click Next, until you click the Finish to complete the installation.
Sitecom Multi Functional USB server LN-309
4.2.4 Setting the IP Address Using the Control Center
•
Start the Control Center. The Main window will open. (Detailed information about the server
and the printer will be shown when the ‘Server Information’ button is pressed.)
Note:
If the Control center cannot find the MFP server, please check and make sure Firewall and Anti Virus
software is “Off”. Then try searching the MFP server again by pressing the “Refresh Server List” icon.
•
If the tool finds multiple Servers in your local area network, then you have to select one Server
from the Server List.
•
Double click the highlight list and enter the Server’s administrator (default: admin) and
password (default: admin).
•
After you have logged in successfully, select TCP/IP from the Server’s menu. The IP Address
Setting dialog is shown.
Please check www.sitecom.com for up to date drivers & utilities, manuals and support
•
Click the button corresponding to your choice of IP setting method (static or dynamic using
DHCP). When assigning a static IP address you also have to define Subnet Mask and Default
Gateway. If you choose Automatically get IP by DHCP, you can use desired DNS by clicking
the Manual DNS button and manually assigning a DNS.
•
Click Apply to save your settings. The Server will now reboot.
•
You have now finished the procedure of setting up the IP address.
4.2.5 Setting the IP Address Using the Server’s Web Pages
•
Please press the “Goto Homepage” icon. The IE Browser will be opened.
•
Please enter the Server’s administrator (default: admin) and password (default: admin).
Sitecom Multi Functional USB server LN-309
•
A web page “System Status” is shown. Please click Basic Settings.
•
And then click the TCP/IP setting.
Please check www.sitecom.com for up to date drivers & utilities, manuals and support
•
Select the button which corresponds with your choice of IP settings (static or dynamic using
DHCP). When assigning a static IP address you also have to define Subnet Mask and Default
Gateway.
•
Click Submit to save your settings. The Server will then reboot. You have now finished the
procedure of setting up the IP address.
Sitecom Multi Functional USB server LN-309
5. Print Server in Windows
5.1 Connecting the Server
To configure your Server correctly, you should know which type of network topology your Server
connects to.
5.1.1 The Server and Windows PC on LAN
PC
LAN HUB/Switch
USB Printer
MFP
Server
PC
5.1.2 Setting up Local Windows Printer Driver
You are advised to install your Windows printer driver in advance. For most printers, you can install the
printer drivers with the following procedure:
•
•
•
•
•
5.1.3
Click Start, click Control Panel, click Printers and Other Hardware, and then click
Printers and Faxes.
Double click Add Printer to start the Add Printer Wizard, and then click Next.
Click Local printer, clear the Automatically detect and install my Plug-n-Play printer
check box to avoid having to wait for the completion of another printer search, and then click
Next. If you leave this option selected, Windows will attempt to find the printer itself and figure
out what kind it is. If Windows does not find the printer, the wizard will continue as described
in this task.
Select a Windows driver for your printer. Click Next.
Choose whether you want to share the printer with other network users. Do you want to print
a test page? Select the appropriate radio button and click Next and Finish.
Adding Network Printers in Windows
Follow the instructions below to use the standard Windows Add Printer Wizard and the Control Center
for adding a network printer in Windows 2000 and XP.
Note:
Before adding a network printer, you are advised to install the local Windows printer driver in advance.
Please check www.sitecom.com for up to date drivers & utilities, manuals and support
Before using network printer, you have to turn on “Use Printer Online” in installed network printer driver
and then you can use the printer.
6. File Server
The File Server function of the MFP Server which allows USB storage devices to be shared across a
network by using SMB: NetBIOS over TCP/IP and FTP protocol.
6.1 Preliminary
•
This product supports FAT12/16/32 and NTFS file system. However, NTFS is only supported in
NetUSB mode. Please refer to the Storage Access Mode.
•
Sitecom is not responsible for the loss or corruption of data in memory devices, including hard
disks; Sitecom is not responsible for leaking, manipulation, loss, or corruption of data (after
unauthorized access) on memory devices connected to the Server.
•
In order to use the USB Mass Storage device connected to the Server, the SMB protocol or FTP
protocol must be set up.
•
This product does not support magnetic optical drive devices such as a CD-/DVD-ROM.
•
This product allows to share a USB storage device over the network.
•
This product does not support USB devices through a USB hub.
6.2 Connecting USB Mass Storage to the Server
LAN HUB/Switch
MFP Server
Storage
Sitecom Multi Functional USB server LN-309
6.3 Supported Codepages
The Server supports Windows codepages. If users want to communicate with the Server using an FTP
client tool or SMB on Windows 2000, they have to set their Server codepage as the codepage that their
Windows PC is using.
6.3.1 Configuring the Server’s Codepages
•
Open the Control Center.
•
Select the MFP Server from the Server List.
•
Double click the highlighted option in the list or click Configure Server, and enter the Server’s
interface using administrator username (default: admin) and password (default: admin).
•
After you have logged in successfully, the General Configuration dialog appears.
•
Select your codepage from the File Server Codepage box and click Apply.
6.4 Adding Your USB Mass Storage devices with Security to your Network
You can use the following protocols to share your USB Mass Storages with user level security in
network:
•
SMB/CIFS: NetBIOS over TCP/IP
•
FTP
The protocols are shown in the Supported Protocols box of the Control Center or the Server’s web
pages.
6.4.1 Setting up File Server Using the Control Center
Please check www.sitecom.com for up to date drivers & utilities, manuals and support
•
Open the Control Center
•
Select the MFP Server from the Server List.
•
Double click the highlighted option in the list or click Configure Server, and enter the Server’s
interface using administrator username (default: admin) and password (default: admin).
After you have logged in successfully, click Supported Protocols.
•
6.4.2 Setting up File Server Using Web Pages
•
Open the Control Center
•
Select the MFP Server from the Server List.
•
Click Goto Homepage, and enter the Server’s interface using the administrator username
(default: admin) and password (default: admin).
•
After you have logged in successfully, Select Basic Settings.
•
And click Protocol.
Sitecom Multi Functional USB server LN-309
6.4.3 Set up File Server Configuration
6.4.3.1 Set SMB/CIFS Print/File Server
•
Enable SMB/CIFS Print/File Server: select the item, if you want to support SMB/CIFS
print/File server.
•
Enable Internet Access: clear the item, if you do not allow that users can access your
SMB/CIFS server via Internet. If you select the item, you allow Internet users can access your
storage using the SMB/CIFS protocol.
•
Enable Server Authentication: select the item, if you want to share your storage or printer
with user level security which requires user name and password to login. If you clear the item,
your storage will be shared without security.
6.4.3.2 Set FTP Server
•
Enable FTP Server: select the item, if you want to support FTP server.
•
FTP port: enter the desired FTP port. The default value is 21.
•
Maximum Session Number: select the item and fill in desired number.
•
Enable Passive Mode: select the item, if you want to allow your FTP server to accept the
passive mode command.
•
Enable Server Authentication: select the item, if you want to share your storage with user
level security which requires user name and password to login. If you clear the item, your
storage will be shared without security.
Please check www.sitecom.com for up to date drivers & utilities, manuals and support
•
Allow Anonymous Login: select the item, if you want to allow the user “anonymous” to
login to your FTP server with read-only permission and the Server will not check the password.
If you clear the item, your FTP server will not support anonymous login function.
6.4.3.3 Storage Access Mode:
•
To use FTP and SMB/CIFS to access storage, please set the storage access mode to the server
mode. For the NetUSB mode, please refer to < 7.3.5 NetUSB mode for USB storage >.
6.5 Using Shared Storages by SMB/CIFS Method for Windows
•
Connect a USB storage device to this product.
•
Select My Network Places
•
Click View workgroup computers
•
Enter the MPF server by double clicking on the LN-309(Sitecommfp) icon.
•
Then you can enter the USB storage device.
•
If you cannot find Workgroup name of the Server in Microsoft Windows Network, you can press
Search. And then enter the Host Name of the MFP Server (For example, default Host Name
“sitecommfp” or the Server’s IP address) to find it.
•
Double click this Host Name icon.
•
The shared folders will be listed as USB1_DyPz, where Dy represents the y-th disk and Pz
represents the z-th partition.
•
Perform Open, Paste, Remove or Copy the files to the shared folders.
Note:
Another way to use shared storages by SMB/CIFS method : In Control Center, click the “Network
Storage” button.
Sitecom Multi Functional USB server LN-309
6.6 Using Shared Storage by FTP Methods for Windows
•
Open Microsoft Internet Explorer.
•
In the Web Address List, enter the command: “ftp://Server’s Host Name“ or “ftp://Server’s
IP address”. If you have changed the default FTP port : 21 to the new value, you have to add
the new port number behind the command (e.g. “ftp://Server’s Host Name: ftp port” or
“ftp://Server’s IP address: ftp port”).
•
Enter the Server’s administrator username (default: admin) and password (default: admin).
•
If you set Enable Server Authentication in FTP server protocol settings you have to
enter a user name and password to login to the Server; if you set Allow Anonymous Login,
you can use the user name “anonymous” to login with Read-only permissions. If you clear the
Server authentication, you do not need a username or password to login to the Server. You can
add a user name and password in the User Account box in the Control Center or the Server’s
Web pages.
•
The shared folders will be listed in Internet Explorer.
•
Here you can Paste, Remove or Copy the files from/to the shared folders.
Please check www.sitecom.com for up to date drivers & utilities, manuals and support
7. NetUSB Mode
7.1 Introduction
The Sitecom LN-309 has a totally different technology “NetUSB”, to deal with printers and scanners
(MFPs).
•
For printers, some special kinds of printers, such as GDI printers or host-based printers, can
not work well with traditional print server technology. Users should use the NetUSB mode to
deal with these kinds of printers.
•
For MFPs or scanners, the NetUSB mode is able to support almost all models from all
MFP/scanner vendors.
•
For USB mass storage, such as USB hard drives and flash drives and card readers on some
kinds of MFPs, users can also use the NetUSB mode to access them in single-user mode. By this
way, NTFS file system is supported for read/write.
Note:
The default storage access mode is server mode.
7.2 Connect & Disconnect
“NetUSB” allows you to use USB printers or USB storage devices directly, even when they’re actually
connected to the Sitecom LN-309 USB MFP server.
The “connect” operation is a software operation that simulates an actual USB device plug-in. Therefore,
when you do a “connect” operation in the Control Center, PC can detect a USB device’s plug-in, although
actually you do not plug in any USB device to your PC. Similarly, the “disconnect” operation is a
software operation that simulates the disconnection of the USB device.
Note:
If a USB device is “connected” by a PC, we say that PC has the ownership of the USB device. Only one
PC can get the ownership of a USB device at the same time.
7.3 How to Use
7.3.1 Remote Installation
Before using the NetUSB technology, you must first make sure that your PC can access the Sitecom USB
MFP server via TCP/IP. The simplest way to do this is using “Control Center” to search for the Sitecom
USB MFP server on the network and change its IP address to be the same subnet as your PC. If the MFP
server and your PC are not in the same TCP/IP subnet, Control Center will show the MFP server in
green, as the following figure.
Sitecom Multi Functional USB server LN-309
You must change the IP address of the MFP server (or use DHCP) so that the MFP server and your PC
are in the same subnet. Control Center will show these MFP servers in blue, meaning you can safely
access these MFP servers by the NetUSB technology
The steps to do remote installation for USB devices, like MFPs:
•
Turn on Sitecom LN-309 and the USB device.
•
Connect the USB device to Sitecom LN-309. The LED of the USB port will light.
•
Run the Control Center. In the “USB MFP Server List” window, you can see the host names and
IP addresses all of the Sitecom LN-309 servers (in blue) on the network, as shown below.
•
Click the server. Then all USB devices attached to the server will be shown.
Please check www.sitecom.com for up to date drivers & utilities, manuals and support
•
Please follow the user manual of the USB device to install its driver. For example, you may put
the driver CD of the USB device in the CDROM player to install the driver.
•
When you are asked to plug in the USB device into PC’s USB port, click the desired USB device
in the Control Center and then click the “Auto-Connect Printer” button to do the connect
operation and get the ownership of the USB device. The computer name of the device owner
will be shown at the end of the device.
•
PC will automatically detect that the USB device is plugged-in. On the right side of the Windows
Task Bar, you can see the information of the new device. Continue to follow the user manual of
the USB device to do the rest jobs of installation, until the driver installation has finished.
After the installation, you can see the newly created devices on the PC. If the USB device is a MFP, you
can see a new printer and a new scanner from the “Control Panel”.
7.3.2 NetUSB Printing using Auto-Connect Printer
After the driver is installed, you can see a newly created printer in the Control Panel. Follow the steps
below to perform NetUSB printing.
•
•
•
In the Control Center, click the MFP server that has the desired printer (or MFP) attached.
Click the desired printer (or MFP).
Click the “Auto Connect Printer” button and choose “Set Auto-Connect Printer”. The following
figure will appear.
•
Choose the desired printer. The desired printer must be the Windows printer (this is a logical
printer) that matches the printer attached on the MFP server (this is a physical printer). Then
click the “Apply” button.
Sitecom Multi Functional USB server LN-309
•
Then, the printer will be marked as an “Auto-Connected Printer” in red.
•
If you choose “Auto-Connected Printer List” in the “Tools” menu, you can see a newly created
item that describes the association between the Windows printer and the physical printer on
the server.
Please check www.sitecom.com for up to date drivers & utilities, manuals and support
•
Then try to issue a print job to the desired printer. You will see the Control Center will
automatically do a connect operation and, once the print job finished, it will hold the connection.
However, the connection will be released immediately when another user do the printing
afterward. At the same time, the printer is automatically disconnected with your PC.
•
When you do a print job again. The control center will automatically do a connecting operation
on printing again. This is so-called “Auto Connect / Disconnect” operation.
Note:
Under the “Auto-Connected Printer” setting, it is NOT necessary to manually press the “Connect”
button when printing. If you press the “Connect” button for printing, please make sure to click
“Disconnect” button after you finish the printing. Otherwise, other users cannot print properly. It
is because you are the only ownership of the connected printer.
•
You can make the Control Center be run automatically after you login Windows. To do this, you
choose the “Configuration” item in the “Tools” menu. The following window will appear. Click on
the check box and then on the “OK” button. This feature is enabled by default.
•
If you would like to break the association between the Windows printer and the physical printer,
just highlight the association and click the “Delete” button in the “Auto-Connected Printer List”.
7.3.4 NetUSB Scanning using Network Scanning
•
In the Control Center, click the MFP server that has the desired MFP attached.
•
Click the desired MFP.
•
Click the “Network Scanner” button.
Sitecom Multi Functional USB server LN-309
•
Then you can see that the Control Center will automatically do a “connect” operation. The
following window will appear.
•
Choose one of TWAIN or WIA item. Click “OK”. The following window will appear.
•
Follow the usual steps to do scanning.
7.3.5 NetUSB mode for USB Storage
Please check www.sitecom.com for up to date drivers & utilities, manuals and support
Before you use NetUSB technology to access USB storage, please make sure the storage access mode
is in NetUSB mode. For detail setting, please refer to <8.2.3 Supported Protocols >
•
In the Control Center, click the MFP server that has the desired USB storage device attached.
•
Click the desired USB storage device.
•
Click the “Connect” button to manually connect the USB storage device.
•
Now your PC will have a new disk. For example, if you connect a flash drive, your PC will have
a new “removable disk”. You can see the storage icon in the system tray.
•
•
Just use the new disk as a normal drive.
After you finish the disk operations, click the storage icon in the system tray and choose “Safely
remove USB Mass Storage Device”.
•
•
In the Control Center, click the “Disconnect” button to disconnect the USB storage device.
Please note that FAT32 and NTFS file system can be fully supported.
Note:
Only one PC can get the ownership of the same USB device at the same time. In other words, the PC
connects the USB device directly & independently, other PCs can not “access” this USB device. Until the
USB device is disconnected by the user.
Note:
For USB storage, although NTFS can be supported by the NetUSB technology, it can not be shared
among network users.
Sitecom Multi Functional USB server LN-309
8. Using the Control Center
8.1 Using Tools of Control Center
You can use the following tools to help you use the server:
•
•
•
•
•
Refresh Server List: renew to auto search the existing servers on the network.
Configure Server: configure the highlighted MFP server.
Goto Homepage: go to the web pages of the highlighted MFP server.
Auto-Connect Printer: perform set printer function of the highlighted MFP server.
Connect: Connect your printer, or access the network storage by SMB/CIFS method. The
storage access mode must be in Server Mode.
Note:
You can also right-click the mouse button on the highlighted MFP server to get the “Configure Server”,
“Goto Homepage”, “Set Printer”, and “Network Storage” functions.
Note:
You can also double-click on the highlighted server to get the “Configure Server” function.
8.2 Setting up Server Configuration
Click the “Configure Server” button to setup the highlighted MFP server. Then type the administrator ID
and password to login.
8.2.1 General Configuration
•
•
•
•
Server Name: the name to represent the Server for using SMB protocol
Workgroup: the name of the SMB workgroup that the Server belongs to.
Description: optionally set to describe the Server.
File Server Codepage: generally, the criteria of choosing codepage are based on your
Windows codepage.
8.2.2 TCP/IP
To set the MFP server’s TCP/IP configuration and connect TCP/IP network, please see < 4.2.4 Setting
the IP address Using the Control Center > for details.
Please check www.sitecom.com for up to date drivers & utilities, manuals and support
8.2.3 Supported Protocols
•
•
•
•
•
•
•
LPR (Line Printer Remote) Printing: select or clear LPR Printing support. It is enabled in
Factory Default.
IPP Printing: select or clear IPP Printing support. It is enabled in Factory Default.
Raw TCP/ Jet Direct Printing: select or clear Raw TCP / jet Direct Printing support. It is
enabled in Factory Default and set some parameters as below :
TCP Port: Set TCP port for the printer on the USB1 port (default: 9100)
SMB/CIFS Print/File Server: select or clear SMB/CIFS Print/File Server support. It is
enabled in Factory Default
Internet Access: select or clear Internet Access support. If you clear the item, you do not
allow that users can access your SMB/CIFS server via Internet. If you select the item, you allow
Internet users to access your storage using the SMB/CIFS protocol.
Server Authentication: select or clear Server Authentication support. Select the item, if you
want to share your storage or printer with user level security which requires user name and
password to login. If you clear the item, your storage will be shared without security.
•
UPnP (Universal Plug and Play): select or clear ‘Enable UPnP support’. It is enabled in
Factory Default.
•
FTP Server: select or clear FTP Server support. It is enabled in Factory Default and set some
parameters as below :
FTP Port: enter an integer number to set FTP server’s TCP port (default: 21)
Maximum Session Number: enter or clear Maximum Session Number support. You can limit
the number of FTP sessions by selecting the support and enter an integer to set the allowable
maximum session number. If you clear the support, it means that FTP server will have not any
limitation in session number. (default :5)
Set Passive Mode: select or clear Set Passive Mode support that FTP server can accept
passive mode.
Server Authentication: select or clear Enable Server Authentication support. If you select
the support, you need to enter user name and password to login to the Server. If you clear the
support, you do not need user name and password to enter the Server.
Allow Anonymous Login: select the item, if you want to allow the user “anonymous” to login
to your FTP server with Read-Only permission and FTP server will not check the password. If
you clear the item, your FTP server will not support anonymous login function
•
•
•
•
•
•
•
•
Storage Access Mode : select Server mode (default) or NetUSB mode. And set some
parameters as below :
Server Mode : In this mode, you can access the USB storage via FTP or SMB/CIFS protocols.
Only FAT16/32 file format is supported in this mode. This is the default mode.
NetUSB Mode: In this mode, you can access the USB storage using NetUSB technology. In this
mode, FAT16/32 and NTFS file formats are supported, but only one user is allowed to access
the storage at the same time. Please refer to <7. NetUSB mode> for the details.
Sitecom Multi Functional USB server LN-309
8.3 User Accounts
•
•
•
New Administrator: enter your desired administrator name.(default : admin)
New Password: enter your desired password
Retype Password: confirm your previous password typing.
Then, please click the Set button to complete and save the new settings.
Note:
If you forgot the administrator username and password, you must perform Restore Factory Default
action by plugging in the power adaptor while pressing the Init button. Please refer to the “10. Restore
Factory Defaults”.
•
•
•
User name: add a new user account for accessing the storage attached to the Server.
Password: set a password for the added user.
Permission: select Read-Only or Read-Write permissions to access File servers.
•
Add: click the Add button, enter the user name and corresponding password, and Permission
selection. The account will take effect once shown in the list below.
Delete: delete the existing user account.
•
Please check www.sitecom.com for up to date drivers & utilities, manuals and support
8.4 SNMP
•
•
•
•
•
•
•
•
•
•
•
Authentic Community: set Community name of SNMP server.
Trap Community: set Trap Community name for SNMP server to send trap packets.
Trap Address: enter an IP address to send the Trap packet.
SysContact: enter some letters for variable SysContact that represents the name of system
contact.
SysName: enter some letters for variable SysName that represents the name of system.
SysLocation: enter some letters for variable SysLocation that represents the location of
system.
EnableAuthenTrap: enter 1 or 2 for the variable EnableAuthenTrap that represents to enable
(1) or disable (2) to send Trap packets receiving the wrong Community name.
SNMP V3: select or clear SnmpV3 support.
User Security name: set user security name of SNMP v3
Auth Password: set authentication password of SNMP v3.
Privacy Password: set privacy password of SNMP v3
Sitecom Multi Functional USB server LN-309
8.5 Email
If you want to receive alert mails from the Server, you have to enable SMTP Protocol, and set Email
configuration. You can set new SMTP port number (default: 25)
•
•
•
•
•
•
•
SMTP Protocol: select or clear SMTP support
SMTP Server Name: enter your SMTP server’s Host Name or IP address.
SMTP Port Number: set new SMTP server’s TCP port number (default: 25)
Subject: enter the subject of the e-mail.
From Address: enter the sender’s e-mail address.
To Address: enter the sender’s e-mail address.
Cc: stands for carbon copy; enter an e-mail address to send that mail to a second person.
•
SMTP Server requires authentication: login to remote SMTP server which requires
authentication.
Account Name: enter account name for remote SMTP server.
Password: enter account’s password for remote SMTP server.
•
•
Please check www.sitecom.com for up to date drivers & utilities, manuals and support
8.6 Maintenance
To restart the Server, restore the Server to factory defaults, download new firmware file from product’s
public website and upgrade new firmware.
•
•
•
Restart Server: click this button, the Server will restart
Factory Default: click this button, the Server will restore factory default values.
Download New Firmware: click this button to download new firmware or user software from
our website http://www.sitecom.com.
•
Upgrade Firmware : click Open and find the firmware file to be upgraded. Click Upload to
start the firmware upgrade into the MFP Server.
Sitecom Multi Functional USB server LN-309
Note:
The Control Center doesn’t really quit if you click the “X” box (close box) at the top right corner of the
window. Instead, it just minimizes itself to the system tray. There are two ways to really close the
Control Center. The first way is choosing “Exit” item in the “File” menu in the Control Center. The second
way is right-clicking the icon of the Control Center in the system tray and choosing the “Exit” option.
Please check www.sitecom.com for up to date drivers & utilities, manuals and support
9. The Server’s Web Pages
9.1 Introduction
By using the web pages to see the Server’s system status and configure the Server.
9.2 Using the Server’s Web Pages
9.2.1
•
•
•
•
•
Displaying Server Status
In the Control Center, click the MFP server.
Click the “Goto Homepage”.
Enter the administrator and password (default : admin/admin)
Then, the System status of MPF server’s information is shown.
Information is including with System, TCPIP and Protocol status.
9.3 Basic Settings
9.3.1 General Configuration
•
•
•
•
Server Name: the name to represent the Server when using SMB protocol
Workgroup: the name of the SMB workgroup that the Server belongs to.
Description: optionally set to describe the Server.
File Server Codepage: generally, the criteria of choosing codepage are based on your
Windows codepage.
Sitecom Multi Functional USB server LN-309
9.3.2 TCP/IP Configuration
To set the MFP server’s TCP/IP configuration and connect TCP/IP network, please see < 4.2.5 Setting
the IP address Using the Server’s Web Pages > for details.
9.3.3 Protocols Configuration
•
•
•
•
•
•
•
•
•
•
LPR (Line Printer Remote) Printing: select or clear LPR Printing support. It is enabled in
Factory Default.
IPP Printing: select or clear IPP Printing support. It is enabled in Factory Default.
Raw TCP/ Jet Direct Printing: select or clear Raw TCP / jet Direct Printing support. It is
enabled in Factory Default and set some parameters as below :
TCP Port : Set TCP port for the printer of USB1 port (default: 9100)
TCP Port : Set TCP port for the printer of USB2 port (default: 9101)
SMB/CIFS Print/File Server: select or clear SMB/CIFS Print/File Server support. It is
enabled in Factory Default
Internet Access: select or clear Enable Internet Access support. If you clear the item, you do
not allow that users can access your SMB/CIFS server via Internet. If you select the item, you
allow Internet users can access your storage using the SMB/CIFS protocol.
Server Authentication: select or clear Server Authentication support. Select the item, if you
want to share your storage or printer with user level security which requires user name and
password to login. If you clear the item, your storage will be shared without security.
FTP Server: select or clear FTP Server support. It is enabled in Factory Default and set some
parameters as below :
FTP Port: enter an integer number to set FTP server’s TCP port (default: 21)
Please check www.sitecom.com for up to date drivers & utilities, manuals and support
•
•
•
•
•
•
•
•
Maximum Session Number: enter or clear Maximum Session Number support. You can limit
the FTP session number by selecting the support and enter an integer to set the allowable
maximum session number. If you clear the support, it means that FTP server will have not any
limitation in session number. (default :5)
Set Passive Mode: select or clear Set Passive Mode support that FTP server can accept
passive mode.
Server Authentication: select or clear Enable Server Authentication support. If you select
the support, you need to enter user name and password to login to the Server. If you clear the
support, you do not need user name and password to enter the Server.
Allow Anonymous Login: select the item, if you want to allow the user “anonymous” to login
to your FTP server with Read-Only permission and FTP server will not check the password. If
you clear the item, your FTP server will not support anonymous login function
UPnP (Universal Plug and Play): select or clear Enable UPnP support. It is enabled in
Factory Default.
Storage Access Mode : select Server mode (default) or NetUSB mode. And set some
parameters as below :
Server Mode : In this mode, you can access the USB storage via FTP or SMB/CIFS protocols.
Only FAT16/32 file format is supported in this mode. This is the default mode.
NetUSB Mode: In this mode, you can access the USB storage using NetUSB technology. In this
mode, FAT16/32 and NTFS file formats are supported, but only one user is allowed to access
the storage at the same time. Please refer to < 7. NetUSB mode > for the details.
9.4 Advanced Settings
9.4.1 User
•
Administrator: enter your desired administrator username.(default : admin)
Sitecom Multi Functional USB server LN-309
•
•
New Password: enter your desired password
Retype Password: confirm your previous password typing.
Note:
If you forgot administrator username and password, you must perform Restore Factory Default action
by plugging in the power adaptor while pressing the Init button. Please refer to the “10. Restore Factory
Defaults”.
•
•
•
User name: add a new user account for accessing the storage attached to the Server.
Password: set a password for added user.
Permission: select Read-Only or Read-Write permission to access File servers.
•
Add: click Add button, after entering the user name, corresponding password, and Permission
selection. The account will take effect once shown in the blank below.
Delete: delete the existing user account.
•
9.4.2 SNMP
•
•
•
•
•
•
•
Authentic Community: set Community name of SNMP server.
Trap Community: set Trap Community name for SNMP server to send trap packets.
Trap Address: enter an IP address to send the Trap packet.
SysContact: enter some letters for variable of SysContact that represents the name of system
contact.
SysName: enter some letters for variable of SysName that represents the name of system.
SysLocation: enter some letters for variable of SysLocation that represents the location of
system.
AuthenTrap: To enable or disable to send Trap packets receiving the wrong Community name.
Please check www.sitecom.com for up to date drivers & utilities, manuals and support
•
•
•
•
SNMP V3: select or clear SnmpV3 support.
User Security name: set user security name of SNMP v3
Auth Password: set authentication password of SNMP v3.
Privacy Password: set privacy password of SNMP v3
9.4.3 Email
If you want to receive alert mails from the Server, you have to enable SMTP Protocol, and set Email
configuration. You can set new SMTP port number (default: 25)
•
•
•
•
•
•
SMTP Protocol: select or clear SMTP support
SMTP Server Name: enter your SMTP server’s Host Name or IP address.
SMTP Port Number: set new SMTP server’s TCP port number (default: 25)
Subject: enter the subject of the e-mail.
From Address: enter the sender’s e-mail address.
Cc: stands for carbon copy; enter an e-mail address to send that mail to a second person.
•
SMTP Server requires authentication: login to remote SMTP server which requires
authentication.
Account Name: enter account name for remote SMTP server.
Password: enter account’s password for remote SMTP server.
•
•
9.5 Toolbox
9.5.1 Firmware Upgrade
Click Browse to find the latest firmware file and do the firmware upgrade. Click Upload to start the
firmware upgrade into the MFP Server.
Sitecom Multi Functional USB server LN-309
9.5.2 Restart
Click the Apply button, the Server will be restarted.
9.5.3 Restore
Click the Apply button, the Server will restore factory default settings and then restart.
Please check www.sitecom.com for up to date drivers & utilities, manuals and support
10. Restore Factory Defaults
10.1 Using the Control Center
•
Start the Control Center.
•
If the tool finds Servers in your local area network, then you have to select a Server from the
Server List.
•
Double click the highlighted option or click the Configure Server icon. Then enter the Server’s
administrator username (default: admin) and password (default: admin).
•
After you have logged in successfully & select Maintenance. The Maintenance dialog
appears.
•
Click Factory Default.
10.2 Using the Server’s Web Pages
•
Go to the Server’s web page or click the Goto Homepage under the control center.
•
Enter administrator username (default: admin) and password (default: admin).
•
Click Toolbox and the click Restore.
•
A Restore Factory Default Settings screen is showing. And then click Apply.
10.3 Using Init Button
Note:
Before start to do the reset, please do power off and on the MFP device. It is easy to do by removing
the power plug & plug-in the unit again.
•
Press and hold the Init button
•
As the same time, please remove the power adaptor plug and plug in again
•
Release the Init button. At this moment, the LED indicator for the USB port blinks.
•
After that, remove the power adaptor & plug in to restart the server. At this moment, the LED
indicator will blink alternatively.
Finally, the Server will operate using the Factory Default values.
Sitecom Multi Functional USB server LN-309
11. Upgrade Firmware
Note:
Before starting to upgrade the firmware, please do power off and on the MFP device. It is easy to do
by removing the power plug & plugging-in the unit again.
11.1 Using the Control Center
•
Open Control Center. It will automatically search the existing Servers and display their status.
Note:
Before starting to search our MFP server, please ensure all the Firewall application software are off or
unblock the Control center software under the Firewall software setting.
•
Select the Server that you want to upgrade the firmware. Double click the selected Server and
enter Administrator username (default: admin) and Password (default: admin).
•
Select the Maintenance button.
•
Click Open to find your new firmware file and click Upload to start upgrading the firmware.
•
Wait for 20 seconds for system reboot.
Note:
After finish to upgrade the firmware, please do power off and on the MFP device again in order to
make sure the MFP server is reset. And it is easy to do by removing the power plug & plug-in the unit
again.
Please check www.sitecom.com for up to date drivers & utilities, manuals and support
11.2 Using the Server’s Web Pages
•
Power on the Server. Suppose that the Server is in DHCP mode
•
Check the Server's IP address.
•
First, run Control Center. It will automatically search for Servers on the LAN. Then Servers’ IP
addresses will be shown in Control Center.
•
Run any Web browser, like Microsoft Internet Explorer. Go to “http://Server’s IP address “or
“http://Server’s Host Name” to access the Server's home page.
•
Login to the Server’s interface with Administrator username (default: admin) and Password
(default: admin).
•
Click Toolbox at the top of the menu.
•
Select Upgrade
•
Click the Browse button to choose the file of new firmware.
•
Click the Upload button to start firmware upgrade.
•
Wait for 15 seconds for system reboot.
11.3 Using the Init Button and the TFTP Client
•
Plug in the power adaptor while pressing the Init button until the LED indicators of Power and
USB blink.
Sitecom Multi Functional USB server LN-309
Note:
Please note that after that, the Server will operate using the factory default values after restarting, i.e.,
your Server’s configuration will recover to Factory Default values.
•
•
Start the TFTP client Tool: Image Burner
Press Start -> All Programs -> Sitecom -> Multi-Function Printserver Control Center -> Image
Burner.
•
Enter the Server’s Fallback IP address: 192.168.0.100 and click Open Image to open your
new firmware. Please note that you must configure your PC’s TCP/IP such that PC and the
Server belong to the same LAN, i.e. PC’s IP is 192.168.0.xxx and subnet mask is
255.255.255.0.
•
•
•
Click Upload Image.
Wait for Image Uploading to finish and then click Close.
Plug-off the power adapter and then plug-in the power adapter to restart the Server.
12. The Init Button
The Init button is used for maintenance:
Simultaneously press the Init button and turn on (by plugging in the power adaptor) the Server until
the USB1 and USB2 LED indicators simultaneously blink. After that, the Server will do the following
tasks:
•
•
Perform a Factory Default of the MFP server, which will restore most of the parameters and
settings to factory default values,
Start a TFTP server. You can upgrade new firmware using any TFTP client tool.
Note:
After performing the tasks mentioned above, you have to unplug the power adaptor and then plug
in the power adaptor to restart the Server.