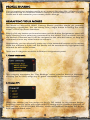
1
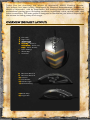
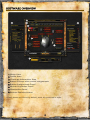
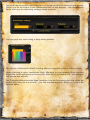
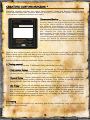
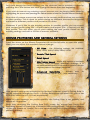
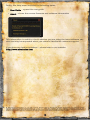
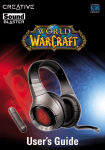
Thank you for choosing the World of Warcraft® MMO Gaming Mouse.
This mouse has been jointly developed by Blizzard Entertainment, makers of
World of Warcraft® and by SteelSeries, the leading manufacturer of innovative
professional gaming gear, including headsets, keyboards, mice, mouse pads, and
other accessories. This user guide is designed to familiarize you with all aspects of
the mouse including setup and usage.
OVERVIEW (DEFAULT LAYOUT)
1.
2.
3.
4.
Left Click
Right Click
Assist Target
Scroll Up - Zoom in
Scroll Down - Zoom out
Press - Move & Steer
5. Open All Bags
6. World Map
7. Character
8. Windows Button 5
9. Windows Button 4
10. Autorun
11. Last Hostile
12. Attack Target
13
3. Nearest Enemy
14. Battle Map
15. Target Self
2
CONNECTING YOUR MOUSE
Connect the USB cord to a USB port.
NOTE: The World of Warcraft® MMO Gaming Mouse can work in 250/500/1000Hz polling
rate frequencies. This is configurable through the software and will be explained in the
software section below. Some USB hubs might decrease the mouse polling frequency; if you
experience decreased performance when using your mouse with a USB hub, plug your
mouse directly into the USB port on your computer.
TECHNICAL SPECIFICATIONS
• Interface: USB 1.1 operating at full speed*
• Sensor Type: Laser
• Real-time Adjustable (via software) Resolution: 800/1200/1600/2000/2400/
3200 DPI (Default: 800 DPI)
• Max. Speed: 65ips
• Frame Rate: 7200fps
• Max. Acceleration: 20g
• Min. Lift Distance: 2.5mm
• Adjustable Polling Rate (via software): 1000/500/250 Hz at 1/2/4 ms respectively
(Default: 500 Hz / 2 ms response time)
• Data Path Format: 16-bit
• Sleep Mode: Disabled (the mouse is always on)
• Buttons: 15
• Cord: Braided, 2m (6.5 feet)
*Denotes operating rate of 12 Mbit/s (1.5 MB/s).
INSTALLING THE SOFTWARE
1. Download the software from our website:
http://www.steelseries.com/downloads/
2. Launch the installer and follow the instructions on the screen
3
SOFTWARE OVERVIEW
1
6
2
5
3
4
8
7
1. Menu Area
2. Profile Area
3. Character Information Area
4. Button Groups with current assignments
5. Button Assignments Panel*
6. Mouse Properties Panel*
7. Illumination Panel*
8. Restore Defaults button
*These panels are closed by default; press the panel tab to open.
4
PROFILE MANAGEMENT
The World of Warcraft® MMO Gaming Mouse allows up to 10 different profiles to
be programmed with unique button assignments, DPI, sensitivity and illumination
settings. All settings are profile-specific.
Every profile can be linked to a World of Warcraft® character of your choice.
Simply click the Character Information Area:
Enter the character, character's realm name, and select the region where the
realm is located in the new window:
Finally, press OK and your character information and avatar will be retrieved from
the World of Warcraft® Armory server and the current profile will be associated
with that character and named accordingly. If you encounter any errors, please
ensure that the information is correct by testing it on www.wowarmory.com
5
The next step in profile customization is to set up colors and effects on the mouse.
These can be accessed in the Illumination tab at the bottom - the Illumination
Panel will have the following settings when opened:
You can pick any color using a drop-down palette:
The World of Warcraft® MMO Gaming Mouse supports up to 16 million colors.
After selecting a color, choose the High, Medium or Low intensity level for how
bright the colors will show on the mouse. Note that if you select Off - the lights on
the mouse will turn off.
The Pulsation effects include High, Medium, Low or Off settings for how often the
colors will pulse on the mouse - you can experiment with these to achieve the
desired effect.
6
USING YOUR PROFILE
There are 3 ways to activate your profile:
1. Select it manually in the software by clicking the profile number on top of the
main window or choose a profile from tray icon Profile menu.
2. Associate an executable file with the profile, so it will be loaded automatically
when the EXE is launched. This can be done through the File -> Edit Game/APP. menu:
Simply browse or type in the desired EXE and press
Add to add it to the list of associated EXE’s. You can
remove any EXE by pressing the Remove button.
Note: If there are several profiles using the same EXE, the
first matching profile will be loaded when the game/application is launched.
3. Assign profile change to a mouse button using the Change Profile section from
the Button Assignment panel:
This allows on-the-fly profile switching while you are in game. For example, you
can switch between PVE and PVP profiles when entering the battlegrounds. Just
assign different colors (i.e. green to PVP) to the 2 profiles so you have an
indication as to which profile is currently active.
Note that you can assign either a specific profile to a button, or simply
Profile UP/DOWN to go through profiles sequentially. Ensure that you assign
Profile UP/DOWN in all relevant profiles so it works everywhere.
7
PROFILE SHARING
You can export your existing profile to an external file using File -> Export Profile,
and send this file to a friend. In order to import a profile simply click File -> Import
Profile and it will overwrite your current profile settings.
REMAPPING YOUR MOUSE
The World of Warcraft® MMO Gaming Mouse provides simple yet powerful
remapping capabilities. You can remap every single button including the scroll
wheel's Scroll Up/Down functions.
Simply click any button on the main screen and the Button Assignments panel will
open allowing you to select any command for this button. You can either click on
the desired command and it will be assigned to the selected button, or drag the
command over to any other button to remap it.
Alternatively you can physically press any of the extended buttons on the mouse
while the software is open and this button will be automatically highlighted and
selected for edit on the screen.
There are 4 categories available in Buttons Assignments panel:
1. Game commands.
This category represents the “Key Bindings” menu found in World of Warcraft®
allowing you to easily assign any in-game commands to the mouse buttons.
2. Change DPI.
Using this section you can assign on-the-fly DPI switch to any mouse button.
Selecting a specific value will toggle that DPI setting when a button is pressed, or
you can use a DPI UP/DOWN function, which will increase/decrease DPI to the
next/previous listed value.
8
3. Change Profile.
Using the Change Profile function you can assign any mouse button to switch
profiles. Similar to DPI you can either assign a specific profile or Profile UP/DOWN
switch to load next/previous profile.
4. Custom Macros *
The Custom Macros section will contain all custom created macros for the current
profile. These macros can be assigned to mouse buttons similar to Game
Commands. Refer to the detailed description below on how to create your own
macros.
When you have finished editing/re-mapping all buttons you can print the profile
for future reference using File - > Print menu. This is a handy way to have your key
bindings readily available for viewing without having to exit the game to
Windows.
9
CREATING CUSTOM MACROS *
Creating custom macros has never been easier! Open the Button Assignments
panel and expand the Custom Macros section. Press New to create a new macro
– the macro creation window will open:
*Important Notice:
Users and owners of the World of Warcraft MMO
Gaming Mouse are responsible for how they use
the device within World of Warcraft. SteelSeries
and Blizzard Entertainment do not condone or
support any actions or inappropriate implementations
with any of the features of this mouse or its software
that violates the rules set forth by Blizzard
Entertainment and the World of Warcraft Terms of
Use Agreement, such as the prohibition against
automating gameplay. For more information, please
review the World of Warcraft Terms of Use at
http://www.worldofwarcraft.com/legal/termsofuse.html
Type in the macro name, click in the macro input area and type in your macro.
When done, press OK and the macro will appear in the Custom Macros list – drag
it over to any key and it’s ready for use.
Some advanced details available when creating a macro:
1. Timing control
You can switch between 3 different delay recording modes:
• Textt (Autto Dellay) – This option is selected by default and is designed to
optimize the delays for proper in-game performance. If you are not sure what
option to use – simply leave this option on.
• Record Dellay – When selected, it will record the delays in real time reflecting
your typing speed when creating a macro. This option is useful when you
need precise real-life timing for some advanced macros.
• No Dellay – Turns off all delays and simply injects the macro instantly. Note
that while this option can be sometimes useful, World of Warcraft® and other
games normally require some delays added in order for the game to process
the macro as a human-like input. If there are no delays the game or
application might not receive the macro or it may be injected partially, so use
this advanced option with caution.
2. Looping
You can loop the macro by enabling the Loop check-box and specifying the
number of repetitions.
10
Any time during the macro editing you can clear the macro window content by
pressing the Clear button and start typing the macro from the beginning.
If you wish to remove any existing custom macros you can simply delete them by
highlighting the macro and pressing the Delete button under the Custom Macros section.
Note that all custom macros are unique to the current profile and are not available
in other profiles. This is done to avoid mixing up different macros that might be
irrelevant in different profiles and preserve the order.
However, if you’d like to use existing macros in another profile you can export
your current profile using File -> Export menu and import (File -> Import) it in the
new profile. This will allow you to start editing the new profile based on the
existing settings and with a full list of macros available.
MOUSE PROPERTIES AND GENERAL SETTINGS
Press the arrow on the Mouse Properties tab on the left side to open the panel.
Here you can adjust the standard mouse settings:
• DPI Value – the following settings are available:
800/1200/1600/2000/2400/3200
Click Speed
• Double-C
• Scroll Speed
Pointer Speed – While this option is available
• Win-P
among other standard Windows settings, it is
recommended that DPI be used to control mouse
responsiveness for better precision
• Advanced Sensitivity – Allows user
independently adjust X/Y – axis sensitivity
to
One general setting not included in the Mouse Properties panel is Polling Rate. It
can be adjusted through the Tools - > Polling Rate menu and allows the user to set
250/500/1000 Hz at 1/2/4 ms respectively.
While all other settings are profile-specific, the Polling Rate is set globally and
affects all 10 profiles.
Note that changing the Polling Rate fully resets the mouse and forces the
operating system to switch to a different USB polling speed. This global change
causes the mouse to “freeze” for a few seconds and lose all functionality – this is
perfectly normal.
11
Finally, the Help menu includes the following items:
• User Guide – opens this user guide
• About – shows the mouse firmware and software information
This information is useful to check whether you are using the latest software version and may be requested when you contact SteelSeries customer support.
If you have any further questions – please refer to our website:
http://www.steelseries.com
© 2008 Blizzard Entertainment, Inc. All rights reserved. Warcraft, World of Warcraft and Blizzard Entertainment are trademarks and/or
registered trademarks of Blizzard Entertainment, Inc., in the U.S. and/or other countries. All other trademarks referenced herein are the
properties of their respective owners. © SteelSeries 2008. All rights reserved. SteelSeries and all other product sub-brands are owned and registered by
SteelSeries ApS. All other trademarks referred to are the property of their respective owners. US and other patents pending.
12