1
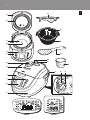
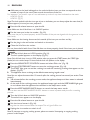
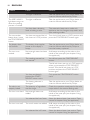
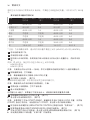
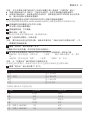
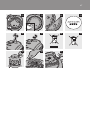
HD4763, HD4761
2
3
1
O
A
B
P
2
C
Q
D
E
R
F
M
N
G
S
H
T
I
J
K
L
HD4761
HD4763
U
V
4
HD4763, HD4761
English 6
繁體中文 20
简体中文 33
6
English
Introduction
Congratulations on your purchase and welcome to Philips! To fully benefit from the support that
Philips offers, register your product at www.philips.com/welcome.
General description (Fig. 1)
A
B
C
D
E
F
G
H
I
J
K
L
M
N
O
P
Q
R
S
T
U
V
---
Inner lid
Sealing ring
Heating element
Temperature sensor
Lid release button
Control panel
Lid lock lever
Outer lid
KEEP WARM light
START/REHEAT light
Display
Main body
Automatic steam vent
Pressure regulator
Steam tray (HD4763 only)
Water level indication
Inner pot
Rice scoop
Measuring cup
Rice cooker handle (HD4763 only)
Cord storage facility
Mains cord
HD4763 display
HD4761 display
Important
Read this user manual carefully before you use the appliance and save it for future reference.
Danger
-- Never immerse the main body of the rice cooker in water, nor rinse it under the tap.
-- Do not cover the steam vent and the pressure regulator when the rice cooker is operating.
Warning
-- Check if the voltage indicated on the appliance corresponds to the local mains voltage before
you connect the appliance.
-- Only connect the appliance to an earthed wall socket. Always make sure that the plug is
inserted firmly into the wall socket.
-- Do not use the appliance if the plug, the mains cord, the inner pot or the main body is damaged.
-- If the mains cord is damaged, it must be replaced by Philips, a service centre authorised by
Philips or similarly qualified persons in order to avoid a hazard.
-- This appliance is not intended for use by persons (including children) with reduced physical,
sensory or mental capabilities, or lack of experience and knowledge, unless they have been given
supervision or instruction concerning use of the appliance by a person responsible for their
safety.
-- Children should be supervised to ensure that they do not play with the appliance.
-- Keep the mains cord out of the reach of children. Do not let the mains cord hang over the edge
of the table or worktop on which the appliance stands.
English
7
-- Make sure the heating element, the temperature sensor and the outside of the inner pot are
clean and dry before you put the plug in the wall socket.
-- Do not use the appliance if the sealing ring is damaged.
-- Do not plug in the appliance or press any of the buttons on the control panel with wet hands.
-- Never connect this appliance to an external timer switch in order to avoid a hazardous situation.
-- Do not come near the pressure regulator or the steam vent with your face or hands when the
rice cooker is operating.
-- Do not open the lid while rice is boiling.
-- Do not open the lid immediately after the cooking process has ended, but wait until the steam
inside the rice cooker has been released completely.
-- Check the steam vent regularly to ensure that there is no blockage.
-- If you have a pacemaker or other implanted device, consult your doctor before you use
the appliance.
Caution
-- Never use any accessories or parts from other manufacturers or that Philips does
not specifically recommend. If you use such accessories or parts, your guarantee becomes
invalid.
-- Only use the rice scoop provided. Avoid using sharp utensils.
-- Do not expose the rice cooker to high temperatures, nor place it on a working or still hot stove
or cooker.
-- Always insert the inner pot before you put the plug in the wall socket and switch on the rice
cooker.
-- Always unplug the rice cooker if not used for a longer period of time.
-- Always let the rice cooker cool down before you clean or move it.
-- Do not place the inner pot directly over an open fire to cook rice.
-- This appliance is intended to be used in household and similar applications such as:
-- staff kitchen areas in shops, offices and other working environments;
-- farm houses;
-- by clients in hotels, motels and other residential type environments;
-- bed and breakfast type environments.
-- If the appliance is used improperly or for professional or semi-professional purposes or if it is
not used according to the instructions in this user manual, the guarantee becomes invalid and
Philips refuses liability for any damage caused.
-- Place the rice cooker on a stable, horizontal and level surface.
-- The accessible surfaces may become hot when the appliance is operating. Only touch the
control panel.
-- Beware of hot steam coming out of the steam vent and pressure regulator during cooking or
out of the rice cooker when you open the lid.
-- Do not lift and move the rice cooker by its handle while it is operating.
-- Do not expose the rice cooker to direct sunlight.
-- Do not insert metallic objects or alien substances into the steam vent and pressure regulator.
-- Do not cook sticky food or food that bubbles a lot, such as curry or barley tea.
-- Make sure the lid lock lever is in lock position before you switch on the rice cooker.
-- Do not place a magnetic substance on the lid. Do not use the appliance near a magnetic
substance.
-- Do not use the inner pot if it is deformed.
-- Do not exceed the maximum water level indicated in the inner pot to prevent overflows
through the pressure regulator.
-- Regularly clean the pressure regulator and the steam vent with the Auto Clean function (see
chapter ‘Cleaning’).
-- Do not place the rice scoop inside the pot while cooking, keeping warm or reheating rice.
-- Always clean the appliance after use.
8
English
-- Do not clean the appliance in the dishwasher.
Electromagnetic fields (EMF)
This Philips appliance complies with all standards regarding electromagnetic fields (EMF). If handled
properly and according to the instructions in this user manual, the appliance is safe to use based on
scientific evidence available today.
Steam vent and pressure regulator
Beware of hot steam coming out of the steam vent and the pressure regulator when the rice
cooker is operating.
During cooking, steam pressure builds up inside the rice cooker. The pressure regulator regulates the
amount of pressure built up inside the rice cooker. It is normal for the pressure regulator to rock
gently during cooking. The steam pressure built up inside the rice cooker is automatically released
before the end of the cooking process.
If a cooking process is interrupted (e.g. during a power failure), the automatic safety system keeps
the rice cooker locked until the pressure inside the cooker has dropped to a safe level.
Do not try to open the lid by forcibly turning the lid lock lever to UNLOCK position during a
cooking process or immediately after a cooking process is interrupted.
Power failure backup function
This appliance has a backup function that remembers the status before a power failure, provided the
power supply is resumed within 2 hours. If the power failure occurs during a cooking process, the
countdown of the cooking time continues where it left off when the power supply resumes.
If the power failure lasts longer than 2 hours and the failure occurs during a cooking process, the
rice cooker automatically resets to standby mode when the power supply resumes. Open the rice
cooker, remove its contents and start all over again.
If you have set the timer and the preset cooking process has not yet started when a power failure
occurs, the process starts when the power supply resumes, provided it resumes within 12 hours.
If the power failure occurs during a cooking process, the steam vent automatically closes for safety
reasons
Preparing for use
Before first use
1 Remove the sheet between the inner pot and the heating element.
2 Clean the parts of the rice cooker thoroughly before you use the appliance for the first time
(see chapter ‘Cleaning’).
3 Dry all parts thoroughly before you start to use the appliance.
Control panel and display
The control panel has seven buttons with which you operate the appliance. The display gives
information on the selected processes.
-- Control panel and display of the HD4763 (Fig. 2)
-- Control panel and display of the HD4761 (Fig. 3)
Battery for display
-- When the appliance is not plugged into the mains, the display runs on a lithium battery
-- The battery lasts approximately five years if the appliance is only rarely connected to the mains.
If you keep your rice cooker connected to the mains most of the time, the battery will last very
long.
Note: If the battery is empty, it must be replaced by a service centre authorised by Philips or a similarly
qualified person in order to avoid a hazard.
English
9
Setting the clock time
1 Put the plug in the wall socket and switch on the mains.
2 Press and hold the HR or the MIN button to set the clock time (Fig. 4).
,, The colon (:) starts to flash (Fig. 5).
3 Press the HR button to set the hours.
-- Press the HR button once to move the hour indication forward by 1 hour.
-- Press and hold the HR button to move the hour indication forward quickly.
4 Press the MIN button to set the minutes.
-- Press MIN button once to move the minute indication forward by 1 minute.
-- Press and hold the MIN button to move the minute indication forward quickly in steps of 5
minutes.
Note:You cannot adjust the clock time during a cooking process or when the appliance is in keep-warm
mode.
5 Press the START/REHEAT button to confirm the time. To cancel the changes, press the KEEP
WARM/CANCEL button.
Note:You can also wait for 5 seconds to confirm the time.
,, The colon (:) stops flashing and the display shows the set clock time (Fig. 6).
Using the appliance
Cooking plain rice
1 Measure the rice with the measuring cup provided (Fig. 7).
Each cup of uncooked rice normally gives 2 bowls of cooked rice. Do not exceed the quantities
indicated on the inside of the inner pot. 1 cup of rice is approx. 180ml.
Rice quantities and cooking times for rice menus
Menu
HD4761
Approximate
cooking time
HD4761
Quantity of rice
(cups)
HD4763
Approximate
cooking time
HD4763
Quantity of rice
(cups)
Plain rice
25-35 min.
1-6
25-40 min.
2-10
Quick plain
rice**
25 min.
2-4
25 min.
2-6
Rice with beans
45-55 min.
1-4
45-55 min.
2-6
Glutinous rice
NA
NA
45-55 min.
2-8
Brown rice
NA
NA
45-55 min.
2-6
Mixed rice
45-55 min.
1-4
45-55 min.
2-6
Sushi rice
NA
NA
30-45 min.
2-8
Congee
1.5 -4 hrs
0.25-1
1-4 hrs
0.5-1.5
**Note: To get an optimal result, we advise you to cook not more than 4 (HD4761) or 6 (HD4763)
cups of rice.
2 Wash the rice thoroughly.
3 Put the pre-washed rice in the inner pot.
10
English
4 Add water to the level indicated on the scale inside the inner pot that corresponds to the
number of cups of rice used. Then smooth the surface of the rice.
For instance, if you cook 4 cups of rice, add water up to the 4-cup level indicated on the scale.
-- HD4763 (Fig. 8)
-- HD4761 (Fig. 9)
Note:The level marked inside the inner pot is just an indication; you can always adjust the water level for
different types of rice and your own preference.
5 Press the lid release button to open the lid.
Note: Make sure the lid lock lever is in UNLOCK position.
6 Put the inner pot in the rice cooker.  (Fig. 10)
Make sure the pot is placed properly and the handles of the pot are aligned with the grooves in the
main body.
Note: Make sure the heating element and the outside of the inner pot are clean and dry.
7 Put the plug in the wall socket and switch on the mains.
8 Close the lid of the rice cooker.
Do not close the lid with force. If the lid does not close properly, check if the inner pot is placed
correctly.
9 Turn the lid lock lever to LOCK position (Fig. 11).
,, The lock symbol appears on the display (Fig. 12).
Note: If the lid lock lever is not in LOCK position when you press the START button, the START light
flashes, the rice cooker beeps 10 times and the lock icon flashes on the display.
10Press the MENU/TASTE CONTROL button and select ‘Plain rice’ (Fig. 13).
11Press the START/REHEAT button to start the cooking process (Fig. 14).
,, The START light goes on and the cooking icon and the remaining cooking time appear on the
display.  (Fig. 15)
,, The appliance starts cooking at the default taste setting ‘regular taste’.
Note:You can adjust the taste within 10 seconds after the cooking process has started (see section ‘Taste
control’).
,, 3-8 minutes before the cooking process ends, the appliance beeps and then steam is released
intermittently.
,, At the end of the cooking process the appliance beeps again and the KEEP WARM light goes
on to indicate that the appliance has switched to the keep-warm mode.
12Press the KEEP WARM/CANCEL button to cancel the keep-warm mode.
You can also use the KEEP WARM/CANCEL button to cancel a preset ready time for a cooking
process.
13Turn the lid lock lever to UNLOCK position.
,, The unlock icon appears on the display.
14Press the lid release button to open the lid.
15Stir the rice to loosen it (Fig. 16).
Stirring the rice allows excess steam to escape. This will give fluffier rice.
16Unplug the rice cooker to switch it off.
Note:To interrupt an ongoing cooking process, please see section ‘Interrupting an ongoing cooking
process’ in this chapter.
English 11
Cooking other rice menus
1 Follow steps 1 to 9 in section ‘Cooking plain rice’.
Do not exceed the volume indicated in the table, as this may cause the rice cooker to overflow.
2 Press the MENU/TASTE CONTROL button to select a rice menu.
-- HD4763: You can choose ‘Quick plain rice’, ‘Rice with beans’, ‘Brown/mixed/glutinous rice’ or
‘Sushi rice’.
-- HD4761: You can choose ‘Quick plain rice’, ‘Rice with beans’, ‘Mixed rice’  or ‘Mixed cereal’.
Note: Only use white rice when cooking in the ‘Quick plain rice’ mode.
When cooking rice with beans, consult the tables below for the soaking times of the beans and the
proportion of beans to rice.
3 Follow steps 11 to 16 in section ‘Cooking plain rice’.
Type of bean
Suggested time to soak before cooking
Peanut
at least 10 minutes
Green beans, soy beans
at least 30 minutes
Black beans
at least 40 minutes
Red beans
at least 5 hours
The table below indicates the recommended proportion of rice to beans.
Rice with beans
Proportion of beans
Proportion of rice
1 cup
¼ cup
¾ cup
2 cups
½ cup
1½ cups
3 cups
½ cup
2½ cups
4 cups
¾ cup
3 cups
5 cups (HD4763 only)
1 cup
4 cups
6 cups (HD4763 only)
1 cup
5 cups
Taste control
With taste control you can select the preferred stickiness and softness of rice.
1 Follow steps 1 to 9 in section ‘Cooking plain rice’.
2 Press the MENU/TASTE CONTROL button and select a rice menu.  (Fig. 13)
3 Press the START/REHEAT button to start cooking (1) and immediately afterwards press the
MENU/TASTE CONTROL button to change the taste (2) (Fig. 17).
Note:You must press the MENU/TASTE CONTROL button within 10 seconds. If you press the MENU/
TASTE CONTROL button later, the rice cooker starts cooking at the default setting ‘regular taste’.
Note:You can change the taste in all rice menus except ‘Quick plain rice’.
Note:The taste control function does not work in the keep-warm mode, the timer mode or the reheat
mode.
4 Select a taste (soft, regular or hard) and press the START/REHEAT button to
confirm (Fig. 14).
12
English
If you do not press the START/REHEAT button to confirm, the taste is automatically set after 5
seconds.
Note:The cooking time may vary depending on the taste that is selected.
Cooking in the different modes
The table below shows the approximate cooking time in the different modes. The actual cooking
time may vary depending on voltage, room temperature, humidity and amount of water used.
Cooking times in different modes
Mode
Approximate cooking time
Soup
1.5-4 hrs
Steam
10-40 min.
Stew
30-60 min. (HD4761), 20-60 min. (HD4763)
Cake
35 min. (HD4761), 40 min.(HD4763)
Reheat
~20 min.
Cooking congee, soup or stew
1 Put the ingredients for the soup, congee or stew in the inner pot.
2 Add the water.
Do not exceed the maximum water level indicated inside the inner pot on the scale for congee,
soup or stew cooking.
-- HD4763 (Fig. 8)
-- HD4761 (Fig. 9)
3 Follow steps 6 to 9 in section ‘Cooking plain rice’.
4 Press the MENU button to select the congee, soup or stew cooking mode (Fig. 13).
,, The default cooking time (90 minutes for congee and soup, 40 minutes for stew) appears on
the display.
5 Press the HR and/or MIN button if you want to change the cooking time.
-- You can set any time between 1.5 and 4 hours for congee and soup and 30-60 minutes
(HD4761) or 20-60 minutes (HD4763) for stew.
-- Press the HR button once to move the hour indication forward by 1 hour.
-- Press the MIN button once to put the minute indication forward by 1 minute or press and hold
the MIN button to move the minute indication forward in steps of 5 minutes.
6 Follow steps 11 to 14 in section ‘Cooking plain rice’.
7 Unplug the rice cooker to switch it off.
Note:To interrupt an ongoing cooking process, please see section ‘Interrupting an ongoing cooking
process’ in this chapter.
Steaming
1 Measure 3 cups of water with the measuring cup and pour it into the inner pot.
-- The amount of water required varies according to the quantity of food being steamed.
-- It takes approx. 9 minutes for 3 cups of water to come to boil.
2 Put the steam tray into the inner pot (Fig. 18).
If you use a separate plate put it on the steam tray.
English 13
Note: Only HD4763 comes with a steam tray. If you want to steam food in the HD4761, use a steam
tray that fits in the inner pot.
3 Put the food to be steamed on the steam tray or on a plate (Fig. 19).
Note:To ensure even steaming, spread out the food evenly and do not pile it up.
4 Follow steps 6 to 9 in section ‘Cooking plain rice’.
5 Press the MENU/TASTE CONTROL button to select the ‘steam’ mode (Fig. 13).
,, The default steaming time of 20 minutes appears on the display.
6 Press the MIN button if you want to change the steaming time.
-- You can set any time between 15 minutes and 40 minutes.
-- Press the MIN button once to put the minute indication forward by 1 minute or press and hold
the MIN button to move the minute indication forward in steps of 5 minutes.
7 Press the START/REHEAT button to start the steaming process (Fig. 14).
,, The START light goes on and the cooking icon and the remaining steaming time appear on
the display.  (Fig. 15)
,, 3-8 minutes before the steaming process ends, the appliance beeps and then steam is
released intermittently.
,, At the end of the cooking process the appliance beeps again and the KEEP WARM light goes
on to indicate that the appliance has switched to the keep-warm mode.
8 Press the KEEP WARM/CANCEL button to cancel the keep-warm mode.
You can also use the KEEP WARM/CANCEL button to cancel a preset ready time for the steaming
process.
9 Turn the lid lock lever to UNLOCK position.
,, The unlock icon appears on the display.
10Press the lid release button to open the lid.
11Unplug the rice cooker to switch it off.
Note:To interrupt an ongoing cooking process, please see section ‘Interrupting an ongoing cooking
process’ in this chapter.
Baking a cake
1 Mix the ingredients mentioned in the table below to prepare the cake mixture.
Cake ingredients
Ingredients
HD4763 quantities
HD4761 quantities
Ready-to-bake cake mix
400g
250g
Butter
100g
65g
Water or milk
150ml
100ml
Egg
2 large
1 large
2 Grease the inner pot.
3 Put the mixture in the inner pot.
4 Follow steps 5 to 9 in section ‘Cooking plain rice’.
5 Press the MENU/TASTE CONTROL button to select the ‘cake’ mode (Fig. 13).
14
English
6 Press the START button to start the cake baking process (Fig. 14).
,, The START light goes on and the cooking icon and the remaining cake baking time appear on
the display (Fig. 15).
,, 3-8 minutes before the cake baking process ends, the appliance beeps and then steam is
released intermittently.
,, At the end of the cake baking process the appliance beeps again.
7 Follow steps 9 to 11 in section ‘Steaming’.
Interrupting an ongoing cooking process
1 To interrupt an ongoing cooking process, press and hold the KEEP WARM/CANCEL button
for about 3 seconds.
2 The KEEP WARM/CANCEL light starts to flash and the remaining cooling-down time
appears on the display.
-- If a cooking process is interrupted, the automatic safety system keeps the rice cooker locked
until the pressure inside the cooker has dropped to a safe level. Do not try to open the lid by
forcibly turning the lid lock lever to UNLOCK position during the cooling-down time.
-- The cooling-down time for the STEAM mode is 3 minutes.
-- The cooling-down time for the RICE/STEW/SOUP modes is 20 minutes.
-- The cooling-down time for the CONGEE mode is 30 minutes.
-- At the end of the cooling down time, the rice cooker beeps to indicate that the steam is
automatically released.
3 Turn the lid lock lever to UNLOCK position and then press the lid release button to open
the lid.
Reheating
You can use the reheat mode to warm up rice that has cooled down. Fill the inner pot to not more
than half its capacity to ensure that the rice is heated up properly.
1 Loosen the cooled rice and evenly distribute it in the inner pot.
2 Pour ½ cup of water onto the rice to prevent it from becoming too dry. The amount of
water to be added depends on the amount of rice being reheated.
If the rice starts scorching, add more water.
3 Follow steps 6 to 9 in section ‘Cooking plain rice’.
4 Press the START/REHEAT button twice to start the reheating process (Fig. 14).
,, The START light goes on and the reheat icon and the remaining reheating time appear on the
display (Fig. 15).
,, The default reheat time is 20 minutes.
,, When the reheating process is finished, you hear a beep.
,, Cooled rice should not be reheated more than once.
5 Follow steps 9 to 11 in section ‘Steaming’.
Keeping warm
This mode allows you to keep your rice or food warm for a longer period of time.
Note:We advise you to keep your rice or food warm for not more than 12 hours so as to preserve its
taste.
1 Press the KEEP WARM/CANCEL button once to activate the keep-warm mode.
,, The KEEP WARM/CANCEL light lights up continuously.
,, During the KEEP WARM process, the display shows the time in hours from 0 to 11 (0HR,
1HR ...11HR).
English 15
,, After 12 hours, the keep-wam mode automatically ends and the rice cooker beeps 10 times.
The display switches to clock time.
2 Follow steps 9 to 11 in section ‘Steaming’.
Timer
You can use the timer for the rice menus, the steaming mode and the stew, soup and congee
cooking mode. Press the TIMER button to set the time when you want the food to be ready to eat.
Note:You can set a time from 1 minute up to 23 hours and 59 minutes.
Setting the ready time for the rice menus
1 Press the MENU/TASTE CONTROL button to select the desired rice cooking menu (Fig. 13).
2 To set the ready time, press the TIMER SET button once (1) and then use the HR (2) and/or
MIN (3) buttons to set the time.
-- You can for example use the TIMER button to set the ready time for the rice at 18:30
hours (Fig. 20).
-- Every time you press the HR button, the hour indication moves forward by 1 hour. Every time
you press the MIN button, the minute indication moves forward by 1 minute. When you press
and hold the MIN button, the minute indication moves forward quickly in steps of 5 minutes.
3 Press the START/REHEAT button to start the timer (Fig. 14).
,, The START light goes on and the text ‘Timer set’ and the preset ready time for the cooking
process appear on the display.
,, When the cooking process starts, the cooking icon and the remaining cooking time appear
on the display.
Note: If the preset time is shorter than the required total cooking time of the selected rice menu, the rice
cooker starts the cooking process immediately, using the default cooking time.The cooking time will not
be shortened if the preset time is shorter than the required total cooking time.
Setting the ready time of congee, stew, soup or steamed dishes:
1 Press the MENU/TASTE CONTROL button to select the congee, stew or soup cooking
mode or the steaming mode (Fig. 13).
2 Follow steps 2 and 3 under the heading ‘Setting the ready time of rice menus’ above. For
cooking times, see section ‘Cooking congee, soup or stew’ or ‘Steaming’ (Fig. 20).
Cleaning
Unplug the rice cooker before you clean it.
Wait until the rice cooker has cooled down sufficiently before you clean it.
Only remove the rubber sealing ring from the inner lid if necessary for cleaning purposes (see
section ‘Rubber sealing ring’ in this chapter).
Clean the lid and rubber sealing ring regularly to keep them free from food residue. Food residue
on the lid and sealing ring may cause steam leakage.
Do not use abrasive cleaning agents, scourers or metal utensils to clean the main body, lid and
inner pot as they cause damage.
Never immerse the body of the rice cooker in water, nor rinse it under the tap.
To protect the non-stick coating of the inner pot, do not:
-- use the inner pot for washing dishes;
-- put vinegar into the pot;
16
English
-- wash rice in the pot.
1 Wipe the main body, the inner and outer lid and the rubber sealing ring with a damp cloth.
2 Wipe the heating element with a dry cloth.
3 Clean the inner lid, inner pot, steam tray (HD4763 only) and rice scoop with a sponge or a
cloth in hot water with some washing-up liquid.
4 Make sure the rubber feet of the steam tray (HD4763 only) are fully inserted after cleaning.
Rubber sealing ring
The rubber sealing ring does not come out easily to prevent steam leakage. If necessary, remove it
from the lid by pulling it out and cleaning it.
Note: If steam leakage is observed at the lid, remove the sealing ring and clean it. If steam continues to
leak from the lid, replace the sealing ring.
1 Pull the rubber sealing ring out of the groove (Fig. 21).
This requires some force.
2 Clean the sealing ring in warm soapy water.
3 To reassemble the sealing ring, insert it into the groove in the lid (Fig. 22).
-- Make sure the arrow on the sealing ring points towards the marking on the inner lid.
-- Make sure the projecting part of the ring faces towards you (Fig. 23).
-- Push the sealing ring into the groove with both hands, starting at the top and working towards
the bottom (Fig. 24).
Note: If the rubber sealing ring is not inserted properly, steam will leak out at the sealing ring when the
rice cooker is operating.
Auto Clean
Regularly, preferably once a month, use the Auto Clean function to keep the steam vent and
pressure regulator free from food residues and to prevent the pressure regulator from rocking
heavily during cooking.
1 Pour 2 cups of water into the inner pot with the rice measuring cup (360ml).
2 Close the lid and turn the lid lock lever to LOCK position.
3 Press the AUTO CLEAN button (Fig. 25).
4 Press the START/REHEAT button to start the Auto Clean process.
Note: If you press the START/REHEAT button when the lid is still unlocked, the rice cooker beeps 10
times and the LOCK icon flashes on the display.
During the Auto Clean process, the appliance beeps and then steam is released. The START light
goes on, the text ‘Auto Clean’ and the remaining cleaning time appear on the display.
,, The START light goes on and the text ‘Auto Clean’ and the remaining cleaning time appear
on the display.
,, At the end of the Auto Clean process the appliance beeps again and switches off
automatically.
5 Turn the lid lock lever to UNLOCK position.
6 Press the lid release button to open the lid.
English 17
Steam vent and pressure regulator
1 Regularly clean the area around the steam vent with a damp cloth.
To clean the pressure regulator:
1 Pull up the pressure regulator (1) and turn it anticlockwise (2) (Fig. 26).
2 Turn the pressure regulator anticlockwise.
3 Remove the pressure regulator and clean it.
-- To reassemble the pressure regulator in the lid, turn it clockwise until it is fixed (Fig. 27).
Note:When properly assembled, the pressure regulator is still able to move freely.
Storage
1 Wind the mains cord round the cord storage facility.
Environment
-- Do not throw away the appliance with the normal household waste at the end of its life, but
hand it in at an official collection point for recycling. By doing this, you help to preserve the
environment (Fig. 28).
-- The built-in lithium battery contains substances that may pollute the environment. Always
remove the battery before you discard and hand in the appliance at an official collection point.
Dispose of the battery at an official collection point for batteries (Fig. 29).
Removing the battery
Please note that this process is not reversible.
-- To remove the battery, you need a screwdriver and a pair of pliers. Observe basic safety
precautions when you follow the procedure outlined below. Be sure to protect your eyes, hands,
fingers, and the surface on which you work.
1 Use a screwdriver to remove the 4 screws in the bottom cover (Fig. 30).
2 Use a screwdriver to undo the 2 screws of the bracket (Fig. 31).
3 Take out the bracket and use a pair of pliers to cut the battery plate at both ends of the
battery and remove the battery (Fig. 32).
Guarantee & service
If you need service or information or if you have a problem, please visit the Philips website at
www.philips.com or contact the Philips Consumer Care Centre in your country (you find its phone
number in the worldwide guarantee leaflet). If there is no Consumer Care Centre in your country,
go to your local Philips dealer.
Troubleshooting
If your rice cooker does not function properly or if the cooking quality is insufficient, consult the
table below. If you are unable to solve the problem, please contact the Philips Customer Care
Centre in your country.
Problem
Cause
Solution
The START light
does not go on.
There is a connection
problem.
Check if the rice cooker is connected to the
mains and if the plug is inserted firmly into
the wall socket.
18
English
Problem
Cause
Solution
The light is defective.
Take the appliance to your Philips dealer or
a service centre authorised by Philips.
The light is defective.
The KEEP-WARM
light does not go on
when the cooking
process is finished.
Take the appliance to your Philips dealer or
a service centre authorised by Philips.
You have been reheating
food or baking a cake.
The automatic keep-warm mode only
applies to the rice, congee, soup, steam and
stew cooking modes.
You have not turned the lid Turn the lid lock lever to LOCK position and
The rice cooker
beeps when I press lock lever to LOCK position. press the START/REHEAT button again.
the START/REHEAT
button.
The display does
not function.
The battery that supplies
power to the display is
empty.
The rice is not
cooked.
Not enough water has been Add water according to the scale on the
added.
inside of the inner pot (see chapter ‘Using
the appliance’).
The cooking process has
not started.
Take the appliance to your Philips dealer or
a service centre authorised by Philips to
have the battery replaced.
You did not press the START/REHEAT
button.
The lid lock lever was not in LOCK position
when you pressed the START/REHEAT
button. Turn the lid lock lever to LOCK
position and press the START/REHEAT
button again.
You have accidentally
pressed the START/
REHEAT button twice.
Only press the START/REHEAT button
once.
The heating element is
damaged.
Take the appliance to your Philips dealer or
a service centre authorised by Philips.
The cake is not
properly baked.
The quantity of ingredients
was too large.
Check the quantities mentioned in the cake
recipe table in the section ‘Baking cake’.
The rice is too hard
Not enough water was
added.
Add water according to the scale on the
inside of the inner pot (see chapter ‘Using
the appliance’).
You selected the ‘hard’ taste. Select the desired taste (see section ‘Taste
control’ in chapter ‘Using the appliance’).
The rice is too soft.
Too much water was added. Add water according to the scale on the
inside of the inner pot (see chapter ‘Using
the appliance’).
You selected the ‘soft’ taste.
Select the desired taste (see section ‘Taste
control’ in chapter ‘Using the appliance’).
English 19
Problem
Cause
Solution
The congee does
not have the
consistency I want. I
want to recook it,
but the default
cooking time is 30
minutes and I
cannot adjust the
time.
The rice cooker has
an automatic safety system
to keep the pressure inside
the cooker at a safe level.
Therefore the default
cooking time is set to 30
minutes.
Either recook the congee for 30 minutes
right away or let the congee cool down
completely and then recook it.
A lot of steam and/
or water is coming
out of the steam
vent and/or
pressure regulator
intermittently.
A lot of steam pressure is
building up inside the rice
cooker. The steam vent and
pressure regulator are
releasing this steam to
reduce the pressure.
Wait for the cooking process to finish
automatically.
Only use the reheat function to reheat rice.
You used the reheat
Use other cooking methods to reheat
function to reheat/recook
congee, soup or stew.
congee, soup or stew
because the result was not
satisfactory (e.g. the congee
did not have the consistency
you wanted).
I cannot turn the lid
lock lever to
UNLOCK position.
The steam pressure inside
the rice cooker is still high.
Do not forcefully unlock the lid. Allow the
rice cooker to cool down completely.
Display shows error
code E01 or E02
Electronic parts or the
temperature
sensor malfunction.
Take the appliance to your Philips dealer or
a service centre authorised by Philips
Display shows I_I
The inner pot is not
inserted into the rice
cooker.
Place the inner pot correctly in the rice
cooker and restart the cooking process.
Display shows 24
Ho
The timer is set to more
than 24 hours.
The set time cannot exceed the maximum
of 24 hours (see section ‘Timer’ in
chapter ‘Using the appliance’).
20
繁體中文
簡介
恭喜您購買本產品並歡迎加入飛利浦!請於 www.philips.com/welcome 註冊您的產品,
以善用飛利浦提供的支援。
一般說明 (圖 1)
A
B
C
D
E
F
G
H
I
J
K
L
M
N
O
P
Q
R
S
T
U
V
---
內鍋蓋
密封環
加熱板
溫度感應器
開蓋按鈕
控制面板
開蓋控制桿
外鍋蓋
保溫指示燈 (KEEP WARM)
開始/再加熱指示燈 (START/REHEAT)
顯示
主機體
自動蒸氣通氣孔
壓力調節器
蒸盤 (僅限 HD4763 型號)
水位刻度
內鍋
飯勺
量杯
電子鍋握柄 (僅限 HD4763 型號)
電源線收納裝置
電源線
HD4763 顯示
HD4761 顯示
重要事項
在使用本產品前,請先仔細閱讀本使用手冊,並保留說明以供日後參考。
危險
-- 請勿將電子鍋主體浸泡在水中或在水龍頭下沖洗。
-- 電子鍋使用中,請勿遮蓋蒸氣通氣孔及壓力調節器。
警示
-- 在您連接電源之前,請檢查本地的電源電壓是否與產品所標示的電壓相符。
-- 僅可將本產品連接到有接地的電源插座上。並請務必確定將插頭確實插入電源插座
中。
-- 如果插頭、電源線、內鍋或電子鍋主體損壞時,則請勿使用。
-- 如果電源線損壞,必須交由飛利浦、飛利浦授權之服務中心,或是具備相同資格的技
師更換,以免發生危險。
-- 基於安全考慮,在缺乏監督及適當指示之下,本產品不適用於孩童及任何身體、知
覺、或心理功能障礙者,或缺乏使用經驗及知識者。
-- 請勿讓孩童使用本產品或當成玩具。
-- 請勿讓兒童接觸電源線。請勿讓電源線懸掛在產品放置的餐桌或流理台邊緣。
-- 請確定加熱板、溫度感應器與內鍋外側是否清潔、乾燥,再將插頭插入電源插座。
-- 密封圈損壞時,則請勿使用產品。
-- 連接電器電源或按壓控制面板上的按鈕時,請確保雙手乾燥。
-- 為了避免發生危險,本產品不可加裝外部定時器開關。
繁體中文 21
------
電子鍋運作時,手、臉請勿靠近壓力調節器或蒸氣通氣孔。
電子鍋內烹調沸騰時請勿開啟鍋蓋。
烹調程序結束後,請勿立即打開鍋蓋;應待鍋內蒸氣完全釋放完畢再開啟。
請隨時檢查蒸氣通氣孔,確保暢通不堵塞。
若您裝有心律調節器或其他植入裝置,使用本產品之前請先諮詢您的醫師。
警告
-- 請勿使用其他製造商的任何配件或零件,或非飛利浦建議之配件或零件。如果您使用
此類配件或零件,保修即會失效。
-- 請僅使用隨附的飯匙。請勿使用尖銳的器具。
-- 請勿將電子鍋暴露在高溫下,也請勿放置正在使用 (或尚有餘溫) 的爐子或廚具上。
-- 將插頭插入電源插座並開啟電源之前,請務必先裝入內鍋。
-- 若長時間不使用,請務必拔下電鍋的插頭。
-- 清潔或移動電子鍋之前,請務必先待其冷卻。
-- 請勿直接將內鍋置於爐火上炊飯。
-- 本產品為居家用途設計,而類似的應用包含:
-- 店家的員工廚房、辦公室與其他工作場所;
-- 農舍;
-- 供住宿的飯店、汽車旅館與其他居住場所;
-- 擺設床位與供應早餐的空間。
-- 如果不當使用本產品、作為 (半) 專業用途,或未依照使用手冊操作,保固將無效,且
飛利浦將不擔負任何損壞賠償責任。
-- 請將電子鍋放置在平穩的水平面上。
-- 本產品使用時,裝置表面可能會變熱。請注意僅可接觸控制面板部分。
-- 請注意,在炊飯過程中,熱氣會從蒸氣通氣孔與壓力調節器釋出;若掀開鍋蓋,熱氣
會從鍋內釋出。
-- 請勿在使用電子鍋時,舉起握柄或移動電子鍋。
-- 請勿將電子鍋直接曝露在陽光下。
-- 請勿將金屬製品或其他異物插入蒸氣通氣孔和壓力調節器內。
-- 請勿烹煮黏稠或會產生大量氣泡的食物,例如咖哩、麥茶等。
-- 電子鍋的電源開啟前,請務必確定開蓋控制桿已鎖上。
-- 請勿在鍋蓋上放置磁性物品。請勿在磁性物品附近使用電子鍋。
-- 內鍋若變形請勿使用。
-- 內鍋水位不可超過內側所標示的最高刻度,以避免從壓力調節器溢出。
-- 定期利用「自動清潔」功能來清洗壓力調節器與蒸氣通氣孔 (請參閱「清潔」單元)。
-- 烹調、保溫、再加熱時,請勿將飯匙留在鍋內。
-- 使用後請務必清潔本產品。
-- 請勿將產品放入洗碗機清洗。
電磁波 (EMF)
本飛利浦產品符合電磁波 (Electromagnetic fields,EMF) 所有相關標準。只要使用方式正
確並依照本使用手冊之說明進行操作,根據現有的科學研究資料,使用本產品並無安全顧
慮。
蒸氣通氣孔與壓力調節器
請注意,電子鍋運作時,熱氣會從蒸氣通氣孔及壓力調節器釋出。
烹調時,電子鍋內蒸氣壓力會上升。壓力調節器會調整電子鍋內的壓力,因此在烹調時,
壓力調節器輕微搖晃是正常現象。烹調程序結束前,電子鍋會自動釋放鍋內壓力。
烹調程序遭中斷時 (例如斷電),自動安全系統會鎖住電子鍋,等待鍋內壓力降至安全程
度。
烹調過程中,或剛剛中斷程序時,請勿立即將開蓋控制桿強制推往「開」(UNLOCK),打
開鍋蓋。
22
繁體中文
斷電支援功能
本產品具備支援功能,只要在 2 小時內恢復供電,便能記住斷電前的狀態。若是在烹調程
序中途斷電,則烹調定時器會暫停,待恢復供電後再繼續計時。
若在烹調程序中途斷電,且斷電超過 2 小時,則恢復供電後,電子鍋會自動重設為待機模
式。請打開鍋蓋,取出食材,從頭開始重新烹調。
若您設定好定時器後,尚未開始預設烹調程序便斷電,則只要在 12 小時內恢復供電,就
會自動開始執行。
為安全顧慮,若在烹調程序中途斷電,蒸氣通氣孔會自動關閉。
使用前準備
第一次使用前
1請移除內鍋和加熱板中間的紙張。
2第一次使用本產品之前,請先仔細清洗電子鍋各部分 (請參閱「清潔」單元)。
3開始使用本產品前,請先讓所有部分完全乾燥。
控制面板與顯示幕
控制面板上有七個按鈕可以用來操作本產品。顯示幕能顯示您選擇的程序。
-- HD4763 的控制面板與顯示幕 (圖 2)
-- HD4761 的控制面板與顯示幕 (圖 3)
顯示幕電池
-- 產品不插電使用時,顯示幕將消耗鋰電池電力。
-- 如果產品僅偶爾插電使用,則電池壽命約可維持 5 年。如果電子鍋皆為插電使用,則
電池壽命可以維持很久。
注意: 如果電池電力耗盡,必須交由飛利浦、飛利浦授權之服務中心,或是具備相同資格
的技師更換,以免發生危險。
設定時鐘時間
1將插頭插入電源插座,然後開啟插座電源。
2長按小時 (HR) 或分鐘 (MIN) 按鈕,即可設定時鐘時間。 (圖 4)
,, 冒號 (:) 會開始閃爍。 (圖 5)
3按小時 (HR) 按鈕設定小時時間。
-- 每按一次小時按鈕便增加 1 小時。
-- 長按小時按鈕,可迅速增加小時時間。
4按分鐘 (MIN) 按鈕設定分鐘時間。
-- 每按一次分鐘按鈕便增加 1 分鐘。
-- 長按0鐘按鈕,可迅速增加分鐘時間 (每次跳加 5 分鐘)。
注意: 本產品在烹調程序中或保溫時不可調整時鐘時間。
5按下開始/再加熱 (START/REHEAT) 按鈕確認時間。若要取消變更,請按下營養保溫/
取消 (KEEP WARM/CANCEL) 按鈕。
注意: 您也可以等待 5 秒鐘自動完成時鐘設定。
,, 冒號 (:) 會停止閃爍,顯示幕也會顯示新設定的時鐘時間。 (圖 6)
使用此產品
炊煮白飯
1使用隨附的量杯來量米。 (圖 7)
一杯生米通常可煮成 2 碗白飯。請不要超過內鍋內側標示的量線。1 杯米約 180 毫升。
繁體中文 23
米飯功能表的生米量與烹調時間
功能表
HD4761 約略烹
調時間
HD4761 生米量
(杯)
HD4763 約略烹
調時間
HD4763 生米量
(杯)
白飯
25-35 分鐘
1-6
25-40 分鐘
2-10
快煮白飯
25 分鐘
2-4
25 分鐘
2-6
八寶飯
45-55 分鐘
1-4
45-55 分鐘
2-6
糯米
NA
NA
45-55 分鐘
2-8
糙米
NA
NA
45-55 分鐘
2-6
混合穀米
45-55 分鐘
1-4
45-55 分鐘
2-6
壽司米
NA
NA
30-45 分鐘
2-8
粥
1.5-4 小時
0.25-1
1-4 小時
0.5-1.5
**注意:為煮出最好吃的米飯,建議您的烹調量不要超過 4 杯米 (HD4761) 或 6 杯米
(HD4763)。
2將米徹底洗淨。
3將洗好的米倒入內鍋中。
4在內鍋中加水至對應米杯數的水位刻度。然後將米均勻攤平。
例如,如果您要煮 4 杯米,請將水加到 4 杯的水位刻度。
-- HD4763 (圖 8)
-- HD4761 (圖 9)
注意: 內鍋內側所標示的水位僅供參考;您可以隨時針對不同的米以及自己的偏好來調整
水位。
5按下開蓋按鈕,打開鍋蓋。
注意: 請確定開蓋控制桿已撥至「開」(UNLOCK)。
6將內鍋放入電子鍋。  (圖 10)
請確認正確裝入內鍋,將內鍋把手對齊外鍋的導引槽。
注意: 請確定加熱元件和內鍋的外表均乾淨、乾燥。
7將插頭插入電源插座,然後開啟插座電源。
8蓋上電子鍋鍋蓋。
請勿用力蓋上鍋蓋。若鍋蓋無法順利蓋上,請檢查內鍋位置是否正確。
9將開蓋控制桿撥至鎖定 (LOCK)。 (圖 11)
,, 畫面會顯示鎖定圖示。 (圖 12)
注意: 若按下開始 (START) 按鈕時,開蓋控制桿不在鎖定 (LOCK) 位置,則開始
(START) 指示燈會閃爍,電子鍋會發出 10 次嗶聲,顯示幕上的鎖定圖示也會閃爍。
10 按下功能表/米飯軟硬控制 (MENU/TASTE CONTROL) 按鈕,然後選擇白飯 (Plain
rice)。 (圖 13)
11 按下開始/再加熱 (START/REHEAT) 按鈕,開始烹調程序。 (圖 14)
,, 開始指示燈 (START) 會亮起,並在顯示幕上顯示烹調圖示與剩餘烹調時間。  (圖 15)
,, 產品會預設適中的「米飯口感」(regular taste) 進行烹調。
24
繁體中文
注意: 烹調程序啟動後 10 秒內,仍然可以調整米飯口感 (請參閱「米飯軟硬控制」單
元)。
,, 於烹調程序結束的前 3-8 分鐘,裝置會發出嗶聲,接著間歇地釋放蒸氣。
,, 待烹調程序結束,本產品會再度發出嗶聲,並亮起保溫指示燈 (KEEP WARM),表示
已切換為保溫模式。
12 按下營養保溫/取消 (KEEP WARM/CANCEL) 按鈕可取消保溫模式。
營養保溫/取消 (KEEP WARM/CANCEL) 按鈕也可用來取消烹調程序預設的煮好時間。
13 將開蓋控制桿撥至開 (UNLOCK)。
,, 顯示幕會顯示開鎖圖示。
14 按下開蓋按鈕,打開鍋蓋。
15 翻攪白飯使其鬆軟。 (圖 16)
翻攪白飯可釋放多餘的蒸氣,使白飯更加鬆軟可口。
16 請拔下電子鍋電源插頭,以關閉電源。
注意: 要中斷正在執行的烹調程序,請參閱此單元中的「中斷正在執行的烹調程序」章
節。
其他米飯烹調功能表
1請依照「烹調白飯」單元的第 1 步到第 9 步操作。
請勿烹調超過表格中指示的量,以免米飯溢出電子鍋。
2按下功能表/米飯軟硬控制 (MENU/TASTE CONTROL) 按鈕,選取一種米飯功能表。
-- HD4763:可選擇快煮白飯 (Quick plain rice)、八寶飯 (Rice with beans)、糙米/混合/
糯米 (Brown/mixed/glutinous rice),或壽司米 (Sushi rice)。
-- HD4761:可選擇快煮白飯 (Quick plain rice)、八寶飯 (Rice with beans)、混合米
(Mixed rice),或混合穀類 (Mixed cereal)。
注意: 使用「快煮白飯」(Quick plain rice) 模式時,僅限使用普通白米。
烹調八寶飯時,請參照下表關於豆子的浸泡時間,以及豆子與白米的比例。
3請依照「烹調白飯」單元的第 11 步到第 16 步操作。
豆子種類
烹調前建議浸泡時間
花生
至少 10 分鐘
綠豆、大豆
至少 30 分鐘
黑豆
至少 40 分鐘
紅豆
至少 5 小時
下表列出八寶飯混合的建議比例。
八寶飯
豆量
米量
1杯
¼杯
¾杯
2杯
½杯
1½ 杯
3杯
½杯
2½ 杯
4杯
¾杯
3杯
5 杯 (僅限 HD4763 型號)
1杯
4杯
繁體中文 25
八寶飯
豆量
米量
6 杯 (僅限 HD4763 型號)
1杯
5杯
米飯軟硬控制
米飯軟硬控制功能讓您選擇飯粒烹調的黏度與軟度。
1請依照「烹調白飯」單元的第 1 步到第 9 步操作。
2按下功能表/米飯軟硬控制 (MENU/TASTE CONTROL) 按鈕,選取一個米飯烹調功
能。  (圖 13)
3按下開始/再加熱 (START/REHEAT) 按鈕開始烹調 (1),隨後立即按下功能表/米飯軟
硬控制 (MENU/TASTE CONTROL) 按鈕以變更米飯口感 (2)。 (圖 17)
注意: 您必須在 10 秒內按下功能表/米飯軟硬控制 (MENU/TASTE CONTROL) 按鈕。若
時間過後才按,電子鍋會直接以預設適中的米飯口感 (regular taste) 開始烹調。
注意: 除了「快煮白飯」(Quick plain rice) 以外,所有米飯功能表均可調整米飯口感。
注意: 保溫模式、定時模式、再加熱模式中,無法使用米飯軟硬控制功能。
4選擇米飯口感 (軟、適中、硬:soft/regular/hard) 然後按下開始/再加熱 (START/
REHEAT) 按鈕確認。 (圖 14)
若您沒有按下開始/再加熱 (START/REHEAT) 按鈕進行確認,則 5 秒後會自動確認米飯口
感。
注意: 烹調時間會依應所選米飯口感而不同。
不同的烹調模式
下表所示為不同模式的大約烹調時間。實際烹調時間可能會隨電壓、室溫、溼度和所用水
量而不同。
不同模式的烹調時間
模式
大約烹調時間
湯
1.5-4 小時
蒸煮
10-40 分鐘
燜
30-60 分鐘 (HD4761)、20-60 分鐘 (HD4763)
蛋糕
35 分鐘 (HD4761)、40 分鐘 (HD4763)
再加熱
~20 分鐘
烹調粥、湯、燜燉
1在內鍋中放入湯、粥、燜燉食譜的食材。
2加水。
水位不可超過內鍋裡側所標示適用粥、湯、燜燉的最高刻度。
-- HD4763 (圖 8)
-- HD4761 (圖 9)
3請依照「烹調白飯」單元的第 6 步到第 9 步操作。
4按下功能表 (MENU) 按鈕,選取粥、湯或燜燉模式。 (圖 13)
,, 顯示幕會顯示預設的烹調時間 (粥和湯為 90 分鐘,燜燉為 40 分鐘)。
5若要調整烹調時間,請按小時 (HR) 及/或分鐘 (MIN) 按鈕。
26
繁體中文
-- 粥及湯可設定 1.5 至 4 小時內的任何時間,而燜燉則可設定 30-60 分鐘 (HD4761) 或
20-60 分鐘 (HD4763) 的時間。
-- 每按一次小時按鈕便增加 1 小時。
-- 每按一次分鐘 (MIN) 按鈕可增加 1 分鐘;或者長按分鐘 (MIN) 按鈕,可每次跳加 5 分
鐘。
6請依照「烹調白飯」單元的第 11 步到第 14 步操作。
7請拔下電子鍋電源插頭,以關閉電源。
注意: 要中斷正在執行的烹調程序,請參閱此單元中的「中斷正在執行的烹調程序」章
節。
蒸煮
1以量杯量 3 杯水,倒入內鍋中。
-- 需要的水量會因蒸煮的食物量有所差異。
-- 讓 3 杯水沸騰大約需要 9 分鐘的時間。
2將蒸盤放入內鍋中。 (圖 18)
如果您要使用另外的盤子,請將它放在蒸盤裡。
注意: 僅有 HD4763 型號隨附蒸盤。若您要使用 HD4761 蒸煮,請使用可裝入內鍋的蒸
盤。
3將要蒸煮的食物放在蒸盤上或另外裝盤。 (圖 19)
注意: 為確保蒸煮均勻,請平均擺放食物,不要堆疊。
4請依照「烹調白飯」單元的第 6 步到第 9 步操作。
5按下功能表/米飯軟硬控制 (MENU/TASTE CONTROL) 按鈕,選取蒸煮 (steam) 模
式。 (圖 13)
,, 顯示幕會顯示 20 分鐘,此為預設的蒸煮時間。
6若要調整蒸煮時間,請按分鐘 (MIN) 按鈕。
-- 您可設定 15 至 40 分鐘內的任何時間。
-- 每按一次分鐘 (MIN) 按鈕可增加 1 分鐘;或者長按分鐘 (MIN) 按鈕,可每次跳加 5 分
鐘。
7按下開始/再加熱 (START/REHEAT) 按鈕,開始蒸煮程序。 (圖 14)
,, 開始指示燈 (START) 會亮起,顯示幕上會顯示烹調圖示與剩餘蒸煮時間。  (圖 15)
,, 於蒸煮程序結束的前 3-8 分鐘,裝置會發出嗶聲,接著間歇地釋放蒸氣。
,, 待烹調程序結束,本產品會再度發出嗶聲,並亮起保溫指示燈 (KEEP WARM),表示
已切換為保溫模式。
8按下營養保溫/取消 (KEEP WARM/CANCEL) 按鈕可取消保溫模式。
營養保溫/取消 (KEEP WARM/CANCEL) 按鈕也可用來取消蒸煮程序預設的完成時間。
9將開蓋控制桿撥至開 (UNLOCK)。
,, 顯示幕會顯示開鎖圖示。
10 按下開蓋按鈕,打開鍋蓋。
11 請拔下電子鍋電源插頭,以關閉電源。
注意: 要中斷正在執行的烹調程序,請參閱此單元中的「中斷正在執行的烹調程序」章
節。
烘培蛋糕
1請依下表混合食材,製作麵粉糊。
繁體中文 27
蛋糕食材
食材
HD4763 份量
HD4761 份量
混拌好的蛋糕材料
400 公克
250 公克
牛油
100 公克
65 公克
水或鮮奶
150 毫升
100ml
雞蛋
2 大顆
1 大顆
2內鍋抹牛油。
3將麵粉糊放入內鍋。
4請依照「烹調白飯」單元的第 5 步到第 9 步操作。
5按下功能表/米飯軟硬控制 (MENU/TASTE CONTROL) 按鈕,選取蛋糕 (cake) 模
式。 (圖 13)
6按下開始/再加熱 (START/REHEAT) 按鈕,開始烘培程序。 (圖 14)
,, 開始指示燈 (START) 會亮起,並在顯示幕顯示烹調圖示與剩餘烘培時間。 (圖 15)
,, 於烘培程序結束的前 3-8 分鐘,裝置會發出嗶聲,接著釋放間歇地蒸氣。
,, 烘培程序完畢時,本產品會再度發出嗶聲。
7請依照「蒸煮」單元中的第 9 步到第 11 步操作。
中斷正在執行的烹調程序
1要中斷正在執行的烹調程序,請長按營養保溫/取消 (KEEP WARM/CANCEL) 按鈕約 3
秒鐘。
2營養保溫/取消 (KEEP WARM/CANCEL) 指示燈會開始閃爍,顯示幕會顯示剩餘冷卻
時間。
-- 烹調程序遭中斷時,自動安全系統會鎖住電子鍋,等待鍋內壓力降至安全程度。冷卻
期間,請勿立即將開蓋控制桿強制推往「開」(UNLOCK),打開鍋蓋。
-- 蒸煮 (STEAM) 模式的冷卻時間為 3 分鐘。
-- 米飯/燜燉/煲湯 (RICE/STEW/SOUP) 模式的冷卻時間為 20 分鐘。
-- 粥 (CONGEE) 模式的冷卻時間為 30 分鐘。
-- 冷卻時間結束時,電子鍋會發出嗶聲,表示開始自動釋放蒸氣。
3將開蓋控制桿撥至開 (UNLOCK),然後按下開蓋按鈕打開鍋蓋。
再加熱
您可以利用再加熱模式,溫熱已經放涼的米飯。為確保米飯加熱完全,內鍋放置的飯量以
一半為限。
1將放涼的米飯翻鬆,均勻地鋪在內鍋中。
2倒 ½ 杯水在飯上,防止加熱之後變得太乾。而添加的水量要依據加熱的飯量而定。
如果米飯開始燒焦,請再加水。
3請依照「烹調白飯」單元的第 6 步到第 9 步操作。
4按兩次開始/再加熱 (START/REHEAT) 按鈕,開始再加熱程序。 (圖 14)
,, 開始指示燈 (START) 會亮起,並在顯示幕顯示再加熱圖示與剩餘再加熱時間。 (圖 15)
,, 預設的再加熱時間是 20 分鐘。
,, 待再加熱程序完成時,會聽到嗶聲。
,, 放涼的米飯不可多次加熱。
28
繁體中文
5請依照「蒸煮」單元中的第 9 步到第 11 步操作。
保溫
此模式讓您可以延長米飯或食品保溫的時間。
注意: 建議您不要讓米飯或食品保溫時間超過 12 小時,以維持米飯口感。
1按一下營養保溫/取消 (KEEP WARM/CANCEL) 按鈕,啟動保溫模式。
,, 營養保溫/取消 (KEEP WARM/CANCEL) 指示燈會持續亮起。
,, 保溫時,螢幕會以小時為單位,顯示 0 到 11 的時間 (0HR、1HR……11HR)。
,, 經過 12 個小時之後,保溫模式自動結束,電子鍋會發出 10 次嗶聲,顯示幕也會切換
為目前的時鐘時間。
2請依照「蒸煮」單元中的第 9 步到第 11 步操作。
定時器
定時功能可用在米飯功能表、蒸煮模式、粥湯燉等模式。按下定時器 (TIMER) 按鈕,設定
食物烹調完成的時間。
注意: 可設定的時間範圍為 1 分鐘至 23 小時 59 分鐘。
設定米飯烹調功能表的完成時間
1按下功能表/風味控制 (MENU/TASTE CONTROL) 按鈕,選取要用的米飯烹調功
能。 (圖 13)
2要設定烹調完成的時間,請按一次定時 (TIMER) 按鈕 (1),再用小時 (HR) (2) 及/或分
鐘 (MIN) (3) 按鈕設定時間。
-- 例如,您可以利用定時 (TIMER) 按鈕設定米飯在 18 個半小時候烹調完成。 (圖 20)
-- 每次按下小時 (HR) 按鈕,時間就增加 1 小時。每次按下分鐘 (MIN) 按鈕,則增加 1
分鐘。若您長按分鐘 (MIN) 按鈕,則分鐘時間會以 5 分鐘為單位迅速增加。
3按開始/再加熱 (START/REHEAT) 按鈕,開始計時。 (圖 14)
,, 開始 (START) 指示燈會亮起,並在顯示幕顯示定時 (Timer set) 文字以及該烹調程序
設定的完成時間。
,, 烹調程序開始後,顯示幕上會出現烹調圖示及剩餘烹調時間。
注意: 若預設的時間比選定米飯食譜所需的總烹調時間來得短,電子鍋會套用預設的烹調
時間,並立即開始烹調程序。烹調的時間,並不會因為預設時間較烹調所需時間短而縮
短。
設定粥、燉燜、湯或蒸煮菜餚的完成時間:
1按下功能表/米飯軟硬控制 (MENU/TASTE CONTROL) 按鈕,選取粥、燉燜或煮湯模
式,或是蒸煮模式。 (圖 13)
2依照前文「設定米飯功能表的完成時間」單元的第 2 步至第 3 步操作。關於烹調時
間,請參閱「烹調粥、湯、燜燉」單元,或「蒸煮」單元。 (圖 20)
清潔
開始清潔電子鍋前,請先拔除插頭。
在進行清潔之前,請稍加等待,確定電子鍋已充分冷卻。
清潔時,內蓋的橡膠密封圈如非清洗必要請勿取下 (請參閱此單元中的「橡膠密封圈」章
節)。
定期清洗鍋蓋及橡膠密封圈,避免食物殘留。鍋蓋及橡膠密封圈若有食物殘留,可能導致
蒸氣外洩。
繁體中文 29
請勿使用具磨蝕性的清潔劑、菜瓜布或金屬用品來清潔主體、鍋蓋和內鍋,因為這些清潔
用品會造成損壞。
不可將電子鍋浸泡在水中或者在水龍頭下沖洗。
為了保護不沾鍋塗層,請勿採取下列動作:
-- 使用內鍋清洗碗盤;
-- 在鍋中倒入醋;
-- 在鍋內洗米。
1用濕布擦拭主體、內外蓋、橡膠密封圈。
2用乾布擦拭加熱元件。
3清潔內鍋蓋、內鍋、蒸盤 (僅限 HD4763 型號) 及飯匙時,請用海棉或軟布,以熱水沾
濕並加入少許清潔劑來清洗。
4清洗後,請確實將蒸盤 (僅限 HD4763 型號) 的橡膠腳座完整插入。
橡膠密封圈
為防止蒸氣外洩,此橡膠密封圈並不能輕易取下;有必要時請將其從鍋蓋拉下後再清洗。
注意: 若發現鍋蓋處有蒸氣外洩,請取下密封圈清洗。若蒸氣仍然從鍋蓋處洩出,請更換
密封圈。
1將橡膠密封圈從溝槽拉出。 (圖 21)
取出時需要稍微用力。
2用溫的肥皂水清洗密封圈。
3裝回密封圈時,請將其塞入鍋蓋的溝槽中。 (圖 22)
-- 請確定密封圈的箭頭對準內鍋蓋的標記。
-- 請確定密封圈凸出部位面朝向您。 (圖 23)
-- 從上端開始,用雙手將密封圈逐漸壓回溝槽。 (圖 24)
注意: 若未正確裝回橡膠密封圈,電子鍋運作時便會自密封圈處洩出蒸氣。
自動清潔
請定期 (每月一次最佳) 使用「自動清潔」功能,洗去蒸氣通氣孔和壓力調節器的食物殘留
物;如此也可避免壓力調節器在烹調時搖晃過大。
1用米杯 (360 毫升) 量 2 杯水,倒入內鍋。
2蓋上鍋蓋,並將開蓋控制桿撥至鎖定 (LOCK)。
3按下自動清潔 (AUTO CLEAN) 按鈕。 (圖 25)
4按下開始/再加熱 (START/REHEAT) 按鈕,開始自動清潔程序。
注意: 若鍋蓋未鎖便按下開始/再加熱 (START/REHEAT) 按鈕,電子鍋就會發出 10 次嗶
聲,並在顯示幕閃爍鎖定圖示 (LOCK)。
進行自動清潔程序時,裝置會發出嗶聲,並釋放蒸氣。開始 (START) 指示燈亮起,顯示
幕會顯示自動清潔 (Auto Clean) 與剩餘清潔時間。
,, 開始指示燈 (START) 會亮起,並在顯示幕顯示自動清潔 (Auto Clean) 文字,以及剩餘
清潔時間。
,, 自動清潔程序完成後,本產品會再度發出嗶聲,然後自動關閉電源。
5將開蓋控制桿撥至開 (UNLOCK)。
6按下開蓋按鈕,打開鍋蓋。
30
繁體中文
蒸氣通氣孔及壓力調節器
1時常用濕布清潔蒸氣通氣孔附近。
清潔壓力調節器:
1拉起壓力調節器 (1) 向逆時鐘方向旋轉 (2)。 (圖 26)
2以逆時鐘方向旋轉壓力調節器。
3卸下壓力調節,進行清洗。
-- 將壓力調節器裝回鍋蓋時,請向順時鐘方向旋轉,直到固定為止。 (圖 27)
注意: 壓力調節器正確安裝時,仍然能夠自由移動。
收納
1將電源線捲繞在電源線收納裝置上。
環境保護
-- 本產品壽命結束時請勿與一般家庭廢棄物一併丟棄。請將該產品放置於政府指定的回
收站,此舉能為環保盡一份心力。 (圖 28)
-- 內建鋰電池含有可能污染環境的物質。丟棄本產品或是將本產品放到政府指定回收站
前,請務必先取出電池,並且將電池送到政府指定的電池回收站。 (圖 29)
卸除電池
請注意,本程序是不可回復的。
-- 要取出電池,您需要一把螺絲起子與鉗子。並在進行下列步驟之前,請採取基本的安
全防護措施,務必保護眼睛、雙手、手指以及工作平台的表面。
1用螺絲起子將底蓋的 4 顆螺絲取下。 (圖 30)
2用螺絲起子鬆開托架上的 2 顆螺絲。 (圖 31)
3取下拖架,將電池盒的兩端用鉗子剪斷,將電池取出。 (圖 32)
保固與服務
若您需要相關服務或資訊,或是有任何問題,請瀏覽飛利浦網站,網址為
www.philips.com,或聯絡當地的飛利浦客戶服務中心 (電話號碼可參閱全球保證書)。若
您當地沒有客戶服務中心,請洽詢當地的飛利浦經銷商。
故障排除
如果您的電子鍋運作不正常,或烹調品質不佳,請參考下面的表格。如果您無法解決問
題,請聯絡當地的飛利浦客戶服務中心。
問題
原因
解決方法
開始 (START) 指示
燈沒有亮起。
電源連接有問題。
請檢查電子鍋是否連接電源,插頭是否
確實插入電源插座中。
指示燈故障。
請將產品送至飛利浦經銷商或飛利浦授
權的服務中心。
烹調程序完成後,保 指示燈故障。
溫 (KEEP-WARM)
指示燈沒有亮起。
請將產品送至飛利浦經銷商或飛利浦授
權的服務中心。
繁體中文 31
問題
原因
解決方法
您可能是使用再加熱,
或是烘培蛋糕。
自動保溫模式僅適用米飯、粥、湯、蒸
煮、燉燜模式。
您尚未將開蓋控制桿撥
我按下開始/再加熱
到鎖定 (LOCK) 位置。
(START/REHEAT)
按鈕時,電子鍋發出
嗶聲。
將開蓋控制桿撥至鎖定 (LOCK) 位置,
然後重新按下開始/再加熱 (START/
REHEAT) 按鈕。
顯示幕無法顯示。
供應顯示幕的電池電力
耗盡。
請將產品攜至您的飛利浦經銷商或是飛
利浦授權的服務中心更換電池。
米飯沒有煮透。
加入的水量不足。
請根據內鍋內側所標示的刻度來加水
(請參閱「使用此電器」單元)。
烹調程序沒有開始。
您沒有按下開始/再加熱 (START/
REHEAT) 按鈕。
您按下開始/再加熱 (START/REHEAT)
按鈕時,開蓋控制桿並非位於鎖定
(LOCK) 位置。請將開蓋控制桿撥至鎖
定 (LOCK) 後,重新按下開始/再加熱
(START/REHEAT) 按鈕。
您不小心按了兩次開始/
再加熱 (START/
REHEAT) 按鈕。
僅限按一下開始/再加熱 (START/
REHEAT) 按鈕。
加熱元件損壞。
請將產品送至飛利浦經銷商或飛利浦授
權的服務中心。
蛋糕烘培失敗。
食材的用量過多。
請核對「烘培蛋糕」單元中,蛋糕食譜
表格所列的份量。
米飯太硬
加入的水量不足。
請根據內鍋內側所標示的刻度來加水
(請參閱「使用此電器」單元)。
您選用了「硬」(hard)
口感。
改選想要的米飯口感 (請參閱「使用此
產品」章節的「米飯軟硬控制」單
元)。
加入的水量過多。
請根據內鍋內側所標示的刻度來加水
(請參閱「使用此電器」單元)。
您選用了「軟」(soft) 口
感。
改選想要的米飯口感 (請參閱「使用此
產品」章節的「米飯軟硬控制」單
元)。
粥的黏稠度不如預
期。我想重新烹調,
但是預設烹調時間為
30 分鐘,我無法調
整時間。
本電子鍋具備自動安全
系統,會讓鍋內壓力保
持在安全程度。因此,
預設烹調時間設定為 30
分鐘。
請馬上重新烹調粥 30 分鐘,或等待粥
完全冷卻後再重新烹調。
有大量蒸氣和/或水
從蒸氣通氣孔和/或
壓力調節器間歇地洩
出。
電子鍋內會產生大量蒸
氣壓,而蒸氣通氣孔和
壓力調節器正在洩出蒸
氣以降低壓力。
請等待烹調程序自動結束。
米飯太軟。
32
繁體中文
問題
原因
解決方法
僅限使用再加熱功能重新加熱米飯。並
您使用了再加熱功能重
新加熱/烹調粥、煲湯或 使用其他烹調方法重新加熱粥、湯或燜
燉。
燜燉,因為烹調結果不
如預期 (例如粥的黏稠度
不如預期)。
我無法將開蓋控制桿 電子鍋內的蒸氣壓仍然
撥至開
太高。
(UNLOCK)。
請勿強迫開啟鍋蓋;讓電子鍋完全冷
卻。
顯示幕顯示錯誤碼「 電子零件或溫度感應器
E01」或「E02」。 故障。
請將產品送至飛利浦經銷商或飛利浦授
權的服務中心
顯示幕顯示「I_I」
內鍋未裝入電子鍋。
請將內鍋正確裝入電子鍋內,再重新啟
動烹調程序。
顯示幕顯示「24
Ho」。
定時器設定超過 24 小
時。
定時器的設定時間最高不可超過 24 小
時 (請參閱「使用此產品」章節的「定
時功能」單元)。
简体中文 33
简介
感谢您的惠顾,欢迎光临飞利浦!为了您能充分享受飞利浦提供的支持,请注册您的产
品,网址为 www.philips.com/welcome。
一般说明 (图 1)
A
B
C
D
E
F
G
H
I
J
K
L
M
N
O
P
Q
R
S
T
U
V
---
内盖
密封圈
加热元件
温度传感器
锅盖打开键
控制面板
锅盖锁杠
外盖
营养保温 (KEEP WARM) 指示灯
开始/再加热 (START/REHEAT) 指示灯
显示屏
煲身
自动蒸汽孔
调压器
蒸架(仅限于 HD4763)
水位标记
内胆
饭勺
量杯
电饭煲手柄(仅限于 HD4763)
电源线存储装置
电源线
HD4763 显示屏
HD4761 显示屏
注意事项
使用产品之前,请仔细阅读本使用说明书,并妥善保管以备日后参考。
危险
-- 切勿将电饭煲的煲身浸入水中,也不能在水龙头下冲洗。
-- 电饭煲正在工作时,不要盖住其蒸汽孔和调压器。
-------------
警告
在将产品连接电源之前,请先检查产品所标电压与当地的供电电压是否相符。
产品必须插入有接地的插座,且务必确保其已稳固插入。
如果插头、电源线、内锅或煲身已经损坏,请勿再使用本产品。
如果电源软线损坏,为避免危险,必须由飞利浦、飞利浦授权的维修部或类似的专职
人员来更换。
本产品不打算由肢体不健全、感觉或精神上有障碍或缺乏相关经验和知识的人(包括
儿童)使用,除非有负责他们安全的人对他们使用本产品进行监督或指导。
应照看好儿童,确保他们不玩耍该产品。
不要让儿童接触到电源线。切勿将电源线悬挂在放置本产品的桌子或工作台的边上。
将插头接入插座之前,应确保加热元件、温度传感器和内锅外侧是洁净、干燥的。
如果密封圈损坏,请勿再使用产品。
请勿用浸湿的手插接产品插头或按控制面板上的任何按钮。
切勿将本产品连接至外部定时器,以免发生危险。
电饭煲正在工作时,切勿将脸或手靠近调压器或蒸汽孔。
34
-----
简体中文
米饭煮沸时,切勿打开锅盖。
煮饭过程结束后,切勿立即打开锅盖,而要等到电饭煲内的蒸汽完全释放再打开。
定期检查蒸汽孔,确保其不会被堵塞。
有关任何涉及心脏起搏器或其它植入装置的问题,请在使用本产品之前咨询医生。
注意
-- 切勿使用其它制造商生产的或未经飞利浦特别推荐的附件或部件。如果您使用了此类
附件或部件,则本产品的保修将会失效。
-- 仅使用附送的饭勺。不要使用尖锐的器具。
-- 切勿将电饭煲暴露在高温之下,也不要将电饭煲放在正在工作或仍然发热的炉具或炊
具上。
-- 将插头接入插座和打开电饭煲之前,一定要先放入内锅。
-- 如果很长时间不用,请务必拔下电饭煲的电源插头。
-- 一定要先让电饭煲冷却,才能进行清洁或移动。
-- 不要将内锅直接放在火上煮饭。
-- 本产品仅打算用于家用及类似用途,如:
-- 商店、办公场所及其它工作环境的厨房;
-- 农庄;
-- 由旅店、旅馆及其它住宿型环境中的客人使用;
-- B&B 型旅宿环境。
-- 对本产品使用不当,或者将其用于专业、半专业用途,或者没有根据本用户手册中的
说明进行使用,此类情况下保修将失效,飞利浦对此类损坏概不负责。
-- 将电饭煲放在稳固、平整且水平的表面上。
-- 产品工作时,可接触到的表面会发热。只能触摸控制面板。
-- 小心煮饭期间从蒸汽孔和调压器排出的高温蒸汽,或在打开盖子时从电饭煲中冒出的
高温蒸汽。
-- 煮饭期间,切勿提起及移动电饭煲。
-- 切勿将产品直接曝晒于阳光下。
-- 切勿将金属物体或异物插入蒸汽孔和调压器。
-- 请勿烹饪粘性食物或会产生大量气泡的食物,例如咖喱粉或大麦茶。
-- 确保在开启电饭煲之前,锅盖锁杠处于锁定位置。
-- 请勿将带磁性的物体放在锅盖上。请勿在带磁性的物体附近使用本产品。
-- 如果内锅已变形,请勿使用。
-- 请不要超出内锅中标明的最高水位标示,以免调压器中溢水。
-- 使用自动清洁功能定期清洁调压器和蒸汽孔(请参阅“清洁”一章)。
-- 切勿在烹饪、保温或重新加热米饭时将饭勺放入锅中。
-- 每次使用后应清洁产品。
-- 请勿在洗碗机中清洗本产品。
电磁场 (EMF)
这款飞利浦产品符合关于电磁场 (EMF) 的相关标准。据目前的科学证明,如果正确使用并
按照本用户手册中的说明进行操作,本产品是安全的。
蒸汽孔和调压器
务必注意电饭煲工作期间从蒸汽孔和调压器排出的高温蒸汽。
煮饭期间,电饭煲内部会形成蒸汽压力。调压器可调节电饭煲内形成的压力容积。调压器
在煮饭期间轻微震动是正常现象。电饭煲内形成的蒸汽压力会在烹饪过程结束之前自动释
放。
如果煮饭过程中断(如电源故障期间),自动安全系统将一直锁定电饭煲,直到电饭煲内
的压力降至安全级别。
切勿在煮饭过程中强制将锅盖锁杠转至解锁 (UNLOCK) 位置来尝试打开锅盖,或在煮饭
过程中断之后立即打开锅盖。
简体中文 35
电源故障备份功能
如果在 2 小时内恢复供电,则本产品的备份功能可以记忆电源发生故障之前的状态。如果
在煮饭过程中发生电源故障,则恢复供电时,煮饭时间倒计时将从中断处继续。
如果电源故障的持续时间长于 2 个小时,并且故障在煮饭过程中发生,则恢复供电时电饭
煲将自动重置为待机模式。打开电饭煲,倒出其中的米饭,然后重新开始煮饭过程。
如果在发生电源故障时您已设置定时器,而预设煮饭过程尚未开始,则此过程将在电源恢
复时开始,前提是在 12 小时之内恢复供电。
如果在煮饭过程中发生电源故障,出于安全考虑,蒸汽孔将自动闭合
使用准备
初次使用之前
1取出内锅和加热元件之间的隔板。
2首次使用产品前,请彻底清洁电饭煲的组件(请参阅“清洁”章节)。
3在您开始使用本产品之前,请保持所有部件完全干燥。
控制面板和显示屏
控制面板上有几个按钮用于操作产品。显示屏将提供关于所选流程的信息。
-- HD4763 的控制面板和显示屏 (图 2)
-- HD4761 的控制面板和显示屏 (图 3)
显示屏的电池
-- 如果产品没有插接电源,则显示将通过锂电池工作
-- 如果产品很少连接电源,则电池可持续使用 5 年左右。如果电饭煲在大多数时候都连
接电源,则电池可以使用相当长的时间。
注意: 如果电池已耗干,为避免危险,必须由飞利浦授权的服务中心或类似的专职人员来
更换。
设置时钟时间
1将插头接入电源插座,打开产品电源。
2按住小时 (HR) 或分钟 (MIN) 按钮以设置时钟时间。 (图 4)
,, 冒号 (:) 将开始闪烁。 (图 5)
3按小时 (HR) 按钮设置小时。
-- 按一次小时 (HR) 按钮可将小时读数推前 1 小时。
-- 按住小时 (HR) 按钮可将小时读数快速推前。
4按分钟 (MIN) 按钮设置分钟。
-- 按一次分钟 (MIN) 按钮可将分钟读数推前 1 分钟。
-- 按住分钟 (MIN) 按钮可将分钟读数以 5 分钟的隔数快速推前。
注意: 不能在煮饭过程中或当电饭煲处于保温模式下时调整时钟时间。
5按开始/再加热 (START/REHEAT) 按钮以确认时间。要取消更改,请按营养保温/取消
(KEEP WARM/CANCEL) 按钮。
注意: 也可以等待 5 秒钟后自动确定时间。
,, 冒号 (:) 停止闪烁,显示屏将显示设定的时钟时间。 (图 6)
使用本产品
煮白米
1使用附带的量杯量米。 (图 7)
36
简体中文
每杯生米大约相当于煮熟后的 2 碗米饭。不要超过内锅里指定的量。1 杯米大约为 180 毫
升。
煮米饭的用米量和烹煮时间
菜单
HD4761 大概烹
饪时间
HD4761 用米量
(杯)
HD4763 大概烹
饪时间
HD4763 用米量
(杯)
白米
25-35 分钟
1-6
25-40 分钟
2-10
快煮白米**
25 分钟
2-4
25 分钟
2-6
八宝粥
45-55 分钟
1-4
45-55 分钟
2-6
糯米
不适用
不适用
45-55 分钟
2-8
糙米
不适用
不适用
45-55 分钟
2-6
杂锦米
45-55 分钟
1-4
45-55 分钟
2-6
寿司米
不适用
不适用
30-45 分钟
2-8
粥
1.5-4 小时
0.25-1
1-4 小时
0.5-1.5
**注意:为获得最佳效果,建议每次用米量不要超过 4 杯 (HD4761) 或 6 杯 (HD4763)。
2将米彻底淘洗干净。
3将淘好的米倒入内锅。
4按所倒入白米的杯数,依照刻在内锅上的相应水位标记加入适量的水,然后将米抚
平。
例如,煮 4 杯米,就应将水加至水位标记上 4 杯的位置。
-- HD4763 (图 8)
-- HD4761 (图 9)
注意: 内锅的水位标记只是一个参考,您可以根据米的品种及您的个人喜好调整水位。
5按锅盖释放钮,打开锅盖。
注意: 确保锅盖锁杠处于解锁 (UNLOCK) 位置。
6将内锅放入电饭煲。  (图 10)
确保内锅的放置正确,其手柄与电饭煲主体的凹槽对齐。
注意: 确保加热元件和内锅的外表面清洁、干燥。
7将插头接入电源插座,打开产品电源。
8盖上电饭煲的盖子。
切勿强行合上盖子。如果盖子不能完全合上,请检查内锅的放置是否正确。
9将锅盖锁杠转至锁定 (LOCK) 位置。 (图 11)
,, 显示屏上将出现锁定符号。 (图 12)
注意: 如果您按下开始 (START) 按钮时,锅盖锁杠并非处于锁定 (LOCK) 位置,则开始
(START) 指示灯将闪烁,电饭煲发出 10 声哔声,显示屏上将闪烁锁定图标。
10 按功能/米饭软硬控制 (MENU/TASTE CONTROL) 按钮并选择“快煮白米”。 (图 13)
11 按营养保温/取消 (KEEP WARM/CANCEL) 按钮开始煮饭。 (图 14)
,, 开始 (START) 指示灯将亮起,显示屏上将显示煮饭图标和剩余煮饭时间。  (图 15)
,, 电饭煲将按默认口感设置“正常口感”开始煮饭。
简体中文 37
注意: 可以在煮饭过程开始后的 10 秒钟内调整口感(请参阅“口感控制”部分)。
,, 烹煮过程结束前 3-8 分钟时,产品将发出哔声,然后开始间歇性地释放蒸汽。
,, 当煮饭过程结束时,电饭煲会再次发出哔声,营养保温 (KEEP WARM) 指示灯将亮
起,指示电饭煲已切换至保温模式。
12 按营养保温/取消 (KEEP WARM/CANCEL) 按钮可取消保温模式。
还可以使用营养保温/取消 (KEEP WARM/CANCEL) 按钮取消预设的米饭煮好时间。
13 将锅盖锁杠转至解锁 (UNLOCK) 位置。
,, 显示屏上将显示解锁图标。
14 按锅盖释放钮,打开锅盖。
15 翻松米饭。 (图 16)
搅动米饭可将多余蒸汽释放出来,使米饭更松软。
16 拔下电饭煲电源插头,切断电源。
注意: 要中断正在进行的烹煮过程,请参阅本章中的“中断正在进行的煮饭过程”一节。
烹煮其它风味的米饭
1遵循“煮白米”部分的步骤 1 至 9。
不要超过表中标明的量,否则可能导致电饭煲溢水。
2按功能/米饭软硬控制 (MENU/TASTE CONTROL) 按钮选择一种米饭口感。
-- HD4763:您可以选择“快煮白米”、“八宝粥”、“糙米/杂锦米/糯米”或“寿司
米”。
-- HD4761:您可以选择“快煮”、“八宝粥”、“杂锦米”或“杂谷”。
注意: 以“快煮白米”模式煮饭时只能使用白米。
将米和豆混合烹煮时,请参阅下表中关于大豆浸泡时间和米豆比例的说明。
3遵循“煮白米”部分的步骤 11 至 16。
豆的类型
建议的预先浸泡时间
花生
至少 10 分钟
绿豆、黄豆
至少 30 分钟
黑豆
至少 40 分钟
红豆
至少 5 小时
下表指示建议的米与豆的比例。
八宝粥
豆的比例
米的比例
1杯
¼杯
¾杯
2杯
半杯
1 杯半
3杯
半杯
2 杯半
4杯
¾杯
3杯
5 杯(仅限于 HD4763)
1杯
4杯
6 杯(仅限于 HD4763)
1杯
5杯
38
简体中文
口感控制
通过口感控制功能,您可以选择所需的米饭粘度和松软度。
1遵循“煮白米”部分的步骤 1 至 9。
2按功能/米饭软硬控制 (MENU/TASTE CONTROL) 按钮并选择一种口感。  (图 13)
3按开始/再加热 (START/REHEAT) 按钮开始烹煮 (1),然后立即按功能/米饭软硬控制
(MENU/TASTE CONTROL) 按钮更改米饭软硬程度 (2)。 (图 17)
注意: 必须在 10 秒钟内按功能/米饭软硬控制 (MENU/TASTE CONTROL) 按钮。如果超
过此时间才按功能/米饭软硬控制 (MENU/TASTE CONTROL) 按钮,电饭煲将按照默认设
置“正常口感”开始烹煮。
注意: 除了快煮白米”之外,所有其它煮饭模式都可以更改口感。
注意: 口感控制功能不能在保温模式、定时模式或再加热模式下使用。
4选择一种口感(软、适中或硬),并按开始/再加热 (START/REHEAT) 按钮确
认。 (图 14)
如果您没有按开始/再加热 (START/REHEAT) 按钮进行确认,电饭煲会在 5 秒钟后自动设
置口感。
注意: 煮饭时间可能因所选的口感而异。
各种烹饪模式
下表显示了各种模式的大概烹饪时间。实际烹饪时间可能因电压、室温、湿度和用水量而
异。
各种模式的烹饪时间
模式
大概烹饪时间
汤
1.5-4 小时
蒸
10-40 分钟
焖
30-60 分钟 (HD4761),20-60 分钟 (HD4763)
蛋糕
35 分钟 (HD4761),40 分钟 (HD4763)
再加热
约 20 分钟
煮粥、煲汤或焖/炖
1将煲汤、煮粥或焖/炖所需的原料放入内锅。
2加水。
不要超过内锅中针对煮粥、煲汤或焖/炖等模式的最大水位标度。
-- HD4763 (图 8)
-- HD4761 (图 9)
3遵循“煮白米”部分的步骤 6 至 9。
4按菜单 (MENU) 按钮选择煮粥、煲汤或焖/炖烹饪模式。 (图 13)
,, 显示屏上将显示默认烹饪时间(煮粥和煲汤为 90 分钟,焖/炖为 40 分钟)。
5如果要更改烹饪时间,可以按小时 (HR) 和/或分钟 (MIN) 按钮。
-- 煮粥和煲汤时可将时间设置在 1.5 小时到 4 小时之间,焖/炖时可设置在 30-60 分钟之
间 (HD4761) 或 20-60 分钟之间 (HD4763)。
-- 按一次小时 (HR) 按钮可将小时读数推前 1 小时。
简体中文 39
-- 按分钟 (MIN) 按钮一次,将分钟读数推前 1 分钟;或者按住分钟 (MIN) 按钮,将分钟
读数以 5 分钟的隔数向前推。
6遵循“煮白米”部分的步骤 11 至 14。
7拔下电饭煲电源插头,切断电源。
注意: 要中断正在进行的烹煮过程,请参阅本章中的“中断正在进行的煮饭过程”一节。
蒸食品
1用量杯量 3 杯水,并倒入内锅。
-- 所需的水量因所蒸食物的量而异。
-- 3 杯水沸腾大约需要 9 分钟。
2将蒸架放入内锅。 (图 18)
如果需要另外使用盘子,请将其放到蒸架上。
注意: 只有 HD4763 随附了蒸架。如果要用 HD4761 蒸制食物,请使用适合内锅的蒸
架。
3将要蒸的食物放在蒸架或盘子上。 (图 19)
注意: 为确保蒸食物时均匀受热,应将食物摆置均匀,不要堆积在一起。
4遵循“煮白米”部分的步骤 6 至 9。
5按功能/米饭软硬控制 (MENU/TASTE CONTROL) 按钮选择“蒸煮”模式。 (图 13)
,, 显示屏上显示默认蒸煮时间 20 分钟。
6可按分钟 (MIN) 按钮更改蒸煮时间。
-- 可以将蒸煮时间设置为 15 至 40 分钟。
-- 按分钟 (MIN) 按钮一次,将分钟读数推前 1 分钟;或者按住分钟 (MIN) 按钮,将分钟
读数以 5 分钟的隔数向前推。
7按开始/再加热 (START/REHEAT) 按钮开始蒸煮过程。 (图 14)
,, 开始 (START) 指示灯将亮起,显示屏上将显示烹饪图标和剩余蒸煮时间。  (图 15)
,, 蒸制过程结束前 3-8 分钟时,产品将发出哔声,然后开始间歇性地释放蒸汽。
,, 当煮饭过程结束时,电饭煲会再次发出哔声,营养保温 (KEEP WARM) 指示灯将亮
起,指示电饭煲已切换至保温模式。
8按营养保温/取消 (KEEP WARM/CANCEL) 按钮可取消保温模式。
还可以使用营养保温/取消 (KEEP WARM/CANCEL) 按钮取消预设的蒸煮就绪时间。
9将锅盖锁杠转至锁定 (LOCK) 位置。
,, 显示屏上将显示解锁图标。
10 按锅盖释放钮,打开锅盖。
11 拔下电饭煲电源插头,切断电源。
注意: 要中断正在进行的烹煮过程,请参阅本章中的“中断正在进行的煮饭过程”一节。
烘焙蛋糕
1将下表中列出的原料混合在一起,制成蛋糕面粉糊。
蛋糕原料
原料
HD4763 的用量
HD4761 的用量
可随时烘焙的蛋糕面粉糊
400 克
250 克
黄油
100 克
65 克
40
简体中文
原料
HD4763 的用量
HD4761 的用量
水或牛奶
150 毫升
100 毫升
鸡蛋
2 个大的
1 个大的
2给内锅涂上黄油。
3将面粉糊放入内锅。
4遵循“煮白米”部分的步骤 5 至 9。
5按功能/米饭软硬控制 (MENU/TASTE CONTROL) 按钮选择“蛋糕”模式。 (图 13)
6按开始 (START) 开始蛋糕烘焙过程。 (图 14)
,, 开始 (START) 指示灯将亮起,显示屏上将显示烹饪图标和剩余的蛋糕烘焙时
间。 (图 15)
,, 蛋糕烘焙过程结束前 3-8 分钟时,产品将发出哔声,然后开始间歇性地释放蒸汽。
,, 蛋糕烘焙过程结束时,电饭煲会再次发出哔声。
7遵循“蒸煮”部分的步骤 9 至 11。
中断正在进行的煮饭过程
1要中断正在进行的煮饭过程,可按住营养保温/取消 (KEEP WARM/CANCEL) 按钮约 3
秒钟。
2营养保温/取消 (KEEP WARM/CANCEL) 指示灯将开始闪烁,显示屏上将显示剩余的
冷却时间。
-- 如果煮饭过程发生中断,则自动安全系统会将电饭煲保持锁定状态,直至电饭煲内部
的压力降至安全级别。冷却期间,切勿尝试通过强行将锅盖锁杠转至解锁 (UNLOCK)
位置来打开锅盖。
-- 蒸煮 (STEAM) 模式的冷却时间为 3 分钟。
-- 煮饭/焖炖/煲汤 (RICE/STEW/SOUP) 模式的冷却时间为 20 分钟。
-- 煮粥 (CONGEE) 模式的冷却时间为 30 分钟。
-- 冷却之后,电饭煲将发出哔声指示蒸汽已自动释放。
3将锅盖锁杠转至解锁 (UNLOCK) 位置,然后按锅盖释放按钮打开锅盖。
加热
您可以用加热模式来加热冷饭。装入内锅的量不能超过其容量的一半,以确保米饭能得到
适当加热。
1翻松冷饭并将其均匀地分布在内锅中。
2在饭中倒入半杯水以避免饭变得太干。添加的水量视需要加热的米饭量而定。
如果米饭开始变焦,则多添加一些水。
3遵循“煮白米”部分的步骤 6 至 9。
4按两次开始/再加热 (START/REHEAT) 按钮,开始再加热过程。 (图 14)
,, 开始 (START) 指示灯将亮起,显示屏上将显示再加热图标和剩余的再加热时
间。 (图 15)
,, 默认再加热时间为 20 分钟。
,, 再加热过程完成时,您将听到一声哔声。
,, 冷饭再加热的次数不能超过一次。
5遵循“蒸煮”部分的步骤 9 至 11。
简体中文 41
保温
此模式使您可以较长时间地保温米饭或食物。
注意: 建议米饭的保温时间不要超过 12 个小时,以保证其口感。
1按一次营养保温/取消 (KEEP WARM/CANCEL) 按钮激活保温模式。
,, 营养保温/取消 (KEEP WARM/CANCEL) 指示灯将持续亮起。
,, 在保温过程中,显示屏将显示小时数 0 至 11(0HR、1HR ...11HR)。
,, 12 小时后,保温模式自动结束,电饭煲发出 10 声哔声。显示屏将切换至时钟时间。
2遵循“蒸煮”部分的步骤 9 至 11。
定时器
您可以对煮饭过程、蒸煮模式以及焖/炖、煲汤和煮粥等烹饪模式使用定时器。按定时器
(TIMER) 按钮可设置您希望食物煮好的时间。
注意: 可以将时间设置为 1 分钟至 23 小时 59 分钟。
设置米饭的就绪时间
1按功能/米饭软硬控制 (MENU/TASTE CONTROL) 按钮选择所需的煮饭菜单。 (图 13)
2要设置就绪时间,请按一次定时器设置 (TIMER SET) 按钮 (1),然后使用小时 (HR)
(2) 和/或分钟 (MIN) (3) 按钮来设置时间。
-- 例如,您可以用定时器 (TIMER) 按钮将米饭就绪时间设置在 18:30。 (图 20)
-- 您每按一次小时 (HR) 按钮,小时读数会推前 1 小时。您每按一次分钟 (MIN) 按钮,分
钟读数会推前 1 分钟。如果按住分钟 (MIN) 按钮,分钟读数将以 5 分钟的隔数快速推
前。
3按开始/再加热 (START/REHEAT) 按钮启动定时器。 (图 14)
,, 开始 (START) 指示灯将亮起,屏幕上将显示“定时器已设置”的字样以及米饭的就绪
时间。
,, 烹饪过程开始后,显示屏上将出现烹饪图标和剩余烹饪时间。
注意: 如果预设时间短于选定米饭菜单所需的总烹饪时间,则电饭煲将使用默认的烹饪时
间立即开始烹饪过程。如果预设时间短于所需的总烹饪时间,那么烹饪时间将不会缩短。
设置粥、炖品、汤或蒸制食品的就绪时间:
1按功能/米饭软硬控制 (MENU/TASTE CONTROL) 按钮选择煮粥、煲汤或焖/炖等烹饪
模式或蒸煮模式。 (图 13)
2遵循前面“设置米饭的就绪时间”部分中的步骤 2 和 3。有关烹饪时间,请参阅“煮
粥、煲汤或焖/炖”或“蒸煮”部分。 (图 20)
清洁
在清洗电饭煲之前,请拔掉电饭煲的电源线。
等到电饭煲完全冷却后再开始清洗。
仅当出于清洗目的而必要时,才能取下内盖上的橡胶密封圈(请参阅本章中的“橡胶密封
圈”一节)。
请定期清洗锅盖和橡胶密封圈,以防止粘上食物残渣。锅盖和密封圈上的食物残渣可能会
导致蒸汽漏出。
不要用任何研磨性清洗剂、硬毛刷或金属网绒清洁煲身、锅盖和内锅,以免造成损坏。
切勿将电饭煲主体浸入水中,也不能在水龙头下冲洗。
要保护内锅的不粘涂层,请勿:
42
简体中文
-- 用内锅洗盘子;
-- 将醋倒入内锅;
-- 在锅内淘米。
1用湿布擦净煲身、内外盖和密封圈。
2用干布擦干加热元件。
3在热水中加入清洁剂,用海绵或布清洁内盖、内锅、蒸架(仅限于 HD4763)和饭
勺。
4清洗之后,确保蒸架的橡胶脚垫(仅限于 HD4763)完全插入。
橡胶密封圈
橡胶密封圈不会轻易松脱,可防止蒸汽漏出。如果必要,可将其从锅盖上取下并加以清
洁。
注意: 如果锅盖上有蒸汽漏出,请取下密封圈并加以清洁。如果蒸汽继续从锅盖漏出,请
更换密封圈。
1将橡胶密封圈从沟槽中拉出。 (图 21)
这需要稍微施力。
2在温热的肥皂水中清洗密封圈。
3要装回密封圈,将其嵌入锅盖的沟槽中即可。 (图 22)
-- 确保密封圈上的箭头指向内锅上的标记。
-- 确保密封圈的突出部分朝向您自己。 (图 23)
-- 用双手将密封圈从顶部向底部推入沟槽。 (图 24)
注意: 如果橡胶密封圈未能正确嵌入,则电饭煲工作时,蒸汽将会从密封圈漏出。
自动清洁
定期使用自动清洁功能,最好是每月使用一次,以免蒸汽孔和调压器粘上食物残渣,并防
止调压器在煮饭时剧烈震动。
1使用大米量杯(360 毫升)将 2 杯水倒入内锅。
2盖上锅盖,并将锅盖锁杠转至锁定 (LOCK) 位置。
3按下自动清洁 (AUTO CLEAN) 按钮。 (图 25)
4按开始/再加热 (START/REHEAT) 按钮开始自动清洁过程。
注意: 如果您在锅盖尚未锁定时按下开始/再加热 (START/REHEAT) 按钮,则电饭煲会
发出 10 声哔声,且显示屏上会闪烁锁定 (LOCK) 图标。
自动清洁过程中,产品会发出哔声,然后释放蒸汽。开始 (START) 指示灯亮起,显示屏
上会出现“自动清洁”字样以及剩余的清洁时间。
,, 开始 (START) 指示灯将亮起,并且显示屏上会出现“自动清洁”字样以及剩余的清洁
时间。
,, 在自动清洁过程结束时,产品会再次发出哔声并自动关闭。
5将锅盖锁杠转至解锁 (UNLOCK) 位置。
6按锅盖释放钮,打开锅盖。
蒸汽孔和调压器
1经常用湿布清洁蒸汽孔周围的区域。
要清洁调压器:
简体中文 43
1提起调压器 (1) 并逆时针旋转 (2)。 (图 26)
2逆时针旋转调压器。
3取下调压器并加以清洁。
-- 要将调压器装回锅盖,请将其顺时针旋转直到固定为止。 (图 27)
注意: 正确组装后,调压器仍可自由移动。
存储
1将电源线绕在电源线存储装置上。
环保
-- 弃置产品时,请不要将其与一般生活垃圾堆放在一起;应将其交给官方指定的回收中
心。这样做有利于环保。 (图 28)
-- 内置锂电池包含可能污染环境的物质。丢弃产品时,一定要将电池取出,并将产品送
到官方指定的回收中心。到官方指定的电池回收站处理电池。 (图 29)
取出电池
注意此过程是不可逆的。
-- 要取出电池,需要使用螺丝刀和镊子。按照下面列出的步骤执行操作时,请遵循基本
的安全措施。务必保护好您的眼睛、手、手指以及工作台面。
1用螺丝刀卸下底盖上的 4 颗螺钉。 (图 30)
2用螺丝刀拧下托架上的 2 颗螺钉。 (图 31)
3取出托架,用镊子划开电池两端的电池极板,取出电池。 (图 32)
保修与服务
如果您需要服务或信息,或者有任何疑问,请访问飞利浦网站:www.philips.com。您也
可与您所在地的飞利浦顾客服务中心联系(可从全球保修卡中找到其电话号码)。如果您
的所在地没有飞利浦顾客服务中心,则可以与当地的飞利浦经销商联系。
故障种类和处理方法
如果您的电饭煲工作不正常,或烹饪质量有缺陷,请查询以下表格。如果仍不能解决问
题,则请联系您所在国家的飞利浦客户服务中心。
问题
原因
解决方法
开始 (START) 指示
灯不亮。
接触不良。
检查电饭煲是否与电源连接,插头是否
插牢。
指示灯有故障。
请将本产品送往当地的飞利浦经销商,
或经飞利浦授权的客户服务中心。
指示灯有故障。
请将本产品送往当地的飞利浦经销商,
或经飞利浦授权的客户服务中心。
烹饪过程结束后,
保温 (KEEP-WARM)
指示灯不亮。
您已重新加热过食物或 自动保温模式仅适用于煮饭、煮粥、煲
烘烤过蛋糕。
汤、蒸煮和焖/炖等烹煮模式。
44
简体中文
问题
原因
解决方法
按下开始/再加热
(START/REHEAT)
按钮后电饭煲发出
哔声。
可能未将锅盖锁杠转至 将锅盖锁杠转至锁定 (LOCK) 位置,并
锁定 (LOCK) 位置。
再次按下开始/再加热 (START/REHEAT)
按钮。
显示屏不能工作。
为显示屏供电的电池已 请将产品送往飞利浦经销商处或飞利浦
耗干。
授权的服务中心,让其为您更换电池。
饭没煮好。
加水不足。
将水加到内锅的相应水位标志(见“使
用本产品”一章)。
煮饭过程未启动。
您没有按下开始/再加热 (START/
REHEAT) 按钮。
按下开始/再加热 (START/REHEAT) 按钮
时,锅盖锁杠并未处于锁定 (LOCK) 位
置。将锅盖锁杠转至锁定 (LOCK) 位
置,并再次按下开始/再加热 (START/
REHEAT) 按钮。
您无意中按了两次开
始/再加热 (START/
REHEAT) 按钮。
只能按一次开始/再加热 (START/
REHEAT) 按钮。
加热元件已损坏。
请将本产品送往当地的飞利浦经销商,
或经飞利浦授权的客户服务中心。
没有正确烘烤蛋
糕。
配料的数量太多。
核对“烘焙蛋糕”一节的蛋糕制作表中
标明的数量。
米饭太硬
加水不足。
将水加到内锅的相应水位标志(见“使
用本产品”一章)。
您选择了“略硬”的口 选择所需的口感(请参阅“使用产
感。
品”一章中的“口感控制”一节)。
米饭太软。
加水太多。
将水加到内锅的相应水位标志(见“使
用本产品”一章)。
您选择了“松软”口
感。
选择所需的口感(请参阅“使用产
品”一章中的“口感控制”一节)。
煮出来的粥稠度不
均。我想重新煮一
次,但默认时间为
30 分钟,我无法调
整时间。
电饭煲具有自动安全系 可选择立即将粥再煮 30 分钟,或让粥完
统,旨在保证电饭煲内 全冷却,然后再煮。
的压力处于安全级别。
因此默认烹饪时间被设
置为 30 分钟。
蒸汽孔和(或)调
压器中间歇性地冒
出大量蒸汽和(
或)水。
电饭煲内形成了较大的 等待煮饭过程自动完成。
蒸汽压力。蒸汽孔和调
压器可释放这些蒸汽以
减小压力。
简体中文 45
问题
原因
解决方法
由于对效果不够满意( 只能使用重新加热功能来加热米饭。应
例如粥没有达到所需的 使用其它方法来重新加热粥、汤或炖
稠度),您已使用重新 品。
加热功能重新加热/烹
煮粥、汤或炖品。
无法将锅盖锁杠转
至解锁 (UNLOCK)
位置。
电饭煲内的蒸汽压力仍 切勿强行解锁锅盖。请让电饭煲完全冷
然很高。
却。
显示屏显示错误代
码 E01 或 E02
电子部件或温度传感器 请将本产品送往当地的飞利浦经销商,
出现故障。
或经飞利浦授权的维修中心
显示屏显示 I_I
未将内锅放入电饭煲。 将内锅正确放入电饭煲,并重新开始煮
饭过程。
显示屏显示 24 Ho
定时器已被设为 24 小
时以上。
设定的时间最长不得超过 24 小时(请参
阅“使用产品”一章中的“定时器”一
节)。
46
2
3
4
5
6
7
8
9
2
10
11
12
13
14
15
16
17
18
19
20
21
47
22
23
24
25
26
27
28
29
30
31
2
1
32
2x
4x
2x
4222.200.0184.6