1
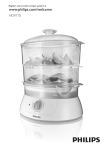
HD4916
1
E
A
F
B
G
C
D
1
2
3
4
5
7
6
2
3
4
6
7
8
5
ENGLISH
Introduction
Congratulations on your purchase and welcome to Philips! To fully benefit
from the support that Philips offers, register your product at www.philips.
com/welcome.
The induction cooker works on the basis of an electromagnet that creates
a powerful, high-frequency electromagnetic field. When cookware consisting
of magnetic material (e.g. iron) is placed on the induction cooker, the
electromagnetic field transfers energy to the bottom of the cookware,
which causes the cookware and the food inside it to become hot. The
amount of heat generated in the cookware is controlled by varying the
strength of the electromagnetic field. When the strength of the
electromagnetic field is changed, the temperature of the cookware changes
instantly.
Advantages of the induction cooker:
- Safe: the induction cooker does not make use of an open flame or fire.
It also has a number of safety features, which allow you to enjoy cooking
with your family whenever you want.
- Fast: in induction cooking, the cookware serves as the heat source. This
results in much faster and more even heat transfer, shortening the
cooking time by more than 1/3 compared to conventional cooking.
- Versatile: the induction cooker has 2 preset cooking modes, each with
its own optimal heating pattern. These modes allow you to prepare a
great variety of nutritious meals.
- Very user friendly: the simple and interactive control panel and display
allow you to easily adjust the settings at the touch of a button. - Comfortable: the induction cooking process is smoke-free and produces
less grease. Moreover, the cooker and the surrounding area stay cool.
This allows you to cook in a cool and comfortable environment.
- Portable: the induction cooker has a compact design and the cooking
plate stays cool. This means the appliance is always safe to use and
allows you to cook anywhere in your home.
A
B
C
D
E
F
G
General description (Fig. 1)
Crystalite cooking plate
Cooking zone
Body
Control panel
Mains cord
Air inlet
Air outlet
1
2
3
4
5
6
7
Control panel
Display for cooking time and power level
Cooking mode buttons with lights for hot pot and stir-fry modes
Cooking time button with cooking time light
Start button with start light
Power on/off button with power-on light
+/- buttons for setting cooking time and power level
Power-level indicator light Important
Read this user manual carefully before you use the appliance and save it for
future reference.
-
-
Danger
Never immerse the appliance in water or rinse it under the tap.
Do not cover any part of the cooking plate with aluminium foil to
prevent the risk of electric shock, short circuiting or fire.
Warning
Check if the voltage indicated on the appliance corresponds to the local
mains voltage before you connect the appliance.
The temperature of accessible surfaces may be high when the appliance
operates.
Only connect the appliance to an earthed wall socket. Always make
sure the plug is inserted firmly into the socket.
Do not use the appliance if the plug, the mains cord or the appliance
itself is damaged.
If the mains cord is damaged, you must have it replaced by Philips, a
service centre authorised by Philips or similarly qualified persons in
order to avoid a hazard.
If the surface of the cooking plate is cracked, switch off the appliance
and do not use it anymore to prevent the risk of electric shock.
This appliance is not intended for use by persons (including children)
with reduced physical, sensory or mental capabilities, or lack of
experience and knowledge, unless they have been given supervision or
instruction concerning use of the appliance by a person responsible for
their safety.
4222.200.0273.2
-
-
-
Children should be supervised to ensure that they do not play with the
appliance.
Keep the mains cord out of the reach of children. Do not let the mains
cord hang over the edge of the table or worktop on which the
appliance stands.
Make sure the cooking plate is clean and dry before you switch on the
appliance.
Do not cover the air outlet while the induction cooker is operating.
Do not plug in the appliance or operate the control panel with wet
hands.
Do not touch the cooking plate after cooking, as it retains heat from the
cookware.
Metallic objects such as knives, forks, spoons and lids should not be
placed on the cooking plate since they can get hot.
Caution
Never use any accessories or parts from other manufacturers or that
Philips does not specifically recommend. If you use such accessories or
parts, your guarantee becomes invalid.
Do not expose the induction cooker to high temperatures, hot gas,
steam or damp heat. Do not place the induction cooker on or near an
operating or still hot stove or cooker.
Always switch off the appliance before you unplug it.
Always unplug the appliance and let it cool down before you clean it.
This appliance is intended for indoor household use only. If the
appliance is used improperly or for professional or semi-professional
purposes or if it is not used according to the instructions in the user
manual, the guarantee becomes invalid and Philips will not accept liability
for any damage caused.
Place the induction cooker on a stable, horizontal and level surface and
make sure there is at least 10cm free space around it to prevent
overheating.
Do not operate the appliance on a plastic tablecloth. Do not place anything between the cookware and the cooking plate.
The maximum weight that can be put on the induction cooker is 7kg.
Beware of hot steam that comes out of the cookware during cooking
or when you remove the lid.
Do not lift and move the induction cooker while it is operating.
Never put empty cookware on the switched-on induction cooker, as
this could cause the cookware to become distorted or the heating coil
to become damaged.
Do not store flammable materials and liquids near or on the induction
cooker.
Avoid hard contact between the cookware or other objects and the
crystalite cooking plate.
Always place the cookware on the cooking zone during cooking.
Never connect this appliance to an external timer switch or remote
control system in order to avoid a hazardous situation.
Do not use cookware with a bottom diameter of more than 16cm to
deep-fry food, as this causes the appliance to malfunction.
Automatic shut-off
The appliance is equipped with automatic shut-off. It switches off
automatically in two situations:
- In the hot pot mode and manual mode, the appliance switches off
automatically if you do not press any button for 60 minutes.
- If there is no cookware or unsuitable cookware on the cooking place
when you press the start button or if you remove cookware from the
cooking plate during cooking, the cooker beeps continuously, the display
shows ‘----’. The cooker automatically switches off after 1 minute unless
you put the cookware back onto the cooking plate within this minute. Electromagnetic fields (EMF)
This Philips appliance complies with all standards regarding electromagnetic
fields (EMF). If handled properly and according to the instructions in this
user manual, the appliance is safe to use based on scientific evidence
available today.
Before first use
Remove all packaging material from the induction cooker.
Preparing for use
1 Place the appliance on a dry, stable and level surface.
2 Make sure there is at least 10cm free space around the appliance to
prevent overheating.
3 Always place the cookware on the cooking zone during cooking.
4 Make sure you use cookware of the correct type and size (see the
tables below).
1 Put the mains plug in the wall socket and press the Power on/off
Recommended types and sizes of cookware
Suitable cookware for the
induction cooker
Material
Cookware with a bottom made of iron or
magnetic stainless steel
Shape
Cookware with a flat bottom
Size
Cookware with a bottom diameter of 1220cm, depending on the cooking mode
(see tips below)
Weight
Cookware with a weight of up to 7kg
(including contents)
Cookware NOT suitable for
the induction cooker
Material
Cookware with a bottom made of non-iron
metal, crystalite, glass, aluminium and copper
Shape
Cookware with a concave or convex bottom
Size
Cookware with a bottom diameter of less
than 11cm
Weight
Cookware with a weight over 7kg (including
contents)
Using the appliance
Only use cookware that is suitable for induction cooking (see chapter
‘Preparing for use’).
Note: Always place and use the appliance on a dry, stable and level surface.
The tables below shows the default settings in the different cooking modes
and to what extent these default settings can be adjusted.
Default and adjustable settings
Manual 4
Default
cooking
time
Adjustable
power
level
Adjustable
cooking
time
Display indications
5
1-7
5-180
Power level
Remaining cooking
time (if cooking
time is set)
Hot
pot
7
-
1-7
-
Power level
Stir fry
6
30
1-7
5-60
Power level Remaining cooking
time (if you press
cooking time
button)
Note: If you want to boil water quickly, simply set to manual mode and set the
power level to 7.The suggested boiling time for 1 litre is 3-5 minutes, for 2 litres
6-10 minutes and for 3 litres 9-14 minutes.
Power level settings
Low
Mid
High
Power
level
1
2
3
4
5
6
7
Related
wattage
(W)
400
800
1200
1400
1600
1800
2000
Using the different modes
You can simply operate the appliance manually or you can choose one of
the two preset cooking modes.
4222.200.0273.2
button to switch on the appliance. (Fig. 2)
The appliance produces a 2-second beep and the power-on light goes
on.
The display shows the default power level (4) (Fig. 3).
2 Place the cookware on the cooking zone.
3 Press the start button to operate the appliance manually or press the
,
,
button of the preset mode you want to use (Fig. 4).
The indicator light above the preset mode button goes on.
If you select one of the preset modes, the appliance is set to the
default settings for manual operation (5 minutes cooking time and a
power level of 4) or to the default settings of the selected preset
mode.
Note: Before you press the start button to confirm the selected mode, you can
still switch to another mode. If you want to switch to a different mode after you
have pressed the start button, you have to switch off the appliance by pressing
the power on/off button.Then press the power on/off button again to switch the
appliance back on and select the desired mode.
4 If you want to start cooking at the default setting of the selected
preset mode, continue with step 7.
See the default settings and cooking time table above for the default settings
in the different cooking modes.
5 If you want to adjust the power level, press the + and -
buttons. (Fig. 5)
The power level indicator light goes on.
Note:You can also adjust the power level during cooking. Tip:To deep-fry food, we advise you to use cookware with a bottom diameter of
12-16cm.
Default
power
level
,
,
Tip:When you cook in the manual mode or hot pot mode, you can
use cookware with a bottom diameter of 12-20cm.
Mode
,
6 If you want to adjust the cooking time, press the cooking time button
,
and then adjust the time with the + and - buttons (Fig. 6).
The cooking time light goes on.
Note:When you press the + and - buttons briefly, the time increases or
decreases by 1 minute.When you press the buttons longer, the time increases
or decreases by 5 minutes.
Note:You can also adjust the cooking time during cooking.
Note:You cannot adjust the cooking time in hot pot mode.
7 Press the start button (Fig. 7).
,
,
The start light goes on.
The induction cooker automatically starts operating according to the
selected mode.
Note: If you have not adjusted the cooking time or power level, the induction
cooker starts operating at the default settings of the manual mode or preset
mode. , During cooking, the fan switches on to keep the appliance cool. When
you switch off the appliance, the fan remains on for approx. 1 minute
and then switches off automatically.
, If you have adjusted the power level, the display shows the set power
level.
, If you have adjusted the cooking time in manual mode, the display
shows the remaining cooking time.
, During cooking in hot pot mode, the display only shows the power
level.You cannot adjust the cooking time in this mode. , If you have adjusted the cooking time in stir-fry mode, the display still
shows the power level. To view the remaining cooking time, press the
cooking time button
, When the cooking time has elapsed, the appliance beeps a few times.
The appliance automatically switches off and the power-on light goes
out.
8 Unplug the appliance after use.
Cleaning and maintenance
Cleaning
Never immerse the appliance in water nor rinse it under the tap. Never use scouring pads, abrasive cleaning agents or aggressive liquids
such as petrol or acetone to clean the appliance.
Do not put vinegar on the crystalite cooking plate.
1 Unplug the appliance and let it cool down.
2 Clean the appliance with a damp cloth and if necessary, with some
mild cleaning agent.
Maintenance
Improper use can lead to scratches on the cooking plate. To avoid
discolouring and scratches, use the appliance according to the instructions in
this user manual and always clean the appliance and cookware properly
after use.
Storage
Do not place heavy objects on the crystalite cooking plate as it is
breakable.
Do not store the appliance in a hot place, for example near a cooker.
If you are not going to use the appliance for a longer period of time, we
advise you to store the appliance in a dry and safe place.
-
Environment
Do not throw away the appliance with the normal household waste at
the end of its life, but hand it in at an official collection point for
recycling. By doing this, you help to preserve the environment (Fig. 8).
Guarantee and service
If you need service or information or if you have a problem, please visit the
Philips website at www.philips.com or contact the Philips Consumer Care
Centre in your country (you find its phone number in the worldwide
guarantee leaflet). If there is no Consumer Care Centre in your country, go
to your local Philips dealer.
Troubleshooting
If your induction cooker does not function properly or if the cooking quality
is insufficient, consult the table below. If you are unable to solve the
problem, contact a Philips service centre or the Customer Care Centre in
your country.
Problem
Solution
The power-on
There is a connection problem. Check if the induction
light does not go cooker is connected to the mains and if the plug is
on.
inserted firmly into the wall socket
The light is defective. Take the appliance to your Philips
dealer or a service centre authorised by Philips.
When I press a
cooking mode
button, the onlight of the
selected mode
does not go on.
The light is defective. Take the appliance to your Philips
dealer or a service centre authorised by Philips.
The cooking
time light does
not go on when
I set the cooking
time.
You have selected the hot pot cooking mode. You can
only adjust the cooking time in the manual mode and
in the stir-fry mode.
Message
What you should do
E1
Unstable voltage
in power supply
network
Check if the voltage in your home is
suitable for the induction cooker.
E2
The cooking
plate has
overheated.
Switch off the appliance and unplug it.
Let it cool down for approx. 10
minutes and then switch on the
appliance again.
E3
The appliance
malfunctions
Take the appliance to a Philips dealer
or a service centre authorised by
Philips. E4
The appliance
has overheated
Check if the air outlet is covered. If so,
remove the object covering the air
outlet and let the appliance cool down.
Then switch on the appliance again.
If the air outlet is not covered, check if
the fan works. Switch on the appliance
and press the Start button. If the fan
does not work, take the appliance to
your Philips dealer or a service centre
authorised by Philips. Recipes
Stir-fried mushroom with bell pepper
Preparation time: 30 minutes
Ingredients:
- 120g fresh mushrooms
- 1 bell pepper
- 2 pieces spicy dried bean curd
- 30g fresh lily bulb
- 2 tablespoons oil
- 1 tablespoon finely chopped garlic
- Some salt and white pepper
- Some sesame oil
1 Clean the mushrooms with kitchen towel.
2 Remove the seeds of the bell pepper and cut into wedges.
3 Clean the dried bean curd and shred into thin pieces.
4 Divide the fresh lily bulb into pieces.
5 Heat the oil in the stir-fry mode (see chapter ‘Using the appliance’,
section ‘Using the different modes’) and stir-fry the garlic until
fragrant.
6 Add the mushrooms and dried bean curd and stir.
7 Add the bell pepper and lily bulb. Season with salt, white pepper and
The light is defective. Take the appliance to your Philips
dealer or a service centre authorised by Philips.
The appliance
beeps
continuously.
You have put unsuitable cookware on the cooking
plate or you have removed the cookware from the
cooking plate during cooking. Place suitable cookware
on the cooking plate.
I cannot switch
to a different
cooking mode
during cooking.
You cannot switch to a different cooking mode during
cooking. If you want to select a different cooking
mode, press the power on/off button to switch off the
cooker. Then press the power on/off button again to
switch the cooker back on.
The fan works
but the appliance
has not started
cooking.
You have to press the start button within 1 minute
after you press the power on/off button.If you do not
press the start button within 1 minute, the induction
cooker switches off and the fan continues to work for
1 minute to cool down the appliance.
Codes on the
display
Message
----
There is no
Place suitable cookware on the
cookware on the cooking plate.
cooking plate or
the cookware is
not suitable for
the induction
cooker.
4222.200.0273.2
Codes on the
display
What you should do
sesame oil to taste.
Diced chicken with red and green peppers
Preparation time: 30 minutes
Ingredients:
- 2 chicken breasts
- 2 red and green peppers
- 1 tablespoon soy sauce
- some salt
- 1 tablespoon sugar
- some vinegar
- 1 bowl cornstarch water
- some sliced scallions, ginger and garlic
- some chicken stock
- some oil
- some sesame oil
1 Dice the chicken breasts and peppers (green and red).
2 Mix the chicken dices properly with salt and cornstarch water.
3 Heat the oil in the stir-fry mode (see chapter ‘Using the appliance’,
section ‘Using the different modes’). Put the chicken dices in the wok
and separate them with chopsticks.
4 Put in the green and red pepper dices and stir-fry thoroughly. Then
empty the wok into a strainer.
5 Put the chicken and pepper dices in the wok again. Add various
condiments and cornstarch to thicken.
6 Stir-fry evenly and sprinkle with sesame oil to taste.
Sweet and sour minced beef
Preparation time: 30 minutes.
Ingredients:
- 150g minced beef
- 2 tomatoes
- 90g green peas
- 90g potatoes
- 1 tablespoon minced garlic
- 1 tablespoon oil
Marinade:
- 1 tablespoon sesame oil
- 1 tablespoon oyster-flavoured sauce
Sauce mix:
- 125ml (1/2 cup) sweet and sour sauce.
1 Mix the minced beef with the marinade.
2 Cook the green peas and potatoes in boiling water in the manual
mode (see chapter ‘Using the appliance’, section ‘Using the different
modes’). Drain the peas and the potatoes.
3 Heat 2 tablespoons of oil in the stir-fry mode. Sauté the minced garlic
until fragrant.
4 Stir in the marinaded minced beef, the peas, the tomatoes and the
potatoes.
5 Add the sauce mix and cook until the minced beef is done.
4222.200.0273.2
繁體中文
簡介
恭喜您購買本產品並歡迎加入飛利浦!請於 www.philips.com/
welcome 註冊您的產品,以善用飛利浦提供的支援。
電磁爐的運作原理是利用電磁鐵產生強力的高頻電磁場。將具磁性
材料 (如鐵製) 的鍋具放在電磁爐上時,電磁場會將能源轉往鍋具底
部,使鍋具及其中食物加熱。要調整鍋具溫度時,只要改變電磁場
強度,鍋具溫度便會立即改變。
電磁爐的優點:
- 安全:電磁爐不使用火焰,還有多重安全裝置,讓您隨時都可以
與家人一同烹調享受美食。
- 快速:使用電磁爐烹煮時,鍋具便是熱源。因此導熱更快也更
好,跟傳統烹調方法比起來,最多能夠省下 1/3 以上的時間。
- 多樣化:電磁爐有 2 種預設烹調模式,每一種都設有最佳的加熱
模式。善用這些模式即可調理各式各樣營養滿點的餐點。
- 簡易操作:互動式的控制面板簡潔有力,並有顯示螢幕助您操作
按鈕輕易調整設定。 - 舒適:電磁爐烹調無煙不油膩,而且電磁爐本身和四週空間不悶
熱,讓您舒舒服服調理餐點。
- 輕便:電磁爐設計輕巧,加熱面板也不留熱度,隨時都能安全操
作,在家裡每個地方都可以調理餐點。
A
B
C
D
E
F
G
一般說明 (圖 1)
黑晶玻璃加熱面板
烹調區
機體
K 控制面板
電源線
進風口
出風口
1
2
3
4
5
6
7
K 控制面板
烹調時間與火力段數顯示
烹調模式按鈕附指示燈,用於火鍋與煎炒模式
烹調時間按鈕附烹調時間指示燈
開始按鈕附指示燈
電源開關按鈕附電源指示燈
設定烹調時間與火力段數的 +/- 按鈕
火力段數指示燈 重要事項
在使用本產品前,請先仔細閱讀本使用手冊,並保留說明以供日後
參考。
-
-
危險
切勿將本產品浸入水中或置於水龍頭下沖洗。
請勿用鋁箔蓋住加熱面板任何部分,以避免觸電、短路或著火。
警示
在您連接電源之前,請檢查本地的電源電壓是否與產品所標示的
電壓相符。
本產品運轉時,機體表面溫度很高。
僅可將本產品連接到有接地的電源插座上。請務必確定將插頭確
實插入插座中。
當插頭、電線或產品本身受損時,請勿使用產品。
如果電線損壞,則必須交由飛利浦、飛利浦授權之服務中心,或
是具備相同資格的技師更換,以免發生危險。
如果加熱面板表面有裂痕,請關閉產品電源勿再使用,以避免觸
電。
基於安全考慮,在缺乏監督及適當指示之下,本產品不適用於孩
童及任何身體、知覺、或心理功能障礙者,或缺乏使用經驗及知
識者。
請勿讓孩童將本產品當成玩具。
請勿讓兒童接觸電源線。請勿讓電源線懸掛在產品放置的餐桌或
流理台邊緣。
啟動電器之前請務必確定加熱面板已清潔且乾燥。
使用電磁爐時,請勿擋住出風口。
為電器插上電源或操作控制面板時,請確保雙手乾燥。
烹煮之後請勿觸摸加熱面板,因為面板尚有鍋具餘熱。
刀、叉、湯匙和蓋子等金屬物品溫度會升高,因此請勿放在加熱
面板上。
警告
請勿使用其他製造商的任何配件或零件,或非飛利浦建議之配件
或零件。如果您使用此類配件或零件,保修即會失效。
請勿使電磁爐暴露於高熱、熱瓦斯、蒸氣或濕熱中。請勿將電磁
爐置於或靠近運作中或仍有餘熱的火爐或電子鍋。
拔下電源之前,請務必先關閉電源。
在進行清潔之前,請務必先拔除電器電源插頭並待其冷卻。
4222.200.0273.2
-
本產品僅供家用。如果不當使用本產品,作為專業或半專業用
途,或未依照使用手冊的指示操作,保修將失效,且飛利浦將不
擔負任何損壞賠償責任。
電磁爐應置於平穩的水平表面,並確定與周圍至少保持 10 公分
的距離,以避免過熱。
請勿在塑膠桌布上使用電磁爐。
鍋具與加熱面板之間請勿放置任何物品。
電磁爐上可放置最重重量為 7 公斤。
烹調時,或掀開鍋蓋時,請小心漏出的熱氣。
電磁爐運作中請勿舉起或移動電磁爐。
切勿將空的鍋具置於已啟動的電磁爐上,此舉可能使鍋具變形,
也可能損壞加熱線圈。
請勿將易燃物或液體存放在電磁爐附近或電磁爐上。
避免使鍋具或其他物體強力碰撞黑晶加熱面板。
烹煮時請務必將鍋具置於烹調區內。
切勿為本產品加裝定時開關或搖控系統,以避免發生危險。
請勿使用底面直徑大於 16 公分的鍋具來油炸食物,此舉會導致
本產品故障。
自動電源關閉
本產品配備自動電源關閉功能,以下兩種情況會自動關閉電源:
- 在火鍋模式與手動模式下,若您超過 60 分鐘沒有按下任何按
鈕,電磁爐將自動關閉。
- 若按下開始按鈕時加熱面板上沒有鍋具,或使用了不適用的鍋
具,或在烹調時將鍋具取走,電磁爐會持續發出嗶聲,顯示螢幕
會顯示「----」。若 1 分鐘內未把鍋具放回加熱面板,電磁爐就
會自動關閉電源。 電磁波 (EMF)
本飛利浦產品符合電磁波 (Electromagnetic fields,EMF) 所有相關
標準。只要使用方式正確並依照本使用手冊之說明進行操作,根據
現有的科學研究資料,使用本產品並無安全顧慮。
第一次使用前
取下電磁爐所有包裝材料。
使用前準備
1 請將本產品放置在乾燥、穩固且水平的表面。
2 確認本裝置周圍至少保留 10 公分的空間,以預防過熱。
3 烹煮時請務必將鍋具置於烹調區內。
4 請務必使用正確類型、正確尺寸的鍋具 (請見下表)。
建議使用的鍋具類型與尺寸
適用電磁爐的鍋具
材質
鐵製或具磁性的不锈鋼製鍋底
形狀
平底的鍋具
尺寸
鍋底直徑為 12 至 20 公分,視烹調
模式而定 (請見下列提示)
重量
含食材最重 7 公斤以內的鍋具
不適用電磁爐的鍋具
材質
鍋底非鐵製,或者是黑晶、玻璃、
鋁、銅製的鍋底
形狀
凸底或凹底的鍋具
尺寸
鍋底直徑小於 11 公分的鍋具
重量
含食材超過 7 公斤的鍋具
提示: 以手動模式或火鍋模式烹煮時,可使用鍋底直徑 12 至 20 公
分的鍋具。
提示: 油炸食物時,建議使用鍋底 12 至 16 公分的鍋具。
使用此產品
切記僅使用適用電磁烹調的鍋具 (請見「使用前準備」單元)。
注意: 請務必在乾燥、平穩且水平的表面放置、操作本產品。
下面表格列出各個烹調模式的預設設定,以及各設定可以調整的程
度。
預設與可調整的設定
模式
預設火力
段數
預設烹調
時間
可調整火
力段數
可調整烹
調時間
顯示幕標示
手動
4
5
1-7
5-180
火力段數
模式
預設火力
段數
預設烹調
時間
可調整火
力段數
可調整烹
調時間
顯示幕標示
清潔與維護
清潔
剩餘烹調時間
(若有設定烹調時
間)
切勿將電器浸泡在水中,或者在水龍頭下沖洗。 火鍋
7
-
1-7
-
火力段數
絕對不可使用鋼絲絨、磨蝕性的清潔劑或侵蝕性的液體 (例如汽油或
丙酮) 清潔本產品。
煎炒
6
30
1-7
5-60
火力段數 切勿讓黑晶玻璃加熱面板沾上醋。
剩餘烹調時間
(按下烹調時間按
鈕)
1 拔除插頭並讓機器冷卻。
2 用濕布清潔電器,若有必要可使用少許溫和的清潔劑。
保養
注意: 如果您想要快速燒開水,只需以手動模式將火力段數設為 7
即可。要燒 1 公升的水,建議時間為 3-5 分鐘;要燒 2 公升的水,
建議時間為 6-10 分鐘;若要燒 3 公升的水,建議時間為 9-14 分
鐘。
低
中
高
火力段數
1
2
3
4
5
6
7
相關瓦數
(W)
400
800
1200
1400
1600
1800
2000
使用不同模式
您可以手動方式操作電磁爐,或者您也可以自兩種預設烹調模式中
選擇一種來操作。
1 將電源插頭插入供電插座,然後按下電源開關,啟動電
器。 (圖 2)
本產品會發出 2 秒長的嗶聲,電源指示燈會亮起。
螢幕顯示預設火力段數 (4)。 (圖 3)
2 將鍋具置於烹調區內。
3 按下開始按鈕,以手動方式操作電磁爐,或按下您想使用的預設
,
,
模式按鈕。 (圖 4)
預設模式按鈕上方的指示燈會亮起。
如果您選擇其中一種預設模式,電磁爐會設定為手動操作的預設
設定 (烹調時間 5 分鐘、火力段數 4),或預設模式的預設設定。
注意: 按下「開始」按鈕決定模式之前仍可切換成另一種模式。如
果按了啟動按鈕後要改用其他模式,就必須先按電源開關把電源關
閉,然後再按一次電源開關重新啟動,才能選擇想要使用的模式。
4 若要以所選模式的預設設定進行烹調,請跳至第 7 步驟。
關於各烹調模式的預設設定,請參考之前的表格。
5 按 + 和 - 按鈕可調整功率。 (圖 5)
,
收納
黑晶玻璃加熱面板易碎,請勿重壓。
勿將電器收藏於高溫處,如電子鍋旁。
火力段數設定
,
,
使用不當可能會刮傷加熱面板。為避免變色、刮傷,請依本手冊指
示使用電器,每次使用後也請清潔電器和鍋具。
火力段數指示燈會亮起。
若將長時間不使用電器,建議您將電器收藏在乾燥且安全的地方。
-
環境保護
本產品壽命結束時請勿與一般家庭廢棄物一併丟棄。請將該產品
放置於政府指定的回收站,此舉能為環保盡一份心力。 (圖 8)
保證書與服務
若您需要相關服務或資訊,或是有任何問題,請瀏覽飛利浦網站,
網址為 www.philips.com,或連絡當地的飛利浦顧客服務中心 (您可
以在全球保證書上找到連絡電話)。若當地沒有顧客服務中心,請洽
詢當地的飛利浦經銷商。
故障排除
如果您的電磁爐運作不正常,或烹調品質不佳,請參考下面的表
格。如果您無法解決問題,請連絡您當地的飛利浦服務中心或所在
國家的客戶服務中心。
問題
解決方法
電源指示燈不會
亮。
接線有問題。請檢查電磁爐是否已插上電線,
且插頭已確實插入牆面插座。
指示燈故障。請將電器送至飛利浦經銷商或
飛利浦授權的服務中心。
按下烹調模式按鈕
時,該模式的指示
燈不會亮。
指示燈故障。請將電器送至飛利浦經銷商或
飛利浦授權的服務中心。
設定烹調時間時,
定時指示燈不會
亮。
您選擇了火鍋烹調模式。您只能在手動模式
或煎炒模式下調整烹調時間。
指示燈故障。請將電器送至飛利浦經銷商或
飛利浦授權的服務中心。
注意: 烹調時仍然可以調整功率。 6 如果您想要調整烹調時間,請按下烹調時間按鈕,接著利用 + 和
,
- 按鈕來調整時間。 (圖 6)
烹調時間指示燈會亮起。
注意: 短暫按下 + 和 - 按鈕時,會增加或減少 1 分鐘時間;按鈕按
久一點的話,則是增加減少 5 分鐘。
電器持續發出嗶
聲。
您在加熱面板放上了不適用的鍋具,或是您
在烹調中取走了加熱面板上的鍋具。請在加
熱面板放上合適鍋具。
烹調時沒辦法改用
其他烹調模式。
為安全起見,烹調中不可切換烹調模式。若
要選用不同烹調模式,請按電源開關將電磁
爐電源關閉,然後再按一次電源開關,啟動
電磁爐。
電扇在運轉,但是
卻還不開始烹調。
開啟電源開關之後,必須在 1 分鐘內按下開
始按鈕。如果 1 分鐘內沒有按下開始按鈕,
電磁爐就會自動關機,風扇則會繼續運轉 1
分鐘以降低機體溫度。
注意: 烹調時仍然可以調整烹調時間。
注意: 在火鍋模式下,您無法調整烹調時間。
7 按一下開始按鈕。 (圖 7)
,
,
開始指示燈會亮起。
電磁爐會依所選模式自動開始運作。
注意: 如果您沒有調整烹調時間或火力段數,電磁爐會以手動模式
或預設模式之預設設定運作。 , 烹調時,風扇會啟動散熱。關閉電器電源之後,風扇仍會繼續轉
動約 1 分鐘,然後會自動停止。
, 如果您調整火力段數,螢幕會顯示您設定的火力段數。
, 如果您在手動模式下調整烹調時間,螢幕會顯示剩餘烹調時間。
, 使用火鍋模式烹調時,會顯示火力段數。在此模式下,您將無法
調整烹調時間。 , 如果您在煎炒模式下調整烹調時間,仍會顯示火力段數。要檢視
剩餘烹調時間,請按下烹調時間按鈕。
, 烹調時間結束時,電磁爐會發出數次嗶聲,然後自動關閉電源,
電源指示燈熄滅。
8 使用完畢後請立即將插頭拔下。
4222.200.0273.2
顯示代碼
訊息
正確應對方式
----
加熱面板上
沒有鍋具,
或是該鍋具
不適用電磁
爐。
在加熱面板放上合適的鍋具。
E1
供電電壓不
穩定。
檢查您的家裡供電電壓是否適用本電
磁爐。
E2
加熱面板過
熱。
關閉電器電源並拔下插頭。讓機體降
溫約 10 分鐘後,再打開電源。
顯示代碼
訊息
正確應對方式
E3
電器故障
將電器帶往經銷商或飛利浦授權的服
務中心。 E4
電器過熱
檢查通氣孔是否被蓋住。若被蓋住,
請移開障礙物並讓機體降溫,然後再
打開電源。
若通氣孔沒有被蓋住,請檢查風扇是
否正常運轉。打開電器電源,按「開
始」按鈕。如果電扇沒有運轉,請將
電器帶往您的飛利浦經銷商或是飛利
浦授權的服務中心。 食譜
磨菇炒甜椒
準備時間:30 分鐘
材料:
- 120 克新鮮蘑菇
- 1 顆甜椒
- 2 片辣豆干
- 30 克新鮮百合
- 2 大匙油
- 大蒜 1 大匙,切碎
- 鹽少許、白胡椒少許
- 麻油少許
1 以廚房紙巾清潔磨菇。
2 去除甜椒籽並將甜椒切塊。
3 將辣豆干切成薄片。
4 將新鮮百合切片。
5 使用煎炒模式將油加熱 (請參閱「使用此產品」中的「使用不同
模式」單元) 並將大蒜爆香。
6 倒入磨菇與豆干拌炒。
7 加入甜椒與百合,佐以鹽、白胡椒與麻油入味。
雞丁雙椒
準備時間:30 分鐘
材料:
- 2 塊雞胸肉
- 2 顆紅椒與青椒
- 醬油 1 大匙
- 鹽少許
- 砂糖 1 大匙
- 醋少許
- 粟粉水 1 碗
- 蔥少許、薑少許、大蒜少許
- 雞高湯少許
- 油少許
- 麻油少許
1 將雞胸肉與青椒紅椒切丁。
2 將雞丁以鹽與粟粉水徹底混合。
3 使用煎炒模式將油加熱 (請參閱「使用此產品」之「使用不同模
式」單元),將雞丁下鍋,並用筷子撥開。
4 倒入青椒與紅椒炒熟,起鍋並先擺旁備用。
5 再度將雞丁與雙椒倒入鍋中。倒入各種調味料與粟粉水埋芡。
6 均勻拌炒,並佐以麻油調味。
糖醋碎牛肉
準備時間:30 分鐘。
材料:
- 150 克碎牛肉
- 2 顆蕃茄
- 90 克豌豆
- 90 克馬鈴薯
- 蒜末 1 大匙
- 油 1 大匙
調味:
- 麻油 1 大匙
- 蠔油 1 大匙
醬汁:
- 125ml (1/2 杯) 糖醋醬
1 將碎牛肉與調味混合
4222.200.0273.2
2 使用手動模式將豌豆與馬鈴薯以滾水煮熟 (請參閱「使用此產
品」之「使用不同模式」單元)。瀝乾豌豆與馬鈴薯。
3 使用煎炒模式加熱 2 大匙的油,炒大蒜末爆香。
4 倒入豌豆、蕃茄與馬鈴薯,與浸泡調味入味的碎牛肉拌炒。
5 倒入醬汁,烹調直至完成。