1
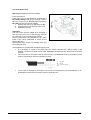
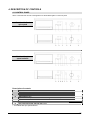
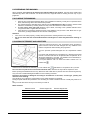
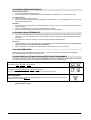
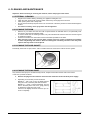
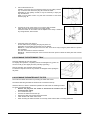
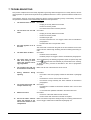
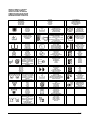
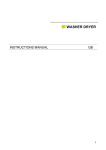
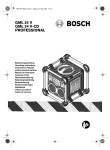
LAVABIANCHERIA
WASHING MACHINE
LAVE-LINGE
WASCHMASCHINE
LAVADORA
WASAUTOMAAT
LIBRETTO ISTRUZIONI
IT
INSTRUCTIONS MANUAL
GB
MANUEL D’INSTRUCTIONS
F
GEBRAUCHSANWEISUNG
D
MANUAL DE INSTRUCCIONES
E
GEBRUIKSAANWIJZING
NL
1
I
Indice
1. Il nuovo sistema di lavaggio
GB
Pag.
Contents
Pag.
3
1. The new washing system
2. Avvertenze per la sicurezza e l’uso
4
2. Safety warnings
23
3. Istruzioni per l’installazione
6
3. Installation instructions
26
4. Descrizione comandi
9
4. Description of controls
28
5. Utilizzazione della macchina
13
5. Using the machine
32
6. Pulizia e manutenzione
7. Avvertenze in caso di anomalie e malfunzionamento
Simboli Pannello Comandi
18
6. Cleaning and maintenance
37
20
7. Troubleshooting
39
118
Control Panel Symbols
119
Contrassegno WEEE
119
WEEE mark
120
F
Sommaire
1. Le nouveau système de lavage
22
D
Pag.
Inhaltsverzeichnis
Pag.
41
1. Das neue Waschsystem
60
2. Avertissements pour la sécurité et l’utilisation
42
2. Sicherheits- und Gebrauchs-Hinweise
61
3. Instructions pour l’installation
44
3. Installations-Anweisungen
64
4. Description des commandes
47
4. Beschreibung der Schaltungen
67
5. Utilisation de la machine
51
5. Gebrauch der Waschmaschine
71
6. Nettoyage et entretien
7. Avertissements en cas d’anomalies de fonctionnement
Symboles Tableau De Board
56
6. Reinigung und Wartung
76
58
7. Hinweise bei Betriebsstörungen
78
119
Symbole Bedienungsblende
119
Marque WEEE
120
WEEE Zeichen
120
E
Índice
NL
Pag.
Inhoudsopgave
Pag.
1. El nuevo sistema de lavado
80
1. Het nieuwe wassysteem
99
2. Advertencias para la seguridad y el uso
81
2. Aanwijzingen voor de veiligheid en het gebruik
100
3. Instrucciones para la instalación
83
3. Aanwijzingen voor de installatie
103
4. Descripción de los mandos
86
4. Beschrijving van de bediening
106
5. Utilización de la máquina
90
5. Gebruik van de machine
110
6. Limpieza y mantenimiento
7. Advertencias en caso de anomalías de
funcionamiento
Simbolos Panel De Mandos
95
6. Schoonmaak en onderhoud
115
97
7. Aanwijzingen bij storingen
117
119
Bedieningspaneel Symbolen
119
120
Markteken WEEE
120
Marca WEEE
2
GB
1. THE NEW WASHING SYSTEM
This new washing machine is the outcome of years of research.
The leading-edge design and the quality of the production processes used to
manufacture this product ensure it will give you many years of excellent service.
Its concept satisfies all current and future washing requirements.
Its low water, power and detergent consumption help protect the environment
and reduce running costs to a minimum.
Water and power consumption has been reduced in all programmes.
These results were achieved by means of a special washing system valid for all
programmes and all fabrics.
The drum is fitted with three external vanes that keep the water constantly circulating,
thereby offering intensive and uniform washing whilst consuming less water.
This ensures your laundry is washed and treated with utmost care.
The new washing system is so effective that normally dirty laundry can even be
cleaned without a pre-wash cycle.
Washing times have also been reduced.
Pre-washing is only recommended for very dirty laundry.
Please read the operating instructions with care in order to take full advantage of all
the features offered by this washing machine.
Warning!
Please read all the instructions contained in this manual in order to understand how
to operate this appliance correctly and safely.
This manual is divided into paragraphs which provide a step-by-step description of
all the functions of the appliance. The instructions are easy to understand and are
accompanied by detailed illustrations.
This manual provides a quick and easy reference for answering all your questions
concerning the use of your new washing machine.
Keep this manual near the machine for future consultation.
When selling or moving the appliance, make sure this manual remains with the
machine.
22
2. SAFETY WARNINGS
Attention!
These warnings are given for safety reasons.
Please read them carefully before installing and using the appliance.
This manual forms an integral part of the appliance and must therefore be kept intact together with the
machine. Before using the appliance, carefully read all the instructions contained in this manual.
Installation must be performed by a qualified technician in compliance with the regulations in force. It
has been designed for domestic use and complies with EEC Directives 72/23, 89/336 (including 92/31
and 93/68) currently in force. The appliance is designed for the following purpose: washing linen or
fabrics declared by their manufacturers to be suitable for machine washing by means of an appropriate
symbol. Any other use shall be considered improper. The manufacturer declines all responsibility
for uses other than those described above.
The name plate featuring the technical data, serial number and markings is visibly positioned on the
inner edge of the door. This name plate must never be removed.
Do not leaving discarded packaging materials unsupervised within the home. Separate the various
packaging materials and take them to the nearest sorted waste collection centre.
The electrical and plumbing work require to install the appliance may only be performed by
qualified technicians.
The appliance must be provided with an earth connection in accordance with the electrical safety
regulations in force. The manufacturer declines all responsibility for damage to persons or
property resulting from failure to earth the appliance or from a defective earth connection.
If the appliance is not connected to the electrical power supply by means of a plug, it is necessary to
install an isolation switch with a contact opening gap of at least 3 mm.
The plug on the power cord and the corresponding socket must be of the same type and must conform
to the regulations in force. Check that the voltage and frequency of the electrical power supply match
the ratings on the name plate. Avoid using adaptors or shunt connections. Never unplug the appliance
by pulling the power cord.
The machine is only disconnected from the electrical power supply if the plug has been
removed from the socket or if the general switch has been turned off. After installation, the
plug must remain accessible.
The appliance must always be connected to the water supply with new hoses (supplied with the
appliance). Old hoses must never be reused.
Make sure the appliance does not lie on the power cord.
Before use, make sure the tub assembly has been released (see instructions).
If the tub assembly has not been released, it may damage the appliance or adjacent furniture or
appliances during the spin cycle.
The washing machine must never be used in vehicles, on ships or planes, or in special environmental
conditions such as explosive or corrosive (powder, vapour and gas) atmospheres or near explosive
and/or corrosive liquids.
Do not install the washing machine in areas subject to frosting. Frozen pipes may burst under
pressure.
Make sure that the drain hose is securely attached to the basin and cannot move.
If it is not securely fitted, the repulsive force of the water may detach it from the basin and cause
flooding.
When attaching the hose to the basin, make sure the water drains away rapidly and does not fill
the basin up.
Do not overload the appliance.
Never use detergents containing solvents or chemicals.
These may damage the machine and form poisonous fumes.
They may also catch fire and explode.
23
Do not wash petrol-soaked garments in the washing machine. Make sure there are no inflammable
items (e.g.: lighters, matches, etc.) in pockets before washing.
If volatile fluids have been used to clean garments, make sure that the substances have been removed
before loading them in the washing machine.
Before loading garments for washing, make sure the pockets are empty, the buttons securely fixed and
the zips closed.
Do not wash frayed or torn garments.
The glass of the door will heat up considerably when washing at elevated temperatures.
Make sure all the water has drained away before you open the door.
If water is present, only open the door after draining it. If in doubt, read the instructions manual.
The water in the machine is not drinkable!
Swallowing washing machine detergents can cause lesions in your mouth and throat.
Before removing laundry from the washing machine, make sure the drum has stopped moving.
Always switch off the appliance after use to avoid wasting electricity.
Leave the door ajar between one wash and the next in order to keep the gasket in good condition.
Prolonged inactivity.
If the machine is left inactive for a long period: disconnect the machine from the electricity and water
supplies and leave the door ajar to prevent bad smells from forming.
In the event of a fault, never attempt to repair the machine yourself. Disconnect the appliance from
the electrical power supply and shut off the water tap. Then call a qualified technician. Repairs may
only be performed by qualified technicians.
Repairs performed by unqualified people may be hazardous for users.
Obsolete appliances must be rendered unusable: make sure that the door cannot be closed (to
prevent children from getting trapped inside while playing and risking their lives) and cut off
the power cord after unplugging it.
The appliance must then be taken to a sorted waste collection centre.
This appliance is intended for use by adults.
Do not allow children to tamper with the controls or play with the washing machine.
Do not allow children to approach the appliance while it is working.
Keep children away from the appliance.
Small animals or children may get inside the washing machine.
Always check the inside of the drum before use and do not allow children to play with the
appliance.
Packaging materials (plastic bags, polystyrene, metal profiles, etc.) must not be left within reach of
children.
Keep children away from the machine when the door or detergent tray is open; the appliance may
contain residues of detergent which can cause irreversible damage to the eyes, mouth and throat, as
well as possible death by suffocation.
Important !
This appliance is easy to use.
In order to obtain the best results, however, read this manual with care and follow all the instructions
before starting.
The manual gives instructions and useful advice on how to install, use and service the appliance
correctly.
The manufacture declines all responsibility for damage to persons or property resulting
from failure to observe the above precautions, from tampering with even just a single
component of the appliance, or from the use of unoriginal spare parts.
24
For Great Britain only
Warning: this appliance must be earthed.
Fuse replacement
If the mains lead of this appliance is fitted with a
BS 1363A 13amp fused plug, to change a fuse in
this type of plug use an A.S.T.A. approved fuse to
BS 1362 type and proceed as follows:
1. Remove the fuse cover (A) and fuse (B)
2. Fit replacement 13A fuse into fuse cover
3. Refit both into plug
Important:
The fuse cover must be refitted when changing a
fuse and if the fuse cover is lost the plug must not
be used until a correct replacement is fitted.
Correct replacement are identified by the colour
insert or the colour embossed in words on the
base of the plug.
Replacement fuse covers are available from your
local electrical store.
If the appliance is provided with a plugless supply cord:
• It is necessary to install in the fixed wiring an all-pole disconnection device having a gap
between contacts of at least 3,5mm. After installation the disconnection device has to be easy
to reach.
• The connection to the mains must be carried out by a qualified technician in accordance to the
scheme shown below and the regulations in force
L = brown
N = blue
= yellow-green
•
In the event of damage to the supply cord, it has to be replaced by the manufacturer or an
authorized technical service center in order to avoid any risk.
25
3. INSTALLATION INSTRUCTIONS
Important !
The appliance must be installed by a specialised technician according to current regulations.
The washing machine is very heavy. Take care when lifting it.
3.1 UNPACKING
The inside of the machine comprises a moving assembly which is blocked for transport purposes by the screws
(A) located at the rear of the washing machine.
1. Release the assembly by removing these screws with a 13 mm wrench.
2. Remove the screws (A) and relative spacers (B) from the back of the washing machine.
3. To prevent water from entering the machine or people from touching live components with their fingers, close
the four holes left open by the screws with the supplied plastic plugs (C).
Attention!
•
Do not turn the machine upside down and do not place it on its side.
•
Keep all the components used to block the drum assembly as they will be needed if you decide to move the
appliance in future.
3.2 POSITIONING AND LEVELLING
1.
Place the appliance in the
chosen position.
2.
Carefully level the machine in
all directions using a spirit
level and adjusting the height
of the feet if necessary. After
adjusting the machine, lock
the feet with the relative lock
nuts.
The water inlet and drain hoses can be turned to the right or left depending on installation requirements.
Attention!
•
Carry out this operation carefully to prevent the washing machine from vibrating, generating noise or
moving during operation.
•
If the appliance is installed on a carpeted floor, ensure that the openings on its underside are not obstructed.
•
Make sure the washing machine does not touch walls, furniture, etc., while it is working.
3.3 WATER SUPPLY CONNECTION
1.
Check that inlet pressure lies between the following values: 50-900kPa. For higher
pressures, install a pressure reducer.
2.
Connect the cold water inlet hose (light blue ring nut) to the cold water tap with a ¾
gas thread, taking care to screw it firmly into place in order to prevent leaks. The water
inlet hose must not be bent or crushed and must not be replaced or cut.
3.
If a hot water inlet is used, inlet water temperature must not exceed 60°C and the
hose with the red ring nut must be connected to the hot water tap.
26
Attention!
•
If the water pipe is new or has not been used for a long time, let a certain amount of water run before attaching the inlet hose. This stops any deposits of sand and other impurities from clogging the filters used by the
machine to protect the water inlet valves.
3.4 DRAIN CONNECTION
1. Insert the end of the drain hose into a drain pipe having an internal diameter of at least 4 cm and a height ranging between 50 and 90 cm, or attach it (using the relative curved plastic profile) to a basin or bath tub.
2. Always check that the end of the drain hose is securely attached in order to prevent the repulsive force of the water from moving it out of position.
Attention!
•
Do not bend or obstruct the hose as this will reduce the flow of water.
•
Any extensions to the drain hose must not exceed 1 metre, they must have the same internal diameter and
must not be obstructed in any way.
•
In no case may the end of the drain hose be submerged in water.
3.5 ELECTRICAL CONNECTION
Before fitting the plug into the socket, make sure that:
1. Input voltage matches that indicated on the name plate attached to the inner edge of the door.
2. The contactor, pressure relief valves, power line and socket are capable of withstanding the maximum rated
power input indicated on the name plate.
3. The socket is compatible with the plug supplied with the machine without the need to fit multiple sockets, adaptors or extension leads that could cause overheating or burning.
4. If the socket does not correspond to the supplied plug, replace the socket with one of a suitable type.
Attention
•
The plug must be accessible after installation.
•
The appliance must be earthed. Plug the machine into a socket fitted with an efficient earth connection.
The manufacturer declines all responsibility for damage to persons or property resulting from
failure to earth the appliance or from a defective earth connection. Correct electrical connections guarantee maximum safety.
•
•
•
•
This appliance complies with EEC directive 89/336 of 3.5.89 (modified by EEC directive 92/31) relative to the
elimination of radio interference.
If the power cord is damaged, only replace it with an original spare part available from our service department.
Do not insert/remove the plug from the socket if your hands are wet.
Remove the plug from the socket by gripping the plug and not the cord.
27
4. DESCRIPTION OF CONTROLS
4.1 CONTROL PANEL
All the commands and controls of the appliance are assembled together on the front panel.
Models with fixed
spin speed
Models with spin
speed selector
Description of controls
A
B
C
D
E
F
G
H
Open door button
ON-OFF and programme selection knob
Programme phase LED'S
Start-Pause button
Options buttons (a list follows in the description of controls)
Options enabled LED's
Select spin speed or stop with tub full button*
Spin speed and stop with tub full LED's*
*: for models with spin speed selector
28
A Open door button
Press the button to open the door. Chapter 5 – Washing instructions – explains how the door works and how to use it.
B
This knob lets you:
ON-OFF and washing programme selection knob
•
switch the machine on and off by moving it in either
direction from the OFF position (knob indicator vertical)
•
select washing temperatures within the various fabric sectors by turning it in both directions
The knob does not move while the programme is running.
The programme is electronically controlled by the machine.
C
Programme phase LED'S
The programme phase LED's indicate which phase of the
programme the washing machine is in. The operating
phases, shown to the side of the LED's, are the following:
START
Start
This LED indicates that the machine is on but the selected
washing programme has not started yet. This is the phase in
which the programme select knob has been turned but the
“Start/Pause” button has not been pressed yet.
WASH
Wash
End
The “Start/Pause” button has been pressed and the washing
programme is running. The LED remains on throughout the
washing programme.
END
The LED lights up when the washing programme has finished. It switches off when the machine is switched off (programme select knob to OFF) or when the “Start/Pause” button is pressed again.
D
“Start/Pause” button
Press this button to start the selected washing programme.
During washing, press the “Start/Pause” button for about 3
seconds to pause the washing cycle. During the pause, the
“Wash” programme phase LED flashes.
To resume the washing cycle from where it left off, simply
press the “Start/Pause” button again.
29
E
Options buttons
The options that may be available on the washing machine
are shown below.
Quick wash Button
This button reduces the overall duration of the washing cycle. This
option is used to wash small loads or less dirty washing in less time.
The bleach stage is skipped when the Quick Wash button is
pressed (for models with bleach function).
Increase water button
This washing machine is programmed to use a certain quantity of
water and consume a certain amount of power considered to be sufficient for a normal washing cycle.
Only press this button for specific requirements, e.g.: for very
delicate fabrics (curtains or wool).
The water level for washing and rinsing rises and power consumption for heating increases.
Easy-iron button
This option reduces creasing on garments at the end of the programme. The machine performs a more delicate spin cycle and
moves the garments at the end of the programme. Spin speed for
all programmes is 600 rpm.
Economy cycle button
Press this button for cottons programmes, the machine will perform an extended wash at 35°C (biological step) thereby offering good washing performance combined with power saving.
-
e
The machine then continues the cycle at the selected temperature.
N.B.:
Press the economy cycle button to obtain a maximum washing
temperature of 60° C and the elimination of the prewash.
Extra Rinse button
In areas with soft water or to improve rinsing, press this button (optional for intensive programmes) to enable the extra rinse function
(about 20% more water).
No spin button
Press this button to eliminate the final spin cycle. The machine
stops with the tub full of water and the washing remains soaked. To
remove the soaked and dripping washing (drip-dry fabrics) turn the
) and press the
knob to the drain and spin position (Drain
“Start/Pause” button. The water is automatically drained on all programmes without spinning.
Delicates button
Press this button to reduce movement of the drum and, consequently, of the washing. Suitable for particularly delicate garments
(shirts, silk, curtains, etc.)
Half load button
If the machine is used with a smaller amount of washing than that
indicated in the “Programme Chart”, press this button to save water,
detergent and electricity.
1/2
This option should not be used for synthetics or woollens.
The recommended doses of detergents should be reduced in
proportion to the load.
30
These LED's light up when the relative option button is
pressed and indicate that the option has been selected. They
remain on until the machine switches off or a different selection is made.
F
Options enabled LED's
G
Select spin speed or stop Press this button to select one of three spin speed levels, indicated by the spin speed and stop with tub full LED's. The
with tub full button*
levels are:
H
Spin speed and stop with tub
full LED's*
•
maximum speed: the machine spins at the indicated
speed
•
intermediate speed: the machine spins at the indicated speed
•
final spin disabled and stop with tub full: the machine
does not perform all the spins and finishes the washing programme with water in the tub. To drain the
water, see the explanations shown in paragraphs
5.10 and 5.14
The LED's indicate the selected speed level. The LED corresponding to the selected level remains on until the machine
is switched off or until a new spin speed is selected.
(max. speed)
(intermediate speed)
* For models with spin speed selector
4.2 DETERGENT TRAY
This is located to the left of the control panel. Pull it out to
open.
The tray comprises four compartments which are marked as
follows
“1”: pre-wash detergent
“2”: main wash detergent
“ ” or “3”: fabric softener, starch, etc. (treatment products).
Compartment “4” is used for bleach. If there is a cover marked
, this means that bleach cannot be used with this model of
machine. If bleach can be used with the machine, there is no
cover.
31
5. USING THE MACHINE
5.1 PREPARING THE WASHING
3.
4.
Separate the washing according to the type and colourfastness of the fabrics.
Wash whites and coloureds separately. Wash new coloured garments separately for the first time. A label is
normally applied to garments giving information on how to clean them. A brief description of these labels is
shown below.
WASHING
BLEACHING
Machine wash at max. 90°C
Machine wash at max. 60°C
Do not bleach
Bleaching allowed
IRONING
Machine wash at max. 40°C
Machine wash at max. 30°C
Hot iron
Warm iron
Cool iron
Do not iron
Petroleum solvent
and R113
Do not dry
clean
DRY CLEANING
Machine wash, delicate cycle at max.
60°C
Machine wash, delicate cycle at max.
40°C
Machine wash, delicate cycle at max.
30°C
Any solvent
Any solvent except
trichloroethylene
DRYING
Hand wash
Do not wash
High temperature
Less than 60°C
Do not tumble dry
Attention!
•
Do not wash unhemmed or torn garments as they may fray.
•
Foreign bodies may damage garments or machine components. Therefore, empty all pockets and turn them
inside out, remove rollers from curtains or put them in a string bag.
•
Put very small articles (belts, handkerchiefs, socks, bras with stiffeners, etc.) into a white canvas bag. Close
push buttons and zips and sew on dangling buttons.
•
Modern detergents and correct washing temperatures are generally sufficient to remove stains from fabrics.
However, some stubborn stains, such as grass, fruit, egg, blood, rust and biro, should be pre-treated before
washing. Depending on the type of fabric, many stain removers can be found in the shops. Stains
should always be cleaned or diluted immediately as the older they get, the more difficult they are to
remove.
•
Garments may be damaged if fabric care symbols are not observed.
Wool – Only pure wool, identified by
or with the label <<shrink-proof machine washable and dryable>> can
be machine washed with the specific programme, other types of wool should be hand-washed or dry-cleaned.
5.2 OPENING THE DOOR
The machine is fitted with a safety device that prevents the door from opening while it is working.
1.
2.
Before opening the door, wait 1 or 2 minutes after the programme ends (“End” LED on) to allow the
safety device to disengage.
Make sure there is no water in the tub and that the drum is not moving. Open the door by pressing the
“Open door” button on the front panel and pulling it open.
Attention!
•
If the washing programme is interrupted, you will have to wait from 3 to 15 minutes, depending on the temperature of the water, before the door opens.
Attention!
The water may still be boiling if the washing cycle was performed at high temperatures.
If there is still water inside the drum, do not open the door!
32
5.3 PREPARING THE WASHING
Where possible, save electricity by washing full loads divided by type of fabric. Introduce loose washing and
alternate large items with small ones. For the first few times, weigh the loads of washing and then rely on your
judgement.
5.4 LOADING THE WASHING
1.
2.
3.
4.
Open the door and load the washing taking care to distribute it uniformly, loosely and not packed into the
drum; alternate large items with small ones if possible.
The washing machine described in this manual can be loaded with up to 5kg of washing. Heavier loads
will lead to unsatisfactory washing results and may cause the machine to work incorrectly.
To save energy, wash full loads divided by type of fabric, according to the quantities indicated in the
“Programmes chart” supplied with this manual.
Close the door by pressing it against the body of the appliance until you hear a click. Make sure no garments have got caught between the door and the rubber gasket.
Attention!
•
If the door is not closed properly, a safety device prevents the washing machine from working.
•
Do not use more than the recommended amount of detergent: too much may deteriorate washing results.
5.5 ADDING DETERGENT AND ADDITIVES
Follow the instructions shown in the “Programme Chart” provided together with the manual and add detergent and any additives to the
relative compartment before starting the programme.
Pour the pre-wash powder detergent into the compartment marked
“1”.
Pour main wash detergent into compartment “2”. Machine accessories
include a red insert “A” that can be placed inside compartment “2” to
allow liquid detergent to be used. The additives are automatically introduced into the tub during final rinsing.
Pour liquid additives such as starch and fabric softener into “3”,
marked with
.
If bleach can be used with the machine (no cover marked with
) add bleach to compartment “4” if you wish.
The level of the liquids must not exceed the maximum limit, otherwise the trays will be emptied too soon.
Before pouring thick additives into the tray, dilute them with a little water to prevent them from obstructing the trap.
Only use foam-controlled detergent suitable for use in washing machines.
Determine the quantity of detergent according to the hardness of the water, and the type, quantity and
dirtiness of the washing.
This will allow you to obtain the required effect using as little detergent as possible.
Detergent packs indicate the quantities to use according to 4 levels of hardness and for normally dirty loads of 4-5
kg.
Ask your local water board to tell you how hard your water is.
Water hardness
Hardness level
Soft
Moderately hard
Hard
Very hard
French degree fH
Up to 15°
15° - 25°
25° - 40°
Over 40°
German degree dH
Up to 8°
8° - 14°
14° - 22°
Over 22°
33
5.6 DOSING POWDER DETERGENTS
Normally dirty washing
1. Choose a programme without prewash.
2. Pour the total quantity of detergent indicated on the packs into compartment “2” of the detergent tray.
Very dirty washing
1. Choose a programme with prewash.
2. Add ¼ of the recommended quantity of detergent into compartment “1” of the detergent tray and ¾ of the detergent into compartment “2”.
Attention!
•
If there are no dosage indications for delicate synthetics, add from ½ to 2/3 of the recommended quantity for
resistant cottons.
•
For the wool programme, only use neutral detergents for woollens.
•
Base your doses according to the detergent manufacturer's recommendations.
5.7 DOSING LIQUID DETERGENTS
1.
2.
Pour the recommended dose into the batcher supplied with the liquid detergent and place it inside the drum;
otherwise, pour it into compartment “2” of the detergent tray after fitting the relative red insert “A” (see paragraph 5.5).
The scale on the red insert will help you to use the right quantity of liquid detergent.
Attention!
•
Liquid detergents can be used according to the manufacturer's recommended dose only for the main washing cycle, that is, in all programmes without prewash.
•
When compartment “2” is used for powder detergent, the red insert “A” must be removed.
5.8 SCALE-REMOVERS
Scale-removers can be introduced into compartments “1” and “2” according to the manufacturer's indications.
First, add the detergent and then the scale-remover.
5.9 SWITCHING ON THE MACHINE AND SELECTING PROGRAMMES
The washing machine has the following basic programmes which, by adjusting the temperature and using the
various button functions, allow a wide range of programmes to be set for all requirements.
Intensive washing programme
for resistant cotton, coloured or hemp fabrics.
Delicate washing programmes
for delicate artificial synthetic fibres, blends or linen fabrics.
They prevent the formation of creases that are difficult to remove during ironing.
Wool programme
only for garments marked “pure wool” washable, treated, shrink proof. Other types of wool should
be hand washed or dry-cleaned.
To select programmes according to the type of fabric, consult the “Programme chart” supplied together with this manual.
34
To switch on the machine and select programmes, proceed as follows:
1.
2.
Turn the programme knob in either direction. The machine switches on and the “Start” programme phase
LED lights up.
Select the washing temperature, within the sectors marked on the front panel by the following words:
•
Cottons, coloureds
•
Woollens
•
Synthetics, delicates
Attention!
•
The following partial washing programmes can be set using the programmes knob:
-Rinse with additive
-Drain and spin
-Fabric softener
These partial programmes are inside the Cotton, Synthetics and Wool sectors, except for the drain and spin
programme (Drain ).
•
If the indicated temperature shows 0°, this means that the programme performs a cold wash cycle. The same
cold wash is also performed by the Hand wash programme in the Wool sector.
•
The fabric treatment labels show which washing temperature must be set.
•
If various garments in the same load require different washing temperatures, choose the lowest washing temperature of all.
•
If the laundry is only slightly dirty and does not need the bleaching effect of high temperatures, a lower temperature can be chosen to save power. In spite of the low temperature and consequent saving of electricity, an automatic time control keeps the duration of the main washing unvaried compared with that of a high
temperature programme. It is therefore possible to successfully wash normally dirty laundry at lower washing temperatures than the maximum temperatures shown on the fabric care labels.
5.10 SPEED SELECTION
The models described in this instructions manual may either feature fixed or variable spin speeds. Models with
fixed spin speeds cannot be adjusted but can disable the spin cycle (
) if the model features this option.
Other models are fitted with a button for selecting spin speed (see chapter 4 – Description of controls) which allows one of three speed levels to be selected.
Press the button identified with the letter “H” in chapter 4 – Description of controls, the 3 LED's located over the
button light up in sequence to indicate (from top to bottom):
•
maximum spin speed
•
intermediate spin speed
•
): if this option is selected, the final spin is not perfinal spin disabled and stop with tub full (
formed at the end of the washing programme and the machine stops with the tub full of water and the
washing soaked. To remove the soaked and dripping washing (drip-dry fabrics) turn the knob to “Drain
” and press the “Start/Pause” button. The water is automatically drained on all programmes without
”, select one
spinning. If you wish to drain the water in the tub and then spin, turn the knob to “Drain
of the two available speeds (maximum or intermediate) with the select button and press the “StartPause” button. These methods are also valid for fixed speed machines featuring the spin disable option.
With programmes in the Cottons/Coloureds sector, fabrics can be spun up to the maximum speed envisaged for
the model. For Synthetics/Delicates and Woollens, spin speed cannot exceed 900 rpm.
35
5.11 SELECTION OF OPTIONS
Use the options buttons (indicated in chapter 4 – Description of controls) to enable machine options. A selected
option is highlighted by the option LED located above the button in question.
5.12 STARTING THE WASHING PROGRAMME
1.
2.
Before starting the selected programme, carefully close the door, open the water tap and add the detergent and additive.
Press the “Start-Pause” button and the “Wash” programme phase LED lights up. After 10 seconds, the
machine starts automatically and performs the programmed cycle. During operation, the “Washing” LED
remains on.
5.13 INTERRUPTING OR CHANGING THE WASHING PROGRAMME
The washing programme may be interrupted at any time while it is running:
1. pressing the “Start/Pause” button for about 3 seconds. During the pause, the “Wash” programme phase
LED flashes. The programme can also be stopped by turning the programme/temperature selection knob
while the cycle is running.
2. If you wish to change the washing programme, simply select the new programme by turning the programme knob without pausing the machine first. The new washing cycle will be performed starting from
the beginning. If the tub is already full of water, the new programme will omit the filling phase.
3. To resume the cycle, press Start-Pause again.
5.14 END OF PROGRAMME
The washing programmes are automatically completed and the “End” programme phase LED lights up.
1.
2.
3.
4.
5.
Turn the programmes knob to OFF to switch off the machine
Before opening the door, wait 1 or 2 minutes to allow the safety device to disengage.
Remove the washing from the drum.
Leave the door ajar in order to allow the inside of the washing machine to dry.
Turn off the water tap.
If the disable spin option (
) was selected, proceed as follows:
1. turn the programmes knob to “Drain ”;
2. press the “Start-Pause” button. The water is automatically drained on all programmes without spinning.
If you wish to drain the water and then spin:
1. turn the programmes knob to “Drain
2. deactivate the disable spin option (
speeds;
3. press the “Start-Pause” button.
”
) or, for models with spin speed selector, select one of the two
36
6. CLEANING AND MAINTENANCE
Important – Before cleaning or servicing the machine, remove the plug from the socket.
6.1 EXTERNAL CLEANING
•
•
•
•
•
Regular and constant cleaning will keep your appliance looking like new.
Clean the outer surfaces with soap and water and then dry thoroughly with a soft cloth.
Clean parts in plastic with a damp cloth.
Do not scratch with sharp objects and do not use solvents or abrasive products as these will damage the
surface.
For reasons of safety, never spray water onto the appliance.
6.2 CLEANING THE DRUM
•
•
•
•
Remove any rust stains from the drum with a special cleaner for stainless steel or, for particularly stubborn stains, with extra fine abrasive paper.
To remove scale from the washing machine, only use branded scale removers with anti-corrosion agents
for washing machines.
Follow the manufacturer's instructions and recommended quantities to the letter.
After removing scale or rust from the drum, perform a few rinse cycles to eliminate acid residues
as these may damage the machine. Never use detergents containing solvents. These may form
vapours that may catch fire and explode.
6.3 CLEANING THE DOOR GASKET
Periodically check that no clips, buttons, nails or needles have got caught in the folds of the door gasket.
6.4 CLEANING THE DRAIN PUMP
Only clean the drain pump if it is obstructed by buttons, hairpins and the like and the water cannot drain.
In this case, proceed as follows.
3.
Remove the plug from the socket to disconnect the machine from the electrical power supply.
4.
Depending on the model, proceed as follows:
MODEL A – Use a coin to turn the plastic buttons
fixing the cover to the base plate anti-clockwise.
MODEL B – Insert a small screwdriver into the
slots in the base plate cover, then gently prise up
to release the upper part of the cover.
Pull the cover slightly forwards and then up to remove it completely.
37
4.
Pull out the drain hose “A”.
Attention: if the hose is hot it means the water is hot or boiling. Place a
tray on the floor and remove the plug “B” to drain the water.
Depending on the quantity of water, it may be necessary to empty the
tray several times.
When no more water comes out, push the hose back in and screw
back the plug “B”.
6.
Unscrew the cover of the pump “D” by turning it anti-clockwise.
Clean the pump body and remove any foreign bodies.
Check the inside “E” and make sure the impeller turns freely. If there are
any foreign bodies, remove them.
7.
Screw the pump cover back on.
Fix the drain hose by snapping the plug into place «C».
Depending on the model, put back the cover as follows:
MODEL A – Insert the lower part of the cover first. Then secure it by turning the plastic buttons a quarter
turn clockwise.
The slots in the buttons must be horizontal.
MODEL B – Insert the lower part of the cover first and then push it towards the base plate until it clicks
into place.
6.5 CLEANING THE DETERGENT TRAY
Keep the detergent tray free from scale.
To simplify this operation, completely remove the detergent tray (pull it out
as far as it will go, lift it slightly and then pull fairly vigorously).
Remove the traps «B» and clean with hot water.
Put back the traps and remove any residues of detergent before putting the
tray back.
6.6 CLEANING THE WATER INLET FILTER
The machine is fitted with a filter for protecting the water inlet valves.
The filter is fitted the gas thread of the inlet hose connected to the tap
Clean the filter if no water or insufficient quantities of water enter the washing machine.
To do this, proceed as follows:
•
Remove the plug from the socket to disconnect the machine from the
electrical power supply.
•
Turn off the water tap.
•
Unscrew the inlet hose from the tap.
•
Remove the filter from the inlet hose gas thread.
•
Clean the filter with water and a brush.
•
When screwing the inlet hose back on to the tap, make sure the filter is correctly positioned.
38
7. TROUBLESHOOTING
This product complies with current safety regulations governing electrical equipment. For safety reasons, all technical inspections or repairs must be performed by qualified technicians in order to prevent hazardous situations for
users.
If the machine does not work, before calling the Service Centre and spending money unnecessarily, check that
the operations indicated in this troubleshooting table have been performed.
1
2
3
4
5
The machine does not start
The tub does not fill with
water
Check that:
-
the plug is correctly fitted into the socket
-
the door is securely closed
-
the “Start-Pause” button has been pressed.
Check that:
-
the plug is correctly fitted into the socket
-
the door is securely closed
-
the water tap is open
-
the water inlet filters are not clogged. Clean them as indicated in
paragraph 6.5.
-
the water inlet tube is not jammed or bent
No water appears to be in
the drum
No fault.
The water does not drain
Check that:
The water level is lower than the glass of the door because the new machines use less water though obtaining the same washing and rinsing results.
-
the drain hose is not twisted
-
the drain pump is not clogged. Clean it as indicated in paragraph 6.3.
The water does not drain
after final rinsing in delicates and woollens washing programmes
This is envisaged by the washing programme (if the no-spin and stop with
option has been selected) to prevent fabrics from creasing.
tub full
6
The machine fills with water and drains continuously
Make sure the end of the drain hose is not too low.
7
Strong vibrations
spinning
Check that:
8
9
10
during
Too much foam forms and
escapes from the tray
Water on the floor
Not all the fabric softener
enters the machine or too
much water remains in the
compartment
To drain the water, proceed as described in the “End of programme”
paragraph.
-
the machine has been properly levelled as described in paragraph
3.2
-
the machine is not too close to walls or furniture
-
the internal moving assembly has been released as described in
paragraph 3.1
Check that:
-
the detergent is suitable for automatic machines and is not for hand
washing
-
no more than the quantities indicated in the manual are used
Check that:
-
the unions of the water inlet hose are not loose
-
the end of the drain hose has not moved out of place.
Make sure that the traps in the detergent tray are correctly positioned and
are not clogged. Clean them as indicated in paragraph 6.4.
39
11
The machine does not spin
The unbalanced load sensor has triggered because the washing is not
uniformly distributed inside the drum. If the washing is wet at the end of
the cycle, distribute it well inside the basket and repeat just the spin cycle.
12
Draining water from the
drum
In the event of a power failure or a fault in the appliance, the water inside
the drum can be drained as described in paragraph 6.3
13
The washing has not been
correctly spun
Large items have rolled up and are not uniformly distributed inside the
drum. Always wash large items together with small ones.
14
Residues of detergent on
the washing
Many phosphate-free detergents contain substances that are difficult to
dissolve in water.
Select the Rinse programme or brush the washing.
15
Washing results are unsatisfactory
-
Too little detergent or an unsuitable detergent may have been
used.
-
Stubborn stains were not pre-treated
-
The wrong temperature was selected
-
The drum was overloaded
ERROR SIGNALS
In the event of a malfunction, the “End” programme phase LED starts flashing and the LED's located above the
options buttons light up to signal the fault.
The “End” LED flashes for about half a second and then goes off for the same amount of time before flashing
again. While the “End” LED flashes, the LED's located above the options button flash but do so more rapidly. To
determine the type of error, count the number of times the “End” LED flashes:
Number of times the “End” programme
phase LED flashes between two 15 second
intervals
Problem
The tub does not fill with water
5
Consult the troubleshooting table at point: 2
The water does not drain from the tub
6
Consult the troubleshooting table at points: 4 and 5
A leak has occurred and aquastop has triggered (only for models fitted with this safety device)
1
For this type of error, turn off the water tap, remove the plug and
contact the Service Centre.
When the washing programme starts but the door has not been closed correctly, the “Start” and “Wash” programme phase LED's start flashing alternatively at intervals of about half a second. This continues until the door
has been closed properly. The door open signal starts about 5 seconds after the washing programme commences.
For all other error codes, contact the nearest Assistance Centre after disconnecting the power supply and closing
the water tap.
40
SIMBOLI PANNELLO COMANDI
CONTROL PANEL SYMBOLS
SIMBOLOS PANEL DE MANDOS
SYMBOLES TABLEAU DE BOARD
SYMBOLE BEDIENUNGSBLENDE
BEDIENINGSPANEEL SYMBOLEN
ALTRI SIMBOLI
OTHER SYMBOLS
OTROS SIMBOLOS
AUTRES SYMBOLES
WEITERE SYMBOLE
SYMBOLEN
OPZIONI
OPTIONS
OPCIONES
OPTIONS
OPTIONEN
OPTIES
PROGRAMMI
PROGRAMS
PROGRAMAS
PROGRAMMES
PROGRAMME
PROGRAMMA
ASCIUGATURA
DRYING
SECADO
SECHAGE
TROCKNEN
DROGEN
AUMENTO ACQUA IN VASCA
WATER INCREASE
AUMENTO AGUA
AUGMENTATION EAU
MEHR WASSER
WATERTOENAME
AMMORBIDENTE
FABRIC CONDITIONER
SUAVIZANTE
ASSOUPLISSANT
WEICHSPÜLER
WASVERZACHTER
LAVA A MANO
HAND WASH
LAVADO A MANO
LAVAGE À LA MAIN
HANDWÄSCHE
HANDWAS
ESC.CENTRIFUGA E ARRESTO VASCA
PIENA
NO SPIN OR STOP WHIT FULL TUB
EXCLUSIÓN CENTRIFUGADO Y PARADA
CON CUBA LLENA
EXCL. ESSORAGE ET ARRÈT A PLEIN
CUVE
KEIN ENDSCHLEUDERN UND HALTMIT
VOLLEM BEHÄLTER
UITSLUITING CENTRIFUGE
APERTURA OBLÒ
OPEN DOOR
APERTUTA PUERTA
OUVERTURE HUBLOT
ÖFFNEN BULLAUGE
URTJE OPENEN
PRELAVAGGIO
PRE-WASH
PRELAVADO
PRELAVAGE
VORSPÜLEN
VOORWASSEN
DELAY TIMER
DELAY TIMER
ARRANQUE DIFERIDO
RETARD PROGRAMME
STARTVERZÖGERUNG
UITSTEL PROGRAMMA
AVVIO – PAUSA
START-PAUSE
MARCHA – PARADA
MARCHE-PAUSE
START-PAUSE
START-PAUZE
RISCIACQUI
RINSES
ENJUAGUE
RINCAGES
KLARSPÜLEN
SPOELEN
DELICATI
DELICATES
DELICADO
LINGE DÉLICATE
EMPFINDLICHE WÄSCHE
FIJNE WAS
INIZIO
START
INICIO
SELÉCTION
BEGINN
BEGIN
SCARICO E CENTRIFUGA
DRAIN AND SPIN
VACIADO Y CENTRIFUGADO
VIDANGE ET ESSORAGE
ABPUMPEN UND SCHLEUDER
LEEGPOMPEN EN CENTRIFUGEREN
ECONOMICO
ECONOMY CYCLE
ECONÓMICO
ÉCONOMIQUE
SPAR
ZUINIG
LAVAGGIO
WASH
LAVADO
LAVAGE
SPÜLEN
WASSEN
RAPIDO
QUICK WASH
RÁPIDO
LAVAGE COURT
SCHNELLPROGRAMM
SNELLE CYCLUS
FINE
END
FINAL
FIN
ENDE
EINDE
COTONE E COLORATI
COTTON AND COLOURED
ALGODÒN Y COLORADOS
COTON OU COLORÉS
BAUMWOLLE UND BUNTWÄSCHE
KATOENEN OF BONTE
RISCIACQUO AGGIUNTIVO
EXTRA RINSE
ACLARADO ULTERIOR
RINCAGE SUPPLÉMENTAIRE
ZUSÄTZLICHES NACHSPÜLEN
EXTRA SPOELING
RISCALDAMENTO
HEATING
CALENTAMIENTO
CHAUFFAGE
AUFHEIZEN
VERWARMINGSFASE
LANA
WOOL
LANA
LAINE
WOLLE
LAINE
SELEZIONE CENTRIFUGA
SPIN
CENTRIFUGADO
ESSORAGE
SCHLEUDER
CENTRIFUGE
TEMPO RIMANTE
TIME REMAINING
TIEMPO RESIDUAL
TEMPS RESTANT
RESTZEIT
RESTERENDE TIJD
ASCIUGATURA
DRYING
SECADO
SECHAGE
TROCKNEN
DROGEN
STIRAMENO
EASY-IRON
ANTIARRUGAS
REPASSAGE
BÜGELLEICHT
KREUKVERMINDERING
SINTETICI E DELICATI
SINTHETICS AND DELICATES
SINTETICAS Y DELICADOS
SYNTETIQUES EN DELICATS
SYTHETISCHE UND
SCHONGEWEBE
SYNTHETISCH FIJNE WAS
MEZZO CARICO
HALF LOAD
MEDIA CARGA
DEMI-CHARGE
HALBE LADUNG
HALFVOL
SETTORI
SECTION
SECCIÒN
SECTION
BEREICHE
SECTOR
-
e
119
CONTRASSEGNO WEEE
WEEE MARK
MARQUE WEEE
WEEE ZEICHEN
MARCA WEEE
I
Questo apparecchio dispone di contrassegno ai sensi della direttiva europea 2002/96/CE
in materia di apparecchi elettrici ed elettronici (waste electrical and electronic equipment WEEE).
Questa direttiva definisce le norme per la raccolta e il riciclaggio degli apparecchi dismessi
valide su tutto il territorio dell’Unione Europea.
This appliance is marked according to the European directive 2002/96/EC on Waste Electrical and Electronic Equipment (WEEE).
GB
This guideline is the frame of a European-wide validity of return and recycling on Waste
Electrical and Electronic Equipment.
Cet appareil est marqué selon la directive européenne 2002/96/CE relative aux appareils
électriques et électroniques usagés (waste electrical and electronic equipment - WEEE).
F
La directive définit le cadre pour une reprise et une récupération des appareils usagés applicables dans les pays de la CE.
Dieses Gerät ist entsprechend der europäischen Richtlinie 2002/96/EG über Elektro- und
Elektronikaltgeräte (waste electrical and electronic equipment - WEEE) gekennzeichnet.
D
Die Richtlinie gibt den Rahmen für eine EU-weit gültige Rücknahme und Verwertung der
Altgeräte vor.
Este aparato cumple con la Directiva europea 2002/96/CE sobre aparatos eléctricos y
electrónicos identificada como (Residuos de aparatos eléctricos y electrónicos).
E
La directiva proporciona el marco general válido en todo el ámbito de la Unión Europea
para la retirada y la reutilización de los residuos de los aparatos eléctricos y electrónicos.
NL
Dit apparaat is voorzien van een merkteken in de zin van de Europese richtlijn
2002/96/EG betreffende afgedankte elektrische en elektronische apparatuur (AEEA). In
deze richtlijn worden de voor het gehele territorium van de Europese unie geldende
normen vastgelegd voor het inzamelen en recyclen van afgedankte apparaten.
120