1
Gebrauchsanweisung
D
Operating instructions
GB
Kühl-Gefrierkombination
combined refrigerator-freezer
Mode d’emploi
F
combinés réfrigérateur-congélateur
Gebruiksaanwijzing
NL
koel-vriescombinatie
Istruzione d’uso
I
Instrucciones de manejo
E
combinazione frigo-congelatore
combinación de frigorífico-congelador
Kullaným Kýlavuzu
TR
Οδηγίες Χρήσης
GR
Soðutucu-Dondurucu-Kombinasyonu
Ψυγειοκαταψύκτης
7081 929-02
Liebherr Hausgeräte Marica EOOD* 4202 Radinovo* Bezirk Plovdiv* Bulgarien**www.liebherr.com
CT(esf)20/24/28
0609
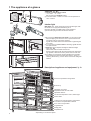
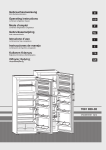
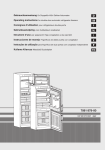
1 The appliance at a glance
Controls, fig. A1:
1On/off and temperature control
"1" = warm "7" = cold
We recommend a medium setting.
2Cool-Plus switch*. Switch on at low room temperatures of
18°C or below.
Interior light
Bulb data: max. 15 W, voltage and current should agree with
the details on the type plate, bulb fitting: E 14.
Replacing the bulb, fig. A1a: Switch off the appliance.
W Pull out the plug or switch off/unscrew the fuse.
W By moving the bottle and can holder, you can prevent bottles from tipping over when the door is opened and closed.
The holder can be removed for cleaning:
- fig. A2: The holder slides and releases left or right along the
door stops.
W You can remove all door racks for cleaning, fig. A2: lift rack
and pull forwards.
W Shelves* can be adjusted in height for different height
items, figs. A3:
- Lift the shelf, slide forwards and remove.
- Always insert shelves with the raised edge at the back pointing upwards, otherwise food may freeze onto the rear wall.
W Fig. A4: If you need space for large bottles and containers,
then simply push the front half of glass shelf 1 back. For
cleaning, the holder 2 can be used to remove the half glass
shelves.
Description of appliance and equipment, fig. A
Freezer compartment storage shelf
Butter stop
adjustable door racks
Adjustable bottle and can holder
adjustable shelves
On/off and temperature control, interior light
Defrost drain
Coldest zone of the refrigerator compartment,
for sensitive and perishable foodstuffs
Door rack for large bottles
Vegetable bins
Rating plate
Adjustable feet
* Depending on model and options
Congratulations on your purchase. In choosing this appliance you have opted for all the benefits of stateof-the-art refrigeration technology, guaranteeing you top quality, a long life span and excellent reliability.
The features on your appliance have been designed to ensure maximum convenience - day in, day out.
This appliance has been manufactured with recyclable materials using an environmentally friendly
process, so together you and we are making an active contribution to the preservation of our environment.
To get to know all the benefits of your new appliance, please read the information contained in these
operating instructions carefully.
We wish you much pleasure with your new appliance.
Keep these operating instructions in a safe place and
pass them on to the next owner, where applicable.
The operating instructions apply to several models. Differences may therefore occur.
Contents
Page
Operating instructions
1 The appliance at a glance.................................. 8
Contents................................................................ 9
Safety regulations.................................................. 9
2 Safety instructions and warnings................... 10
Disposal notes..................................................... 10
Setting up............................................................ 10
Connecting to the mains...................................... 10
3 Refrigerator compartment............................... 11
Switching the appliance on and off...................... 11
Setting the temperature....................................... 11
Cool-Plus switch.................................................. 11
Notes on cooling................................................. 11
4 Freezer compartment....................................... 11
Making ice-cubes................................................ 11
Notes on freezing and storage............................ 11
5 Defrosting, cleaning......................................... 12
Energy savings.................................................... 12
6 Troubleshooting................................................ 13
Customer service and type plate......................... 13
7 Instructions for installation and modification
Changing over door hinges................................. 13
Insertion into row of kitchen units......................... 13
Safety regulations
§
W The device is designed exclusively for the cooling foodstuffs. The applicable statutory regulations are to be observed in the event that the device is
to be used for commercial cooling of foodstuffs.
The device is not suitable for the storage and cooling of
drugs, blood plasma, laboratory preparations or similar
medicine-related materials and products as detailed in
the Medical Devices Directive 2007/47/EC. Improper
use of the device can cause the stored products stored
in it to be damaged or the items can be spoiled. In addition, the device is not suitable for operation in explosion-prone areas.
W The appliance is set to operate within specific ambient temperature limits according to its climate rating.
These temperature limits should not be exceeded. The
correct climate rating for your appliance is indicated on
the type plate. This is explained as follows:
Climate rating Set for ambient temperatures of
SN
+10°C to +32°C
N
+16°C to +32°C
ST
+16°C to +38°C
T
+16°C to +43°C
- The refrigerant circuit has been tested for leaks.
- The appliance complies with current safety regulations
and EC directives 2006/95/EC and 2004/108/EC.
2 Safety instructions and warnings
Disposal notes
The packaging is made of recyclable materials.
- Corrugated board/board
- EPS moulded parts
- Polythene sheets
- Polypropylene straps
W Keep packaging materials away from children- polythene sheets and bags can cause suffocation!
W Please return the packaging to an official collection point.
Your old appliance: This contains some reusable
materials and should be disposed of properly - not
simply with unsorted household refuse.
W Discarded appliances should be disabled: Remove the plug, cut through the connection cable
and render the catch unusable so that children
cannot become trapped inside.
W Ensure that the refrigerant circuit is not damaged when the
appliance that is no longer needed is taken away for disposal.
W Details of the refrigerant can be found on the type plate.
W Appliances which are no longer needed must be disposed
of in a professional and appropriate way, in accordance
with the current local regulations and laws.
Technical safety
W To prevent injury or damage to the unit, the appliance should only be transported wrapped and set
up by two people.
W The refrigerant R 600a is environmentally friendly but flammable.
W Do not damage the refrigerant circuit pipes.
Splashes of refrigerant can harm your eyes or ignite.
W If refrigerant escapes, remove all naked flames or sources
of ignition in the vicinity of the leak, disconnect the appliance from the mains and ventilate the area well.
W In the event that the appliance is damaged, contact the supplier immediately before connecting to the mains.
W To guarantee safe operation, ensure that the appliance is set
up and connected as described in these operating instructions.
W Disconnect the appliance from the mains if any fault occurs. Pull out the plug (not by pulling on the mains cable)
or switch off or remove the fuse.
W Any repairs and work on the appliance should only be
carried out by the customer service department, as unauthorised work could prove highly dangerous for the
user. The same applies to changing the mains power cable.
Safety during use
W Do not store explosives or sprays using combustible propellants such as butane, propane, pentane,
etc. in the appliance. Electrical components might
cause leaking gas to ignite. You can identify such sprays
by the printed contents or a flame symbol.
W Only store high-percentage alcohol in tightly sealed, upright containers.
W Do not allow naked flames or ignition sources to enter the
appliance.
W Do not use electrical appliances inside the appliance (e.g.
steam cleaners, heaters, ice makers, etc.).
W Do not stand on the plinth, drawers or doors or use them
to support anything else.
W This appliance is not intended for use by persons (including children) with reduced physical, sensory or mental
capabilities or lack of experience and knowledge unless
they have been given initial supervision or instruction
concerning use of the appliance by a person responsible
for their safety. Children should be supervised to ensure
that they do not play with the appliance.
W Avoid prolonged skin contact with cold surfaces or
chilled/frozen food. This could cause pain, numbness and
frostbite. In the case of prolonged skin contact, protective
measures should be taken, e.g. gloves should be worn.
W Do not consume food which has been stored for too long,
as it could cause food poisoning.
Setting up
W When setting up/fitting ensure that the refrigerant circuit
pipes are not damaged.
10
W Once in position, use a 10 spanner to adjust the feet
so that the appliance is level and does not wobble.
W Avoid positioning in direct sunlight or next to an
oven, radiator or similar, in damp locations or near
spraying water.
W Standard EN 378 specifies that the room in which you install
your appliance must have a volume of 1 m3 per 8 g of R 600a
refrigerant used in the appliance, so as to avoid the formation of inflammable gas/air mixtures in the room where the
appliance is located in the event of a leak in the refrigerant
circuit. The quantity of refrigerant used in your appliance is
indicated on the type plate on the inside of the appliance.
W Always position the appliance directly up against
the wall.
W The ventilation grilles should not be obstructed. Always ensure that there is good ventilation and that the outward flowing air is able
to escape. Please note the appendix concerning
installation instructions.
W Condensation may form on the outside of the
refrigerator/freezer during periods of high humidity. Constant ventilation of the installation site is recommend.
W Do not place heat-emitting appliances, e.g. microwave
oven, toaster, etc., on top of the refrigerator or freezer.
W In order to avoid the risk of fire, do not place any burning
candles, lamps or other objects with open flames on the
refrigerator/freezer.
W Fire hazard due to dampness!
If live parts or the mains lead become damp this may
cause short circuits.
- The appliance is designed for use in enclosed areas. Do
not operate the appliance outdoors or in areas where it is
exposed to splash water or damp conditions.
W CAUTION! Risk of injury and danger of damage as a result
of incorrect transport!
- Transport the appliance in a packed condition.
- Transport the appliance upright.
- Do not transport the appliance without assistance.
Connecting to the mains
Power supply (AC) and voltage
at the operating point must comply with the details on
the type plate, which is located on the inside left of the
appliance, next to the vegetable bins.
W Connect the appliance with a properly
earthed fused plug and socket only.
W The socket must be fused with a 10 A fuse or higher, it
must be away from the rear of the appliance and must be
easily accessible.
W Do not connect the appliance to the supply with other
equipment using a distribution outlet - risk of overheating.
W When removing the mains cable from the back of the appliance, remove the cable holder as well so as to avoid
vibration noise.
The wires in the mains lead are coloured in accord-ance
with the following code: green/yellow = earth, blue = neutral,
brown = live.
Warning! This appliance must be earthed.
Non-rewireable plugs BS 1363
If this machine or appliance is fitted with a non-rewireable
plug, the following information applies: If the socket outlets
are not suitable for the plug supplied with this product, it must
be cut off and an appropriate plug fitted. The plug cut from
the flexible cord should be disposed of and on no account be
inserted into a 13 A socket elsewhere in the house (electric
shock hazard).
The fuse cover must be re-fitted when changing the fuse,
and if the fuse cover is lost the plug must not be used until a
suitable replacement is obtained. The colour of the correct
replacement cover is that of the coloured insert in the base of
the plug, or the colour that is embossed in words on the base
of the plug (as applicable to the design of the plug fitted).
The correct rating of the replacement fuses that are ASTA
approved to BS 1362 should be fitted. Replacement fuse
covers may be purchased from your local electrical suppliers,
electricity showroom or approved service agent.
3 Refrigerator compartment
4 Freezer compartment
You are advised to clean the appliance before switching it on
for the first time (see "Cleaning").
You can store frozen food for several months, prepare icecubes and freeze fresh food in the
freezer compartment at temperatures of -18°C and lower (medium
temperature setting or lower).
NB: The air temperature in the compartment, measured
with a thermometer or other measuring equipment, may fluctuate. However this will have little effect on the frozen food
when the compartment is full. The core temperature of the
frozen food will be the average of these values.
Switching the appliance on and off,
setting the temperature
W On: Turn the temperature control 1, fig.
A1, clockwise from "0" to "4". The appliance is now switched on and the interior
light comes on.
W Off: The appliance is switched off at the
"0" setting. The interior light is off.
W The positions of the temperature control
indicate the following:
"1" = warm, lowest cooling setting
"7" = cold, highest cooling setting
W We recommend a medium setting.
Making ice-cubes
W At setting ”7” it is possible to reach temperatures below “0”
in the coldest zone of the fridge section.
W If you are storing frozen food and wish to ensure that the
low freezing temperature is maintained, we recommend
setting the temperature control to between "4" and "7".
Cool-Plus switch*
W At low room temperatures of 18°C or
below, switch on the Cool-Plus switch 2,
fig. A1, on the temperature control housing.
This will ensure that the freezer compartment stays at the right temperature.
W At normal room temperatures of above
18°C, it is not necessary to switch on the Cool-Plus
switch; it should stay switched off.
NB: Please note that the temperature inside the appliance
is affected by the room temperature, the place where the
appliance is installed, the frequency with which the door is
opened and how full the appliance is.
Notes on cooling
W Fill the ice-cube tray* three-quarters full with water and freeze. The
ice-cubes can be removed from the
tray by twisting or by holding upside
down for a short time under running
water.
Freezing fresh food
Fresh food should be frozen to the core as rapidly as possible. This ensures that the nutritional value, vitamins, appearance and flavour of the food remain intact. Larger quantities
of fresh food should be frozen as follows:
W Approx. 24 hours before placing the food in the freezer,
turn the temperature control to a medium to cold setting
(approx. 6).
- Switch on Cool-Plus 2. Frozen food already stored will
receive an additional boost.
W Insert the fresh food. The maximum amount of food which
can be frozen in 24 hours is shown on the type plate
("Freezing capacity ... kg/24h")*.
Spread out the fresh food on the bottom of the freezer
compartment as much as possible and do not allow it to
come into contact with frozen food already stored.
W The freshly frozen food will be thoroughly frozen after 24
hours.
- Set the temperature control back to its previous setting.
Switch off Cool-Plus 2 again. The freezing procedure is
complete and the appliance will return to its normal cooling function.
! Notes on freezing and storage
W As a result of the circulation of the air, the temperature
in the refrigerator compartment is not uniform. This
can have advantages for storing different types of
food.
- Just above the vegetable bins and at the back of the
refrigerator, the air is colder, ideal for raw meat or cold
meats.
- At the top front of the compartment and in the door, the air
is warmer, making it ideal for cheese and for spreadable
butter.
W Store food so that the air can circulate freely; do not place
items too close together, and keep at least 2 cm away
from the interior light.
W Always store food in closed containers or wrapped; highpercentage alcohols should be tightly sealed and stored
upright.
W Reusable plastic, metal, aluminium and glass contain-ers
or cling-film can be used for wrapping.
W Always store food which gives off or is sensitive to ethylene gases such as fruit, vegetables and salads separately
or wrapped in order not to affect their storage life; e.g. do
not store tomatoes together with kiwis or cabbage.
W You can put foods that are already frozen and up to
1 kg of fresh foods per day straight into the cold freezer
compartment.
W Once food has been thawed it should be prepared and not
simply frozen again.
W As a guideline for the storage time, the following applies to
various foodstuffs in the freezer compartment:
Ice cream
2 to 6 months
Bread, cakes and pastries
2 to 6 months
Sausage, ham
Game, pork
Fish, oily
Fish, lean
Cheese
Poultry, beef
Vegetables, fruit
* Depending on model and options
2 to 6 months
6 to 10 months
2 to 6 months
6 to 12 months
2 to 6 months
6 to 12 months
6 to 12 months
11
5 Defrosting, cleaning, Energy savings
Defrosting
The refrigerator compartment
defrosts automatically. The defrost water is evaporated by the heat from the compressor; drops of water
on the rear wall are perfectly normal.
W Ensure that the defrost water can flow freely through the
drain hole in the rear wall (arrow in fig. A).
The freezer compartment
After a long period of operation, a layer of frost or ice can
build up inside the freezer compartment.
However, a thick layer of ice will increase the appliance's
energy consumption. You should therefore defrost the appliance regularly:
W To defrost, switch off the appliance:
- Disconnect the appliance from the mains or
- set the temperature control to "0".
W If possible, put the frozen goods in the freezer drawer,
wrap in newspaper or a blanket and store in a cool place.
W To speed up the defrosting process place a saucepan of
hot but not boiling water on one of the middle shelves.
Do not use electric heaters or steam clean-ers,
defrosting sprays or naked flames for defrosting nor
any metal objects for removing the ice. Risk of injury
and damage!
W Leave the appliance door open when defrosting.
After defrosting, mop up the remaining water with a
sponge or cloth and clean the appliance.
Cleaning
W Before cleaning, always switch off the appliance. Disconnect from the mains or un-screw
or switch off the fuse.
W Wash shelves, glass plates and other options by
hand.
W Clean the outer walls, inside and appliance by hand with
lukewarm water and a little detergent. Because of the risk
of injury and damage to the appliance, steam cleaning
equipment should not be used.
W Never use abrasive or scouring sponges. Do not use concentrated cleaning agents and never use abrasive or acid
cleaners or chemical solvents.
W We recommend using a soft cloth and an all-purpose cleaner with a neutral pH value. Only use food safe cleaning
materials inside the appliance.
W Clean the drain hole on the rear wall above the vegetable
bins often Fig. A, arrow.
If necessary, clean with a thin object, e.g. a cotton swab or
similar.
W The dust should be removed
from the refrigeration unit and heat
ex-changer - metal grid at the back
of the appliance - once a year.
Dust de-posits increase energy
consumption.
W Ensure that none of the wires or
other components are dislodged,
bent or damaged.
W Then connect/switch on the appliance.
If the appliance is to be left switched off for any length of
time, empty the appliance, disconnect from the mains, clean
as described above and leave the door open so as to avoid
odours.
Notes on energy saving
W Ensure that the ventilation spaces are free.
W Avoid keeping the door open for too long.
W Store food logically. Do not exceed the storage period
specified.
W Keep all food properly packed and covered so as to avoid
its frosting up on the outside.
W Always allow hot food to cool to room temperature before
placing in the appliance.
W Defrost frozen food in the refrigerator.
W If an ice layer forms in the freezer compartment, you
should defrost it. This will improve the cold transfer and
reduce energy consumption.
W Keep the appliance door shut in the event of a breakdown.
This will delay the cold loss and will help to maintain the
quality of the frozen food for longer.
W For stainless-steel appliances*:
- Clean the side panels and door surfaces with a clean and
soft cloth. If necessary, use a moist cloth (water + detergent). Alternatively, use a micro-fibre cloth.
W Ensure that no cleaning water penetrates into the electrical components, drain gulley* or ventilation grilles. Wipe
the appliance dry.
W Do not damage or remove the type plate on the inside of
the appliance. It is very important for servicing purposes.
12
* Depending on model and options
6 Troubleshooting
7 Instructions for installation
and modification
Your appliance is designed and manufactured for a long life
Before reading, please fold out and refer
span and reliable operation.
to the illustrated back page.
If a malfunction nonetheless occurs during operation, check
whether it is due to an operating error. Please note that even
during the warranty period the resultant servicing costs in this
case will have to be borne by the owner.
Do not install the appliance side-by-side with another refrigYou may be able to rectify the following faults by checking
erator or freezer. This is important to prevent condensation
the possible causes yourself:
and consequential damage from it.
Malfunction
Possible cause and remedy
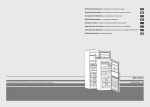
The external dimensions of the appliance can be seen on
the illustration at the back (fig. S).
Appliance does not work:
- Is the appliance switched on properly?
- Is the mains plug properly inserted in the socket?
- Is the socket fuse intact?
Model
Appliance dimensions (mm)
The interior light does not come on:
- Is the appliance switched on?
- The bulb is defective. Change the bulb as described in
"Interior light".
Interior light on when Cool-Plus activated:
- This is necessary from a technical point of view and is quite normal.
Loud running noise:
- Is the appliance standing firmly on the floor, or does the
compressor cause nearby items of furniture or objects to
vibrate? If necessary, move the appliance slightly, align by
adjusting the adjustable feet, or move bottles and containers apart.
- Burbling noises are normal. These are caused by the refrigerant flowing round the refrigerant circuit.
A short clicking sound: This will be heard whenever
the refrigeration unit (the motor) switches on or off automatically.
Motor noise: This will be slightly louder for a brief period
when the refrigeration unit switches on.
The temperature is not cold enough:
- Is the temperature setting correct? If necessary, set a
lower temperature.
- Loose thermometer in appliance is showing a wrong reading.
- Does the door close properly?
- Is the appliance sufficiently well ventilated? Clear ventilation grilles if necessary.
- Is the ambient temperature too hot? (See "Safety regulations")
- Has the appliance been opened too often or left open too
long?
- If applicable, wait until the appliance reaches the required
temperature itself.
Customer service and type plate
If none of the above causes apply and you cannot
rectify the fault yourself, please contact your nearest customer service department (see enclosed list
for addresses). State the type designation 1, service
number 2 and appliance number 3 as given on the type
plate, so as to ensure rapid, accurate servicing. The type
plate is located inside the appliance on the left-hand side.
Nominal width A
C
D
E
G
H
CT 2011
550 560 1127 629 615 1230
CT 2411
550 560 1127 629 615
CT 2831
550 560 1127 629 615
CT(esf)2041 550 560 1127 629 615
1230
CT(esf)2431 550 560 1127 629 615
1425
1425
1425
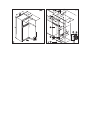
Changing over door hinges
Fig. T/T1/T2: You can change over the door hinges if necessary.
Follow the order of the positions illustrated in fig. T or T1/T2.
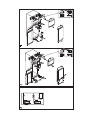
Insertion into row of kitchen units
Fig. U: The appliances can be installed in a row of kitchen
units. To adapt the height of the appliance to the surrounding furniture a top unit 1 can be added.
A gap of at least 50 mm depth must be provided behind and
along the entire width of this unit so as to ensure sufficient
ventilation. The area of ventilation underneath the ceiling
should be at least 300 cm2. The greater the area the more
economically the appliance will run.
W When setting up the appliance next to a wall 4, a minimum distance of 30 mm must be provided on the hinge
side between the appliance and the wall.
W If you wish to attach the appliance to adjacent units or to fit
a spacer between the appliance and the wall, please note
the following:
- Verify that the door can open and close properly.
- Do not drill holes inside the marked area (fig. U), otherwise damage could be caused to foamed components.
- Attach appliance to kitchen units with self-tapping screws
(max. depth 10 mm).
1 top unit
2 refrigerator/freezer
3 kitchen unit side panel 4 wall
All types and models are subject to continuous improvement
and the manufacturer therefore reserves the right to make
modifications in the shape, equipment and technology.
13