1
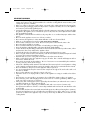
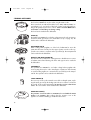
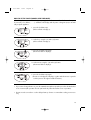
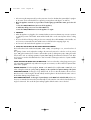
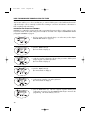
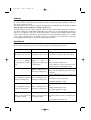
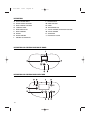
GB
2-07-2003
10:21
Pagina 14
DESCRIPTION
A PASTA COOKER BODY
B
BASKET HOOK HOUSING
L
BASKET HOOK
M MIXER SUPPORT
C BOWL HANDLE HOUSING
N MIXER
D CONTROL PANEL
O TRANSPARENT LID
E
REMOVABLE BOWL
P
F
BOWL HANDLES
Q SAUCE WARMER
SAUCE WARMER/SEPARATOR HOUSING
G BASKET
R
SEPARATOR
H BASKET HANDLE
S
PROTECTIVE COVER
I
HANDLE LOCK BUTTON
DESCRIPTION OF CONTROL PANEL BASIC MODEL
DESCRIPTION OF CONTROL PANEL WITH TIMER
14
GB
2-07-2003
10:21
Pagina 15
IMPORTANT WARNINGS
• As with all electrical appliances, the instructions aim to cover the largest possible number of situations.
Caution and common sense should nevertheless be used when cooking with the "Pasta Cooker", particularly in the presence of children.
• Before use, make sure the mains supply voltage corresponds to the voltage indicated on the rating plate.
• After removing the packaging, make sure the product is complete. If in doubt, do not use the appliance
and contact a professionally qualified person.
• Connect the appliance to an efficiently earthed socket with a minimum current rating of 10 A only. (If the
plug fitted to the appliance does not match the power socket, have the socket replaced with a suitable
type by qualified personnel).
• This appliance is intended for household use only. Any other use is considered improper and thus dangerous.
• Never locate the appliance near sources of heat or outdoors.
• Never immerse the appliance in water. Water infiltration could cause electrical shock.
• When in use, the appliance becomes hot. KEEP AWAY FROM CHILDREN.
• The hot water could cause serious burns. Never move the pasta cooker when the water is hot.
• Never move the bowl while in operation.
• Never exceed the MAX level to avoid water or foam boiling over during cooking.
• Move the appliance with the handles only. (Never lift by the basket handle).
• Position the bowl only after filling it with water to the levels indicated. If heated up without water, a thermal protection device trips and shuts the appliance down.
• If water leaks from the removable bowl, contact an authorised technical service centre.
• Before using the "Pasta Cooker" for the first time, wash the removable bowl, basket, transparent lid and
accessories in hot water and washing up liquid.
• Materials and accessories coming into contact with food conform to EC directives.
• When used for the first time, the appliance may give off smoke. This is normal and disappears after a
few minutes. Ventilate the room.
• Never insert any utensils into the appliance. The use of accessories not recommended by the manufacturer may cause fire, electric shock or injury.
• If the bowl is filled beyond the maximum level indicated, the water may boil over and optimum cooking
results cannot be guaranteed. Always respect the quantities and volumes recommended in this manual.
• Never let children or unfit persons use the appliance without supervision.
• You are recommended to keep the "Pasta Cooker" away from the edge of the work surface and out of
the reach of children.
• Never use the appliance as a deep fryer. Never cook in oil
• Important: do not use on sloping surfaces, make sure the appliance is resting on a stable surface before
using.
• The protective cover most under no circumstances be used while the "Pasta Cooker" is in operation.
• Never leave the power cable dangling from the work surface as it could be grabbed by children or get
in the way of the user. Do not use extensions.
• If the power cable is damaged, it must be replaced by the manufacturer, an authorised service centre or
a qualified electrician in order to eliminate all risk.
• If the power cable requires replacing, use H05VV-F cable with a cross-section of 3x1mm2 only.
The replacement cable must conform to current safety standards and must have the same diameter as the
original cable.
• The removable bowl must be inserted and extracted with great care. When performing these operations,
the water and appliance must be cold. When the removable bowl is in place, make sure it is correctly
positioned as otherwise the appliance may not start up and it may be difficult to insert and move the
cooking basket.
15
GB
2-07-2003
10:21
Pagina 16
STANDARD ACCESSORIES
MAX
MED
MIN
REMOVABLE BOWL (E)
The bowl must ALWAYS be in place when using the Pasta Cooker.
Three water levels are indicated inside the bowl – MIN, MED and MAX, corresponding to 1.5 l, 2.5 l and 3.5 l. The level of water can be adjusted according to the quantity of pasta to be cooked. - Never exceed the MAX level to
avoid water or foam boiling over during cooking.
The bowl can be washed in the dishwasher.
BASKET (G)
The basket must ALWAYS be used when cooking pasta. The only exception is
fresh home-made gnocchi (for more information see tips on page 19). The
basket can be washed in the dishwasher.
TRANSPARENT LID (O)
When cooking whole spaghetti, use of the lid is fundamental to ensure the
pasta enters the water correctly. For other types of pasta, it can be used to support the sauce warmer or separator in the special slots (P). The transparent lid
can be washed in the dishwasher.
MIXER (N) AND MIXER SUPPORT (M)
The mixer must be used whenever cooking pasta. It is divided into two sections
to facilitate removal and cleaning. The mixer and support can be washed in
the dishwasher.
SEPARATOR (R)
The separator must ALWAYS be used when cooking broken spaghetti. This
accessory may, however, be used to mix all types of pasta (even short formats)
to avoid it sticking together. It is inserted in the special slot (P) in the transparent lid. The separator can be washed in the dishwasher.
SAUCE WARMER (Q)
This accessory can be used to warm the sauce while cooking the pasta, exploiting the steam given off by the boiling water. The sauce warmer is inserted in
the special slot (P) in the transparent lid. It cannot be used to reheat frozen
sauces. The sauce warmer can be washed in the dishwasher.
PROTECTIVE COVER (S)
The protective cover most under no circumstances be used while the "Pasta
Cooker" is in operation. After cooking, place the protective cover on the
appliance to avoid dust building up inside the Pasta Cooker.
16
GB
2-07-2003
10:21
Pagina 17
HOW TO SET THE CLOCK (MODELS WITH TIMER ONLY)
When the appliance is connected to the electricity supply for the first time or after it has been without power
for some time, four dashes (- - : - -) will flash on the display and the pasta cooking time (10) is automatically set by the appliance.
12--
1. press the clock button (6).
(the hours flash on display 1)
15--
2. set the hour using the - (2) and + (3) buttons
(the hours flash on display 1)
15:00
15:06
15:06 10
3. press the clock button (6) again.
(the minutes flash on display 1)
4. set the minutes using the - (2) and + (3) buttons.
(the minutes flash on display 1)
5. press the clock button (6) again.
(the time set is displayed on display 1 together with the minutes required to
cook the pasta on the right in smaller characters).
• If you want to change the time set, press the CLOCK button (6) then repeat the procedure described above
to set a new time (this operation must be performed only when the machine is not in operation).
• The time must be set in order to use the "delayed start-up" function. For immediate cooking it is not necessary.
17
GB
2-07-2003
10:21
Pagina 18
COOKING THE PASTA
1. GENERAL TIPS
• Before use, check that the mains supply voltage corresponds to the voltage indicated on the rating plate.
• Before using the "Pasta Cooker" for the first time, wash the removable bowl, basket, transparent lid and
other accessories in hot water and washing up liquid.
• Never turn the appliance on without water in the bowl. If the Pasta Cooker is used without water, the
safety device shuts down operation. If this occurs, before using the appliance again you must wait until
it cools down.
• The water must be replaced after each cooking operation, otherwise there is a risk that excessive foam
will form and overflow from the appliance.
• The protective cover must never under any circumstances be used while the "Pasta Cooker" is in operation.
2.
•
•
•
•
•
•
•
•
•
•
•
•
•
•
•
•
•
•
18
COOKING
remove the transparent lid from the basket, levering on the fins with the hands (figure 1).
pull out the lock button at the top of the basket handle and lift the basket upwards to remove (figure 2).
remove the bowl from the Pasta Cooker using the side handles (figure 3).
fill the bowl with water (either hot or cold) until it reaches one of the levels indicated inside the bowl (figure 4). NEVER exceed the MAX level (figure 5) to avoid the water boiling over during cooking. Never
use with water below the minimum level indicated.
place the bowl in the Pasta Cooker, lining up the handles (F) with the respective housing (C) (figures 56).
add normal quantities of salt - about 10 g (2 teaspoons) for each litre of water (figure 7).
place the basket in the bowl lining up the hook with the housing. Make sure the mixer is attached correctly to the support. The basket must be in the raised position (above the water) (figure 8).
short pasta: place the required amount of pasta in the basket (max 500 g) (figure 9). Place the transparent lid on the basket (figure 10), pressing on the edges and making sure it fits correctly in place.
Insert the sauce warmer or separator as required in the slot (figure 11).
whole spaghetti (or other long pasta): place the transparent lid on the basket and then insert the spaghetti, dividing them evenly among the available holes (figure 12).
if using the sauce warmer (Q), divide the spaghetti among the three free holes.
the preset cooking time of 10 minutes is displayed. If the cooking time indicated on the pack is different,
modify using the - (2) or + (3) buttons. Press the START/STOP button (4) (figure 13). The Pasta Cooker
starts operating and the relative LED (5) comes on.
when the water comes to the boil, the basket is automatically lowered, immersing the pasta completely.
Countdown of the pasta cooking time begins once the basket has been lowered completely.
the cooking time indicated on the display can be modified at any moment using the - (2) or + (3) buttons.
one minute before the end of the cooking time, the appliance emits a beep to warn that cooking is about
to end. You can taste the pasta to check if it is cooked as you require.
at the end of the cooking time, the basket is raised up automatically accompanied by a beep.
if the pasta is still too hard, press the START/STOP button (4) again. The pasta will continue cooking for
a further minute (this time can be increased by pressing the + (3) button) and then is drained automatically.
to interrupt cooking before the end of the cooking time, just press the START/STOP BUTTON (4);
after 30 seconds, the basket is raised automatically.
alternatively, the basket can be raised up manually at any moment by pulling the handle lock outwards
and lifting the basket up (figure 14).
GB
2-07-2003
10:21
Pagina 19
• after removing the transparent lid, pour the pasta into a bowl. To facilitate this (particularly for spaghetti), the mixer can be unhooked from its support by pressing the two tabs (figures 15 and 16).
• Once the appliance is turned on, if you realise it needs topping up with further water, proceed as follows:
1. Press the START/STOP button (4) to turn off the appliance;
2. Add water, taking care not to exceed the MAX level;
3. Press the START/STOP button to turn the appliance on again.
3. IMPORTANT
• When the appliance is plugged in, the automatic basket movement mechanism may come into operation
to verify the position of the basket. Wait until the handle lock is in the raised position before cooking
again.
• Do not touch the bowl during cooking as it becomes extremely hot. To lift it ALWAYS use the handles. You
are, however, recommended to wait until the water cools down before emptying (figure 17).
• Do not remove the bowl when the appliance is in operation
4. USEFUL TIPS FOR GETTING THE BEST FROM YOUR PASTA COOKER
The bowl has three levels marked inside (MIN - MED - MAX), corresponding to 1.5, 2.5 and 3.5 litres of
water.
The quantity of water can be adjusted according to the amount of pasta to be cooked. To cook one portion
(up to 100 g), the minimum level of water is sufficient (this speeds up boiling times). Up to 300 g, the middle level can be used. To cook large quantities of pasta (300 to 500 g), the maximum level must be used. There
are, however, a number of fundamental rules to bear in mind for certain types and sizes of pasta available
on the market.
WHOLE SPAGHETTI OR OTHER TYPES OF LONG PASTA: for best results when cooking long pasta in general, use the MED or MAX levels only. When not using the sauce warmer, use all four holes for optimum distribution of the spaghetti.
BROKEN SPAGHETTI: for broken spaghetti, NEVER use the MAX level, but only the MIN or MED levels, even
when cooking the maximum quantity (500 g). Always use the separator for optimum mixing of the pasta.
HOME-MADE GNOCCHI: for this type of very delicate food, do not use either the basket or the accessories.
Gnocchi must be cooked using the classical method, immersing them in the bowl when the water comes to
the boil then draining using a kitchen sieve.
FRESH HOME-MADE PASTA: for this type of pasta always use the MAX level and add a little oil. You are,
however, recommended to immerse the pasta manually once the water has come to the boil and basket lowering has commenced. This avoids the pasta sticking together while the water comes to the boil.
19
GB
2-07-2003
10:21
Pagina 20
HOW TO PROGRAMME COOKING USING THE TIMER
INTRODUCTION
This function enables you to choose at what time you want to find the pasta cooked and drained automatically and ready to eat. It is extremely useful for those wanting to come home at lunchtime or dinnertime to
find everything ready and waiting.
PROCEDURE AND SETTING THE CONTROLS
EXAMPLE: it is 8.00 in the morning and I want to programme the Pasta Cooker to eat the pasta at 13.10.
Prepare the Pasta Cooker (with water, pasta and salt) as described in the chapter COOKING THE PASTA
paragraph COOKING on page 18.
8:00 10
1. The first operation (if not already done) is to set the time (see the chapter
SETTING THE CLOCK on page 17).
12:00
2. press the TIMER button (7)
(the hours flash on display 1)
13:00
13:00
4. press the TIMER button (7)
(the minutes flash on display 1)
13:10
5. set the minutes using the - (2) and + (3) buttons
(the minutes flash on display 1)
8:00 10
20
3. set the hour (end of cooking time, the time when you want to find the pasta
ready) using the - (2) and + (3) buttons
(the hours flash on display 1)
6. press the TIMER button (7). The time reappears together with the pasta
cooking time in minutes. Press the TIMER ON bottom (8) to memorise the
programming. The relative LED (9) comes on.
GB
2-07-2003
10:21
8:09 8
Pagina 21
7. If necessary, modify the pasta cooking time using the - ( 2 ) and + ( 3 ) buttons.
IMPORTANT WARNINGS
• the pasta cooking time can be modified at any moment except while the appliance is bringing the water
to the boil. If you press one of the two buttons - (2) or + (3) by mistake, "ERR" will be displayed on display
(1) for a few seconds. Operation, however, continues as normal. Wait until the basket is fully lowered
before modifying the cooking time if necessary.
• if you wish for any reason to interrupt the programmed automatic cooking before the Pasta Cooker begins
the heating phase, just press the TIMER ON button (8). The relative LED (9) goes out. If, on the other hand,
the Pasta Cooker is already operating and heating the water (LED 5 already on), to interrupt press the
START/STOP button (4).
• if during programming there is no power for more than a few seconds, the appliance returns to the initial state and the memorised settings are lost.
• the programmed cooking timer is limited to a maximum of 24 hours from activation of the ON indicator
light.
• programmed cooking can be activated if the Pasta Cooker has time to bring the water to the boil and
cook the pasta for the specified time. If the time requested is too short, the Pasta Cooker will display an
"ERR" message when the TIMER ON button is pressed. If this occurs, simply set the TIMER for a longer
period.
• there may be a maximum tolerance of about five minutes longer than the time set.
• once programmed cooking has been activated (TIMER ON indicator light on), the time reappears on the
display. To display the programmed cooking time, just press the TIMER button. The setting reappears for
a few seconds.
21
GB
2-07-2003
10:21
Pagina 22
CLEANING
Before cleaning, always unplug from the mains.
Do not immerse the Pasta Cooker in water and do not place under the tap. Water infiltration could cause
short circuits and electric shock.
After allowing the water to cool down, empty the bowl (E), lifting it out with the help of the handles (F). Never
empty the Pasta Cooker by tilting it or turning it upside down.
The bowl and all accessories may be washed in warm water with normal washing up liquid or in a dishwasher. When washing the bowl (E) and the basket (G), position with care to avoid scratching the non-stick coating. Do not use abrasives, steel wool or sharp metal utensils to clean the bowl (E) and basket (G). Clean the
surfaces with a soft damp cloth only. You are recommended to clean the basket each time you use it, taking
care to remove all pasta deposits. To facilitate cleaning, you should remove the mixer from its support by
pressing lightly with the fingers on the tabs projecting inside the basket.
MAINTENANCE
In the case of malfunction or defective operation, contact a technical service centre authorised by the manufacturer. Before contacting us, however, it is worth carrying out the following simple controls.
PROBLEM (Basic model)
PROBLEM (model with Timer)
CAUSE/REMEDY
the plug is not correctly inserted in the socket.
The appliance does not work The appliance does not work no current from socket (check the household fuse).
press the START/STOP button (4) to turn the beep
"E" or "L" is displayed "H2O" or "HI_t" is off.
accompanied by a warning displayed accompanied by make sure the bowl contains water.
a warning beep
beep
leave the appliance to cool down for half an hour then
add water and press the START/STOP button (4).
The bowl is not in the correct place.
"EPOS" is displayed accomMake sure the bowl handles (F) are inserted in their
panied by a warning beep.
housing (C).
press the START/STOP button (4) to turn the beep
off.
"C" is displayed accompa- "Prob" is displayed accomnied by a warning beep
panied by a warning beep the temperature sensor may be faulty.
try turning the appliance on again.
press the START/STOP button (4) to turn the beep
off.
"F" is displayed accompa- "FCO" is displayed accomnied by a warning beep
panied by a warning beep the lifting mechanism may be faulty.
try turning the appliance on again.
the MAX level has been exceeded
Water in the bowl boils Water in the bowl boils dirty starchy water from previous cooking has been
used.
over during cooking
over during cooking
turn the appliance off and dry well
22