1
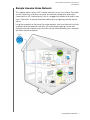
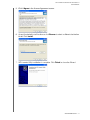
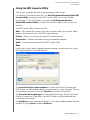
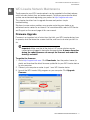
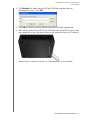
WD Livewire ™ Powerline AV Network Kit User Manual WD® Service and Support Should you encounter any problem, please give us an opportunity to address it before returning this product. Most technical support questions can be answered through our knowledge base or e-mail support service at http://support.wdc.com. If the answer is not available or, if you prefer, please contact WD at the best telephone number shown below. Your product includes 30 days of free telephone support during the warranty period. This 30-day period starts on the date of your first telephone contact with WD technical support. E-mail support is free for the entire warranty period and our extensive knowledge base is available 24/7. To help us keep you informed of new features and services, remember to register your product online at http://register.wdc.com. Accessing Online Support Visit our product support website at http://support.wdc.com and choose from these topics: • Downloads - Download drivers, software, and updates for your WD product. • Registration - Register your WD product to get the latest updates and special offers. • Warranty & RMA Services - Get Warranty, Product Replacement (RMA), RMA Status, and Data Recovery Information. • Knowledge Base - Search by keyword, phrase, or answer ID. • Installation - Get online installation help for your WD product or software. Contacting WD Technical Support When contacting WD for support, have your WD product serial number, system hardware, and system software versions available. North America English Spanish 800.ASK.4WDC (800.275.4932) 800.832.4778 Europe (toll free)* 00800 ASK4 WDEU (00800 27549338) Europe Middle East Africa +31 880062100 +31 880062100 +31 880062100 Asia Pacific Australia China Hong Kong India Indonesia Japan Korea Malaysia Philippines Singapore Taiwan 1 800 42 9861 800 820 6682/+65 62430496 +800 6008 6008 1 800 11 9393 (MNTL)/1 800 200 5789 (Reliance) 011 26384700 (Pilot Line) +803 852 9439 00 531 650442 02 719-3240 +800 6008 6008/1 800 88 1908/+65 62430496 1 800 1441 0159 +800 6008 6008/+800 608 6008/+65 62430496 +800 6008 6008/+65 62430496 * Toll free number available in the following countries: Austria, Belgium, Denmark, France, Germany, Ireland, Italy, Netherlands, Norway, Spain, Sweden, Switzerland, United Kingdom. Table of Contents 1 Important User Information . . . . . . . . . . . . . . . . . . . . 1 Important Safety Instructions . . . . . . . . . . . . . . . . . . . . . . . . . . . . . . 1 Recording your WD Product Information . . . . . . . . . . . . . . . . . . . . . . . 2 Registering your WD Product . . . . . . . . . . . . . . . . . . . . . . . . . . . . . 2 Accessories . . . . . . . . . . . . . . . . . . . . . . . . . . . . . . . . . . . . . . . . . . 2 2 Product Overview . . . . . . . . . . . . . . . . . . . . . . . . . . . . 3 3 Features and Functions . . . . . . . . . . . . . . . . . . . . . . . 4 Sharing Internet Access on the Livewire Network. . . . . . . . . . . . . . . 4 Sample Livewire Home Network . . . . . . . . . . . . . . . . . . . . . . . . . . . . . . 5 Connections . . . . . . . . . . . . . . . . . . . . . . . . . . . . . . . . . . . . . . . . .6 LED Indicators . . . . . . . . . . . . . . . . . . . . . . . . . . . . . . . . . . . . . . . . . 6 4 Getting Started . . . . . . . . . . . . . . . . . . . . . . . . . . . . . . 7 Package Contents . . . . . . . . . . . . . . . . . . . . . . . . . . . . . . . . . . . . . . 7 Minimum Installation Requirements . . . . . . . . . . . . . . . . . . . . . . . . . 7 Installation Procedures . . . . . . . . . . . . . . . . . . . . . . . . . . . . . . . . . . . . . . 8 5 WD Livewire Utility . . . . . . . . . . . . . . . . . . . . . . . . . . 10 Operating Systems Supported . . . . . . . . . . . . . . . . . . . . . . . . . . . . 10 Installation Instructions. . . . . . . . . . . . . . . . . . . . . . . . . . . . . . . . . . 10 Using the WD Livewire Utility. . . . . . . . . . . . . . . . . . . . . . . . . . . . . . . . 12 6 WD Livewire Network Maintenance . . . . . . . . . . . . 17 Firmware Upgrade . . . . . . . . . . . . . . . . . . . . . . . . . . . . . . . . . . . . . 17 Troubleshooting . . . . . . . . . . . . . . . . . . . . . . . . . . . . . . . . . . . . . . 19 7 Appendix . . . . . . . . . . . . . . . . . . . . . . . . . . . . . . . . . . 20 Regulatory Compliance . . . . . . . . . . . . . . . . . . . . . . . . . . . . . . . . . 20 Warranty Information . . . . . . . . . . . . . . . . . . . . . . . . . . . . . . . . . . . 22 TABLE OF CONTENTS – i WD LIVEWIRE POWERLINE AV NETWORK KIT USER MANUAL 1 Important User Information Important Safety Instructions This device is designed and manufactured to assure personal safety. Improper use can result in electric shock or fire hazard. The safeguards incorporated into this unit will protect you if you observe the following procedures for installation, use, and servicing. Read these instructions. Keep these instructions. Heed all warnings. Follow all instructions. Do not use this apparatus near water. Clean only with dry cloth. Do not block any ventilation openings. Install in accordance with the manufacturer’s instructions. Do not install near any heat sources such as radiators, heat registers, stoves, or other apparatus (including amplifiers) that produce heat. Protect the power cord from being walked on or pinched particularly at plugs, convenience receptacles, and the point where they exit from the apparatus. Only use attachments/accessories specified by the manufacturer. Unplug this apparatus during lightning storms or when unused for long periods of time. Refer all servicing to qualified service personnel. Servicing is required when the apparatus has been damaged in any way, such as power-supply cord or plug is damaged, liquid has been spilled or objects have fallen into the apparatus, the apparatus has been exposed to rain or moisture, does not operate normally, or has been dropped. Carefully read and follow the Quick Install Guide and User Manual. Do not operate this device outside the temperature range of 5°C–35°C (41°F–95°F). Do not drop or shake the device. Do not move the device when it is powered on. Power supply cords should be routed so that they are not likely to be walked on or pinched by items placed upon them or against them. Do not overload wall outlets. For additional safety information, refer to www.wdc.com. IMPORTANT USER INFORMATION – 1 WD LIVEWIRE POWERLINE AV NETWORK KIT USER MANUAL Recording your WD Product Information In the following table, write the serial and model numbers of your new WD product. You can find this information on the label on the bottom of the device. You should also note the date of purchase. This information may be required when requesting technical support. Serial Number: Model Number: Purchase Date: System and Software Notes: Registering your WD Product Your WD product includes 30 days of free technical support during the applicable warranty period for your product. The 30-day period commences on the date of your first telephone contact with WD technical support. Register your WD product online at http://register.wdc.com. Accessories For U.S. residents, visit www.shopwd.com to view additional accessories available for your WD Livewire. For users outside the U.S., visit http://support.wdc.com. IMPORTANT USER INFORMATION – 2 WD LIVEWIRE POWERLINE AV NETWORK KIT USER MANUAL 2 Product Overview Thank you for purchasing the WD Livewire Powerline AV Network Kit. This user manual provides step-by-step instructions for installing and using your new WD Livewire devices. For the latest WD product information and news, visit our website at www.westerndigital.com. Expand your home network instantly without running wires – Create high-speed Internet connections anywhere in your home without running wires between rooms. Just use your home's electrical wiring to create a network. Set-up is as easy as plugging in a lamp – Plug one adapter into your router and an electrical outlet. Plug the other adapter into an electrical outlet in any room where you want a high-speed connection. Faster and more reliable than wireless – With speed up to 200 megabits per second*, the WD Livewire Powerline AV network kit is fast enough for every computer in your home to share your broadband internet connection and still have the velocity you need to smoothly stream 1080p full-HD video to your TV. *Your performance may vary based on network conditions and volume of network traffic. More ports for more devices – The WD Livewire adapter kit offers 4 ports on both devices in the pair. This allows you to plug in your router and up to seven Internet-connected devices such as computers, TVs, game consoles, media players, and network storage drives. Encrypted for security – The data transfer between the WD Livewire adapters is protected with the same 128-bit encryption that you trust for your online banking and shopping. And because the encryption is automatic, there’s no need to remember a password. PRODUCT OVERVIEW – 3 WD LIVEWIRE POWERLINE AV NETWORK KIT USER MANUAL 3 Features and Functions Sharing Internet Access on the Livewire Network To share Internet access over the powerline network, connect your router to a WD Livewire device using an Ethernet cable and plug the device directly into an electrical outlet. The connections between the Internet, modem, and router remain the same. In the example below, a WD TV® device and laptop computer are connected to a WD Livewire device using Ethernet cables. Internet access is provided through the network from a different room. FEATURES AND FUNCTIONS – 4 WD LIVEWIRE POWERLINE AV NETWORK KIT USER MANUAL Sample Livewire Home Network This diagram below shows a WD Livewire network in a two-story house. The router upstairs (which has a desktop computer and network storage drive attached) is connected to a WD Livewire device, which is plugged into an electrical outlet in one room. Downstairs, a network-attached media player and gaming console share a device. Using the powerlines of the home, the router expands your local network to include a network-attached external hard drive, HD media player, gaming console and desktop computer. Internet access and files can be shared between your computers and other networked devices. FEATURES AND FUNCTIONS – 5 WD LIVEWIRE POWERLINE AV NETWORK KIT USER MANUAL Connections 1 3 2 4 5 Item Component Description 1 Ethernet ports (1-4) Supports connection of computers, removable storage devices, gaming consoles, and other network-connectable devices 2 Sync button Press the Sync button on all WD Livewire devices in your powerline network within two minutes to create a private network. 3 Reset button (bottom of device) Resets the device. See “Firmware Upgrade” on page 17. 4 Power switch Turn the switch to On or Off for power saving. 5 Power jack Connects the power cable LED Indicators 1 2 3 Item Component Description 1 Device LEDs Indicates if a device is attached to the corresponding numbered Ethernet port. 2 PLC-Link Indicates that the WD Livewire device is connected to the network. 3 Power LED Indicates that the WD Livewire device is powered on. FEATURES AND FUNCTIONS – 6 WD LIVEWIRE POWERLINE AV NETWORK KIT USER MANUAL 4 Getting Started Package Contents WD Livewire devices AC power adapters Ethernet cables Quick Install Guide Documentation and software CD Minimum Installation Requirements An available electrical outlet in two separate locations in your home or office At least two network-capable devices with an Ethernet connection GETTING STARTED – 7 WD LIVEWIRE POWERLINE AV NETWORK KIT USER MANUAL Installation Procedures Important: Plug the devices directly into a wall socket. Do not plug the devices into a power strip, surge protector, or similar power extension. Connect the Network Devices and Computers 1. Connect the power cables to the power jacks on each device, then plug the opposite ends into AC power outlets in separate locations (one location must be close to your modem or router). 2. Be sure that the power switch on each device is set to the On position. The power LED on both devices illuminates. Location 2 Location 1 3. Connect your router (with modem and other devices/computers connected) and up to three more devices or computers to the Ethernet ports in one location. 4. Connect up to four more devices or computers in the other location. 5. Make sure the power switch on all powerline devices is set to ON. 6. See “Sharing Internet Access on the Livewire Network” on page 4 and “Sample Livewire Home Network” on page 5 for possible configurations. Expand the Network with Additional WD Livewire Devices Note: WD Livewire devices can be added to an existing powerline network with one or more non-WD devices if the devices are HomePlug Alliance AV Certified. Go to www.homeplug.org for further information. Connect a power cable to each device, then plug the opposite end into an AC power outlet in the desired location. The power LED illuminates on each additional device. Press the Sync button on ALL devices (WD Livewire and other powerline adapters) within 2 minutes of installation to join an existing powerline network that includes other manufacturers' Homeplug Alliance AV certified devices. GETTING STARTED – 8 WD LIVEWIRE POWERLINE AV NETWORK KIT USER MANUAL Create a Private Network Note: You may want to create a private network if you live in an apartment building or other dwelling where the electrical system is not exclusive to your living space. To create a private network, press the Sync button on the back of each WD Livewire device in the network for less than three seconds within a span of two minutes. Press the Sync button on all WD Livewire devices in the network within two minutes to create a private network. GETTING STARTED – 9 WD LIVEWIRE POWERLINE AV NETWORK KIT USER MANUAL 5 4 WD Livewire Utility Use the WD Livewire Utility to manage your powerline device network. Note: The WD Livewire devices are plug and play and can be used without having to install any software. For advanced functions such as diagnostics, firmware upgrades, and creating a private network without using the Sync button, install the WD Livewire Utility. Operating Systems Supported The WD Livewire Utility is supported by the following operating systems: Windows® 7 Windows Vista® Windows XP Installation Instructions 1. Turn on your computer and wait for the operating system to load. 2. Insert the product CD into the CD or DVD drive. Note: If AutoPlay is disabled on your computer, you must install the utility manually. Click Start and then (My) Computer. Right-click the CD/DVD drive, click Open, and double-click WDsetup.exe. 3. Windows Vista/Windows 7: Click Run WDsetup.exe, and then click Allow. 4. The WD Livewire Setup Wizard screen displays. Click Next. WD LIVEWIRE UTILITY – 10 WD LIVEWIRE POWERLINE AV NETWORK KIT USER MANUAL 5. Click I Agree in the License Agreement screen. 6. Accept the default install location or click Browse to select a different destination folder. Click Install. 7. WD Livewire Utility installation is complete. Click Finish to close the Wizard. WD LIVEWIRE UTILITY – 11 WD LIVEWIRE POWERLINE AV NETWORK KIT USER MANUAL Using the WD Livewire Utility Turn on your computer and wait for the operating system to load. For Windows Vista and Windows XP, click Start>Programs>Western Digital>WD Livewire Utility or double-click the WD Livewire Utility icon on your desktop. For Windows 7, click the Windows icon and then All Programs>Western Digital>WD Livewire Utility or double-click the WD Livewire Utility icon on your desktop. The WD Livewire Utility contains four tabs: Main - WD Livewire Utility opens to this tab by default. Here, you can view, detect, rename, set passwords for, or add WD Livewire devices. Privacy - Allows you to set up a private WD Livewire network. Diagnostics - Provides information about your powerline adapters. About - Provides information about the WD Livewire Utility. Main Use this tab to view, detect, upgrade firmware, rename, set passwords for, or add WD Livewire devices to a private network. The Local Device(s) on your computer list shows the Device Type name and MAC Address of the powerline device connected directly to your computer. Click on a local device from the list, then click Connect to connect to that device. The Powerline device detected list shows the Device Name, (Device) Password, Quality (of connection), Rate (Mbps), and MAC Address of all powerline devices connected to the network. The AutoScan option is selected by default. To scan the powerline adapter network manually by clicking Scan, deselect AutoScan. WD LIVEWIRE UTILITY – 12 WD LIVEWIRE POWERLINE AV NETWORK KIT USER MANUAL Upgrade Firmware Go to “Firmware Upgrade” on page 17 for instructions. Rename To assign a new name to a remote powerline device, select it, then click Rename. Enter the new name, and then press Enter on your keyboard. Note: The new device name only appears on the computer running the WD Livewire Utility used to assign the new name. If the WD Livewire Utility is installed on a different computer, the default name for the device displays. Device Password Entering the device password allows you to change the name of the private network to which the powerline adapter is attached (see “Privacy” on page 14). Select the remote powerline adapter, then click Enter Password. Enter the password located on the label on the powerline adapter, then click OK. Add If you add a new powerline adapter to an existing WD Livewire network with a private network name other than the default name (HomePlug), it may not be detected. In this case, do the following: 1. Click Add Device to manually add the powerline adapter. 2. Enter a unique name for the powerline adapter. 3. Enter the password located on the label on the powerline adapter, then click OK. WD LIVEWIRE UTILITY – 13 WD LIVEWIRE POWERLINE AV NETWORK KIT USER MANUAL Scan Click Scan to update the status information of the remote powerline adapters. Privacy Create a private network that provides you with extra security using the Privacy tab. Private Network Name The default Private Network Name, HomePlugAV, displays. To change the Private Network Name, all devices in the network must have their device passwords entered (see “Device Password” on page 13). Enter a new name in the Private Network Name field. Click Use Default (Public Network) to reset the Network Password to the default name (HomePlugAV). Place On This Network Click Set Local Device Only to update the network name of the powerline adapter connected to your computer via Ethernet. Click Set All Devices to update the network name of all the powerline adapters in your powerline network. The network name of the powerline adapters whose passwords have been entered will be updated. WD LIVEWIRE UTILITY – 14 WD LIVEWIRE POWERLINE AV NETWORK KIT USER MANUAL Diagnostics The Diagnostics tab provides detailed information about the powerline adapters in your WD Livewire network. System Information The following information about the powerline adapter connected to your computer via Ethernet displays: Ethernet adapter MAC address, powerline adapter MAC address, network password, vendor, and firmware version. The following information about your computer also displays: computer network name, user name, microprocessor, and Operating System (OS) platform. The version number of WD Livewire Utility, library, and drivers information also displays. Remote Device History (Log) The remote powerline adapters display with the following information columns: Device name, MAC Address, device Password, Rate (Mbps), Network name, Last Seen (detected), Vendor, and Firmware version. Devices are displayed in this log until you click Delete. Delete To remove a remote powerline adapter, select it then click Delete. This does not remove the device from a private network, and the device will reappear in the list if it stays connected. Save Report To print the Diagnostics report, click Save Report. Print Report To create a text-only file of the Diagnostics report, click Print Report. WD LIVEWIRE UTILITY – 15 WD LIVEWIRE POWERLINE AV NETWORK KIT USER MANUAL About The About screen displays information about the WD Livewire Utility. Version number, copyright info, release date, and a link to the WD website display under the WD logo. Note: You must have an active Internet connection to use the WD link. WD LIVEWIRE UTILITY – 16 WD LIVEWIRE POWERLINE AV NETWORK KIT USER MANUAL 6 8 WD Livewire Network Maintenance The firmware for your WD Livewire network can be upgraded to the latest release, which includes product fixes and enhancements. To ensure you receive the latest update, we recommend registering your product at http://register.wdc.com. This chapter describes how to upgrade firmware and perform simple troubleshooting. Solutions to more serious problems may require contacting your dealer or an authorized service center for assistance. For more information, refer to WD Service and Support on the second page of this user manual. Firmware Upgrade Firmware is an important set of instructions that tells your WD Livewire devices how to operate, what the interactive screens look like, and how to do what you tell it to do. Important: Make sure that all the devices’ AC power adapters remain connected and plugged in during the firmware update. A power disruption during the update process can corrupt the firmware and render the device(s) unusable. To update the firmware: 1. Go to http://support.wdc.com. Click Downloads, then the product name (or photo) and download the latest firmware update file for your WD Livewire device to your computer. 2. Connect your computer or router to port 1 on a WD Livewire device. 3. Launch the WD Livewire Utility program on your computer. Click Upgrade Firmware. WD LIVEWIRE NETWORK MAINTENANCE – 17 WD LIVEWIRE POWERLINE AV NETWORK KIT USER MANUAL 4. Click Browse and select the new .PIB and .NVM firmware files that you downloaded in step 1. Click OK. 5. Click OK to confirm you have selected the correct firmware upgrade files. 6. Wait until the power LED and PLC-Link LED blink twice (about 65 seconds), then use a paperclip to press the reset button on the bottom of device for 2 seconds. 7. Repeat steps 2-6 above for all the WD Livewire devices in your network. WD LIVEWIRE NETWORK MAINTENANCE – 18 WD LIVEWIRE POWERLINE AV NETWORK KIT USER MANUAL Troubleshooting Problem Solution The power LED does not illuminate after installing the WD Livewire device. Make sure the power switch on the device is set to ON. If this does not solve the problem, do the following: 1. Disconnect the Ethernet cable from the WD Livewire device. 2. Disconnect the power cord from the WD Livewire device. 3. Wait five seconds. 4. Reconnect the Ethernet cable to the WD Livewire device. 5. Re-connect the power cord to the WD Livewire device. If the power LED still does not illuminate, ensure that the electrical outlet is working properly. Plug a different electronic device into the outlet and try to power it on. LED WD LIVEWIRE NETWORK One or more powerline adapters are not detected or you cannot access other computers on the powerline network. Slow, erratic, or poor performance. All devices on the WD Livewire network must be configured with the same network password. If you are adding a new powerline adapter to an existing private network, click Add Device in the Main tab of the WD Livewire Utility. For more information, see “Add” on page 13. Be sure to press the Sync button on all devices within 2 minutes when creating a private network. Make sure the IP address and TCP/IP protocol are set up correctly for all the computers connected to powerline adapters on your WD Livewire network. Refer to Windows Help for more information. Performance can be impacted by your house's electrical wiring. If performance is poor, try plugging one or more of the devices directly into different outlets as necessary. Make sure to download the latest firmware version. Make sure all connections are correctly installed. Make sure that the firmware file name has not been changed. FIRMWARE UPGRADE The firmware upgrade is unsuccessful. WD LIVEWIRE NETWORK MAINTENANCE – 19 WD LIVEWIRE POWERLINE AV NETWORK KIT USER MANUAL 7 Appendix Regulatory Compliance FCC Class B Information This equipment has been tested and found to comply with the limits for a Class B digital device pursuant to Part 15 of the FCC Rules. These limits are designed to provide reasonable protection against harmful interference in a residential installation. This equipment generates, uses, and can radiate radio frequency energy and, if not installed and used in accordance with the manufacturer’s instruction manual, may cause interference with radio communications. However, there is no guarantee that interference will not occur in a particular installation. If this equipment does cause harmful interference to radio or television reception, which can be determined by turning the equipment off and on, you are encouraged to try to correct the interference by one or more of the following measures: Reorient or relocate the receiving antenna. Increase the separation between the equipment and the receiver. Connect the equipment into an outlet on a circuit different from that to which the receiver is connected. Consult the retailer or an experienced radio/television technician for help. ICES-003/NMB-003 Statement Cet appareil numérique de la classe B est conforme à la norme NMB-003 du Canada. This device complies with Canadian ICES-003 Class B. Safety Compliance Approved for US and Canada. CAN/CSA-C22.2 No. 60950-1, UL 60950-1: Safety of Information Technology Equipment. Approuvé pour les Etats-Unis et le Canada. CAN/CSA-C22.2 No. 60950-1 : Sûreté d'équipement de technologie de l'information. CE Compliance for Europe Marking by the CE symbol indicates compliance of this system to the applicable Council Directives of the European Union, including the EMC Directive (2004/108/ EC) and the Low Voltage Directive (2006/95/EC). A “Declaration of Conformity” in accordance with the applicable directives has been made and is on file at Western Digital Europe. Die Markierung mit dem CE-Symbol zeigt an, dass dieses Gerät mit den anwendbaren Richtlinien der Europäischen Union übereinstimmt. Hierzu zählen auch die EMV-Richtlinie (2004/108/EG) sowie die Niederspannungsrichtlinie (2006/95/ EG). Eine "Konformitätserklärung" in Übereinstimmung mit den anwendbaren Richtlinien ist erstellt worden und kann bei Western Digital Europe eingesehen werden. APPENDIX – 20 WD LIVEWIRE POWERLINE AV NETWORK KIT USER MANUAL Le symbole CE indique que ce système est conforme aux directives du Conseil de l'Union Européenne, notamment à la Directive CEM (2004/108/CE) et la Directive Basse tension (2006/95/CE). Une " déclaration de conformité " aux directives applicables a été déposée auprès de Western Digital Europe. I marchi con il simbolo CE denotano la conformità di questo sistema alle direttive del Consiglio dell'Unione europea, ivi compresa la Direttiva EMC (2004/108/CE) e la Direttiva Bassa Tensione (2006/95/CE). In adempimento con le vigenti direttive è stata rilasciata una "Dichiarazione di conformità", depositata presso Western Digital Europe. La marca con el símbolo CE indica el cumplimiento de este sistema con las correspondientes directivas del Consejo de la Unión Europea, que incluye la Directiva CEM (2004/108/CE) y la Directiva de bajo voltaje (2006/95/CE). Se ha realizado una "Declaración de conformidad" de acuerdo con las directivas correspondientes y se encuentra documentada en las instalaciones de Western Digital en Europa. Märkning av CE-symbolen anger att detta systemet uppfyller kraven enligt det Europeiska Parlamentet och Rådets direktiv, inklusive EMC-direktivet (2004/108/EC) och Direktivet om Lågspänning (2006/95/EC). En "Försäkran om Överensstämmelse" har gjorts enligt de gällande direktiven och har registrerats hos Western Digital Europa. Merking med CE-symbolet indikerer dette systemets overholdelse av gjeldende direktiver for EU, inkludert EMC-direktivet (2004/108/EC) og lavspenningsdirektivet (2006/95/EC). En "samsvarserklæring" i henhold til gjeldende direktiver har blitt skrevet og finnes arkivert hos Western Digital Europe. CE-merkintä osoittaa tämän järjestelmän yhdenmukaisuuden sovellettavissa olevien Euroopan unionin neuvoston direktiivien kanssa, mukaan lukien EMC-direktiivi (2004/108/EC), sekä alijännitedirektiivi (2006/95/EC). "Yhdenmukaisuusvakuutus" sovellettavien direktiivien kanssa on tehty ja se on arkistoituna Western Digital Europe:ssa. Маркировка символом CE свидетельствует о соответствии настоящей системы положениям применимых директив Совета Европейского Союза, в том числе Директивы об электромагнитной совместимости (2004/108/EC) и Директивы о низковольтном оборудовании (2006/95/EC). Заявление о соответствии положениям применимых директив, сделанное компанией Western Digital, находится в архиве её европейского подразделения GS Mark (Germany only) Machine noise - regulation 3. GPSGV: Unless declared otherwise, the highest level of sound pressure from this product is 70db(A) or less, per EN ISO 7779. APPENDIX – 21 WD LIVEWIRE POWERLINE AV NETWORK KIT USER MANUAL Maschinenlärminformations-Verordnung 3. GPSGV: Der höchste Schalldruckpegel beträgt 70 db(A) oder weniger gemäß EN ISO 7779, falls nicht anders gekennzeichnet oder spezifiziert. Warranty Information Obtaining Service WD values your business and always attempts to provide you the very best of service. If this Product requires maintenance, either contact the dealer from whom you originally purchased the Product or visit our product support Web site at http://support.wdc.com for information on how to obtain service or a Return Material Authorization (RMA). If it is determined that the Product may be defective, you will be given an RMA number and instructions for Product return. An unauthorized return (i.e., one for which an RMA number has not been issued) will be returned to you at your expense. Authorized returns must be shipped in an approved shipping container, prepaid and insured, to the address provided on your return paperwork. Your original box and packaging materials should be kept for storing or shipping your WD product. To conclusively establish the period of warranty, check the warranty expiration (serial number required) via http://support.wdc.com. WD shall have no liability for lost data regardless of the cause, recovery of lost data, or data contained in any Product placed in its possession. Limited Warranty WD warrants that the Product, in the course of its normal use, will for the term defined below, be free from defects in material and workmanship and will conform to WD’s specification therefor. The term of your limited warranty depends on the country in which your Product was purchased. The term of your limited warranty is for 1 year in the North, South and Central America region and 2 years in the Europe, the Middle East and Africa region, unless otherwise required by law. The term of your limited warranty period shall commence on the purchase date appearing on your purchase receipt. WD shall have no liability for any Product returned if WD determines that the Product was stolen from WD or that the asserted defect a) is not present, b) cannot reasonably be rectified because of damage occurring before WD receives the Product, or c) is attributable to misuse, improper installation, alteration (including removing or obliterating labels and opening or removing external enclosures, unless the product is on the list of limited user-serviceable products and the specific alteration is within the scope of the applicable instructions, as found at http:// support.wdc.com), accident or mishandling while in the possession of someone other than WD. Subject to the limitations specified above, your sole and exclusive warranty shall be, during the period of warranty specified above and at WD’s option, the repair or replacement of the Product. The foregoing warranty of WD shall extend to repaired or replaced Products for the balance of the applicable period of the original warranty or ninety (90) days from the date of shipment of a repaired or replaced Product, whichever is longer. The foregoing limited warranty is WD’s sole warranty and is applicable only to products sold as new. The remedies provided herein are in lieu of a) any and all other remedies and warranties, whether expressed, implied or statutory, including but not limited to, any implied warranty of merchantability or fitness for a particular purpose, and b) any and all obligations and liabilities of WD for damages including, but not limited to accidental, consequential, or special damages, or any financial loss, lost profits or expenses, or lost data arising out of or in connection with the purchase, use, or performance of the Product, even if WD has been advised of the possibility of such damages. In the United States, some states do not allow exclusion or limitations of incidental or consequential damages, so the limitations above may not apply to you. This warranty gives you specific legal rights, and you may also have other rights which vary from state to state. APPENDIX – 22 WD LIVEWIRE POWERLINE AV NETWORK KIT USER MANUAL Information furnished by WD is believed to be accurate and reliable; however, no responsibility is assumed by WD for its use nor for any infringement of patents or other rights of third parties which may result from its use. No license is granted by implication or otherwise under any patent or patent rights of WD. WD reserves the right to change specifications at any time without notice. Western Digital, WD, the WD logo, and WD TV are registered trademarks in the U.S. and other countries; and WD Livewire is a trademark of Western Digital Technologies, Inc. Other marks may be mentioned herein that belong to other companies. © 2010 Western Digital Technologies, Inc. All rights reserved. Western Digital 20511 Lake Forest Drive Lake Forest, California 92630 U.S.A. 4779-705041-A00 Jun 2010 APPENDIX – 23