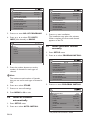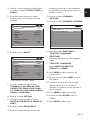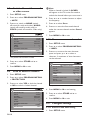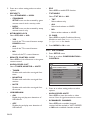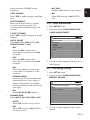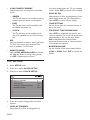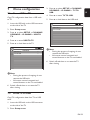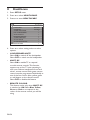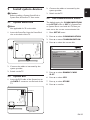
1
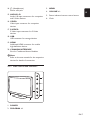
Philips Professional and Business Solutions
22HFL5550D
26HFL5850D
32HFL5850D
DFU-DEC2008
6.13 Set control ������������������������������������������ 20
6.14Video adjustment �������������������������������� 21
1 Important������������������������������������������� 4
6.15 Set energy saving���������������������������������� 21
1.1
Safety������������������������������������������������������ 4
6.16 Set clock ���������������������������������������������� 22
1.2
Screen care�������������������������������������������� 5
1.3
Recycling������������������������������������������������ 5
2 Your TV����������������������������������������������� 6
2.1
Connection overview���������������������������� 6
3 Remote control�����������������������������������8
7 Clone configuration������������������������� 23
7.1
From USB to TV���������������������������������� 23
7.2
From TV to USB���������������������������������� 23
8 Healthcare ��������������������������������������� 24
9 Install system devices ��������������������� 25
4 Get started����������������������������������������� 9
9.1
System Smartcard�������������������������������� 25
4.1
Position the TV�������������������������������������� 9
9.2
System Box������������������������������������������ 25
4.2
Wall mount the TV�������������������������������� 9
9.3
Set communication source������������������ 25
4.3
Connect the antenna cable������������������ 10
4.4
Connect the mains cord���������������������� 10
4.5
Insert the remote control batteries���� 10
4.6
Prepare TV for digital services������������ 11
5 Remote control overview ��������������� 13
10 Trouble shooting ����������������������������� 26
10.1 Communication issues ������������������������ 26
10.2 Picture issues���������������������������������������� 26
10.3 Other issues ���������������������������������������� 26
11 Index������������������������������������������������� 27
6 Setup the TV������������������������������������� 14
6.1
Access setup menu������������������������������ 14
6.2
Select language ������������������������������������ 14
6.3
Select country�������������������������������������� 15
6.4
Select communication source�������������� 15
6.5
Set number of channels ���������������������� 15
6.6
Install all channels automatically���������� 16
6.7
Install individual channel manually ������ 16
6.8
Switch off sound from audio or video
source�������������������������������������������������� 18
6.9
Lock or unlock a channel�������������������� 18
6.10 Name or rename channels������������������ 18
6.11 Configure settings�������������������������������� 18
6.12 Set security������������������������������������������ 19
EN-1
EN
Table of contents
2008 © Koninklijke Philips Electronics N.V. All
rights reserved.
Specifications are subject to change without
notice. Trademarks are the property of
Koninklijke Philips Electronics N.V. or their
respective owners. Philips reserves the right
to change products at any time without being
obliged to adjust earlier supplies accordingly.
The material in this manual is believed
adequate for the intended use of the system.
If the product, or its individual modules or
procedures, are used for purposes other than
those specified herein, confirmation of their
validity and suitability must be obtained. Philips
warrants that the material itself does not
infringe any United States patents. No further
warranty is expressed or implied.
Warranty
• Risk of injury, damage to TV or void of
warranty! Never attempt to repair the TV
yourself.
• Use the TV and accessories only as
intended by the manufacturer.
• The caution sign printed on the back of the
TV indicates risk of electric shock. Never
remove the TV cover. Always contact Philips
for service or repairs.
• Any operation expressly prohibited in
this manual, or any adjustments and
assembly procedures not recommended
or authorised in this manual shall void the
warranty.
Open source software
This television contains open source software.
Philips GBU Hospitality hereby offers to
deliver or make available, upon request, for
a charge no more than the cost of physically
EN-2
performing source distribution, a complete
machine-readable copy of the corresponding
source code on a medium customarily used for
software interchange.
To obtain the source code, write to:
Philips Singapore Pte Ltd
- Philips GBU Hospitality
Software Development Manager
620A Lorong 1 Toa Payoh
Singapore 319762
This offer is valid for a period of 3 years after
the date of purchase of this product.
Pixel characteristics
This LCD product has a high number of
color pixels. Although it has effective pixels
of 99.999% or more, black dots or bright
points of light (red, green or blue) may appear
constantly on the screen. This is a structural
property of the display (within common
industry standards) and is not a malfunction.
Compliance with EMF
Koninklijke Philips Electronics N.V.
manufactures and sells many products targeted
at consumers, which, like any electronic
apparatus, in general have the ability to emit
and receive electromagnetic signals.
One of Philips’ leading Business Principles is to
take all necessary health and safety measures
for our products, to comply with all applicable
legal requirements and to stay well within
the EMF standards applicable at the time of
producing the products.
Philips is committed to develop, produce and
market products that cause no adverse health
effects. Philips confirms that if its products are
handled properly for their intended use, they
are safe to use according to scientific evidence
available today.
Philips plays an active role in the development
of international EMF and safety standards,
enabling Philips to anticipate further
developments in standardisation for early
integration in its products.
Mains fuse (UK only)
EN
This TV is fitted with an approved moulded
plug. Should it become necessary to replace
the mains fuse, this must be replaced with a
fuse of the same value as indicated on the plug
(example 10A).
1. Remove fuse cover and fuse.
2. The replacement fuse must comply with BS
1362 and have the ASTA approval mark. If
the fuse is lost, contact your dealer in order
to verify the correct type.
3. Refit the fuse cover.
In order to maintain conformity to the EMC
directive, the mains plug on this product must
not be detached from the mains cord.
Copyright
VESA, FDMI and the VESA Mounting Compliant
logo are trademarks of the Video Electronics
Standards Association.
Windows Media is either a registered
trademark or trademark of Microsoft
Corporation in the United States and/or other
countries.
® Kensington and Micro Saver are registered
US trademarks of ACCO World Corporation
with issued registrations and pending
applications in other countries throughout the
world. All other registered and unregistered
trademarks are the property of their respective
owners.
EN-3
1
Important
Read and understand all instructions before
you use the TV. If damage is caused by failure to
follow instructions, the warranty does not apply.
1.1 Safety
• Risk of electric shock or fire!
• Never expose the TV to rain or water.
Never place liquid containers, such as
vases, near the TV. If liquids are spilt on
or into the TV, disconnect the TV from
the power outlet immediately. Contact
Philips to have the TV checked before
use.
• Never place the TV, remote control or
batteries near naked flames or other
heat sources, including direct sunlight.
• To prevent the spread of fire, keep
candles or other flames away from this
product at all times.
• Two people are required to lift and
carry a TV that weighs more than 55 lbs.
• If you stand mount the TV, use only the
supplied stand. Secure the stand to the
TV tightly. Place the TV on a flat, level
surface that can support the weight of
the TV and stand.
• The TV must be mounted on the wall
bracket designed for this TV, and on a
wall that can safely hold the weight of
the TV. Koninklijke Philips Electronics
N.V. bears no responsibility for improper
wall mounting that results in accident
or injury.
• Risk of injury to children! Follow these
precautions to prevent the TV from
toppling over and causing injury to children:
• Never place the TV on a surface covered
by a cloth or other material that can be
pulled away.
• Ensure that no part of the TV hangs
over the edge of the mounting surface.
• Never place the TV on tall furniture
(such as a bookcase) without anchoring
both the furniture and TV to a suitable
support (such as a concrete wall).
• Never insert objects into the ventilation
slots or other openings on the TV.
• Educate children about the dangers of
climbing on furniture to reach the TV.
• Risk of short circuit or fire!
• Risk of overheating! Never install the TV in
a confined space such as a bookcase. Always
leave a space of at least four inches around
the TV for ventilation. Ensure curtains or
other objects never cover the ventilation
slots on the TV.
• Never expose the remote control or
batteries to rain, water or excessive
heat.
• Risk of injury, fire or power cord damage!
Never place the TV or any objects on the
power cord.
• Avoid force coming on the power plugs.
Power plugs that are partly loosened can
cause arcing or fire.
• Disconnect the TV from the power outlet
and antenna before lightning storms. During
lightning storms, never touch any part of
the TV, power cord or antenna cable.
• When the TV is swivelled, ensure that
no strain is exerted on the power cord.
Strain on the power cord can loosen
connections and cause arcing.
• Risk of injury or damage to the TV!
EN-4
crossed-out wheel bin symbol attached to a
product, it means the product is covered by
the European Directive 2002/96/EC:
• Never allow children to climb on or play
with the TV.
• Place the TV where it cannot be pushed,
pulled over or knocked down.
• If the TV is transported in temperatures
below 5°C:
1. Remove the TV from the box.
2. Wait until the TV temperature matches the
room temperature.
3. Install the TV.
1.2 Screen care
• Avoid stationary images as much as
possible. Stationary images are images that
remain on-screen for extended periods of
time. Examples include: on-screen menus,
teletext pages, black bars, stock market
information, TV channel logos and time
displays. If you must use stationary images,
reduce screen contrast and brightness to
avoid screen damage.
• Never dispose this product with other
household waste. Inform yourself or ask
your dealer about local environmentallysafe recycling regulations. The correct
disposal of your old product helps prevent
potentially negative consequences on the
environment and human health.
• The remote control supplied with this
product operates on batteries covered by
the European Directive 2006/66/EC and
cannot be disposed with normal household
waste. Inform yourself about the local
regulations on the separate collection of
batteries.
• Unplug the TV before cleaning.
• Clean the TV and frame with a soft, damp
cloth. Never use substances such as alcohol,
chemicals or household cleaners on the TV.
• Risk of damage to the TV screen! Never
touch, push, rub or strike the screen with
any object.
• To avoid deformations and colour fading,
wipe off water drops as soon as possible.
1.3 Recycling
• This product is designed and manufactured
with high quality materials and components,
which can be recycled and reused.
• This product is designed and manufactured
for material recycling. When you see the
EN-5
EN
• Risk of hearing damage! Avoid using
earphones or headphones at high volumes
or for prolonged periods of time.
2
Your TV
2.1 Connection overview
10
11
12
13
54 3 2 1
14
15
16
17
18
9
8
19
20
6
7
1. EXT 1
First SCART connector for DVD players,
VCRs, digital receivers, game consoles and
other SCART devices. Supports Audio L/R,
CVBS in/out, RGB
2. EXT 2
Second SCART connector. Supports Audio
L/R, CVBS in/out.
3. EXT 3
Component video (Y Pb Pr) and Audio L/R
input connectors for DVD players.
4. SPDIF OUT
Sound output connectors for home
theatres or other audio systems.
5. SERV. U
Connector for service use (do not insert
the headphones here)
6. HDMI 1/2/3
HDMI input connectors for Blu-ray disc
players, digital receivers, game consoles and
other high-definition devices.
7. AUDIO IN
Mini-jack connector for PC audio in (when
connecting a PC via DVI-HDMI adaptor).
8. TV ANTENNA
9. Smart Card slot
Slot for compatible 32 pin smart card.
10. VGA In
Input connectors for PC or other devices.
11. DATA 1 (RJ 12)
Port for system terminal connection.
12. DATA 2 (RJ 45)
Port for system terminal connection.
13. 8 Ω ,
Connector for bathroom speaker. Use a
stereo jack.
EN-6
3. MENU
15. AUDIO L/R
Audio L/R input connectors for composite
and S-Video devices.
4. VOLUME +/-
EN
14. * (Headphones)
Stereo mini-jack.
5. Power indicator/remote control sensor
6. Clock
16. VIDEO
Video input connector for composite
devices
17. S-VIDEO
S-Video input connector for S-Video
devices.
18. USB
USB connector for storage devices.
19. HDMI
Additional HDMI connector for mobile
high-definition devices.
20. COMMOM INTERFACE
Slot for Conditional Access Modules.
DDNote
Refer to the user manuals for the respective
devices for details of connection.
2.1.1 Side controls and indicators
VOLUME
4
3
MENU
PROGRAM
2
1
6
POWER
5
1. POWER
2. PROGRAM +/EN-7
3
Remote control
For advanced information about the remote
control, see Chapter 5 Remote control overview.
Guest mode remote control
Setup remote control
This remote control may be purchased
separately for Institutional TV/Professional and
Business Solutions features and SmartCard
settings.
For setup and configuration purposes.
POWER
RECALL
TEXT
SMART
SLEEP
CC
GUEST
DCM
SETUP
1
2
3
4
5
6
7
8
9
GUIDE
0
RESET
CH
M
A/CH
_
+
+
VOL
_
A
EN-8
+
_
B
C
E
F
CLOCK
A/V
CH
D
G
Get started
This section helps you position and install the
TV.
4.1
Position the TV
In addition to reading and understanding the
safety instructions in Section 1.1, consider the
following before positioning your TV:
• The ideal viewing distance for watching TV
is three times its screen size.
• Position the TV where light does not fall on
the screen.
• Connect your devices before you position
your TV.
Step 1 Purchase a VESA-compatible wall
bracket
Depending on the size of your TV screen,
purchase one of the following wall brackets:
TV
screen
size
(inches/
cm)
VESAcompatible
wall bracket
type (mm)
Special
instructions
22" /56 cm Adjustable
100 x 100
None
26”/66cm
Adjustable
100 x 200
None
32”/81cm
Adjustable
300 x 300
The VESAcompatible
bracket must
be adjusted
to 200 x
300 before
securing to
the TV
• Your TV is equipped with a Kensington
Security Slot at the back of the TV.
42”/107cm Fixed 400 x 400
or larger
None
Step 2 Secure the VESA-compatible wall
bracket to the TV
1. Locate the four mounting nuts at the back
of the TV.
If connecting an anti-theft Kensington lock
(not supplied), position the TV within reach
of a permanent object (such as a table) that
can be easily attached to the lock.
4.2 Wall mount the TV
BBWARNING
Wall mounting of the TV should only
be performed by qualified installers.
Koninklijke Philips Electronics N.V. bears no
responsibility for improper mounting that
results in accident or injury.
2. Continue with the instructions provided
with your VESA-compatible wall bracket.
EN-9
EN
4
DDNOTE
When securing the VESA-compatible wall
bracket to your TV, use M4 bolts for 26 inch
models, M6 bolts for 32 inch models or M8
bolts for larger models (bolts not supplied).
4.3 Connect the antenna cable
1. Locate the AC IN mains connector at the
back or on the bottom of the TV.
2. Connect the mains cord to the AC IN
mains connector.
1. Locate the TV ANTENNA connector at
the back of the TV.
2. Connect one end of an antenna cable
(not supplied) to the TV ANTENNA
connector. Use an adaptor if the antenna
cable does not fit
3. Connect the other end of the antenna
cable to your antenna outlet, ensuring that
the cable is tightly secured at both ends.
4.4 Connect the mains cord
BBWARNING
Verify that your mains voltage corresponds
with the voltage printed at the back of the
TV. Do not insert the mains cord if the
voltage is different.
To connect the mains cord
DDNote
The location of the mains connector varies
according to TV model.
EN-10
3. Connect the mains cord to the mains,
ensuring that the cord is tightly secured at
both ends.
CCWARNING
Before you connect the TV to the power
outlet, ensure that the power voltage
matches the value printed under the cable
cover.
To easily disconnect the TV from the power
outlet, ensure that you have full access to
the power cord at all times. When you
disconnect the power cord, always pull the
plug, never the cable.
4.5 Insert the remote control
batteries
DDNote
Remote control is not supplied. Purchase
remote control no. 22AV1105/10 from a
Philips authorized supplier.
EN
1. Slide the battery cover off the back of the
remote control.
2. Insert the two supplied batteries (Size AAA,
Type LR03). Be sure the + and - ends of the
batteries line up with the markings inside
the case.
2. Push the CAM in as far as it will go.
3. Slide the cover back into position.
EETip
Remove the batteries if not using the
remote control for an extended period of
time.
4.6 Prepare TV for digital
services
Scrambled digital TV channels can be decoded
with a Conditional Access Module, inserted
with a smart card (CAM) provided by a digital
TV service operator.
The CAM may enable several digital services,
depending on the operator and services
you choose (for example, pay TV). Contact
your digital TV service operator for more
information about services and terms.
4.6.1 Using the Conditional Access
Module
BBWARNING
Switch off your TV before inserting a CAM.
Be sure to follow the instructions described
below. Wrong insertion of a CAM may
damage both the CAM and your TV.
3. Switch on the TV and wait for the CAM to
be activated. This may take several minutes.
DDNote
Do not remove the CAM from the slot.
Removing the CAM will deactivate the
digital services.
4.6.2 Access CAM services
1. Enter SETUP menu.
2. Press ï to select CONFIGURATION >
SECURITY.
3. Press ï to select CI CARD and Æ to
select YES.
1. Following the directions printed on the
CAM, gently insert the CAM into the
Common Interface slot on the side of the
TV.
EN-11
SECURITY
SECURITY
KEYBOARD LOCK
REMOTE CONTROL LOCK
VIDEO OUT MUTE
USB BREAKIN
EPG
TXT/MHEG
CI CARD
4. Press MENU or M to exit.
EN-12
STANDARD
ALL
NO
NO
NO
NO
NO
YES
Remote control
overview
2. GUIDE
Toggles the Electronic Programme Guide
on or off. Only active with digital channels.
DDNote
Remote control is not supplied. Purchase
remote control no. 22AV1105/10 from a
Philips authorized supplier.
3. RADIO
Accesses the radio channels.
This section provides a detailed overview of
remote control no. 22AV1105/10.
5. Colour keys
Selects tasks, teletext pages or sets sleep
timer.
1
19
18
2
3
4
5
17
6
7
8
16
9
15
10
14
11
4. SUBTITLE
Activates or deactivates subtitles.
6. ALARM OFF
Deactivates the alarm function. Only for
models with clock display.
7. OK
Activates a setting.
8. Navigation keys
Up Î, Down ï, Left Í and Right Æ keys
navigate the menu.
9. TELETEXT
Toggles teletext on or off
10. P +/Switches to the next or previous channel.
11. Number buttons
Selects a channel, page or setting.
12. ∏
Selects a picture format.
13. MHEG CANCEL
Cancels digital text or interactive services
(UK only).
14. [
Mutes or restores sound.
13
12
15. ” +/Increases or decreases volume.
16. MENU
Toggles the menu on or off.
17. ALARM ON
Activates the alarm function. Only for
models with clock display.
1. .
Switches the TV on from standby or back
to standby.
18. PAY TV
Accesses the Pay TV channels.
19. INFO
Accesses the Info channels.
EN-13
EN
5
6
Setup the TV
6.1.2 With setup remote control
On-screen menus help you setup and install
channels on the TV. This section describes how
to navigate the menus.
POWER
RECALL
TEXT
SMART
SLEEP
CC
GUEST
6.1 Access setup menu
DCM
SETUP
6.1.1 With guest mode remote control
M
SETUP
1
2
3
4
5
6
7
8
RESET
0
9
GUIDE
CH
M
A/CH
_
+
1. Slide the slider at+the side+of the remote
_
_
control to SETUP.
VOL
to
CH
A
B
C
D
2. Press M to display
the
SETUP
menu.
E
DDNote
This is applicable only when SECURITY is
set to STANDARD.
SETUP
LANGUAGE
COUNTRY
COMMUNICATION
NO. OF PROGRAMS
AUTO INSTALL
PROGRAM INSTALL
CONFIGURATION
CLOCK SETUP
CLONING/UPGRADE
HEALTHCARE
ENGLISH
AUSTRIA
>
>
>
>
>
>
>
>
G
SETUP
LANGUAGE
COUNTRY
COMMUNICATION
NO. OF PROGRAMS
AUTO INSTALL
PROGRAM INSTALL
CONFIGURATION
CLOCK SETUP
CLONING/UPGRADE
HEALTHCARE
CLOCK
1. Press 3,1,9,7,5,3 and [on the remote
control within 20 seconds to display the
SETUP menu.
F
A/V
6.2 Select language
1. Enter SETUP menu.
2. Press > to select ENGLISH, FRANCAIS,
DEUTSCH or ITALIANO.
SETUP
LANGUAGE
COUNTRY
COMMUNICATION
NO. OF PROGRAMS
AUTO INSTALL
PROGRAM INSTALL
CONFIGURATION
CLOCK SETUP
CLONING/UPGRADE
HEALTHCARE
3. Press MENU or M to exit.
EN-14
ENGLISH
AUSTRIA
>
>
>
>
>
>
>
>
ENGLISH
AUSTRIA
>
>
>
>
>
>
>
>
special remote control. Contact your local
PHILIPS sales representatives for details.
1. Enter SETUP menu.
• OFF
Select to return to factory default.
2. Press > to select your country.
SETUP
LANGUAGE
COUNTRY
COMMUNICATION
NO. OF PROGRAMS
AUTO INSTALL
PROGRAM INSTALL
CONFIGURATION
CLOCK SETUP
CLONING/UPGRADE
HEALTHCARE
ENGLISH
BELGIUM
>
>
>
>
>
>
>
>
3. Press MENU or M to exit.
6.4 Select communication
source
1. Enter SETUP menu.
2. Press ï to select COMMUNICATION.
SETUP
LANGUAGE
COUNTRY
COMMUNICATION
NO. OF PROGRAMS
AUTO INSTALL
PROGRAM INSTALL
CONFIGURATION
CLOCK SETUP
CLONING/UPGRADE
HEALTHCARE
ENGLISH
AUSTRIA
>
>
>
>
>
>
>
>
5. Press ï to select ENABLE CARD
SLOT.
6. Press Æ to select YES to enable system
card functions.
See Section 8.2 Set Comminication Source for
details.
7. Press ï to select DCM TYPE.
8. Press Æ to select GENERIC if SP - SPI
or SP - 12C is selected or NO SOURCE
SWITCHING if the setup box requires
no source switching.
COMMUNICATION
COMMUNICATION
SP - SPI
STORE
>
ENABLE CARD SLOT
YES
DCM TYPE
GENERIC
9. Press Î to select STORE.
10. Press Æ to store all settings.
11. Press MENU or M to exit.
6.5 Set number of channels
3. Press Æ to enter COMMUNICATION.
1. Enter SETUP menu.
4. Press Í or Æ to select a setting.
2. Press ï to select NO. OF PROGRAMS.
• SP - SPI, SP - 12C, HM - LINK or
SERIAL XPRESS
Select the type of connection link between
the TV and the setup box.
• SMART RC
Select to access PAYTV channels via a
EN-15
EN
6.3 Select country
SETUP
LANGUAGE
COUNTRY
COMMUNICATION
NO. OF PROGRAMS
AUTO INSTALL
PROGRAM INSTALL
CONFIGURATION
CLOCK SETUP
CLONING/UPGRADE
HEALTHCARE
ENGLISH
AUSTRIA
>
>
>
>
>
>
>
>
3. Press Æ to enter NO. OF PROGRAMS.
4. Press Î or ï to select TV, PAYTV,
INFO (Info channel) or RADIO.
TV
PAYTV
INFO
RADIO
STORE
NO. OF PROGRAMS
35
5
5
5
>
5. Press the number buttons to set the
number of channels for each type of
channel.
DDNote
The maximum total number of channels
that you can set for each type of channel is
250.
6. Press ï to select STORE.
SETUP
LANGUAGE
COUNTRY
COMMUNICATION
NO. OF PROGRAMS
AUTO INSTALL
PROGRAM INSTALL
CONFIGURATION
CLOCK SETUP
CLONING/UPGRADE
HEALTHCARE
ENGLISH
AUSTRIA
>
>
>
>
>
>
>
>
3. Press Æ to start installation.
The installation may take a few minutes
When complete, the first tuned channel
appears on the TV.
6.7 Install individual channel
manually
1. Enter SETUP menu.
2. Press ï to select PROGRAM INSTALL.
SETUP
LANGUAGE
COUNTRY
COMMUNICATION
NO. OF PROGRAMS
AUTO INSTALL
PROGRAM INSTALL
CONFIGURATION
CLOCK SETUP
CLONING/UPGRADE
HEALTHCARE
ENGLISH
AUSTRIA
>
>
>
>
>
>
>
>
3. Press Æ to enter PROGRAM INSTALL.
7. Press Æ to store all settings.
8. Press MENU or M to exit.
6.6 Install all channels
automatically
1. Enter SETUP menu.
2. Press ï to select AUTO INSTALL.
EN-16
PROGRAM INSTALL
PROGRAM NO.
TV 1
INPUT
TUNER
SYSTEM*
WEST EU
FREQUENCY*
559.2500>
LABEL
(
)>
STORE
>
CHANNEL OPTIONS*
>
MUTE
NONE
PROTECTION
NO
* Only available when the INPUT is TUNER.
5. Press the number buttons to select a
channel number for the type of channel
selected.
PROGRAM INSTALL
PROGRAM NO.
TV 25
INPUT
TUNER
SYSTEM*
WEST EU
FREQUENCY*
559.2500>
LABEL
(
)>
STORE
>
CHANNEL OPTIONS*
>
MUTE
NONE
PROTECTION
NO
frequency or press Æ to start installation
of channels. The searching will stop once a
channel is found.
12. Press ï to select CHANNEL
OPTIONS.
13. Press Æ to enter CHANNEL OPTIONS.
CHANNEL OPTIONS
FINE TUNE
0
TELETEXT LANGUAGE
WEST EU
* Only available when the INPUT is TUNER.
6. Press ï to select INPUT.
PROGRAM INSTALL
PROGRAM NO.
TV 25
INPUT
TUNER
SYSTEM*
WEST EU
FREQUENCY*
559.2500>
LABEL
(
)>
STORE
>
CHANNEL OPTIONS*
>
MUTE
NONE
PROTECTION
NO
* Only available when the INPUT is TUNER.
7. Press Æ to select the type of input:
TUNER, AV1, AV2, SIDE AV, SIDE
SVIDEO, CVI, CARD-CVBS, CARDYC, CARD CVI, VGA, HDMI1, HDMI2,
HDMI3 or SIDE HDMI.
8. Press ï to select SYSTEM.
9. Press Æ to select the type of system:
WEST EU, UK, EAST EU, FRANCE or
DVB-T.
14. Press ï to select FINE TUNE or
TELETEXT LANGUAGE.
• FINE TUNE
Fine tunes the frequency when reception
is bad.
• TELETEXT LANGUAGE
Selects WEST EU, EAST EU,
CYRILLIC or GREEK.
15. Press MENU or M to return to the
previous level.
16. Press Î or ï to select LABEL to name
the channel.
17. Press Æ to move to the next character
space and press Î or ï to select a
character. A maximum of nine characters
can be selected.
18. Press MENU or M to end naming.
19. Press ï to select STORE and Æ to
confirm.
20. Press MENU or M to exit.
10. Press ï to select FREQUENCY.
11. Press the number buttons to key in the
EN-17
EN
4. Press Æ to select the type of channel that
you want to install: TV, PAYTV, INFO or
RADIO.
6.8 Switch off sound from audio
or video source
1. Enter SETUP menu.
DDNote
When a channel is locked, LOCKED
will appear on the TV screen.You need to
unlock the channel before you can access it.
2. Press ï to select PROGRAM INSTALL
> MUTE.
4. Press Í or Æ or number buttons to adjust
the frequency.
3. Press Æ to switch to NONE (switch
off sound for audio and video), AUDIO
(switch off sound for audio only) or
VIDEO (switch off sound for video only).
5. Press ï to select Store.
PROGRAM INSTALL
PROGRAM NO.
TV 25
INPUT
TUNER
SYSTEM*
WEST EU
FREQUENCY*
559.2500>
LABEL
(
)>
STORE
>
CHANNEL OPTIONS*
>
MUTE
AUDIO
PROTECTION
NO
* Only available when the INPUT is TUNER.
4. Press ï to select STORE and Æ to
confirm.
5. Press MENU or M to exit.
6.9 Lock or unlock a channel
1. Enter SETUP menu.
2. Press ï to select PROGRAM INSTALL
> PROTECTION.
3. Press Æ to select YES to lock the channel
or NO to unlock a locked channel.
PROGRAM INSTALL
PROGRAM NO.
TV 25
INPUT
TUNER
SYSTEM*
WEST EU
FREQUENCY*
559.2500>
LABEL
(
)>
STORE
>
CHANNEL OPTIONS*
>
MUTE
NONE
PROTECTION
YES
* Only available when the INPUT is TUNER.
EN-18
6. Press Æ to store the fine tuned channel
under the current channel number. Stored
appears.
7. Press MENU or M to exit.
6.10 Name or rename channels
1. Enter SETUP menu.
2. Press ï to select PROGRAM INSTALL
> LABEL.
3. Press Æ to move to the next character
space and press Î or ï to select a
character. A maximum of nine characters
can be selected.
PROGRAM INSTALL
PROGRAM NO.
TV 25
INPUT
TUNER
SYSTEM*
WEST EU
FREQUENCY*
559.2500>
LABEL
(A_ ) >
STORE
>
CHANNEL OPTIONS*
>
MUTE
NONE
PROTECTION
NO
* Only available when the INPUT is TUNER.
4. Press MENU or M to end naming.
5. Press ï to select STORE and Æ to
confirm.
6. Press MENU or M to exit.
6.11 Configure settings
6.11.1 Switch on and OSD setting
1. Enter SETUP menu.
SWITCH ON/OSD
WELCOME MESSAGE
>
SWITCH ON PROGRAM
STANDARD
SWITCH ON VOLUME
30
SWITCH ON PIC FMT
WIDESCREEN
POWER ON
LAST STATUS
VOLUME INDICATOR
YES
PROGRAM INDICATOR
ALL
3. Press ï to select setting and Æ increase or
decrease level or to select options.
• WELCOME MESSAGE
Key in or delete the welcome message.
• SWITCH ON PROGRAM
Sets a channel at TV setup. If STANDARD
is selected, the TV will switch to the last
viewed channel at startup.
• SWITCH ON VOLUME
Sets the volume level at startup.
• SWITCH ON PIC FMT
Sets the picture format at startup.
• POWER ON
Selects the status (STANDBY, FORCED
ON, LAST STATUS or ON) of the TV
when switched on.
• VOLUME INDICATOR
Displays the volume indicator.
• PROGRAM INDICATOR
Displays the channel number, label or all.
4. Press MENU or M to exit.
6.11.2 Set picture or sound settings
1. Enter SETUP menu.
2. Press ï to select CONFIGURATION
> PICTURE or CONFIGURATION >
SOUND.
PICTURE
BRIGHTNESS
COLOUR
CONTRAST
SHARPNESS
TINT
ACTIVE CONTROL
SOUND
EQUALIZER
BALANCE
BALANCE
MIN VOLUME
MAX VOLUME
AVL
SMART SETTING KEY
AUDIO SOURCE
EN
2. Press ï to select CONFIGURATION >
SWITCH ON/OSD.
45
48
30
50
36
YES
>
0
30
0
99
ON
SMART SETTING
>
3. Press ï to select setting and Æ increase or
decrease level or to select options.
SMART SETTING KEY selects either
SMART SETTING or SPLIT AUDIO.
4. Press MENU or M to exit.
6.12 Set security
1. Enter SETUP menu.
2. Press ï to select CONFIGURATION >
SECURITY.
SECURITY
SECURITY
KEYBOARD LOCK
REMOTE CONTROL LOCK
AUDIO/VIDEO OUT
USB BREAKIN
EPG
TXT/MHEG
CI CARD
STANDARD
ALL
NO
NO
NO
NO
NO
YES
EN-19
3. Press ï to select setting and Æ to select
options.
• EPG
Select YES to enable EPG function.
• SECURITY
Select STANDARD or HIGH.
• TXT/MHEG
Select TXT, ALL or NO.
• STANDARD
SETUP menu can be accessed by guest
remote control with a security code.
• HIGH
SETUP menu can be accessed by setup
remote control only.
• KEYBOARD LOCK
Select YES, ALL or NO.
• YES
Lock all the TV's control buttons except
POWER button.
• ALL
Lock all the TV's control buttons.
• NO
Unlock all the TV's control buttons.
• REMOTE CONTROL LOCK
Select YES to lock all buttons on the guest
remote control.
• AUDIO/VIDEO OUT
Select TUNER, MONITOR or MUTE.
• TUNER
Disable audio and video out signal from
tuner.
• MONITOR
Disable audio and video out signal from
monitor.
• MUTE
Disable audio and video out signal from
all sources
• USB BREAKIN
• ON
Enable plug and play auto detection of
USB devices.
• OFF
Disable plug and play auto detection of
USB devices.
EN-20
• TXT
Select teletext only.
• ALL
Select both teletext or MHEG.
• NO
Select neither teletext or MHEG.
• CI CARD
Select YES to enable Conditional Access
Module to work. See Section 4.6 Prepare TV
for digital services for details.
4. Press MENU or M to exit.
6.13 Set control
1. Enter SETUP menu.
2. Press ï to select CONFIGURATION >
CONTROL.
CONTROL
AUDIO/VIDEO MUTE
SCRAMBLED CHANNEL
STEP TUNING
DIGIT TIME OUT
3 DIGIT TUNING
AUTO SCART
ALWAYS RGB
YES
YES
YES
3.0
YES
ALL
AUTO
3. Press ï to select setting and Æ to select
options.
• AUDIO/VIDEO MUTE
Select YES to mute the audio or video
source if loss of signal transmission occurs.
• SCRAMBLED CHANNEL
Select YES and scrambled channels
received will be marked as 'NOT SKIPPED'
or NO and scrambled channels received
• STEP TUNING
Select YES to enable tuning for each digit
entry.
• DIGIT TIMEOUT
Select 1 to 9.9 seconds for a channel
to switch to another channel. The
recommended and default setting is 3.0
seconds.
• 3 DIGIT TUNING
Select YES to enable tuning up to 3-digit
channels.
• AUTO SCART
Select AVI (EXT1), AV2 (EXT2), ALL,
POWER SCART or NO.
• AV1
Select the AV1 channel when a
scart cable is connected to the AV1
connector.
• AV2
Select the AV2 channel when a
scart cable is connected to the AV2
connector.
• ALL
Select the respective channel when
a scart cable is connected to an AV
connector.
• POWER SCART
Switch on the TV from standby mode
automatically when a scart signal is
detected. Switch the TV to standby
mode automatically in the absence of a
scart signal.
• NO
Disable AUTO SCART feature.
• NO_RGB
Disallow RGB insertion in any sources.
• NO
Allow RGB insertion in AV1 (EXT1)
only.
6.14 Video adjustment
1. Enter SETUP menu.
2. Press ï to select CONFIGURATION >
VIDEO ADJUSTMENT.
VIDEO ADJUSTMENT
HORIZONTAL
VERTICAL
PHASE
CLOCK
AUTO ADJUST
RESET
<>
<>
<>
<>
>
>
3. Press ï to select setting and Í Æ or Æ to
select options.
6.15 Set energy saving
1. Enter SETUP menu.
2. Press ï to select CONFIGURATION >
ENERGY SAVING.
ENERGY SAVING
LOW POWER STANDBY
ESP
SMART POWER
FAST
1
LOW
• ALWAYS RGB
Select AUTO, AV1, NO_RGB or NO.
• AUTO
Allow RGB insertion in any sources.
• AV1
Allow RGB insertion in AV1 (EXT1)
and other sources.
3. Press ï to select setting and Æ to select
options.
EN-21
EN
will be marked as 'SKIPPED' at auto
installation.
• LOW POWER STANDBY
Define the power consumption in standby
mode.
the clock display when the TV is in standby
mode. Select OFF to switch off the display.
• GREEN
The TV will enter a low standby mode to
achieve minimum power consumption.
• DISPLAY ON
Select level 1 to 5 for the brightness of the
clock display when the TV is switched on.
Select OFF to switch off the display.
• FAST
The TV will enter a semi-standby mode
to achieve fast power up.
• TIME SETTING
Set the clock. Press the number buttons to
key in the time.
• CLOCK
The TV will enter a low standby mode
with 12V available for card slot ot setup
box.
• TELETEXT TIME DOWNLOAD
Select YES to download the time for the
clock via teletext. The clock will synchronise
automatically to the correct time. Select
NO to deactivate this feature. Make
download channel equal to startup channel
to minimize startup time.
• ESP
Select the period of time to switch off when
TV does not receive any command. The
time is between 1 to 99 hours.
• SMART POWER
Select LOW, MEDIUM, HIGH to activate
the different levels of energy saving mode
or OFF to deactivate the mode.
6.16 Set clock
1. Enter SETUP menu.
2. Press ï to select CLOCK SETUP.
3. Press Æ to enter CLOCK SETUP.
CLOCK SETUP
DISPLAY STANDBY
DISPLAY ON
TIME SETTING
TELETEXT TIME DOWNLOAD
BUZZER VOLUME
5
4
18:03
YES
LOW
4. Press ï to select setting and Æ to select
options.
• DISPLAY STANDBY
Select level 1 to 5 for the brightness of
EN-22
• BUZZER VOLUME
Set the volume of the alarm buzzer. Select
LOW or HIGH. Select OFF to switch off
buzzer.
Clone configuration
7.1 From USB to TV
Copy TV configuration data from a USB stick
to TV.
1. Insert the USB stick to the USB connector
at the side of the TV.
2. Enter Setup menu.
3. Press ï to select SETUP > CLONING/
UPGRADE > CLONING > TV TO
USB.
4. Press Æ to enter TV TO USB.
5. Press Æ to load data to the USB stick.
USB TO TV
TV TO USB
CLONING
>
>
3. Press ï to select SETUP > CLONING/
UPGRADE > CLONING > USB TO
TV.
4. Press Æ to enter USB TO TV.
5. Press Æ to load data to the TV.
USB TO TV
TV TO USB
CLONING
>
>
DDNote
• During the process of copying, do not remove the USB stick.
• All remote control command and control buttons on the TV are disabled.
6. Switch off and then on to reset the TV
after cloning.
DDNote
• During the process of copying, do not remove the USB stick.
• All remote control command and control buttons on the TV are disabled.
6. Switch off and then on to reset the TV
after cloning.
7.2 From TV to USB
Copy TV configuration data from TV to USB
stick.
1. Insert the USB stick to the USB connector
at the side of the TV.
2. Enter Setup menu.
EN-23
EN
7
8
Healthcare
1. Enter SETUP menu.
2. Press ï to select HEALTHCARE.
3. Press Æ to enter HEALTHCARE.
SETUP
LANGUAGE
COUNTRY
COMMUNICATION
NO. OF PROGRAMS
AUTO INSTALL
PROGRAM INSTALL
CONFIGURATION
CLOCK SETUP
CLONING/UPGRADE
HEALTHCARE
ENGLISH
AUSTRIA
>
>
>
>
>
>
>
>
4. Press ï to select setting and Æ to select
options.
• LOUDSPEAKER MUTE
Select ON to switch off the loudspeaker.
Select OFF to switch on the loudspeaker.
• MULTI RC
Select ON to enable TV to respond
to multi remote controls. This function
supports up to four TV sets operating in
one room without interference from each
other's remote control. Each guest remote
control must be programmed individually to
one of the four colour (blue, yellow, green
or red) button on the remote control
Select OFF to disable this feature.
• REMOTE COLOUR
This feature works only when MULTI RC
is switched to ON. Select Blue, Yellow,
Green or Red to correspond to the
colour of the remote control you will be
using.
EN-24
Install system devices
CCCaution
Before installing a System SmartCard or
System Box, disconnect TV from mains.
9.1 System Smartcard
DDNote
Not applicable for 22 inch models.
1. Insert the SmartCard into the SmartCard
slot on the back of the TV.
2. Connect the cables as instructed by the
system provider.
3. Switch on the TV.
9.3 Set communication source
The default setting for COMMUNICATION
in the SETUP menu is OFF. If a SystemCard
or System Box is used with this TV, then you
must set to the correct communication link.
1. Enter SETUP menu.
2. Press ï to select COMMUNICATION.
3. Press Æ to enter COMMUNICATION.
4. Press Æ to select the correct link.
COMMUNICATION
COMMUNICATION
SP - 12C
STORE
>
ENABLE CARD SLOT
YES
DCM TYPE
GENERIC
2. Connect the cables as instructed by the
system provider.
3. Switch on the TV.
5. Press ï to select ENABLE CARD
SLOT.
9.2 System Box
1. Insert the RJ12 cable of the System box to
the DATA 1 connector on the back of the
TV.
6. Press Æ to select YES.
7. Press Î to select STORE.
8. Press Æ to confirm.
to DATA 1
System Box
EN-25
EN
9
10 Trouble shooting
This section describes commonly-encountered
issues and accompanying solutions.
10.1 Communication issues
The TV does not communicate with
external interactive terminal:
• Select the appropriate communication
source. See Section 6.4 Set communication
source for details.
• Check that the card slot is enabled. See
Section 4.6.2 Access CAM services for details.
10.2 Picture issues
Picture performance not at its optimum
when using VGA or EXT 3 source
• Do not connect a VGA input and a EXT 3
input to the TV at the same time.
10.3 Other issues
The character 'F' appears on the TV
screen.
This means that the TV is currently in factory
mode.
• Press and hold the MENU button at the
side of the TV or a few seconds. This will
reset the TV to normal operation.
No respond from TV when using guest
mode remote control.
This means that security has been set to
HIGH.
• Select CONFIGURATION >
SECURITY. Set SECURITY to
STANDARD.
EN-26
antenna cable 10
11 Index
AUDIO
EN
mains cord 10
A
Control 20
IN 6
D
L/R 7
DATA 1 6
DATA 2 6
C
CAM 11
access 11
Channel
E
EMF 2
Energy saving 21
fine tune 17
EPG 20
install automatically 16
EXT 1 6
install manually 16
EXT 2 6
lock or unlock 18
EXT 3 6
name 18
G
options 17
rename 18
scrambled 20
set number 15
Get started 9
H
HDMI 7
HDMI 1 6
CI card 20
HDMI 2 6
Clock 7
set 22
Common Interface 7
Communication source
HDMI 3 6
Headphones 7
Healthcare 24
select 15
I
set 25
Important information 4
Conditional Access Module 11
Connect 10
Install
system box 25
EN-27
system smartcard 25
Rename
channels 18
K
Kensington lock 9
S
L
Safety 4
Loudspeaker mute 24
SCART 6
Screen care 5
M
MHEG 13, 20
Security 19
high 20
Multi RC 24
Mute 13
N
standard 20
SERV. U 6
Setup
Name
menu 14
channels 18
with guest mode remote control 14
with setup remote control 14
P
Picture
Side
Controls 7
settings 19
Power indicator 7
Sound
settings 19
R
Recycling 5
Remote colour 24
Remote control 8
basic use 8
batteries 10
lock 20
overview 13
sensor 7
SPDIF OUT 6
S-VIDEO 7
T
Troubleshooting 25
TV 9
antenna 6
connection overview 6
position 9
prepare for digital services 11
EN-28
setup 14
EN
side controls 7
stand 9
U
USB 7
V
VESA 3
compatible wall bracket 9
VGA In 6
VIDEO 7
W
Warranty 2
EN-29
© 2008 Koninklijke Philips Electronics N.V.
All rights reserved.