1
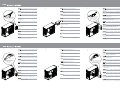
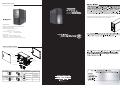
Product Overview
MANUAL
4B
Warrantly period is region specific, please contact your reseller or
SilverStone authorized distributor for more information
4b
Specification:
Material : High-strength plastic and meshed front panel
Motherboard : ATX, Micro ATX
Driver Bay : External
5.25" x 4, 3.5” x 1
Internal
3.5” x 5
1 x 120mm fan slot
Cooling System : Front
1 x 120mm exhaust fan
Rear
Expansion Slot : 7
Front I/O Port : USB2.0 x 2, Audio x 1, MIC x 1
Power Supply : 1 x Optional standard PS2 (ATX)
Dimension : 183.4mm (W) x 412.5 mm (H) x 487.8 mm (D)
Disassemble Chart
RIGHT PANEL
LEFT PANEL
12025 FAN
EXPANSION SLOTS x 7
5.25” DRIVE BAY x 4
RESET BUTTON
3.5” DRIVE BAY
FRONT I/O USB2.0 x 2 + SPK + MIC
PS2 PSU (OPTION)
POWER BUTTON
3.5” DRIVE BAY (HIDDEN) x 5
5.25” DEVICE LOCKING CLIP x 4
3.5” DEVICE LOCKING CLIP x 5
PARTS PACKAGE
USB2.0 CONNECTOR
USB+5V
LPLP+
GND
NC
USB+5V
LPLP+
GND
PHOTO
Pin
PORT1L
PORT1R
PORT2R
SENSE_SEND
PORT2L
PURPOSE
METAL STANDOFF
FOR SECURE
MOTHERBOARD
SCW-PW-M3*6
FOR SECURE
MOTHERBOARD
SCW-HW- #6-32*6
FOR SECURE PSU
Pin
HD AUDIO CONNECTOR
AUD GND
PRESENCE#
SENSE1_RETURN
NO PIN
SENSE2_RETURN
PART NAME
Pin
MANUAL
-
January, 2010
NO:G11211380
ODD
1.
Please follow the arrow direction and turn the locking clip 90
degree to remove outward from 5.25” device bracket as shown.
2.
Install your optical drive or 5.25” device as shown.
Reinstall the locking clip onto the 5.25” device bracket, then follow
the arrow direction and turn it 90 degree to secure your optical drive
or 5.25” device.
Installieren Sie das Optische Laufwerk oder einen 5,25" Einschub
in die Halterung.
Bitte drehen Sie den Verschlußclip um 90° in die angegebene
Richtung, und entnehmen Sie die Blende vom 5,25" Laufwerkskäfig.
Please follow the arrow direction
and rotate the locking clip
vertically as shown to
remove it
3.
Veuillez suivre le sens de la flèche et tournez le clip de verrouillage
de 90 degrés pour retirer le casier 5.25” vers l’extérieur comme montré.
Installez votre lecteur optique ou votre appareil 5.25” comme
montré.
Por favor, siga la dirección de la flecha y gire el clip de agarre
90 grados para sacarlo del bracket para dispositivos de 5,25”
como se muestra.
Instale su dispositivo óptico o dispositivo de 5,25” como se muestra.
2
Bringen Sie den Verschlussclip am 5,25" Laufwerkshalter an, und
drehen Sie ihn um 90° in die angegebene Richtung um das optische
Laufwerk bzw. Ihren 5,25" Einschub sicher zu befestigen.
Réinstallez le clip de verrouillage dans le casier 5.25”, puis suivez
le sens de la flèche et tournez le de 90 degrés pour fixez votre lecteur
optique ou votre appareil 5.25”.
Please follow the arrow direction
and rotate the locking clip
horizontally as shown to
secure 5.25” device
Reinstale el clip de agarre en el bracket para dispositivos de 5,25”,
luego siga la dirección de la flecha y gírelo 90 grados para fijar su
dispositivo óptico ó dispositivo de 5,25”.
Installare l’unità ottica o il dipositivo da 5.25” come mostrato.
Reinstallare il clip di chiusura sul supporto del dispositivo da 5.25”
e seguire la direzione della freccia girando il clip di 90 gradi per
fissare l’unitá ottica o dispositivo da 5.25”.
Seguire la direzione della freccia e girare il clip di chiusura di 90
gradi per rimuovere il supporto del dispositivo da 5.25” come mostrato.
Установите оптический привод или 5,25-дюймовое устройство,
как показано на рисунке.
1
Следуя направлению стрелки, поверните фиксирующую
клипсу на 90 градусов и выньте кронштейн 5,25-дюймового
устройства.
3
請依圖示安裝您的光碟機或5.25吋裝置。
Верните на место клипсу, фиксирующую кронштейн 5,25дюймового устройства, затем, следуя направлению стрелки,
поверните ее на 90 градусов, чтобы закрепить оптический
привод или 5,25-дюймовое устройство.
請依圖示將扣具裝回5.25吋裝置架,並依照箭頭方向旋轉90度以
鎖上您的光碟機或5.25吋裝置。
請依圖示照箭頭方向旋轉90度後將扣具自5.25吋裝置架取出。
请依图示安装您的光驱或5.25吋装置。
请依图示照箭头方向旋转90度后将扣具自5.25吋装置架取出。
请依图示将扣具装回5.25吋装置架,并依照箭头方向旋转90度以
锁上您的光驱或5.25吋装置。
図のように光学ドライブまたは5.25”デバイスをインストール
します。
図のように、矢印の方向に従って固定用クリップを90度回して
5.25”デバイスブラケットを取り出します。
5.25”デバイスブラケットに固定用クリップを戻し、矢印の方
向に従って90度回して光学ドライブまたは5.25”デバイスを固
定します。
그림과 같이 광드라이브나 다른 5.25” 장치를 장착합니다.
화살표 방향에 따라, 로킹클립을 90도 틀어 그림과 같이 5.25”
디바이스 브라켓을 바깥 쪽으로 제거합니다.
로킹클립을 5.25” 디바이스 브라켓에 재장착한 후, 화살표 방향으로
90도 돌려, 광드라이브나 5.25” 드라이브를 고정시킵니다.
HDD
1.
4Please follow the arrow direction and turn the locking clip 90
degree to remove it outward from 3.5” hard drive cage.
2.
Install your 3.5” hard drive into the cage.
3.
Reinstall the locking clip onto the 3.5” hard drive cage, then follow
the arrow direction and turn it 90 degree to secure your 3.5” hard
drive.
Bringen Sie den Verschlussclip wieder am 3,5" Festplattenkäfig
an und befestigen Sie den Käfig indem Sie den Verschlussclip
um 90° in die angegebene Richtung drehen.
Installieren Sie Ihre 3,5” Festplatten in den Laufwerkskäfig
Zum entnehmen des 3,5" Festplattenkäfigs drehen Sie bitte den
Verschlussclip um 90° in die angegebene Richtung.
Installez votre disque dur 3.5” dans le casier.
Veuillez suivre le sens de la flèche et tournez le clip de verrouillage
de 90 degrés pour retirer le casier à disques durs 3.5” vers l’extérieur.
Réinstallez le clip de verrouillage dans le casier à disques durs
3.5”, puis suivez le sens de la flèche et tournez le de 90 degrés
pour fixez votre disque dur 3.5”.
Instale su disco duro de 3,5” en la carcasa.
Por favor, siga la dirección de la flecha y gire el clip de agarre
90 grados para sacarlo de la carcasa para discos duros de 3,5”.
Please follow the arrow direction
and rotate the locking clip
vertically as shown
to remove it
Installare l’hard disk da 3.5” hard nel box.
Seguire la direzione della freccia e girare il clip di chiusura di 90
gradi per rimuovere il box del dispositivo da 3.5”.
Reinstale el clip de agarre en la carcasa de discos duros de
3,5”, luego siga la dirección de la flecha y gírelo 90 grados
para fijar su disco duro de 3,5”.
Please follow the arrow direction
and rotate the locking clip
horizontally as shown
to secure hard drive
Reinstallare il clip di chiusura sul box del dispositivo da 3.5” e seguire la
direzione della freccia girando il clip di 90 gradi per fissare l’hard
disk da3.5”
Установите 3,5-дюймовый жесткий диск в корзину.
Следуя направлению стрелки, поверните фиксирующую клипсу
на 90 градусов и выньте корзину для 3,5-дюймового жесткого
диска.
Верните на место клипсу, фиксирующую корзину для 3,5дюймового жесткого диска, затем, следуя направлению
стрелки, поверните ее на 90 градусов, чтобы закрепить
3,5-дюймовый диск.
2
安裝您的3.5吋硬碟至硬碟架中。
請依圖示將扣具裝回3.5吋硬碟架,並依照箭頭方向旋轉90度以鎖
上您的3.5吋硬碟。
請依圖示照箭頭方向旋轉90度後將扣具自3.5吋裝置架取出。
安装您的3.5吋硬盘至硬盘架中。
1
请依图示照箭头方向旋转90度后将扣具自3.5吋装置架取出。
3
请依图示将扣具装回3.5吋硬盘架,并依照箭头方向旋转90度以锁
上您的3.5吋硬盘。
3.5”ハードディスクドライブをケージにインストールします。
3.5”ハードディスクドライブケージに固定用クリップを戻し、
矢印の方向に従って90度回して3.5”ハードディスクドライブを
固定します。
図のように、矢印の方向に従って固定用クリップを90度回して
3.5”ハードディスクドライブケージを取り出します。
화살표 방향에 따라 로킹클립을 90도 틀어 3.5” 하드드라이브
케이지를 바같 쪽을 제거합니다.
3.5” 하드 드라이브를 케이지에 장착합니다.
로킹클립을 3.5” 하드 드라이브 케이지에 장착한 후, 화살표
방향으로 90도 틀어 3.5” 하드 드라이브를 고정합니다.