1
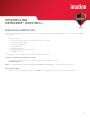
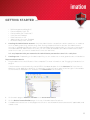
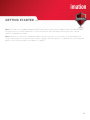
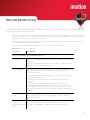
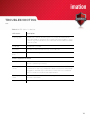
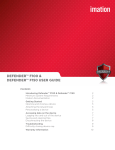
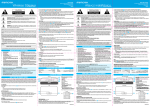
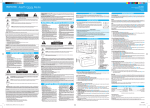
DEFENDER™ H200+BIO
USER GUIDE
Contents
Introducing Defender™ H200+Bio
Minimum System Requirements
Device accessories
Imation Documentation
2
2
2
3
Getting Started
Plugging in the device
Personalizing a device
4
4
4
Accessing data on the device
Logging into and out of the device
Saving and opening files
Disconnecting the device
7
7
8
8
Troubleshooting
9
Warranty Information
11
INTRODUCING
DEFENDER™ H200+BIO
Defender™ H200+Bio is a USB (Universal Serial Bus) portable hard drive with built-in biometric security, data
encryption, digital identity, and cryptographic services.
Figure 1-1: Defender H200+Bio
This guide is designed to help you set up your Defender H200+Bio device with minimal effort.
MINIMUM SYSTEM REQUIREMENTS
Defender H200+Bio comes with built-in Imation Defender ACCESS Standard™ software on its application
partition. The following list describes the requirements you need to use your device with ACCESS Standard.
• One or two USB ports (Type A), depending on the power available from your computer
• An operating system that supports USB 2.0 or 1.1 Mass Storage Devices
Operating systems
• Microsoft Windows 7 Pro
• Windows Vista (Business, Enterprise, Home SP2)
• Windows XP Professional SP3
• Windows XP Professional SP2
• Windows XP Home SP3
• Mac OS X 10.5 and 10.6
DEVICE ACCESSORIES
Your Defender H200+Bio package includes a dual-head USB cable. For information on how to use this cable,
see “Plugging in the device” on page 4. Defender H200+Bio gets the power it requires from your computer
when you connect it to the USB port(s) on your system. An external power supply is not provided or required.
2
INTRODUCING
DEFENDER™ H200+BIOcont.
IMATION DOCUMENTATION
You can find detailed instructions about using and managing Defender™ H200+Bio in the ACCESS Standard
User Guide.
Topics include:
•
•
•
•
•
•
•
Information about Imation Defender Collection Devices
Personalizing the device
Accessing the device
Managing users
Managing devices
Protecting the device from viruses
Troubleshooting
Online Help is also available with ACCESS Standard software.
To view the ACCESS Standard User Guide
•
From the root directory of the application partition, double-click the
UserGuide.pdf file.
Note: You need Adobe® Reader® (http://www.adobe.com/acrobat) to view the documentation.
To view online Help
•
When ACCESS Standard is open, click Help on the page for which you want more information.
3
GETTING STARTED
Before you can use your device, you must properly connect it to the computer. After you plug in a new device,
you must personalize it before you can use the authentication and private partition features. The device uses
pre-installed ACCESS Standard software to guide you through the personalization process. The
personalization wizard starts automatically when you plug in a new (or recycled) device. If autorun is not
configured for your computer, you can start ACCESS Standard from the application partition on the device.
PLUGGING IN THE DEVICE
Depending on the power supplied by the host computer, you may require one or two USB connectors to use
Defender™ H200+Bio.
To plug in Defender H200+Bio using one USB port
1.
Plug the smaller (Mini-A) USB connector into the back of the Defender H200+Bio device.
2.
Plug the black Type A USB connector into the host computer.
3.
Do not plug in the gray Type A USB connector.
If the yellow power LED flashes slowly, follow the procedure that uses two USB ports.
To plug in Defender H200+Bio using two USB ports
1.
Plug the smaller (Mini-A) USB connector into the back of the Defender H200+Bio device.
2.
Plug the gray Type A USB connector into the host computer.
3.
Plug the black Type A USB connector into the host computer.
If the yellow power LED flashes slowly, the host computer does not meet the USB specification and cannot supply the required power to the device.
Note 1: Plugging in the black USB connector first, followed by the gray connector, may delay the start up of
Defender H200+Bio by a few seconds.
Note 2: If the yellow power LED flashes quickly, power detection has timed out. Remove all USB connections
and reconnect the cable.
PERSONALIZING A DEVICE
The personalization process involves three main steps:
1
Applying a device profile—The profile sets default preferences for the device. You can choose the Typical
profile, with preconfigured device settings, or the Custom profile that allows you to configure device settings. The Typical profile contains the following device settings:
• Authentication method: fingerprint authentication
• Number of device users: 1 (not including the Administrator)
• Private partition uses the total available disk space
• Two Factor authentication: Off
• Biometric Security Level: 1 in 4,500
4
GETTING STARTED
•
•
•
•
•
•
•
2.
cont.
Minimum password length: 6
Password Retry Limit: 10
Password Re-use Threshold: 3
User Rescue: Enabled
Data Destruction: Off
Administrator Account: Enabled
Biometric Retry Limit: Infinite
Creating the Administrator account—Only the Administrator can perform certain operations on a device,
such as adding, removing, and rescuing users. During the personalization process, the Administrator
account is created automatically when you set the Administrator password. If you choose a Custom profile and disable the Administrator account, you will not be prompted to provide an Administrator password. In this case, you cannot create the account at a later time.
It is very important that you memorize the Administrator password or store it in a safe place.
3.
Creating users—Depending on the device profile, you can create one or more general users on the device.
To personalize the device
1.
Plug the device into the USB port of the computer. For more information, see “Plugging in the device” on
page 4.
If Autorun does not automatically start ACCESS Standard, double-click the Start.exe file from the root
directory on the application partition. (If necessary, in the notification area at the far right of the taskbar,
click the Imation Defender icon, and then click Personalize from the menu.)
2.
On the main page of ACCESS Standard, click Personalize Device.
3.
On the Device Personalization page, click one of the device profile options.
4.
Complete the instructions on the pages that follow to set the Administrator password (if applicable) and
create a user.
5
GETTING STARTED
cont.
Note 1: If you do not complete the personalization process you may have to repeat some of the above steps
the next time you connect the device. For more information about the personalization process, see the
ACCESS Standard User Guide.
Note 2: After you successfully complete the personalization process, you can access your private partition
using a file manager. For more information about logging in and saving files to or opening files from the private
partition, see “Accessing data on the device” on page 7.
6
ACCESSING DATA
ON THE DEVICE
After you personalize a device, only registered users can authenticate to it. Authentication involves logging
into the device using a password, fingerprint, or both. The authentication method you use depends on the
capabilities of the device and the profile applied to the device.
After you successfully log in, you can save files to, and open files from, your private partition. It is
recommended that you log out of your device if you must leave it connected while you are away from your
computer. Otherwise, another user could access your private partition while you are absent. You can also
disconnect the device completely to bring the data with you.
This chapter provides information about the following topics:
• Logging into and out of the device
• Saving and opening files
• Disconnecting the device
LOGGING INTO AND OUT OF THE DEVICE
To log into the device
1.
From the notification area, at the far right of the taskbar, right-click the Defender icon and click Login.
2.
If you are using a computer running Mac OS X, open a file manager and click the application drive for the
device. Double-click the ACCESS Standard application and on the main page of ACCESS Standard, under
Manage Device, click Login.
3.
Follow the prompts in the authentication wizard until the device successfully authenticates you.
Tip: If your device uses only biometric authentication, you can log into it without starting ACCESS Standard by
swiping your finger across the fingerprint sensor.
To log out of the device
1.
From the notification area, at the far right of the taskbar, right-click the Defender icon and click Logout.
2.
If you are using a computer running Mac OS X, open a file manager and click the application drive for the
device. Double-click the ACCESS Standard application and on the main page of ACCESS Standard, under
Manage Device, click Logout.
Tip: You can also log out of your device by right-clicking the Defender icon, and then clicking Eject Device.
7
ACCESSING DATA
ON THE DEVICE cont.
SAVING AND OPENING FILES
When you plug in your device both the application drive and the private partition display in a file manager,
such as Windows® Explorer, with an associated drive letter for each partition.
Application
drive
Private
partition
Once you log into the device, you can open files on your private partition using the appropriate program or a
file manager. When you save data to your private partition, the device encrypts the data using hardware-based
AES 256-bit encryption. Data is automatically decrypted when you open the file.
Note: You cannot save data to the application partition.
DISCONNECTING THE DEVICE
To disconnect the device
•
From the notification area at the far right of the taskbar, right-click the Defender icon and click Eject
Device.
Tip: You can also disconnect the device by clicking the Safely Remove Hardware icon in the notification area
at the far right of the taskbar. Click the message “Safely remove USB Mass Storage Device - Drive (F:); where F
is the letter of the drive in the file manager that is associated with the device. Disconnect the device when the
following message displays, “The USB Mass Storage Device can now be safely removed from the system”.
Note: If you are using a computer running Mac OS X, drag the device drive on the desktop to the Trash.
Release the mouse button when you see the Eject prompt.
Caution: Disconnecting the device either accidentally or on purpose, without properly ejecting it, could
corrupt the data on the device.
8
TROUBLESHOOTING
If you experience difficulty using Defender™ H200+Bio after following the instructions in this User Guide, read
the following troubleshooting information.
• Check to make sure the USB cable is plugged in properly and that the cable provides sufficient USB
power to the device. For information about how to properly plug in the device to ensure adequate
power, see “Plugging in the device” on page 4.
• Check the light emitting diode (LED) status of Defender H200+Bio to assess the power output to
the device and the state of the device.
• Check the Frequently Asked Questions section at Imation.com/support.
Table 4-1: LED status for devices
LED status
Description
Status of authentication and data transfer
Solid green
Open—if no authentication mechanisms are set, any user can use
the device.
User has logged into the device—if users exist, it indicates that
the device has authenticated a user.
Flashing green
The flash frequency is approximately once per second and
indicates that the device is waiting for a finger due to one of the
following situations:
• The device has just been plugged in and no user is currently
logged into the device.
• Software has initiated a biometric authentication or enroll
operation.
• A user has initiated a finger authentication operation for
example, by touching the device when it is in the “idle” waitingfor-finger state. A device will remain in an idle state for only
two minutes before the LED turns red to indicate the device is
locked.
Flashing red
once
Failed fingerprint authentication attempt. The device will go
back to waiting for a finger (flashing green normal) after the
failed signal finishes.
Flashing LED
alternating
between red and
green
The device is waiting for a finger to authenticate but this is also
the last chance to authenticate before biometric access is
blocked. The frequency is approximately twice per second.
9
TROUBLESHOOTING
cont.
Table 4-1: LED status for devices
LED status
Description
Flashing red
The device is either powering up or is totally blocked. When
totally blocked, no authentication methods are available to allow
a user to log into the device; this indicates that the device needs
to be recycled.
Solid red
The device is locked.
Blue LED
Indicates a data transfer activity for all devices.
Flashing red and
blue
The device no longer has valid firmware.
Status of power to device
Solid yellow
Sufficient power from the host computer is available and the
device is operating normally.
Flashing yellow
(slow)
Insufficient power to operate the device. Attach both USB
connectors to the host computer. If both connectors are already
plugged in, and the LED continues to flash, the host computer
does not meet the USB power requirements.
Flashing yellow
(fast)
Power detection has timed out. Unplug all USB connections and
reconnect the them.
No yellow LED
No power is detected. Device is off.
10
WARRANTY INFORMATION
Limited Warranty: If any defect in material or manufacture appears within 5 years of the date of original retail purchase of
this product, it will be repaired or replaced at Imation’s option. Proof of purchase is required to obtain warranty service.
This warranty does not apply to normal wear or bundled software. Imation will not be liable for any lost data or other
indirect, incidental or consequential damages. Some jurisdictions do not allow the exclusion or limitation of incidental or
consequential damages, so the above limitation or exclusion may not apply to you. This warranty gives you specific rights you may have other rights that vary from country to country.
Regulatory Compliance:
FCC
This device complies with part 15 of the FCC Rules. Operation is subject to the following two conditions: (1) This device may
not cause harmful interference, and (2) this device must accept any interference received, including interference that may
cause undesired operation.
Residential use statement:
NOTE: This equipment has been tested and found to comply with the limits for a Class B digital device, pursuant to part 15
of the FCC Rules. These limits are designed to provide reasonable protection against harmful interference in a residential
installation. This equipment generates, uses and can radiate radio frequency energy and, if not installed and used in
accordance with the instructions, may cause harmful interference to radio communications. However, there is no guarantee
that interference will not occur in a particular installation. If this equipment does cause harmful interference to radio or
television reception, which can be determined by turning the equipment off and on, the user is encouraged to try to
correct the interference by one or more of the following measures:
—Reorient or relocate the receiving antenna.
—Increase the separation between the equipment and receiver.
—Connect the equipment into an outlet on a circuit different from that to which the receiver is connected.
—Consult the dealer or an experienced radio/TV technician for help.
Note: Changes or modifications not expressly approved by the party responsible for compliance could void the user’s
authority to operate the equipment.
This Class B apparatus complies with Canadian ICES-003.
The following information applies to only EU-member states:
The equipment that you bought required the extraction and use of natural resources for its production. It may
contain hazardous substances that could impact human health and the environment. The crossed-out wheeled bin
symbol indicates that this product may not be treated as household waste. By disposing of this product using the
appropriate take-back systems, you will help prevent the spread of hazardous substances to our environment and
reduce the impact on natural resources. Those systems will reuse or recycle most of the materials of your end-life
equipment in a sound way. If you need more information on the collection, reuse and recycling systems, please contact
your local or regional waste administration.
Imation Enterprises Corp.
1 Imation Way
Oakdale, MN 55128-3414 USA
www.imation.com | [email protected]
Imation, the Imation logo, Defender and the Defender Collection logo are trademarks of Imation Corp. ACCESS Standard is
a trademark of MXI Security. All other trademarks are the property of their respective owners.
Copyright 2010 Imation Corp.
11