1
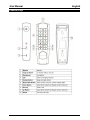
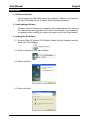
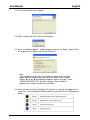
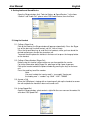
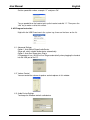
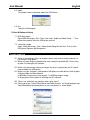
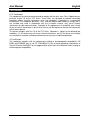
USB VoIP Phone – 2 Piece
User Manual
English
LINDY No. 42779
www.lindy.com
© LINDY ELECTRONICS LIMITED & LINDY-ELEKTRONIK GMBH - FIRST EDITION (March 2009)
User Manual
English
Introduction
Thank you for purchasing the LINDY USB VoIP Phone. This phone has been designed
primarily for use with Skype, but can also be used with other VoIP applications. You can
control the Skype software by simply pressing the keys on the phone to select phone
listing and dialling function. With the in-built echo eliminating technology, voice clarity is
vastly improved.
Features
•
•
•
•
•
•
•
•
USB 1.1 & USB 2.0 specification compliant
Compatible with VoIP ( Voice over Internet Protocol ) solutions, such as Skype, MSN
Messenger and Yahoo Messenger
Built in hot key functions to make operating the Skype software as easy as dialling a
normal telephone.
Skype hot key, up, down, 0 ~ 9, send & hook on the base unit for quick access
Built in speaker and microphone
Echo-eliminating for better sound quality
Buzzer function for incoming call alerts
Desk and Wall mount
System Requirements
•
•
•
•
•
Processor: PC 1GHZ or over
Storage: 128MB RAM 15MB Hard Disk
Internet service: ISDN, ADSL or LAN
Operating System: Microsoft Windows 2000/XP/Vista, Mac OS compliant
Skype Software Version: 2.0 or over
Package Contents
•
•
•
USB phone
Installation CD (API Software and manual )
This manual
User Manual
Function Keys
English
User Manual
English
Installation
1. Hardware Installation
Please connect the USB VoIP Phone to your computer’s USB port. Your computer
will find a USB Audio Device. The driver will be installed automatically.
2. Installing Skype Software
If Skype is not yet installed on your computer, please download the latest version of
the software from www.skype.com and install on your computer. If you experience
any problems while installing this software then please refer to the Skype website.
3. Installing the API Software
3.1 Insert the Utility CD into your CD-ROM drive. Double Click My Computer and then
choose the CD-ROM drive.
3.2 Run the setup icon to start the installation.
3.3 Please click Next.
3.4 Please click Next.
User Manual
English
3.5 Click Install to begin the installation.
3.6 After installing, click OK to start the API program.
3.7 When this dialogue appears: “Another program wants to use Skype”. Select “Allow
this program to use Skype” and click the OK button.
Note:
If you accidentally select the “Do not allow this program to use Skype”
option, open the Skype window and take these steps: Click “Tools ►
Options ► Privacy ► Manage other programs access to Skype”, Select
“USBPHONESKYPE.EXE” and click “Change”. Select “Allow this
program to use Skype” and click the OK button.
3.8 When you have finished installing the API software, a small icon will appear in the
system tray. The icon displays different colours to show the status of USB phone as
follows:
User Manual
English
4. Setting Audio and Sound Device
Open the Skype window, click “Tools ► Options ► Sound Devices”. In the items
“Audio In” and “Audio Out”, please select USB Audio Device, then click Save.
5. Using the Handset
5.1 Calling a Skype User
Pick up the handset, the Skype window will pop-up automatically. Press the Skype
key on the base unit to select contact, call list, Live or history.
Press the Up and Down key to scroll the list of contacts; when you have found the
desired contact press the dial key to make a call.
To cancel the call replace the handset in the base unit or press the hang up button
on the handset.
5.2 Calling a Phone Number (Skype Out)
Before using this function, please make sure you have paid for the service.
For further information about Skype Out, please go to http://www.skype.com.
Pick-up the handset and dial the phone number by pressing the keys on the base
unit.
Press the send key to call the number
Note:
You must include the “country code” + “area code” (leaving out
the leading zero” + “number” e.g. “0044” “1642” “754000”
5.3 Answer a Call
When the USB phone is ringing with an incoming call, pick up the handset to answer
the call and place the handset in base unit to end a call.
5.4 Assign Speed-Dial
Open the Skype window, select contacts, right-click the user name on the contact list
and select “Set Speed-Dial”.
User Manual
English
Set the speed dial number, example “11” and press OK.
To use speed dial on the handset, pick up the handset and dial “11”. Then press the
“dial” key to make a call to this contact.
6. API Program Instruction
Right-click the USB Phone icon in the system tray, there are five items on the list.
6.1 Advanced Settings
Option 1: Auto Switch Skype Audio Device
Skype will switch suitable audio device automatically.
Option 2: Auto Run Skype when Plug in
If Skype doesn’t run, the API will run Skype automatically when plugging the handset
into the USB port of the PC.
6.2 Volume Control
You can control the volume of speaker and microphone in this window.
6.3 Audio Device Settings
To change the Windows default audio device.
User Manual
English
6.4 About
The window shows information about the USB Phone.
6.5 Exit
To quit the API program.
7 Other IM Software Setting
7.1 MSN Messenger
Open MSN Messenger, Click “Tools” and select “Audio and Video Setup… ”. Then
follow the wizard to select the USB phone and test.
7.2 Yahoo Messenger
Open Yahoo Messenger, Click “Yahoo! Audio Setup Wizard” item. Then test the
USB phone Speaker and Microphone.
Troubleshooting
Q1 Skype is launched, but it has no response when I pick up the handset and press a
key using my USB phone
A1. Make sure your Skype is allowed to be accessed by the provided API. Please refer
to point 3 installing the API software.
Q2. While using messenger software or Skype, the voice is played from the PC sound
card instead of the USB phone.
A2. Make sure your software is configured to USB phone as audio device. Refer to point
4 Setting Audio and Sound device.
In MSN Messenger please refer to point 7.1 MSN Messenger setting.
In Skype please refer to point 3 ‘Installing the API software.’
Q3. There is no audio from my speakers when I play music?
A3. Please go to your Control Panel/Sound and Audio Devices, set Sound playback and
Sound Recording’s preferred device to your sound card, as shown below:
User Manual
English
Certifications
FCC Certifications
This equipment has been tested and found to comply with the limits for a Class A digital device,
pursuant to part 15 of the FCC Rules. These limits are designed to provide reasonable
protection against harmful interference when the equipment is operated in a commercial
environment. This equipment generates, uses, and can radiate radio frequency energy and, if
not installed and used in accordance with the instruction manual, may cause harmful
interference to radio communications. Operation of this equipment in a residential area is likely
to cause harmful interference in which case the user will be required to correct the interference
at their own expense.
This device complies with Part 15 of the FCC Rules. Operation is subject to the following two
conditions: (1) this device may not cause harmful interference, and (2) this device must accept
any interference received; including interference that may cause undesired operation.
CE Certification
This equipment complies with the requirements relating to electromagnetic compatibility, EN
55024 and EN55022 class A for ITE, EN61000-3-2/-3 the essential protection requirement of
Council Directive 89/336/EEC on the approximation of the laws of the Member States relating to
electromagnetic compatibility.
User Manual
English
Recycling Information
WEEE (Waste of Electrical and Electronic Equipment),
Recycling of Electronic Products
United Kingdom
In 2006 the European Union introduced regulations (WEEE) for the collection and recycling of
all waste electrical and electronic equipment. It is no longer allowable to simply throw away
electrical and electronic equipment. Instead, these products must enter the recycling process.
Each individual EU member state has implemented the WEEE regulations into national law in
slightly different ways. Please follow your national law when you want to dispose of any
electrical or electronic products. More details can be obtained from your national WEEE
recycling agency.
Germany / Deutschland
Die Europäische Union hat mit der WEEE Direktive umfassende Regelungen für die
Verschrottung und das Recycling von Elektro- und Elektronikprodukten geschaffen. Diese
wurden von der Bundesregierung im Elektro- und Elektronikgerätegesetz – ElektroG in
deutsches Recht umgesetzt. Dieses Gesetz verbietet vom 24.März 2006 an das Entsorgen von
entsprechenden, auch alten, Elektro- und Elektronikgeräten über die Hausmülltonne! Diese
Geräte müssen den lokalen Sammelsystemen bzw. örtlichen Sammelstellen zugeführt werden!
Dort werden sie kostenlos entgegen genommen. Die Kosten für den weiteren Recyclingprozess
übernimmt die Gesamtheit der Gerätehersteller.
France
En 2006, l'union Européenne a introduit la nouvelle réglementation (DEEE) pour le recyclage
de tout équipement électrique et électronique.
Chaque Etat membre de l’ Union Européenne a mis en application la nouvelle réglementation
DEEE de manières légèrement différentes. Veuillez suivre le décret d’application
correspondant à l’élimination des déchets électriques ou électroniques de votre pays.
Italy
Nel 2006 l’unione europea ha introdotto regolamentazioni (WEEE) per la raccolta e il riciclo di
apparecchi elettrici ed elettronici. Non è più consentito semplicemente gettare queste
apparecchiature, devono essere riciclate. Ogni stato membro dell’ EU ha tramutato le direttive
WEEE in leggi statali in varie misure. Fare riferimento alle leggi del proprio Stato quando si
dispone di un apparecchio elettrico o elettronico.
Per ulteriori dettagli fare riferimento alla direttiva WEEE sul riciclaggio del proprio Stato.
LINDY No. 42779
1st Edition March 2009
www.lindy.com