1
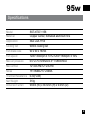
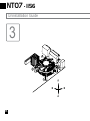
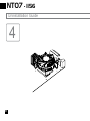
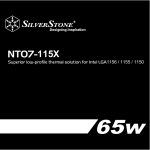
NT07 - 1156
Superior low-profile thermal solution for Intel LGA 1156
[email protected]
Issue Date : January, 2010
95w
NO:G11211150
NT07 - 1156
Introduction
SilverStone Technology’s Nitrogon NT07-1156 is a super slim profile CPU
cooler designed for space limited applications that utilizes LGA 1156
platforms. It has a copper center construction with extruded aluminum fins
for excellent thermal conductive capability that rivals many larger coolers.
The custom 90mm fan was designed with fan blades to achieve the highest
air pressure possible while maintaining an acoustic profile that is rare for
cooler of this size. At a total height of only 37mm tall, the NT07-1156 is
likely the best choice and the only choice for slim sized cases utilizing LGA
1156 processors.
Special Feature
Support Intel LGA 1156 processors
Designed for low profile systems at only 37mm tall
Large, custom 90mm fan for excellent cooling and low noise
Copper center and base with extruded aluminum fins
Easy to install
Built-in Intel Extreme series CPU cooler fan speed switch
1
95w
Specifications
Model
SST-NT07-1156
Material
Copper center, Extruded aluminum fins
Application
Intel LGA 1156
Cooling fan
90mm cooling fan
Fan blade size
90 x 90 x 16mm
Fan speed
1200~3000rpm ± 10% /1200~1800rpm ± 10%
Max air pressure
0.5~2.75 mmH2O/0.5~1.58mmH2O
Max airflow
12~40CFM/12~23CFM
Noise
15~38dBA/15~23dBA
Thermal Resistance
0.30( C/W)
Net Weight
310g
Dimension w/fan
93mm (W) x 36.5mm (H) x 93mm (D)
2
NT07 - 1156
Installation Guide
1
3
95w
Apply the included heatsink compound on you CPU evenly.
Verteilen Sie die mitgelieferte Wärmeleitpaste gleichmäßig auf der CPU.
Appliquez de la pate thermique incluse sur votre processeur régulièrement.
Inserte la estructura de refrigeración incluida en su CPU haciendo presión de forma igual en
todos sus puntos.
Applicare il dissipatore di calore sul CPU in maniera uniforme.
Равномерно нанесите на ЦП прилагаемый термосостав.
付属のヒートシンクコンパウンドをCPUに均等に塗ります。
동봉된 히트싱크 콤파운드를 장착하려는 CPU에 고루 바릅니다.
請將散熱膏均勻地塗抹在您的CPU上。
简体中文
请将散热膏均匀地涂抹在您的CPU上。
4
NT07 - 1156
Installation Guide
2
Place the NT07-1156 cooler on top of the installed CPU, and align the four fasteners with the holes
on the motherboard.
(Make sure each fastener is oriented as shown, with the arrow directed outward.)
Setzen Sie den NT07-1156-Kühler auf die installierte CPU auf, achten Sie darauf, dass die vier
Halter über den Aussparungen im Motherboard sitzen.
(Achten Sie darauf, dass die Halter wie in der Abbildung ausgerichtet sind – der Pfeil zeigt nach außen.)
5
95w
Placez le NT07-1156 par-dessus le processeur installé, et alignez les 4 fixations rapides avec les trous
de la carte mère. (Vérifiez bien que chaque fixation rapide est orientée comme montré, avec la flèche
dirigée vers l’extérieur.)
ISitúe el disipador NT07-1156 sobre la CPU instalada y alinee los cuatro cierres con los agujeros de la
placa base. (Asegúrese de que cada cierre se oriente de la forma que se muestra, con la flecha hacia el
exterior).
Posizionare il cooler NT07-1156 sul CPU installato ed allineare i quattro ganci con i fori della scheda madre
(assicurasri che ciascun gancio sia orientate come mostrato, con la freccia diretta verso l’esterno).
Поместите кулер NT07-1156 на верхнюю часть установленного ЦП, выровняйте четыре зажима и
соответствующие отверстия материнской платы. (Убедитесь, что зажимы ориентированы так, как
показано на рисунке, т.е. стрелка направлена наружу.)
NT07-1156クーラーをインストールされたCPUの上に置き、マザーボードの4つの穴に4個のファスナーを合わ
せます。(各ファスナーは図のように矢印を外向きにしてください。)
NT07-1156를 장착된 CPU 위에 위치하고, 4개의 고정 핀을 메인보드의 구멍에 정렬합니다. ( 반드시
고정핀이 그림과 같이 화살표 방향이 바깥쪽으로 위치하도록 합니다. )
將NT07-1156 散熱器置於已安裝CPU上方,並將四個散熱器螺絲對準主機板上的孔位。
(請確認每個散熱器螺絲的方向與附圖上的箭頭方向一致)
简体中文
将NT07-1156 散热器置于已安装CPU上方,并将四个散热器螺丝对准主机板上的孔位。
(请确认每个散热器螺丝的方向与附图上的箭头方向一致)
6
NT07 - 1156
Installation Guide
3
A
B
B
A
A
B
B
A
7
95w
Press and hook up two fasteners of A at a time and then the other two of B to fix the CPU cooler in place.
Zum Fixieren der CPU drücken Sie zunächst die beiden Halter A gleichzeitig hinab, anschließend drücken
Sie die beiden Halter B ebenfalls gleichzeitig hinab.
Appuyez et crochetez les deux fixations rapides A en même temps et ensuite les deux autres fixations
rapides B du dissipateur du processeur.
Presione y enganche hasta dos cierres A a la vez y luego los otros dos B para situar el disipador de CPU
en su lugar.
Premere e agganciare contemporaneamente due ganci di A e poi gli altri ganci di B per fissare il cooler
del CPU.
Нажмите одновременно и зацепите два зажима A, а затем два зажима B, тем самым зафикси
ровав кулер ЦП.
図のようにAの方向の2個のファスナーを同時に押して固定し、他方のBのファスナー2個も固定して、CPUクー
ラーを所定の位置に取り付けます。
A의 두개의 고정핀을 한개씩 눌러 끼운 후, B쪽도 동일하게 끼워 쿨러가 자리를 잡도록 합니다.
請依圖示下壓與鎖上位置A的散熱器螺絲,再下壓與鎖上位置B的散熱器螺絲。
简体中文
请依图标下压与锁上位置A的散热器螺丝,再下压与锁上位置B的散热器螺丝。
8
NT07 - 1156
Installation Guide
4
9
95w
When the NT07-1156 is in place, connect the CPU fan cable to the connector labeled CPU_FAN
on motherboard.
Wenn der NT07-1156 richtig sitzt, schließen Sie das CPU-Lüfterkabel an den Anschluss CPU_FAN
des Motherboards an.
Lorsque le NT07-1156 est en place, branchez le câble du ventilateur du processeur au connecteur
de la carte mère nommé CPU_FAN.
Cuando el NT07-1156 esté situado, conecte el cable del ventilador de la CPU al conector etiquetado
CPU_FAN en la placa base
Una volta portato il NT07-1156 in posizione, connettere il cavi della ventola del CPU al connettore
contrassegnato CPU_FAN sulla scheda madre.
Когда NT07-1156 окажется на месте, подключите кабель вентилятора ЦП к разъему материнской
платы с пометкой CPU_FAN.
NT07-1156が設置されたら、CPUファンケーブルをマザーボード上のCPU_FANと表示されたコネクタに
接続します。
NT07-1156가 잘 장착된것을 확인한 후, CPU 팬케이블을 메인보드상 CPU_FAN이라 표시된
커넥터에 꼽아줍니다.
當NT07-1156已安裝完成,將CPU風扇電源接頭接上主機板。
简体中文
当NT07-1156已安装完成,将CPU风扇电源接头接上主机板。
10
NT07 - 1156
Uninstallation Guide
1
11
95w
Remove the CPU fan cable from the connector labeled CPU_FAN on the motherboard.
Trennen Sie das CPU-Lüfterkabel vom mit CPU_FAN beschrifteten Anschluss am Motherboard.
Retirez le câble du ventilateur du processeur branché sur la prise nommé CPU_FAN de votre carte mère.
Retire el cable del ventilador de la CPU del conector etiquetado CPU_FAN de la placa base.
Rimuovere il cavo della ventola del CPU dal connettore contrassegnato CPU_FAN sulla scheda madre.
Выньте кабель вентилятора ЦП из разъема материнской платы с пометкой CPU_FAN.
CPUファンケーブルをマザーボード上のCPU_FANと表示されたコネクタから外します。
CPU 팬케이블을 CPU_FAN이라 메인보드에 표시된 커넥터에서 제거합니다.
將CPU風扇電源線自主機板上移除。
简体中文
将CPU风扇电源线自主机板上移除。
12
NT07 - 1156
Uninstallation Guide
2
13
95w
Rotate each fastener in a counterclockwise direction.
Drehen Sie die einzelnen Halterungen gegen den Uhrzeigersinn.
Faites tourner chaque fixation rapide dans le sens inverse des aiguilles d’une montre.
Gire cada cierre en dirección contraria a las agujas del reloj.
Rotare ciascun gancio in senso orario.
Поверните каждый зажим против часовой стрелки.
各ファスナーを反時計回りに回します。
각 고정핀을 시계 반대방향으로 돌려줍니다.
請依圖示箭頭方向逆時針旋轉散熱器螺絲。
简体中文
请依图示箭头方向逆时针旋转散热器螺丝。
14
NT07 - 1156
Uninstallation Guide
3
A
B
B
A
A
B
B
A
15
95w
Pull up two fasteners of A at a time and then the other two of B to remove the CPU Cooler from the motherboard.
Zum Abnehmen des CPU-Kühlers vom Motherboard ziehen Sie zunächst die beiden Halter A gleichzeitig
heraus, anschließend ziehen Sie die beiden Halter B ebenfalls gleichzeitig heraus.
Tirez vers le haut les deux fixations rapides A en même temps, puis faites de même avec les fixations
rapides B afin de retirer de votre carte mère le dissipateur du processeur.
Tire de hasta dos cierres A a la vez y luego los otros dos B para retirar el disipador de CPU de la placa base.
Tirare contemporaneamente i ganci di A e poi i ganci di B per rimuovere il cooler del CPU dalla scheda madre.
Одновременно потяните два зажима A, а затем два зажима B, и высвободите кулер ЦП из отверстий
материнской платы.
Pull up two fasteners of Aの側のファスナー2個を同時に引き上げ、他方のB側のファスナー2個を引き上げて、
マザーボードからCPUクーラーを外します。
A의 2개의 고정핀을 한개씩 차레로 위로 당겨준 후, B쪽의 고정핀도 차례로 하나씩 당긴 후, CPU 쿨러를
메인보드로부터 제거합니다.
請依圖示拉起位置A散熱器螺絲,再拉起位置B散熱器螺絲,以將CPU自主機板取出。
简体中文
请依图示拉起位置A散热器螺丝,再拉起位置B散热器螺丝,以将CPU自主机板取出。
16
NT07 - 1156
Uninstallation Guide
4
17
95w
Remove the CPU cooler from the motherboard.
Nehmen Sie den CPU-Kühler vom Motherboard ab.
Retirez le dissipateur de la carte mère.
Retire el disipador de la CPU de la placa base.
Rimuovere il cooler del CPU dalla scheda madre.
Выньте кулер ЦП из материнской платы.
マザーボードからCPUクーラーを取り外します。
메인보드로 부터 CPU 쿨러를 제거합니다.
將CPU散熱器自主機板上移除。
简体中文
将CPU散热器自主机板上移除。
18
NT07 - 1156
Uninstallation Guide
5
19
95w
Rotate each fastener in a clockwise direction to reset its place. (When reset, each fastener should be oriented
as shown, with the arrow directed outward.)
Drehen Sie sämtliche Halter zum Rücksetzen gegen den Uhrzeigersinn. (Achten Sie darauf, dass die Halter n
ach dem Rücksetzen wie in der Abbildung ausgerichtet sind – der Pfeil zeigt nach außen.)
Faites tourner chaque fixation rapide dans le sens des aiguilles d‘une montre pour le réinitialiser. (Lors de la
réinitialisation, chaque fixation rapide doit être positionnée comme montré, avec la flèche dirigée vers l’extérieur.)
Gire cada cierre en el sentido de las agujas del reloj para volverlos a poner en su lugar. (Cuando vuelvan a
estar en su lugar, cada cierre deberá estar orientado como se muestra, con la flecha hacia fuera).
Ruotare ciascun gancio in senso orario per ristabilire la posizione. (ogni gancio deve essere orientato come
mostrato con la freccia diretta verso fuori.)
Поверните зажимы по часовой стрелке, чтобы вернуть их в исходное положение. (В исходном положении
зажимы должны быть ориентированы так, как показано на рисунке, т.е. стрелка направлена наружу.)
各ファスナーを時計方向に回して、所定の場所に設置します。(設置するときは、図のように矢印を外向きにしてください。)
고정핀을 시계 방향으로 돌려 제자리로 돌아오게 리셋 합니다. (리셋이 된 상태에서 고정핀은, 그림과 같이
화살표 방향이 바깥으로 와야 합니다.)
將每個散熱器螺絲順時間旋轉以復原其位置(當歸位時,每個散熱器螺絲上的螺絲應與圖示中的箭頭方向一致)
简体中文
将每个散热器螺丝顺时间旋转以复原其位置(当归位时,每个散热器螺丝上的螺丝应与图示中的箭头方向一致) 20
NT07 - 1156
Warranty Information
95w