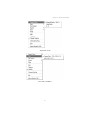
1
Presto! PVR
Analog and Digital TV
DVB-T, DMB-T, and ATSC
User’s Guide
507100-02-01-W-E-092308-11
Copyright
© 2005-2008, NewSoft Technology Corp. All Rights Reserved. No portion
of this document may be copied or reproduced in any manner without prior
written permission from NewSoft Technology Corp. (NewSoft)
NewSoft has no warranties to this documentation and disclaims any implied
warranty of merchantability or fitness for a particular purpose. All
information contained herein is subject to change without notice.
All sample images and electronic files included in the documentation and
distribution materials are copyrighted by their respective photographers
and are not to be copied or reproduced in any manner.
Trademarks
Windows 2000, Windows XP, and Windows Vista are registered
trademarks of Microsoft Corporation.
Pentium is a registered trademark of Intel Corporation.
All other trademarks are the properties of their respective owners.
www.newsoftinc.com
www.newsoft.com.tw
www.newsoft.co.jp
www.newsoft.eu.com
www.newsoft.com.cn
ii
Contents
Chapter 1 Introducing Presto! PVR
1
System Requirements .................................................................. 1
Features ......................................................................................... 2
Chapter 2 Using Your Presto! PVR
3
Installing Presto! PVR .................................................................. 3
Receiving a Channel..................................................................... 5
Receiving S-Video and Composite Signals ................................ 7
Receiving FM Radio......................................................................7
Choosing a Channel to Watch ..................................................... 8
Channel List ............................................................................ 9
Channel Surfing Window......................................................... 10
Teletext (available for DVB-T and DMB-T Digital TV or PAL
Analog TV) .............................................................................. 10
Recording a Program ................................................................. 11
Scheduling Your Program Recording ....................................... 12
Adjusting the Schedule Settings.............................................. 13
Task .................................................................................... 14
Time .................................................................................... 14
Quality ................................................................................. 14
Using EPG (Electronic Program Guide) .................................. 15
Time Shifting ............................................................................... 15
Adjusting the Volume ................................................................. 16
Taking Snapshots ....................................................................... 16
Chapter 3 Menus and Settings
17
Main Screen................................................................................. 17
Program Viewer........................................................................... 19
Screen Menu................................................................................ 20
Settings........................................................................................ 25
iii
Device ..................................................................................... 25
Device ................................................................................. 27
Audio ................................................................................... 27
Channel................................................................................... 27
Video ....................................................................................... 30
Record..................................................................................... 31
Recording............................................................................ 33
Time Shifting ....................................................................... 33
Schedule ................................................................................. 34
Advanced ................................................................................ 35
Skin ......................................................................................... 36
Live Update ............................................................................. 37
Channel Surfing .......................................................................... 38
History ......................................................................................... 39
Taskbar Commands.................................................................... 40
Shortcut Keys.............................................................................. 40
Chapter 4 Appendix
41
Frequently Asked Questions ..................................................... 41
Troubleshooting.......................................................................... 42
Glossary ...................................................................................... 45
iv
Chapter 1
Introducing Presto! PVR
Presto! PVR is a video recorder for your computer. It takes television
signals and records them onto your hard drive. You have all the
convenience of a VCR (recording, playback, fast forwarding, rewinding,
pausing) without having to rewind any tape. Here are the requirements and
features of the program.
•
System Requirements
•
Features
System Requirements
•
Presto! PVR will run on Microsoft Windows XP with Service Pack 2
and Windows Vista.
•
Requirement for different video resolution:
•
H264 Video:
For 1920 X 1080, Intel Core 2 Duo Processor, 2.0 GHz, 1 GB RAM.
(2 GB of RAM is recommended.)
For 1280 X 720, Intel Pentium D Processor, 2.8 GHz, 512 MB RAM.
(1 GB of RAM is recommended.)
For 720 X 576, Intel Pentium 4 Processor, 2.4 GHz, 512 MB RAM.
(1 GB of RAM is recommended.)
•
MPEG2 Video:
For 1920 X 1080, Intel Pentium 4 Processor, 2.4 GHz, 512 MB
RAM. (1 GB of RAM is recommended.)
For 720 X 576, Intel Pentium 4 Processor, 2.0 GHz, 512 MB RAM.
(1 GB of RAM is recommended.)
•
A least 100 MB of hard disk space is required for installing the
program. An additional 500 MB of space will be needed working with
files.
•
A True Color or HiColor display card supporting DirectX 9.0, 16-bit
high color mode and with at least 1280 x 1024 pixel resolution with
128 MB of RAM. (256 MB of RAM is recommended.)
•
DirectX 9.0c or higher is installed.
•
An AC'97 compatible sound card.
•
Digital or analog TV antenna.
1
Chapter 1 Introducing Presto! PVR
Features
•
Support HD(High Definition) video quality.
•
Support for Analog and Digital TV (DVB-T, DMB-T, and ATSC
systems).
•
Record programs to a hard disk or DVD. (This feature is available
only when your program supports Direct Disc Recording (DDR).)
•
Schedule your recordings for the future.
•
Use the EPG (Electronic Program Guide) function to get the program
guide for current TV listings and add them to your recording schedule
with the click of a button. This function also has support for multiple
languages.
•
Easily play the shows that you have recorded on the hard disk. Just
look in the History section.
•
Pause the program while watching (to do things like answer the door
or make a sandwich) and then resume watching without missing any
of the show.
•
Watch video in a resizable preview window. Choose to freely resize
or retain the original ratio. Adjust the brightness and color. The
preview window changes while the adjustments are made.
•
Receive analog or digital TV programs.
•
Digital tuner supports AC3 audio, DVB radio, and HDTV.
•
View Subtitles and Closed Captions in multiple languages.
•
Take snapshots of your favorite TV moments.
•
Browse many channels in one window with Tile mode.
2
Chapter 2
Using Your Presto! PVR
This program has everything a personal video recorder needs—preview,
full screen view, snapshot, channel selection, channel surfing, recording,
programmed recording, time shifting, settings, help, and a link to our
website. Here are explanations of how to perform the most common tasks.
•
Installing Presto! PVR
•
Receiving a Channel
•
Receiving S-Video and Composite Signals
•
Receiving FM Radio
•
Choosing a Channel to Watch
•
Recording a Program
•
Scheduling Your Program Recording
•
Time Shifting
•
Adjusting the Volume
•
Taking Snapshots
Installing Presto! PVR
Before you begin, make sure that the antenna or Cable is connected to the
Presto! PVR device. Insert the Presto! PVR disc into your computer disc
drive and follow the installation instructions. After the installation, the
Wizard will open to let you choose what type of signal you will be using.
3
Chapter 2 Using Your Presto! PVR
The image above is for reference only. This dialog box may
vary depending on the version of your Presto! PVR program.
After selecting the signal type, the Settings Wizard for the selected option
will open.
Analog TV
Digital TV
Click the desktop icon to start using your Presto! PVR program.
4
Chapter 2 Using Your Presto! PVR
Receiving a Channel
To receive a channel through your network, please connect the antenna to
the Presto! PVR device and make the proper settings.
1. Click
tab.
to open the Settings dialog box, and then click the Device
2. Choose a device from the Device list. The options will be different
depending on the type of TV signal selected.
Analog TV
Digital TV
For Analog TV signals, you can choose an audio device and source.
3. Click the Channel tab on the Settings dialog box, and then click Scan
or Auto Scan to search for channels. If a channel is found, it will be
included in the channel list. When finished, you can choose a channel
and change its name. You can also scan for changes by selecting Add
or Update Channels, or use the Minimum Frequency and Maximum
Frequency boxes to limit the frequency range to be scanned. Other
options include importing and exporting channel lists. You can remove
selected channels by clicking the Delete button.
5
Chapter 2 Using Your Presto! PVR
Digital TV - DVB-T and DMB-T
Digital TV - ATSC
6
Chapter 2 Using Your Presto! PVR
Analog TV
4. Click OK to close the Settings dialog box and watch some TV.
Receiving S-Video and Composite Signals
1. Click
and choose S-Video, Composite or Component Video
from the source type.
2. PVR will pick up video and audio signals.
These two features may not be available on all devices. Please
refer to the user guide for your device.
Receiving FM Radio
To get the latest cool and hip music and news through your computer, you
can set it up to receive FM Radio.
1. Click
and choose FM Radio from the source type.
2. Click Auto Scan to find all the available radio stations.
7
Chapter 2 Using Your Presto! PVR
When scanning is finished, you can choose a station and change its name.
You can also select a frequency and click the Add Channel button to add
the corresponding station directly to the list of stations, or remove selected
channels by clicking the Delete button. Other options include importing and
exporting lists of stations.
to identify a station as your favorite. Clear it to
Select the red heart
remove the station from the favorites list.
Search results vary from device to device. If your device
doesn’t support radio, you won’t be able to receive FM Radio.
Please refer to the user guide for your device.
Choosing a Channel to Watch
After you have installed Presto! PVR and scanned for channels, you can
click
and select a channel from the channel list to watch. Click
to switch between channels, and
or
to go to the last channel viewed.
8
Chapter 2 Using Your Presto! PVR
•
Channel List
•
Channel Surfing Window
•
Teletext (available for DVB-T and DMB-T Digital TV or PAL
Analog TV)
Channel List
This is a quick way to select a channel. There are three buttons at the top of
the window. Each shows different channels based on the settings you
made on the Channel tab of the Settings dialog box. Here are some
details for the channel list.
9
Chapter 2 Using Your Presto! PVR
TV Radio : Click this button to listen to the TV radio. Please note that this
button is not available when the input source is Analog TV.
: Click this button to show your favorite channels.
Favorite Channels
Favorite channels are chosen on the Channel tab of the Settings dialog
box.
All Channels
: Click this button to list all available channels.
Channel Surfing Window
You can browse all the TV channels from the Channel Surfing window.
Right-click the program viewer and select Channel Surfing from the
screen menu. Presto! PVR provides different options for tiling the channels
in thumbnails. You can play a channel by clicking the thumbnail.
To change the Channel Surfing window settings, click
choose the Advanced tab.
and
Teletext (available for DVB-T and DMB-T Digital TV or PAL
Analog TV)
Teletext is a quick and easily accessible service that gives you useful
information for free. As long as a signal is present at the tuner and the
channels are already scanned and stored, you will see the Teletext
information offered by the corresponding TV station.
10
Chapter 2 Using Your Presto! PVR
This service varies for different areas. It may not be available
in all the countries.
Recording a Program
When you find a good show, click
change to
to start recording. The button will
. The recorded program will be saved in the working folder.
You can click
to pause recording. If you click
while you are
watching, recording will stop and the preview screen will return to the live
program.
When recording, you can go to full screen, minimize, and
restore, but you cannot change programs, or close the
program.
11
Chapter 2 Using Your Presto! PVR
Scheduling Your Program Recording
You can add, modify, or delete items for recording shows in the future. For
and
this, you will have to open the Settings dialog box by clicking
selecting the Schedule tab.
The message about encrypted programs will not appear when
the input source is analog TV.
•
Click Add… to schedule additional recording, or click Modify to
change the schedule for selected recordings.
•
Click Delete to cancel a selected recording, or Delete All to cancel all
scheduled recordings.
•
Click EPG to get an online listing to current TV programs.
•
If you want to use Silent mode while recording, click When a
scheduled recording starts, it will be in silent mode.
12
Chapter 2 Using Your Presto! PVR
•
You can choose the action to be taken when a scheduled recording is
finished from the After scheduled recordings from Hibernate or
Standby mode are completed box.
For more information see:
•
Adjusting the Schedule Settings
•
Using EPG (Electronic Program Guide)
Adjusting the Schedule Settings
If you click Add… or Modify from the Schedule tab, the Schedule
Settings dialog box will open. There are three sections to pay attention
to—Task, Time, and Quality.
•
Task
•
Time
•
Quality
13
Chapter 2 Using Your Presto! PVR
Quality is only available when selecting the analog device.
Task
Task Name: Give a name to the recording session or use the default.
Channel: Choose from the available channels for the one you want.
Time
Type: You can choose to record the selected channel One Time, Daily,
Sunday, Monday, Tuesday, Wednesday, Thursday, Friday, Saturday,
Monday to Friday, Monday to Saturday, or Saturday to Sunday.
Choose Assign the Date to pick a more specific date.
Start Date: This option is available only when you have selected One Time
in the Type field. Pick the day to start recording on.
Start Time: Choose what time to start recording on the selected date.
Duration: Choose how long to record. The recording will stop after the
specified time period.
Quality
Saved Type: Choose what kind of recording you are scheduling.
Quality: Choose the level of quality for the selected recording.
After selecting the appropriate dialog box options, click OK to return to the
Schedule list.
(1) If a scheduled task comes up when running time shifting or
recording, the running task will be terminated and the
scheduled task will be performed.
(2) If you have scheduled tasks that overlap, you will be
reminded after you click OK. Presto! PVR cannot record more
than one show at a time.
14
Chapter 2 Using Your Presto! PVR
Using EPG (Electronic Program Guide)
Use the Channel box to choose an available channel.
Select the program that you want to record, and then click Add to
Schedule. The program will be added to the schedule. Click Refresh to
make sure that the schedule is up-to-date.
Time Shifting
Time Shifting means that you can pause a program while watching the big
game, click the pause button, and then go get another bag of chips without
missing any of the action. When you come back and click the play button,
you will resume watching from the point at which you paused.
•
to pause. The preview screen will freeze, but the recording
Click
will continue.
•
to continue watching the program from the point at which it
Click
was paused.
15
Chapter 2 Using Your Presto! PVR
•
Click
to stop time shifting and return to the live program.
When paused, you can change the screen size and adjust the
volume, but you cannot change programs, take snapshots,
change the configuration, or close the program.
Adjusting the Volume
Use the plus and minus buttons to increase and decrease the volume. The
indicator will reflect the changes. Clicking on the speaker button will turn the
sound on and off.
Taking Snapshots
Click
to capture the screen at that moment. The snapshots will be
saved in the working folder. You can change the file format to save the
snapshots on the Advanced tab of the Settings dialog box.
16
Chapter 3
Menus and Settings
For all that it does, Presto! PVR is very easy to use. There are only a few
menus and settings that you need to worry about. Here they are in their
entirety.
•
Main Screen
•
Program Viewer
•
Screen Menu
•
Settings
•
Channel Surfing
•
History
•
Taskbar Commands
•
Shortcut Keys
Main Screen
The PVR screen is very compact and useful. Here is an overview of the
various displays and buttons.
Digital TV - DVB-T and DMB-T
17
Chapter 3 Menus and Settings
Digital TV – ATSC
Across the top of the presentation area will be listed the program
status (Time shifting, Recording, Playing, Forward, Backward, and
the program name) as well as the signal quality.
(1) The program status will only appear when playing,
recording, or time shifting.
(2) The signal quality will only be shown when the source
is Digital TV.
List the time along with the channel number and name.
Display the currently connected adapter and how much free space is
available for recording.
These are the buttons for controlling the program. There are full
screen, minimize and close
Click the NewSoft logo to connect to our website. Also available is
the help file, the settings button, and a button for selecting the input
source.
18
Chapter 3 Menus and Settings
These are special feature buttons. EPG (for Digital TV), Teletext (for
DVB-T, DMB-T and PAL Analog TV), and Closed Captions (for
ATSC and NTSC Analog TV) / Subtitles (for DVB-T and DMB-T).
EPG is available for Digital TV only.
The program control buttons are used for recording programs and
watching the programs that have already been recorded.
Click to capture screen at that moment and check the programs that
have already been recorded
The volume controls let you turn it up and down as well as off. There
is also an indication of the current volume level.
These buttons are for choosing a channel to watch on TV. Either by
going up or down a channel, going back to the previously viewed
channel, or choosing from the channel list.
Program Viewer
19
Chapter 3 Menus and Settings
There are four buttons in the upper-right corner of the program viewer. Here
is a quick tour of how to use them.
Exit
: Clicking this button closes the program.
Minimize
Full Screen
screen.
: Clicking this button sends the program viewer to the taskbar.
: Clicking this button maximizes the program viewer to full
: Clicking this button keeps the program viewer on top
Always on Top
of all other windows.
Screen Menu
When you right-click your Presto! PVR screen when a video is playing, you
will see the following menu. This will give you quick control over how you
watch the program.
Aspect Ratio - DVB-T and DMB-T
20
Chapter 3 Menus and Settings
Aspect Ratio - ATSC
Size - DVB-T and DMB-T
21
Chapter 3 Menus and Settings
Size - ATSC
Sound - DVB-T and DMB-T
22
Chapter 3 Menus and Settings
Sound - ATSC
AC3 - ATSC
Aspect Ratio: Click to select the width to height ratio for your Presto! PVR
screen. You can choose Original Ratio (4:3), Free Ratio or 16:9.
Choosing Free Ratio will allow you to distort your TV picture by dragging
the lower-right corner of the screen. If you have chosen Original Ratio
(4:3), the ratio will not change as you resize the picture.
23
Chapter 3 Menus and Settings
Original Ratio varies depending on the program or channel you
have switched to. Sometimes the submenu options may appear
like Original Ratio (16:9), Free Ratio or 4:3. The image above
is for reference only.
Size: Click to change the size of the display window or restore it to the
original size. If you are receiving a Digital TV signal, you have the additional
option of choosing to watch in the Original Size – 720x540 (4:3).
Similarly, original size may be 704x540 (4:3) depending on the
program or channel you are watching.
Full Screen: Click to see the program in the entire video screen. Press the
ESC key to restore the screen to the most recently selected size.
Sound: If the program has multiple sound tracks, you can switch them here.
Analog TV offers Stereo, Mono, or SAP audio, while Digital TV has a list of
the available soundtracks.
AC3: AC3 audio is only available for Digital TV. Access to this feature
requires additional codecs. Please check our website for updates in case
your PVR doesn’t support AC3 audio.
Mute: Click to turn the audio off and on.
EPG: Click to get a current TV schedule online. This option is available for
Digital TV only.
Teletext (only for DVB-T, DMB-T and PAL Analog TV): Click to get
useful information offered by some TV stations.
Closed Caption (for ATSC and NTSC Analog TV) / Subtitles (for DVB-T
and DMB-T): Click to get Closed Captions for NTSC Analog TV and ATSC,
or Subtitles for DVB-T and DMB-T.
Multiple languages can be viewed for captions and subtitles
as long as they are included in the signals.
Channel Surfing: Click to browse TV channels in a tiled window.
Exit: Click to close the program.
24
Chapter 3 Menus and Settings
About Presto! PVR…: Click to display the program version information.
Settings
Click
to see the Settings dialog box to help you personalize you
Presto! PVR program.
•
Device
•
Channel
•
Video
•
Record
•
Schedule
•
Advanced
•
Skin
•
Live Update
Device
On the Device tab, you can select how you control the Presto! PVR device.
•
Device
•
Audio
25
Chapter 3 Menus and Settings
Analog TV
Digital TV
26
Chapter 3 Menus and Settings
Device
Available Presto! PVR devices are listed here. Other settings on this tab will
be disabled unless you select a device.
Audio
For Analog TV only, you can choose an audio device and source.
Channel
On the Channel tab, you can set up the scan parameters to more efficiently
scan for available television channels.
Digital TV- DVB-T and DMB-T
27
Chapter 3 Menus and Settings
Digital TV - ATSC
Analog TV
28
Chapter 3 Menus and Settings
Country: Select the country you are in to have the television reception
properly formatted.
Minimum Frequency/Minimum Channel, Maximum
Frequency/Maximum Channel: For Digital TV only, these settings can be
changed to restrict the range that Scan will use to search for available
channels.
Signal: For Analog TV only, choose the source of the television signals.
Scan/Auto Scan: Click to look for all available channels and list them.
Export, Import: You can use these two functions to export or import a
channel list so that you don’t need to scan again when using other
computers.
Delete: For Digital TV only; you can remove a channel from the list by
clicking this button.
Add or Update Channels: For Digital TV only. Select the frequency range
you want and then click Scan. This feature saves time by allowing you to
rescan for channels to add or update without having to run through the
whole frequency spectrum.
Smart Scanning: For Digital TV - DVB-T and DMB-T only, enabling this
option can widen the scanning range to get improved results. However, it’ll
take longer to finish the scanning process. If the first scan was not
satisfactory, select this option and scan again.
Type: For Digital TV-ATSC only; select the signal from Cable or Antenna.
Channel Information/Edit Channel: You can edit the name for each
channel. Type a name that may help you be clearer about what kind of
show it is.
Select the red heart
next to a channel to make it a favorite.
Clear the heart
to remove it from the favorites list. Favorite
channels will be shown when you click the
button on the
channel list.
29
Chapter 3 Menus and Settings
Video
On the Video tab, you can adjust the brightness and the color in the picture.
Enable Deinterlace to prevent lines from appearing in the video.
Check Display HD in original resolution to see the HD video in original
resolution.
This feature is optional and may not be available on all
versions.
From the list, you can adjust the Video Frame Rate to as high as your
computer capabilities will permit.
30
Chapter 3 Menus and Settings
Record
This tab will let you adjust your recording preferences.
Record to the Hard Disk
You are allowed to choose Saved type and Quality only
when your input source is Analog.
If your PVR doesn’t support DDR, the Destination option
will not be available.
31
Chapter 3 Menus and Settings
The Quality option for Time Shifting is available only when
the input source is analog TV. It is not available for DVB-T,
DMB-T, or ATSC.
Record to DVD RW
The Quality option is available when your PVR supports
DDR and your input source type is Analog.
For more information see:
•
Recording
•
Time Shifting
32
Chapter 3 Menus and Settings
Recording
You can choose a disc drive under Destination and a Folder for saving
your recorded files and snapshots. Then use the slider to adjust the Auto
cut file size. The video will be automatically cut into separate files when the
limit is reached. If your disk file system is FAT32, the maximum size of each
file will be 4 GB. If your disk file system is NTFS, it will be equal to the space
available on the specified disk.
You can burn programs onto DVD. If the disc contains data, the Erase Disc
button will be activated, allowing you to erase it before you proceed with the
burning process. You can also append new data to a previous session. The
Customize Menu button provides a choice of DVD screen menus.
Scheduled recordings will be burned onto the hard disk even
if you have selected the DVD burner as the output device.
Before you click the Record button, Presto! PVR will check
whether the disc contains data and is appendable. If the
DVD is not appendable, you will be prompted to erase any
existing data.
Saved type: Select the kind of recording you want to save. You can choose
DVD or VCD with hard disk set as the output destination. You are not
allowed to choose saved type with the DVD burner as the output device.
Quality: Select the quality of the recording. This will affect the size of the
recorded file. You are not allowed to choose Quality when your input
source is Digital TV.
Time Shifting
Use the slider to control the buffer size for time shifting. This will determine
how long you can pause a program and not miss any of it. The buffer can be
set for up to 60 minutes. When the limit is reached, time shifting will
continue, but the buffer will be overwritten and you may lose part of the live
program.
33
Chapter 3 Menus and Settings
For computers with limited speed and power, lower the
quality for time-shifting live TV programs to avoid CPU
overload. Please note that while the Quality option is
available when the input source is analog TV. It is not
available when the source is digital TV.
The estimated recording time will be displayed at the bottom
of this dialog box as Maximum recording time.
Schedule
The schedule will display the programs that have been selected for
recording at a later date. For more information, see Scheduling Your
Program Recording.
Digital TV – DVB-T and DMB-T
34
Chapter 3 Menus and Settings
Analog TV
For Digital TV – ATSC, *If you have chosen an encrypted
program, it will not be recorded will appear at the bottom.
This message won’t appear when the input source is analog
TV.
Advanced
Under Snapshot, select a file format for saving the images. In the Channel
Surfing section, you can select the display mode for channel surfing.
35
Chapter 3 Menus and Settings
Other options include:
Always on Top
During Recording/Time Shifting, if there is already a scheduled
setting, the scheduled recording will take priority: When this option is
selected, scheduled recording is given the highest priority, which means
the system will begin scheduled recording regardless of whether other
recording or time shifting is in process.
Skin
In this tab, you can change the skin. Choose a different skin from the Select
list and see how it looks in the Preview window. Click OK to accept.
36
Chapter 3 Menus and Settings
Live Update
In this tab, you can check for product updates and news under Live
Update. If your Presto! PVR doesn’t support the AC3 audio format, an
update message for AC3 support will appear under the Live Update box.
37
Chapter 3 Menus and Settings
Channel Surfing
Right-click the program viewer and select Channel Surfing from the
screen menu to tile the channels in thumbnails. You can play a channel by
double-clicking the thumbnail. To quit this function, press ESC and return to
the live program.
38
Chapter 3 Menus and Settings
History
Click
to see the programs you have recorded, with the most recent
listed first. The first frame of the selected recording will be shown in the
preview area.
39
Chapter 3 Menus and Settings
•
Click Browse… to look through the recorded programs.
•
Click Play to watch the selected program.
•
Click Delete to erase a selected program from the hard disk.
•
Click Close to close the History dialog box.
Taskbar Commands
After Presto! PVR is installed, the program icon
on the system tray can
be used to start and monitor Presto! PVR. There are three commands that
you can choose from.
Start Presto! PVR: This command quickly starts Presto! PVR. It is
unavailable if the program is running.
Set Schedule: This command allows you to set up a recording schedule.
For details, go to Scheduling Your Program Recording.
Quit: Clicking this command stops all Presto! PVR tasks and removes the
icon from the system tray.
Shortcut Keys
Shortcut keys are a quick way to manipulate the program. See the
Readme.txt file for details. Click the Start button, point to Programs,
NewSoft, and then Presto! PVR. Locate the folder that contains the
Readme file and open it.
40
Chapter 4
Appendix
•
Frequently Asked Questions
•
Troubleshooting
•
Glossary
Frequently Asked Questions
Sometimes we get questions about our product. Here are the questions
that we get asked the most. Hopefully this information will be useful to you.
How can I optimize the PVR performance?
PVR performance depends on the computer system. The following
steps can help to make things better.
1. Try to retain as much free hard disk space as possible.
2. Use a faster hard disk drive. (7,200 rpm or higher.)
3. Disable Power Management in the BIOS.
4. Close unnecessary programs, and do not run other programs
while recording.
5. Use the defragment tool to optimize the hard disk.
6. Make sure your system meets the PVR minimum requirements.
a. Use a USB 2.0 port since some TV tuner devices won't work
with the older USB 1.1 ports. You may need to purchase a
USB 2.0 PCI card or card bus. If the USB port is version 1.0
or 1.1, a message will ask you to connect to a Hi-Speed USB
2.0 port when you plug the USB device into the system.
b. PVR requires at least a Pentium III, 800 MHz CPU or better
for the preview function, and requires at least a Pentium 4,
2.0 GHz CPU or better for recording and time-shifting
functions.
41
Chapter 4 Appendix
c.
PVR requires either Windows 2000 SP4 or Windows XP
SP2.
d. PVR requires DirectX 9.0c or later.
Can I record subtitles from DTV channels?
Dynamic subtitles are subtitles that can be disabled and enabled.
The current version of Presto! PVR doesn't support recording
dynamic subtitles. You can record programs with dynamic subtitles,
but the subtitles will not record.
Troubleshooting
If you are having trouble with the product, please check here first. You may
find the answer quickly.
My system does not recognize the DVB-T, DMB-T or
ATSC tuner in the USB port or the DVB-T, DMB-T or ATSC
PCI slot.
It could be that a related driver already exists on the system, or it may
be a hardware issue.
1. Make sure the device is properly connected.
2. Make sure the device driver is installed.
3. If the above steps do not fix the problem, try unplugging the
device from the computer and uninstalling the driver. Then plug
the device into a different port and install the driver again.
4. If you are connecting the device through a USB hub, try
connecting it directly to the computer.
If the device driver has not been certified by Windows x64, it will not
be recognized under Windows x64. For device driver issues, contact
the manufacturer for assistance and information.
If the problem persists, contact the hardware manufacturer for further
assistance.
42
Chapter 4 Appendix
Presto! PVR does not respond after being started, or it
displays stuttering or corrupted video.
If you encounter one of these problems and are using Windows XP
Service Pack 2, please visit the Microsoft website at this link,
http://www.microsoft.com/downloads/details.aspx?displaylang=en&
FamilyID=14caaf6d-198c-4197-82ad-28251f9c50a5, and download
the latest patch.
I can watch and record TV programs, but cannot play
them back or preview the channels.
Make sure that DirectX 9.0 or later has been installed on the
computer. Microsoft DirectX 9.0 improves graphics, video, 3-D
animation, audio, security, and performance in the operating system.
Go to the Start menu, click Run, and type dxdiag. You will find a list
that shows the DirectX version. If the installed DirectX version is
older than 9.0, download and install the latest DirectX version from
the Microsoft website at
http://www.microsoft.com/windows/directx/default.aspx. It's free.
To find out which version of DirectX you are using, click Run from the
Windows Start menu, type "dxdiag", and then OK. The DirectX
diagnostic tool will open, and the version number will be listed under
System Information.
I can’t record Digital TV programs onto DVD.
High-definition Digital TV (DVB-T/DMB-T/ATSC) can’t be recorded
onto DVD.
I can't change the recording settings.
The file type and quality settings are designed for analog TV. These
settings will be disabled and set to 'DVD' and 'Good' when watching
the DVB-T/DMB-T/ATSC TV. The settings, on the Record tab of the
Settings dialog box, will be enabled for analog TV.
Is the TV tuner device properly installed?
43
Chapter 4 Appendix
1. From the Start menu, open the Control Panel.
2. Open System, click the Hardware tab, and then open the
Device Manager.
3. Under Video and Game Controllers, make sure there are no
problems listed for the TV tuner device.
4. If there is a problem indicated, check the device manual and
reinstall the hardware.
If the digital TV signal is not strong enough, adjust the antenna to get
the best reception. (You might consider buying an active antenna.)
Try moving the equipment to a different area in the house, and then
scan for channels again.
Some useful tips.
Visit our patch download page to check if there are any program
patches available.
Visit the manufacturer's website for latest updates for the TV tuner
driver.
Reinstallation is a way to correct many kinds of problems.
We suggest that you install the built-in Windows driver for USB 2.0
PCI cards.
If you need to contact the NewSoft support center, either by phone or
by e-mail, here are the details that you should pass on.
a. Operating system, language, and service pack.
b. PVR version and Product ID.
c. TV tuner device interface (PCI, USB, PCMCIA, etc).
d. USB port type (1.1 or 2.0).
e. Is it an onboard USB port or an external USB device?
f.
Brand name of the TV tuner device.
g. Did the software work when you first installed it.
h. Error Message:
44
Chapter 4 Appendix
i.
Details of the problem (step by step):
Glossary
Here are terms used in the manual for Presto! PVR.
AC'97 – (Short for Audio Codec '97) This is an audio encoding system for
computer files.
Analog TV – This is the traditional old-style television signal. Kind of like
radio waves.
Aspect Ratio – This is a measure of how wide your television picture is
compared to how tall it is. Regular television is 4:3, and HDTV is 16:9.
ATSC - The Advanced Television Systems Committee developed the
ATSC digital television standard for the United States. These standards
were also adopted by Canada, Mexico, and South Korea. It is intended to
replace the widely used NTSC system and produces wide screen 16:9
images. The ATSC standards also boast theater quality audio through the
AC3 format.
Auto Scan – Automatic scanning. The computer looks for television
signals.
Buffer – This is a memory space for making time shifting possible.
Closed Captions – Closed captions are subtitles specifically provided for
the hard of hearing.
Deinterlace – This is used for making you picture look like it is not
composed of many separate lines.
Digital TV – Television signals made up of computer data. Ones and zeros.
DDR (Direct Disc Recording) – Recording TV programs directly to DVD or
hard disk.
DirectX 9 – DirectX is technology for displaying video and playing audio. 9
is the version number.
DVB – Digital Video Broadcast.
45
Chapter 4 Appendix
EPG – Electronic Program Guide
SAP – Second Audio Program. Usually used to present the material in a
different language.
Smart Scanning – A more efficient way to scan for channels and
frequencies.
Teletext – A free program to give information about broadcasts and
schedules. (Not available everywhere.)
46