1
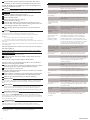
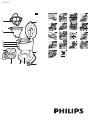
HD7450
2
1
3
1
4
5
2
A
L
6
7
8
9
B
10
11
12
13
C
14
15
16
17
D
E
1
2
F
18
K
G
H
I
J
19
English
Introduction
Congratulations on your purchase and welcome to Philips! To fully benefit
from the support that Philips offers, register your product at www.philips.
com/welcome.
General description (Fig. 1)
A Permanent filter (specific types only)
B Removable filter holder
C Removable water tank cover
D Water tank
E Water level indicator
F Lid of jug
G Jug
H On/off switch
I Hotplate
J Mains cord with plug
K Coffeemaker
L Lid of coffeemaker
Important
Read this user manual carefully before you use the appliance and save it for
future reference.
Danger
-- Never immerse the appliance in water or any other liquid, nor rinse it
under the tap.
Warning
-- Check if the voltage indicated on the appliance corresponds to the local
mains voltage before you connect the appliance.
-- Do not use the appliance if the plug, the mains cord or the appliance
itself is damaged.
-- If the mains cord is damaged, you must have it replaced by Philips, a
service centre authorised by Philips or similarly qualified persons in
order to avoid a hazard.
-- This appliance is not intended for use by persons (including children)
with reduced physical, sensory or mental capabilities, or lack of
experience and knowledge, unless they have been given supervision or
instruction concerning use of the appliance by a person responsible for
their safety.
-- Children should be supervised to ensure that they do not play with the
appliance.
-- Keep the mains cord out of the reach of children. Do not let the
mains cord hang over the edge of the table or worktop on which the
appliance stands.
Caution
-- Do not place the appliance on a hot surface and prevent the mains
cord from coming into contact with hot surfaces.
-- Unplug the appliance if problems occur during brewing and before you
clean it.
-- This appliance is intended to be used in household and similar
applications such as:
-- staff kitchen areas in shops, offices and other working environments;
-- farm houses;
-- by clients in hotels, motels and other residential type environments;
-- bed and breakfast type environments.
-- Wait until the appliance has cooled down before you store it, especially
if you want to push the mains cord into the appliance. The hotplate and
the coffee jug may be hot.
-- Beware of hot steam when you open the lid of the coffeemaker.
-- The jug is hot during and after brewing. Always hold the jug by its
handle.
-- Never use the jug in a microwave oven.
-- Do not move the appliance while it is brewing coffee.
Electromagnetic fields (EMF)
This Philips appliance complies with all standards regarding electromagnetic
fields (EMF). If handled properly and according to the instructions in this
user manual, the appliance is safe to use based on scientific evidence
available today.
Before first use
1 Place the appliance on a flat and stable surface.
2 Push excess cord into the opening in the back of the appliance. To fix
the cord, push it into the narrow part of the opening (Fig. 2).
Note: Make sure that the cord does not come into contact with hot surfaces.
3 Put the mains plug in an earthed wall socket.
4 Clean the detachable parts (see chapter ‘Cleaning’).
5 Reassemble all parts.
2
-- Make sure the water tank cover is placed correctly (‘click’) (Fig. 3).
-- Make sure the filter holder is placed correctly. First place the back of
the filter holder under the rim of the hinge (1) and then push down the
handgrip (2) until the filter holder locks into place (Fig. 4).
Note: If the filter holder is not placed correctly, the lid cannot be closed.
6 Flush the appliance (see section ‘Flushing the appliance’ below).
Flushing the appliance
Note: Do not put a filter and ground coffee in the filter holder.
1 Open the lid of the coffeemaker (Fig. 5).
2 Fill the water tank with fresh cold water up to the MAX
indication (Fig. 6).
Note: Do not switch on the appliance when the lid is still open.
3 Close the lid.
4 Put the jug on the hotplate (Fig. 7).
Note: Make sure you put the jug on the hotplate with the spout facing into the
appliance.
5 Press the on/off switch to switch on the appliance (Fig. 8).
,, The power-on light goes on.
6 Let the appliance operate until all the water has run into the jug.
7 Switch off the appliance. Let it cool down for at least 3 minutes
before you start brewing coffee.
Using the appliance
1 Open the lid of the coffeemaker (Fig. 5).
2 Fill the water tank with fresh cold water up to the required
level (Fig. 9).
-- The indications on the left side of the water level window correspond
to large cups (120ml).
-- The indications on the right side of the water level window correspond
to small cups (80ml).
3 Make sure the filter holder is placed correctly. First place the back of
the filter holder under the rim of the hinge (1) and then push down
the handgrip (2) until the filter holder locks into place (Fig. 4).
Note: If the filter holder is not placed correctly, the lid cannot be closed and the
drip stop cannot function properly.The drip stop prevents coffee from dripping
through the filter onto the hotplate when the jug is removed.
4 Take a paper filter (type 1x2 or no. 2) and fold the sealed edges to
prevent tearing and folding (Fig. 10).
Note: Some versions come with a permanent filter. In this case you do not need
to use paper filters.
5 Put the paper filter or the permanent filter in the filter
holder (Fig. 11).
6 Put ground coffee (filter-fine grind) in the filter (Fig. 12).
-- For large cups: use one heaped measuring spoon of ground coffee for
each cup.
-- For small cups: use one level measuring spoon of ground coffee for each
cup.
7 Close the lid of the coffeemaker.  (Fig. 13)
8 Place the jug with the lid closed on the hotplate (Fig. 7).
Note: Make sure you put the jug on the hotplate with the spout facing into the
appliance. If the spout of the jug sticks out from under the filter holder, the
coffee may cool down.
Note: If you do not place the jug properly on the hotplate, the drip
stop prevents the coffee from flowing into the jug.This may cause the filter to
overflow.
9 Press the on/off switch to switch on the appliance (Fig. 8).
,, The power-on light goes on.
10Let the water pass through the filter into the jug.
Note: If you want to remove the jug during brewing, the drip stop prevents
coffee from dripping through the filter onto the hotplate. Place back the jug as
soon as possible to prevent the filter from overflowing (Fig. 14).
11You can leave the jug on the hotplate to keep the coffee warm and to
preserve its flavour.
Note: Make sure you put the jug on the hotplate with the spout facing into the
appliance. If the spout of the jug sticks out from under the filter holder, the
coffee may cool down.
12After use, press the on/off switch to switch off the appliance.
Note:The appliance does not switch off automatically.
Note: If you want to brew another jug of coffee right away, let the appliance
cool down for 3 minutes first.
4222.200.0405.1
13Remove the filter holder and throw away the paper filter and its
contents. If you have used the permanent filter, empty and rinse it.
Problem
Make sure that the voltage indicated on the
appliance corresponds to the local mains voltage.
Tip: After the brewing cycle is completed, you can pour the hot coffee into a
thermos jug to keep it hot and fresh.
Fill the water tank with water.
Cleaning
Never immerse the appliance in water or any other liquid, nor rinse it
under the tap.
1 Unplug the appliance and let it cool down.
2 Clean the outside of the appliance with a moist cloth.
3 Remove the filter holder.
4 Remove the water tank cover (Fig. 15).
5 Remove the lid from the jug.
6 Clean the filter holder, the permanent filter (specific types only),
the water tank cover, the jug and the lid of the jug in hot water with
some washing-up liquid or in the dishwasher.
7 After cleaning, rinse the jug with fresh hot water and reattach all
parts.
Descaling
Regular descaling prolongs the life of the appliance and guarantees optimal
brewing results and a constant brewing time for a long time.
In case of normal use (two full jugs of coffee every day), descale the
appliance:
-- 2 or 3 times a year if you use soft water (up to 18dH);
-- 4 or 5 times a year if you use hard water (over 18dH).
Contact your local water board for information about the water hardness in
your area.
You can use white vinegar with 4% acetic acid or a liquid descaler to descale
the coffeemaker.
Note: If the appliance starts to produce more steam, this can be an indication
that scale is building up.
Never use vinegar with an acetic acid content of 8% or more, natural
vinegar, powder descalers or tablet descalers to descale the appliance, as
this may cause damage.
Descaling takes approx. 30 to 60 minutes.
1 Fill the water tank with approx. 600ml of white vinegar (4% acetic
acid) (Fig. 16).
In all other cases, contact the Philips Consumer
Care Centre.
Water leaks out of
the appliance.
The appliance takes
a long time to brew
coffee.
Descale the appliance (see chapter ‘Descaling’).
The appliance
produces a lot of
noise and steam
during the brewing
process.
Make sure that the appliance is not blocked by
scale. If necessary, descale the appliance (see
chapter ‘Descaling’ ).
The filter overflows
when I remove the
jug from the
appliance while it
is brewing coffee.
If you remove the jug from the hotplate while
the appliance is brewing coffee, place the jug
back onto the hotplate as soon as possible to
prevent the filter from overflowing. Also note
that the coffee does not reach its full taste before
the end of the brewing cycle. Therefore we advise
you not to remove the jug and pour out the
coffee before the end of the brewing cycle.
Make sure you put the jug on the hotplate with
The lid of the coffee
maker wobbles when the spout facing into the appliance (i.e. not
I remove the jug from pointing sideways).
the hotplate.
Coffee grounds end
up in the jug.
Environment
-- Do not throw away the appliance with the normal household waste
at the end of its life, but hand it in at an official collection point for
recycling. By doing this, you help to preserve the environment (Fig. 19).
Guarantee and service
If you need service or information or if you have a problem, please visit the
Philips website at www.philips.com or contact the Philips Consumer
Care Centre in your country (you find its phone number in the worldwide
guarantee leaflet). If there is no Consumer Care Centre in your country, go
to your local Philips dealer.
Make sure that the water tank cover is in place
before you put the ground coffee in the filter.
Do not put too much ground coffee in the filter.
Make sure you put the jug on the hotplate with
the spout facing into the appliance (i.e. not
pointing sideways).
Note:You can also use an appropriate liquid descaler. In this case, follow the
instructions on the package of the descaler.
2 Press the on/off switch to switch on the appliance and let it complete
the brewing cycle (see chapter ‘Using the appliance’) (Fig. 8).
3 Empty the jug over a sink (Fig. 17).
Replacement
You can order a new jug from your local Philips dealer or a Philips service
centre under type number HD7990/20 (black) or HD7990/70 (celestial
blue).
Do not fill the water tank beyond the MAX level.
In all other cases, contact the Philips Consumer
Care Centre.
Note: Do not put a filter and ground coffee in the filter holder.
Note: For extra through descaling and to make sure that there is no scale left in
the appliance, repeat steps 1 to 3.
4 Let the appliance complete two more brewing cycles with fresh cold
water to remove any vinegar/descaler and scale residues (Fig. 18).
5 Clean the jug and the filter holder (see chapter ‘Cleaning’).
Possible solution
Unclog the opening in the bottom of the filter
holder.
Use the right size of paper filter (1x2 or no. 2).
Make sure the paper filter is not torn.
The coffee is too
weak
Use the right proportion of coffee to water.
Make sure the paper filter does not collapse.
Use the right size of paper filter (1x2 or no. 2).
Make sure there is no water in the jug before you
start to brew coffee.
The coffee does not
taste good.
Do not leave the jug with coffee on the hotplate
too long, especially not if it only contains a small
amount of coffee.
The coffee is not hot
enough.
Make sure you put the jug on the hotplate with
the spout facing into the appliance (i.e. not
pointing sideways).
The amount of coffee Some of the water is absorbed by the ground
is smaller than I
coffee. Put more water in the water tank.
expected.
Troubleshooting
This chapter summarises the most common problems you could encounter
with the appliance. If you are unable to solve the problem with the
information below, contact the Consumer Care Centre in your country.
3
Problem
Possible solution
The appliance does
not work.
Plug in and switch on the appliance.
4222.200.0405.1
Čeština
Introduction
Congratulations on your purchase and welcome to Philips! To fully benefit
from the support that Philips offers, register your product at www.philips.
com/welcome.
General description (Fig. 1)
A Permanent filter (specific types only)
B Removable filter holder
C Removable water tank cover
D Water tank
E Water level indicator
F Lid of jug
G Jug
H On/off switch
I Hotplate
J Mains cord with plug
K Coffeemaker
L Lid of coffeemaker
Important
Read this user manual carefully before you use the appliance and save it for
future reference.
Danger
-- Never immerse the appliance in water or any other liquid, nor rinse it
under the tap.
Warning
-- Check if the voltage indicated on the appliance corresponds to the local
mains voltage before you connect the appliance.
-- Do not use the appliance if the plug, the mains cord or the appliance
itself is damaged.
-- If the mains cord is damaged, you must have it replaced by Philips, a
service centre authorised by Philips or similarly qualified persons in
order to avoid a hazard.
-- This appliance is not intended for use by persons (including children)
with reduced physical, sensory or mental capabilities, or lack of
experience and knowledge, unless they have been given supervision or
instruction concerning use of the appliance by a person responsible for
their safety.
-- Children should be supervised to ensure that they do not play with the
appliance.
-- Keep the mains cord out of the reach of children. Do not let the
mains cord hang over the edge of the table or worktop on which the
appliance stands.
Caution
-- Do not place the appliance on a hot surface and prevent the mains
cord from coming into contact with hot surfaces.
-- Unplug the appliance if problems occur during brewing and before you
clean it.
-- This appliance is intended to be used in household and similar
applications such as:
-- staff kitchen areas in shops, offices and other working environments;
-- farm houses;
-- by clients in hotels, motels and other residential type environments;
-- bed and breakfast type environments.
-- Wait until the appliance has cooled down before you store it, especially
if you want to push the mains cord into the appliance. The hotplate and
the coffee jug may be hot.
-- Beware of hot steam when you open the lid of the coffeemaker.
-- The jug is hot during and after brewing. Always hold the jug by its
handle.
-- Never use the jug in a microwave oven.
-- Do not move the appliance while it is brewing coffee.
Electromagnetic fields (EMF)
This Philips appliance complies with all standards regarding electromagnetic
fields (EMF). If handled properly and according to the instructions in this
user manual, the appliance is safe to use based on scientific evidence
available today.
Before first use
1 Place the appliance on a flat and stable surface.
2 Push excess cord into the opening in the back of the appliance. To fix
the cord, push it into the narrow part of the opening (Fig. 2).
Note: Make sure that the cord does not come into contact with hot surfaces.
3 Put the mains plug in an earthed wall socket.
4 Clean the detachable parts (see chapter ‘Cleaning’).
5 Reassemble all parts.
4
-- Make sure the water tank cover is placed correctly (‘click’) (Fig. 3).
-- Make sure the filter holder is placed correctly. First place the back of
the filter holder under the rim of the hinge (1) and then push down the
handgrip (2) until the filter holder locks into place (Fig. 4).
Note: If the filter holder is not placed correctly, the lid cannot be closed.
6 Flush the appliance (see section ‘Flushing the appliance’ below).
Flushing the appliance
Note: Do not put a filter and ground coffee in the filter holder.
1 Open the lid of the coffeemaker (Fig. 5).
2 Fill the water tank with fresh cold water up to the MAX
indication (Fig. 6).
Note: Do not switch on the appliance when the lid is still open.
3 Close the lid.
4 Put the jug on the hotplate (Fig. 7).
Note: Make sure you put the jug on the hotplate with the spout facing into the
appliance.
5 Press the on/off switch to switch on the appliance (Fig. 8).
,, The power-on light goes on.
6 Let the appliance operate until all the water has run into the jug.
7 Switch off the appliance. Let it cool down for at least 3 minutes
before you start brewing coffee.
Using the appliance
1 Open the lid of the coffeemaker (Fig. 5).
2 Fill the water tank with fresh cold water up to the required
level (Fig. 9).
-- The indications on the left side of the water level window correspond
to large cups (120ml).
-- The indications on the right side of the water level window correspond
to small cups (80ml).
3 Make sure the filter holder is placed correctly. First place the back of
the filter holder under the rim of the hinge (1) and then push down
the handgrip (2) until the filter holder locks into place (Fig. 4).
Note: If the filter holder is not placed correctly, the lid cannot be closed and the
drip stop cannot function properly.The drip stop prevents coffee from dripping
through the filter onto the hotplate when the jug is removed.
4 Take a paper filter (type 1x2 or no. 2) and fold the sealed edges to
prevent tearing and folding (Fig. 10).
Note: Some versions come with a permanent filter. In this case you do not need
to use paper filters.
5 Put the paper filter or the permanent filter in the filter
holder (Fig. 11).
6 Put ground coffee (filter-fine grind) in the filter (Fig. 12).
-- For large cups: use one heaped measuring spoon of ground coffee for
each cup.
-- For small cups: use one level measuring spoon of ground coffee for each
cup.
7 Close the lid of the coffeemaker.  (Fig. 13)
8 Place the jug with the lid closed on the hotplate (Fig. 7).
Note: Make sure you put the jug on the hotplate with the spout facing into the
appliance. If the spout of the jug sticks out from under the filter holder, the
coffee may cool down.
Note: If you do not place the jug properly on the hotplate, the drip
stop prevents the coffee from flowing into the jug.This may cause the filter to
overflow.
9 Press the on/off switch to switch on the appliance (Fig. 8).
,, The power-on light goes on.
10Let the water pass through the filter into the jug.
Note: If you want to remove the jug during brewing, the drip stop prevents
coffee from dripping through the filter onto the hotplate. Place back the jug as
soon as possible to prevent the filter from overflowing (Fig. 14).
11You can leave the jug on the hotplate to keep the coffee warm and to
preserve its flavour.
Note: Make sure you put the jug on the hotplate with the spout facing into the
appliance. If the spout of the jug sticks out from under the filter holder, the
coffee may cool down.
12After use, press the on/off switch to switch off the appliance.
Note:The appliance does not switch off automatically.
Note: If you want to brew another jug of coffee right away, let the appliance
cool down for 3 minutes first.
4222.200.0405.1
13Remove the filter holder and throw away the paper filter and its
contents. If you have used the permanent filter, empty and rinse it.
Problem
Make sure that the voltage indicated on the
appliance corresponds to the local mains voltage.
Tip: After the brewing cycle is completed, you can pour the hot coffee into a
thermos jug to keep it hot and fresh.
Fill the water tank with water.
Cleaning
Never immerse the appliance in water or any other liquid, nor rinse it
under the tap.
1 Unplug the appliance and let it cool down.
2 Clean the outside of the appliance with a moist cloth.
3 Remove the filter holder.
4 Remove the water tank cover (Fig. 15).
5 Remove the lid from the jug.
6 Clean the filter holder, the permanent filter (specific types only),
the water tank cover, the jug and the lid of the jug in hot water with
some washing-up liquid or in the dishwasher.
7 After cleaning, rinse the jug with fresh hot water and reattach all
parts.
Descaling
Regular descaling prolongs the life of the appliance and guarantees optimal
brewing results and a constant brewing time for a long time.
In case of normal use (two full jugs of coffee every day), descale the
appliance:
-- 2 or 3 times a year if you use soft water (up to 18dH);
-- 4 or 5 times a year if you use hard water (over 18dH).
Contact your local water board for information about the water hardness in
your area.
You can use white vinegar with 4% acetic acid or a liquid descaler to descale
the coffeemaker.
Note: If the appliance starts to produce more steam, this can be an indication
that scale is building up.
Never use vinegar with an acetic acid content of 8% or more, natural
vinegar, powder descalers or tablet descalers to descale the appliance, as
this may cause damage.
Descaling takes approx. 30 to 60 minutes.
1 Fill the water tank with approx. 600ml of white vinegar (4% acetic
acid) (Fig. 16).
In all other cases, contact the Philips Consumer
Care Centre.
Water leaks out of
the appliance.
The appliance takes
a long time to brew
coffee.
Descale the appliance (see chapter ‘Descaling’).
The appliance
produces a lot of
noise and steam
during the brewing
process.
Make sure that the appliance is not blocked by
scale. If necessary, descale the appliance (see
chapter ‘Descaling’ ).
The filter overflows
when I remove the
jug from the
appliance while it
is brewing coffee.
If you remove the jug from the hotplate while
the appliance is brewing coffee, place the jug
back onto the hotplate as soon as possible to
prevent the filter from overflowing. Also note
that the coffee does not reach its full taste before
the end of the brewing cycle. Therefore we advise
you not to remove the jug and pour out the
coffee before the end of the brewing cycle.
Make sure you put the jug on the hotplate with
The lid of the coffee
maker wobbles when the spout facing into the appliance (i.e. not
I remove the jug from pointing sideways).
the hotplate.
Coffee grounds end
up in the jug.
Environment
-- Do not throw away the appliance with the normal household waste
at the end of its life, but hand it in at an official collection point for
recycling. By doing this, you help to preserve the environment (Fig. 19).
Guarantee and service
If you need service or information or if you have a problem, please visit the
Philips website at www.philips.com or contact the Philips Consumer
Care Centre in your country (you find its phone number in the worldwide
guarantee leaflet). If there is no Consumer Care Centre in your country, go
to your local Philips dealer.
Make sure that the water tank cover is in place
before you put the ground coffee in the filter.
Do not put too much ground coffee in the filter.
Make sure you put the jug on the hotplate with
the spout facing into the appliance (i.e. not
pointing sideways).
Note:You can also use an appropriate liquid descaler. In this case, follow the
instructions on the package of the descaler.
2 Press the on/off switch to switch on the appliance and let it complete
the brewing cycle (see chapter ‘Using the appliance’) (Fig. 8).
3 Empty the jug over a sink (Fig. 17).
Replacement
You can order a new jug from your local Philips dealer or a Philips service
centre under type number HD7990/20 (black) or HD7990/70 (celestial
blue).
Do not fill the water tank beyond the MAX level.
In all other cases, contact the Philips Consumer
Care Centre.
Note: Do not put a filter and ground coffee in the filter holder.
Note: For extra through descaling and to make sure that there is no scale left in
the appliance, repeat steps 1 to 3.
4 Let the appliance complete two more brewing cycles with fresh cold
water to remove any vinegar/descaler and scale residues (Fig. 18).
5 Clean the jug and the filter holder (see chapter ‘Cleaning’).
Possible solution
Unclog the opening in the bottom of the filter
holder.
Use the right size of paper filter (1x2 or no. 2).
Make sure the paper filter is not torn.
The coffee is too
weak
Use the right proportion of coffee to water.
Make sure the paper filter does not collapse.
Use the right size of paper filter (1x2 or no. 2).
Make sure there is no water in the jug before you
start to brew coffee.
The coffee does not
taste good.
Do not leave the jug with coffee on the hotplate
too long, especially not if it only contains a small
amount of coffee.
The coffee is not hot
enough.
Make sure you put the jug on the hotplate with
the spout facing into the appliance (i.e. not
pointing sideways).
The amount of coffee Some of the water is absorbed by the ground
is smaller than I
coffee. Put more water in the water tank.
expected.
Troubleshooting
This chapter summarises the most common problems you could encounter
with the appliance. If you are unable to solve the problem with the
information below, contact the Consumer Care Centre in your country.
5
Problem
Possible solution
The appliance does
not work.
Plug in and switch on the appliance.
4222.200.0405.1
Hrvatski
Uvod
Čestitamo na kupnji i dobro došli u Philips! Kako biste u potpunosti iskoristili
podršku koju nudi tvrtka Philips, registrirajte svoj proizvod na: www.philips.
com/welcome.
Opći opis (Sl. 1)
A Trajni filter (samo određeni modeli)
B Odvojivi držač filtera
C Odvojivi poklopac spremnika za vodu
D Spremnik za vodu
E Indikator razine vode
F Poklopac vrča
G Vrč
H Prekidač za uključivanje/isključivanje
I Grijaća ploča
J Kabel za napajanje s utikačem
K Aparat za kavu
L Poklopac aparata za kavu
Važno
Prije korištenja aparata pažljivo pročitajte ovaj korisnički priručnik i spremite
ga za buduće potrebe.
Opasnost
-- Aparat nemojte nikada uranjati u vodu ili neku drugu tekućinu te ispirati
pod mlazom vode.
-----
---
----
------
Upozorenje
Prije ukopčavanja aparata provjerite odgovara li mrežni napon naveden
na aparatu naponu lokalne mreže.
Aparat nemojte koristiti ako su utikač, kabel ili sam aparat oštećeni.
Ako se kabel za napajanje ošteti, mora ga zamijeniti tvrtka Philips,
ovlašteni Philips servisni centar ili neka druga kvalificirana osoba kako bi
se izbjegle potencijalno opasne situacije.
Ovaj aparat nije namijenjen osobama (uključujući djecu) sa smanjenim
fizičkim ili mentalnim sposobnostima niti osobama koje nemaju dovoljno
iskustva i znanja, osim ako im je osoba odgovorna za njihovu sigurnost
dala dopuštenje ili ih uputila u korištenje aparata.
Malu djecu potrebno je nadzirati kako se ne bi igrala s aparatom.
Kabel za napajanje držite izvan dohvata djece. Pazite da kabel za
napajanje ne visi preko ruba stola ili radne površine na kojoj aparat stoji.
Oprez
Ne stavljajte aparat na vruću površinu i pazite da mrežni kabel ne dođe
u doticaj s vrućim površinama.
Isključite aparat iz napajanja prije čišćenja i ako dođe do problema
tijekom pripremanja kave.
Ovaj aparat namijenjen je korištenju u kućanstvu te sličnim primjenama,
primjerice:
-- u kuhinjama za osoblje u trgovinama, uredima i drugim radnim
okruženjima;
-- na farmama;
-- od strane klijenata u hotelima, motelima i drugim stambenim
okruženjima;
-- ugostiteljskim objektima koji nude noćenje i doručak.
Prije pohrane pričekajte da se aparat ohladi, naročito ako u njega želite
spremiti kabel za napajanje. Grijaća ploča i vrč za kavu mogu biti vrući.
Prilikom podizanja poklopca aparata za kavu pazite na vruću paru.
Vrč je vruć tijekom i nakon kuhanja. Vrč uvijek držite za ručku.
Vrč nikada nemojte koristiti u mikrovalnoj pećnici.
Aparat nemojte premještati dok se u njemu kuha kava.
Elektromagnetska polja (EMF)
Ovaj proizvod tvrtke Philips sukladan je svim standardima koji se tiču
elektromagnetskih polja (EMF). Ako aparatom rukujete ispravno i u skladu s
ovim uputama, prema dostupnim znanstvenim dokazima on će biti siguran
za korištenje.
Prije prvog korištenja
1 Stavite aparat na ravnu i stabilnu površinu.
2 Višak kabela gurnite u otvor na stražnjoj strani aparata. Kabel
fiksirajte tako da ga gurnete u uži dio otvora (Sl. 2).
Napomena: Pazite da kabel za napajanje ne dođe u dodir s vrućim površinama.
3 Priključite utikač u uzemljenu zidnu utičnicu.
4 Očistite odvojive dijelove (pogledajte poglavlje ‘Čišćenje’).
5 Ponovo postavite sve dijelove.
6
-- Provjerite je li poklopac spremnika za vodu ispravno postavljen
(“klik”) (Sl. 3).
-- Provjerite je li držač filtera ispravno postavljen. Najprije stražnju stranu
držača filtera postavite ispod ruba šarke (1), a zatim ručku (2) pritisnite
prema dolje, tako da držač filtera sjedne na svoje mjesto (Sl. 4).
Napomena: Ako držač filtera nije pravilno postavljen, poklopac se ne može
zatvoriti.
6 Isperite aparat (pogledajte odjeljak “Ispiranje aparata” u nastavku).
Ispiranje aparata
Napomena: U držač filtera nemojte stavljati filter i mljevenu kavu.
1 Otvorite poklopac aparata za kavu (Sl. 5).
2 Spremnik za vodu napunite svježom hladnom vodom do oznake
MAX (Sl. 6).
Napomena: Nemojte uključivati aparat ako je poklopac otvoren.
3 Zatvorite poklopac.
4 Postavite vrč na grijaću ploču (Sl. 7).
Napomena:Vrč morate položiti na grijaću ploču sa žlijebom okrenutim prema
unutarnjoj strani aparata.
5 Za uključivanje aparata pritisnite prekidač za uključivanje/
isključivanje (Sl. 8).
,, Indikator napajanja se uključuje.
6 Pustite da aparat radi sve dok sva voda ne oteče u vrč.
7 Isključite aparat. Pustite da se hladi najmanje 3 minute prije kuhanja
kave.
Korištenje aparata
1 Otvorite poklopac aparata za kavu (Sl. 5).
2 Spremnik za vodu napunite svježom hladnom vodom do željene
razine (Sl. 9).
-- Oznake na lijevoj strani prozora za provjeru razine vode odgovaraju
velikim šalicama (120 ml).
-- Oznake na desnoj strani prozora za provjeru razine vode odgovaraju
malim šalicama (80 ml).
3 Provjerite je li držač filtera ispravno postavljen. Najprije stražnju
stranu držača filtera postavite ispod ruba šarke (1), a zatim ručku
(2) pritisnite prema dolje, tako da držač filtera sjedne na svoje
mjesto (Sl. 4).
Napomena: Ako držač filtera nije pravilno postavljen, poklopac se ne može
zatvoriti, a funkcija za zaustavljanje kapanja ne može pravilno raditi. Funkcija
za zaustavljanje kapanja sprječava kapanje kave kroz filter na grijaću ploču
kada se vrč ne nalazi na njoj.
4 Uzmite papirnati filter (vrsta 1x2 ili br. 2) i preklopite rubove kako
biste spriječili kidanje i gužvanje (Sl. 10).
Napomena: Neki modeli isporučuju se s trajnim filterom. U tom slučaju ne
trebate koristiti papirnate filtere.
5 Papirnati filter ili trajni filter stavite u držač filtera (Sl. 11).
6 Stavite mljevenu kavu (mljevenu za filter) u filter (Sl. 12).
-- Za velike šalice: stavite jednu punu žlicu mljevene kave za svaku šalicu.
-- Za male šalice: stavite jednu do ruba punu žlicu mljevene kave za svake
šalicu.
7 Zatvorite poklopac aparata za kavu.  (Sl. 13)
8 Vrč s zatvorenim poklopcem postavite na grijaću ploču (Sl. 7).
Napomena:Vrč morate položiti na grijaću ploču sa žlijebom okrenutim prema
unutarnjoj strani aparata. Ako žlijeb vrča strši ispod držača filtera, kava bi se
mogla ohladiti.
Napomena: Ako vrč ne postavite ispravno na grijaću ploču, funkcija
za zaustavljanje kapanja sprečava istjecanje kave u vrč.To može
uzrokovati prelijevanje filtera.
9 Za uključivanje aparata pritisnite prekidač za uključivanje/
isključivanje (Sl. 8).
,, Indikator napajanja se uključuje.
10Pustite da voda kroz filter prođe u vrč.
Napomena: Želite li skinuti vrč tijekom kuhanja, funkcija za zaustavljanje
kapanja sprečava kapanje kave kroz filter na grijaću ploču.Vratite vrč na
grijaću ploču što prije kako bi se spriječilo prelijevanje filtera (Sl. 14).
4222.200.0405.1
11Vrč možete ostaviti na grijaćoj ploči kako bi kava ostala zagrijana i
kako bi se sačuvao njezin okus.
Napomena:Vrč morate položiti na grijaću ploču sa žlijebom okrenutim prema
unutarnjoj strani aparata. Ako žlijeb vrča strši ispod držača filtera, kava bi se
mogla ohladiti.
12Nakon upotrebe pritisnite prekidač za uključivanje/isključivanje kako
biste isključili aparat.
Napomena: Aparat se ne isključuje automatski.
Napomena: Ako odmah želite skuhati još jedan vrč kave, aparat prvo ostavite
da se hladi najmanje 3 minute.
13Skinite držač filtera i bacite papirnati filter i njegov sadržaj. Ako ste
koristili trajni filter, ispraznite ga i isperite.
Savjet: Nakon dovršenja ciklusa kuhanja vruću kavu možete uliti u termos
posudu kako bi ostala vruća i svježa.
Čišćenje
Aparat nemojte nikada uranjati u vodu ili neku drugu tekućinu te ispirati
pod mlazom vode.
Zaštita okoliša
-- Aparat koji se više ne može koristiti nemojte odlagati s uobičajenim
otpadom iz kućanstva, nego ga odnesite u predviđeno odlagalište na
recikliranje. Time ćete pridonijeti očuvanju okoliša (Sl. 19).
Jamstvo i servis
U slučaju da vam je potreban servis ili informacija ili imate neki problem,
posjetite web-stranicu tvrtke Philips, www.philips.com, ili se obratite
centru za potrošače tvrtke Philips u svojoj državi (broj telefona nalazi se u
priloženom međunarodnom jamstvu). Ako u vašoj državi ne postoji centar
za potrošače, obratite se lokalnom prodavaču proizvoda tvrtke Philips.
Rješavanje problema
U ovom poglavlju opisani su najčešći problemi s kojima biste se mogli
susresti prilikom korištenja aparata. Ako ne možete riješiti problem uz
informacije u nastavku, obratite se centru za korisničku podršku u svojoj
državi.
Problem
Moguće rješenje
Aparat ne radi.
Ukopčajte i uključite aparat.
Provjerite odgovara li napon naveden na aparatu
naponu vaše lokalne električne mreže.
1 Isključite aparat iz napajanja i ostavite ga da se ohladi.
2 Vanjske dijelove aparata obrišite vlažnom krpom.
Napunite spremnik za vodu vodom.
3 Izvadite držač filtera.
U svim ostalim slučajevima obratite se centru za
potrošače tvrtke Philips.
4 Skinite poklopac spremnika za vodu (Sl. 15).
5 Skinite poklopac sa vrča.
6 Držač filtera, trajni filter (samo određeni modeli), poklopac spremnika
Iz aparata curi
voda.
za vodu, vrč i poklopac vrča operite u vrućoj vodi s malo sredstva za
pranje posuđa ili u stroju za pranje posuđa.
Nemojte puniti spremnik za vodu iznad oznake
MAX.
U svim ostalim slučajevima obratite se centru za
potrošače tvrtke Philips.
7 Nakon čišćenja vrč isperite svježom, vrućom vodom i ponovo
Priprema kave
traje jako dugo.
Očistite aparat od kamenca (pogledajte poglavlje
“Uklanjanje kamenca”).
Uklanjanje kamenca
Redovito uklanjanje kamenca produžava vijek trajanja aparata te jamči
optimalne rezultate kuhanja i konstantno vrijeme kuhanja tijekom dugog
vremena.
U slučaju uobičajene uporabe (dvije pune posude kave dnevno) uklonite
kamenac:
-- 2 ili 3 puta godišnje ako koristite meku vodu (do 18 dH);
-- 4 ili 5 puta godišnje ako koristite tvrdu vodu (više od 18 dH).
Za informacije o tvrdoći vode obratite se svojem lokalnom tijelu za
vodoopskrbu.
Za čišćenje aparata za kavu od kamenca možete koristiti bijeli ocat s
4% octene kiseline ili tekuće sredstvo za uklanjanje kamenca.
Tijekom
pripremanja kave
aparat proizvodi
dosta buke i pare.
Provjerite nije li aparat začepljen kamencem. Ako je
potrebno, očistite aparat od kamenca (pogledajte
poglavlje “Uklanjanje kamenca”).
Filter se prelijeva
kada skinem vrč
s uređaja tijekom
kuhanja kave.
Ako tijekom kuhanja kave skinete vrč s grijaće
ploče, vratite ga na grijaću ploču što je prije moguće
kako bi se spriječilo prelijevanje filtera. Također,
napominjemo da kava ne dobiva svoj puni oku prije
dovršenja ciklusa kuhanja. Iz tog razloga savjetujemo
da ne skidate vrč i ne izlijevate kavu iz njega prije
dovršenja ciklusa kuhanja.
postavite sve dijelove.
Napomena: Ako aparat počne stvarati više pare, to je možda znak da se u
njemu nakuplja kamenac.
Za čišćenje aparata od kamenca nikada nemojte koristiti ocat s 8% ili više
octene kiseline, prirodni ocat, sredstvo za uklanjanje kamenca u prahu ili u
tabletama jer to može uzrokovati oštećivanje aparata.
Poklopac aparata
Vrč morate položiti na grijaću ploču sa žlijebom
za kavu ljulja se
okrenutim prema unutarnjoj strani aparata (tj. ne
kada podignem vrč prema bočnoj strani).
s grijaće ploče.
Mljevena kava
dospijeva u vrč.
Prije stavljanja mljevene kave u filter poklopac
spremnika za vodu mora biti na svojem mjestu.
Uklanjanje kamenca traje pribl. 30 do 60 minuta.
Nemojte stavljati previše mljevene kave u filter.
1 Spremnik za vodu napunite s približno 600 ml bijelog octa (4% octene
Vrč morate položiti na grijaću ploču sa žlijebom
okrenutim prema unutarnjoj strani aparata (tj. ne
prema bočnoj strani).
kiseline) (Sl. 16).
Napomena: U držač filtera nemojte stavljati filter i mljevenu kavu.
Očistite otvor na dnu držača filtera.
Napomena: Možete koristiti i odgovarajuće sredstvo za uklanjanje kamenca. U
tom slučaju slijedite upute na pakiranju sredstva za uklanjanje kamenca.
Koristite papirnati filter odgovarajuće veličine (1x2
ili br. 2).
2 Pritisnite prekidač za uključivanje/isključivanje kako biste uključili
aparat i pustite ga da dovrši ciklus kuhanja (pogledajte poglavlje
“Korištenje aparata”) (Sl. 8).
3 Ispraznite vrč u sudoper (Sl. 17).
Pazite da papirnati filter ne bude poderan.
Kava je preslaba
Pazite da se papirnati filter ne spusti.
Napomena: Za vrlo temeljito uklanjanje kamenca kako biste bili sigurni da je
kamenac potpuno uklonjen iz aparata, ponovite korake 1 do 3.
Koristite papirnati filter odgovarajuće veličine (1x2
ili br. 2).
4 Neka nakon toga aparat završi dva puna ciklusa s čistom, hladnom
vodom kako bi se očistili svi tragovi octa/kamenca (Sl. 18).
5 Očistite posudu i držač filtera (pogledajte poglavlje “Čišćenje”).
Zamjena dijelova
Novi vrč možete naručiti kod lokalnog prodavača proizvoda tvrtke Philips
ili u servisu tvrtke Philips, pod brojem HD7990/20 (crni) ili HD7990/70
(svijetloplavi).
7
Koristite odgovarajući omjer kave i vode.
Prije kuhanja kave uvjerite se da u vrču nema kave.
Kava nema dobar
okus.
Vrč s kavom nemojte predugo ostavljati na grijaćoj
ploči, pogotovo ako je u njoj samo mala količina
kave.
Kava nije dovoljno
vruća.
Vrč morate položiti na grijaću ploču sa žlijebom
okrenutim prema unutarnjoj strani aparata (tj. ne
prema bočnoj strani).
4222.200.0405.1
8
Problem
Moguće rješenje
Količina kave
je manja od
očekivane.
Mljevena kava upit će određenu količinu vode.
Dodajte još vode u spremnik za vodu.
4222.200.0405.1
Polski
Wprowadzenie
Gratulujemy zakupu i witamy wśród użytkowników produktów Philips! Aby
w pełni skorzystać z oferowanej przez firmę Philips pomocy, zarejestruj swój
produkt na stronie www.philips.com/welcome.
Opis ogólny (rys. 1)
A Filtr stały (tylko wybrane modele)
B Wyjmowany uchwyt na filtr
C Zdejmowana pokrywka zbiornika na wodę
D Zbiornik wody
E Wskaźnik poziomu wody
F Pokrywka dzbanka G Dzbanek
H Wyłącznik
I Płytka grzejna
J Przewód sieciowy z wtyczką
K Ekspres do kawy
L Pokrywka ekspresu do kawy Ważne
Przed pierwszym użyciem urządzenia zapoznaj się dokładnie z jego
instrukcją obsługi i zachowaj ją na wypadek konieczności użycia w
przyszłości.
Niebezpieczeństwo
-- Nie zanurzaj urządzenia w wodzie ani innym płynie. Nie opłukuj go pod
bieżącą wodą.
-----
---
Ostrzeżenie
Przed podłączeniem urządzenia upewnij się, że napięcie podane na
urządzeniu jest zgodne z napięciem w sieci elektrycznej.
Nie używaj urządzenia, jeśli uszkodzona jest wtyczka, przewód sieciowy
lub samo urządzenie.
Ze względów bezpieczeństwa wymianę uszkodzonego przewodu
sieciowego należy zlecić autoryzowanemu centrum serwisowemu firmy
Philips lub odpowiednio wykwalifikowanej osobie.
Urządzenie nie jest przeznaczone do użytku przez osoby (w tym
dzieci) o ograniczonych zdolnościach fizycznych, sensorycznych lub
umysłowych, a także nieposiadające wiedzy lub doświadczenia w
użytkowaniu tego typu urządzeń, chyba że będą one nadzorowane lub
zostaną poinstruowane na temat korzystania z tego urządzenia przez
opiekuna.
Nie pozwalaj dzieciom bawić się urządzeniem.
Ułóż przewód sieciowy w miejscu niedostępnym dla dzieci. Nie pozwól,
aby przewód sieciowy zwisał z krawędzi stołu czy blatu, na którym
ustawione jest urządzenie.
Uwaga
-- Nie stawiaj urządzenia na rozgrzanej powierzchni i nie dopuść do
zetknięcia się przewodu sieciowego z rozgrzanymi częściami urządzenia.
-- Wyjmij wtyczkę urządzenia z gniazdka elektrycznego w przypadku
wystąpienia problemów podczas zaparzania oraz przed czyszczeniem
urządzenia.
-- To urządzenie jest przeznaczone do użytku w domach i podobnych
miejscach, takich jak:
-- kuchnie dla pracowników w sklepach, biurach i innych zakładach pracy,
-- domy wiejskie,
-- hotele, motele i inne budynki mieszkalne,
-- pensjonaty typu Bed and Breakfast.
-- Przed schowaniem urządzenia poczekaj, aż ostygnie, szczególnie jeśli
chcesz schować przewód sieciowy wewnątrz urządzenia. Płytka grzejna i
dzbanek na kawę mogą być gorące.
-- Przy otwieraniu pokrywki ekspresu do kawy uważaj na gorącą parę.
-- Dzbanek jest gorący podczas i po zakończeniu parzenia. Zawsze trzymaj
dzbanek za uchwyt.
-- Nigdy nie wstawiaj dzbanka do mikrofalówki.
-- Nie przenoś urządzenia podczas parzenia kawy.
Pola elektromagnetyczne (EMF)
Niniejsze urządzenie firmy Philips spełnia wszystkie normy dotyczące pól
elektromagnetycznych. Jeśli użytkownik odpowiednio się z nim obchodzi i
używa go zgodnie z zaleceniami zawartymi w instrukcji obsługi, urządzenie
jest bezpieczne w użytkowaniu, co potwierdzają wyniki aktualnych badań
naukowych.
Przed pierwszym użyciem
1 Ustaw urządzenie na płaskiej i stabilnej powierzchni.
9
2 Umieść zbędny odcinek przewodu w otworze znajdującym się z
tyłu urządzenia. Aby go zamocować, wciśnij go w wąską szczelinę
widoczną w otworze (rys. 2).
Uwaga: Upewnij się, że przewód nie dotyka rozgrzanych powierzchni.
3 Podłącz wtyczkę przewodu sieciowego do uziemionego gniazdka
elektrycznego.
4 Umyj odłączane części (patrz rozdział „Czyszczenie”).
5 Zamocuj wszystkie części urządzenia.
-- Upewnij się, że pokrywka w zbiorniku wody jest założona prawidłowo
(usłyszysz „kliknięcie”) (rys. 3).
-- Upewnij się, że uchwyt filtra znajduje się na swoim miejscu. Najpierw
wprowadź tylną część uchwytu filtra pod krawędź zawiasu (1), a
następnie dociśnij uchwyt (2) do momentu, aż uchwyt filtra zatrzaśnie
się w odpowiedniej pozycji (rys. 4).
Uwaga: Jeśli uchwyt filtra nie jest umieszczony prawidłowo, nie można zamknąć
pokrywki.
6 Przepłucz urządzenie (patrz rozdział „Płukanie urządzenia” poniżej).
Płukanie urządzenia
Uwaga: Nie wkładaj filtra i zmielonej kawy do uchwytu filtra.
1 Otwórz pokrywkę ekspresu do kawy (rys. 5).
2 Napełnij zbiorniczek świeżą, zimną wodą do poziomu oznaczonego
symbolem „MAX” (rys. 6).
Uwaga: Nie należy włączać urządzenia, gdy pokrywka jest otwarta.
3 Zamknij pokrywkę.
4 Umieść dzbanek na płycie grzejnej (rys. 7).
Uwaga: Upewnij się, że dzbanek znajduje się na płytce grzejnej, a jego dziobek
skierowany jest w stronę urządzenia.
5 Naciśnij wyłącznik, aby włączyć urządzenie (rys. 8).
,, Zaświeci się wskaźnik zasilania.
6 Urządzenie musi pozostać włączone aż do momentu, gdy cała woda
znajdzie się w dzbanku.
7 Wyłącz urządzenie. Zanim przystąpisz do parzenia kawy, odczekaj
przynajmniej 3 minuty, aż ostygnie.
Zasady używania
1 Otwórz pokrywkę ekspresu do kawy (rys. 5).
2 Napełnij zbiorniczek świeżą, zimną wodą do żądanego
poziomu (rys. 9).
-- Wskazania z lewej strony wskaźnika poziomu wody odpowiadają dużym
filiżankom (120 ml).
-- Wskazania z prawej strony wskaźnika poziomu wody odpowiadają
małym filiżankom (80 ml).
3 Upewnij się, że uchwyt filtra znajduje się na swoim miejscu. Najpierw
wprowadź tylną część uchwytu filtra pod krawędź zawiasu (1), a
następnie dociśnij uchwyt (2) do momentu, aż uchwyt filtra zatrzaśnie
się w odpowiedniej pozycji (rys. 4).
Uwaga: Jeśli uchwyt filtra nie został poprawnie założony, nie można zamknąć
pokrywki, a blokada kapania nie będzie działać prawidłowo. Blokada ta
zapobiega wyciekaniu kawy przez filtr i jej skapywaniu na płytkę grzejną po
wyjęciu dzbanka.
4 Weź filtr papierowy (typ 1x2 lub nr 2) i zagnij zaklejone brzegi, aby
uniknąć jego rozdarcia lub złożenia (rys. 10).
Uwaga: Niektóre modele tego ekspresu do kawy są wyposażone w filtr stały.W
takim przypadku nie trzeba używać filtrów papierowych.
5 Umieść papierowy filtr na filtrze stałym w uchwycie filtra (rys. 11).
6 Wsyp do filtra kawę (zmieloną w sposób odpowiedni do parzenia w
ekspresie) (rys. 12).
-- W przypadku dużych filiżanek: wsyp czubatą miarkę zmielonej kawy na
każdą filiżankę.
-- W przypadku małych filiżanek: wsyp płaską miarkę zmielonej kawy na
każdą filiżankę.
7 Zamknij pokrywkę ekspresu do kawy. (rys. 13)
8 Zamknij pokrywkę dzbanka i umieść go na płytce grzejnej (rys. 7).
Uwaga: Upewnij się, że dzbanek znajduje się na płytce grzejnej, a jego dziobek
skierowany jest w stronę urządzenia. Jeśli dziobek dzbanka wystaje poza
4222.200.0405.1
uchwyt filtra, kawa może ostygnąć.
Uwaga: Jeśli dzbanek nie będzie prawidłowo ustawiony na płytce grzejnej,
blokada kapania zablokuje przepływ kawy do dzbanka i na skutek tego filtr
może się przepełnić.
9 Naciśnij wyłącznik, aby włączyć urządzenie (rys. 8).
,, Zaświeci się wskaźnik zasilania.
10Poczekaj, aż cała woda ze dzbanka przejdzie przez filtr.
Uwaga:W przypadku wyjęcia dzbanka podczas parzenia kawy blokada
kapania nie dopuszcza do skapywania kawy z filtra na płytkę grzejną. Należy
jednak jak najszybciej położyć dzbanek na płytce, aby zapobiec przepełnieniu
filtra (rys. 14).
11Można pozostawić dzbanek na płytce grzejnej w celu zachowania
temperatury i smaku kawy.
Uwaga: Upewnij się, że dzbanek znajduje się na płytce grzejnej, a jego dziobek
skierowany jest w stronę urządzenia. Jeśli dziobek dzbanka wystaje poza
uchwyt filtra, kawa może ostygnąć.
12Po użyciu wyłącz urządzenie za pomocą wyłącznika.
Uwaga: Urządzenie nie wyłącza się automatycznie.
Uwaga: Aby szybko przygotować kolejny dzbanek kawy, po wyłączeniu
urządzenia odczekaj 3 minuty, aż urządzenie nieco ostygnie.
13Wyjmij uchwyt filtra i wyrzuć filtr papierowy wraz z zawartością. Jeśli
używany był filtr stały, opróżnij go i opłucz.
Wskazówka: Po zakończeniu cyklu parzenia warto przelać gorącą kawę
do dzbanka termicznego w celu zachowania jej temperatury i aromatu.
Czyszczenie
Nie zanurzaj urządzenia w wodzie ani innym płynie. Nie opłukuj go pod
bieżącą wodą.
1 Wyjmij wtyczkę urządzenia z gniazdka elektrycznego i poczekaj, aż
urządzenie ostygnie.
Uwaga:W celu dokładnego i całkowitego usunięcia kamienia z urządzenia
powtórz czynności od 1 do 3.
4 Niech urządzenie wykona jeszcze dwa cykle parzenia z czystą, zimną
wodą, aby usunąć ocet/odkamieniacz i pozostałości kamienia (rys. 18).
5 Umyj dzbanek i uchwyt filtra (patrz rozdział „Czyszczenie”)
Wymiana
Nowy dzbanek można zamówić u lokalnego sprzedawcy firmy Philips lub
w autoryzowanym centrum serwisowym firmy Philips, podając numer
HD7990/20 (czarny) lub HD7990/70 (niebieski).
Ochrona środowiska
-- Zużytego urządzenia nie należy wyrzucać wraz ze zwykłymi odpadami
gospodarstwa domowego — należy oddać je do punktu zbiórki
surowców wtórnych w celu utylizacji. Stosowanie się do tego zalecenia
pomaga w ochronie środowiska (rys. 19).
Gwarancja i serwis
W razie konieczności naprawy, jakichkolwiek pytań lub problemów prosimy
odwiedzić naszą stronę internetową www.philips.com lub skontaktować
się z Centrum Obsługi Klienta firmy Philips w danym kraju (numer telefonu
znajduje się na ulotce gwarancyjnej). Jeśli w kraju Państwa zamieszkania
nie ma takiego Centrum, o pomoc należy zwrócić się do sprzedawcy
produktów firmy Philips.
Rozwiązywanie problemów
W tym rozdziale opisano najczęstsze problemy, z którymi można się zetknąć,
korzystając z urządzenia. Jeśli poniższe wskazówki okażą się niewystarczające
do rozwiązania problemu, należy skontaktować się z Centrum Obsługi
Klienta.
Problem
Możliwe rozwiązanie
Urządzenie nie
działa.
Podłącz urządzenie do sieci elektrycznej i włącz je.
2 Wytrzyj obudowę urządzenia wilgotną szmatką.
Upewnij się, że napięcie wskazane na urządzeniu
odpowiada lokalnemu napięciu sieci elektrycznej.
3 Wyjmij uchwyt filtra.
Nalej wody do zbiornika.
4 Zdejmij pokrywkę zbiornika wody (rys. 15).
We wszystkich innych przypadkach skontaktuj się z
Centrum Obsługi Klienta firmy Philips.
5 Zdejmij pokrywkę z dzbanka.
6 Umyj uchwyt filtra, filtr stały (tylko wybrane modele), pokrywkę
zbiornika wody, dzbanek i jego pokrywkę w gorącej wodzie z
dodatkiem płynu do mycia naczyń lub w zmywarce.
7 Po wyczyszczeniu przepłucz dzbanek świeżą, gorącą wodą i zamocuj z
powrotem wszystkie części.
Usuwanie kamienia
Regularne usuwanie kamienia przedłuża okres eksploatacji urządzenia i
zapewnia optymalne rezultaty i stały czas parzenia przez długi okres czasu.
W przypadku normalnej eksploatacji urządzenia (dwa pełne dzbanki kawy
dziennie) kamień należy usuwać:
-- 2–3 razy w roku w przypadku wody miękkiej (do 18 dH);
-- 4–5 razy w roku w przypadku wody twardej (powyżej 18 dH).
Informacje na temat stopnia twardości wody w danej okolicy można uzyskać
w lokalnej stacji sanitarno-epidemiologicznej.
W celu usunięcia kamienia można użyć octu o zawartości kwasu octowego
4% lub płynnego środka do usuwania kamienia.
Uwaga: Jeśli urządzenie wytwarza więcej pary w trakcie parzenia, może to
oznaczać osadzenie się kamienia.
Do usuwania kamienia nie należy używać octu o zawartości kwasu
octowego 8% i większej, octu naturalnego ani środków do usuwania
kamienia w proszku lub tabletkach, gdyż może to spowodować
uszkodzenie urządzenia.
Usuwanie kamienia trwa ok. 30–60 minut.
1 Wlej 600 ml octu (4% kwasu octowego) do zbiornika wody (rys. 16).
Woda wycieka z
urządzenia.
Nie napełniaj zbiornika wody powyżej poziomu
„MAX”.
We wszystkich innych przypadkach skontaktuj się z
Centrum Obsługi Klienta firmy Philips.
Urządzenie zbyt
długo parzy kawę.
Usuń kamień z urządzenia (patrz rozdział
„Usuwanie kamienia”).
Urządzenie bardzo
hałasuje i wytwarza
dużo pary podczas
parzenia.
Upewnij się, że urządzenie nie jest zablokowane
przez kamień. Jeśli to konieczne, usuń kamień z
urządzenia (patrz rozdział „Usuwanie kamienia”).
Gdy wyjmuję
dzbanek podczas
parzenia kawy,
zawartość filtra
wycieka.
Jeśli podczas parzenia kawy dzbanek został wyjęty,
należy go jak najszybciej umieścić z powrotem na
płytce grzejnej, aby zapobiec wyciekaniu zawartości
filtra. Należy także pamiętać o tym, że kawa nie
zyska pełni smaku aż do zakończenia cyklu parzenia.
Dlatego też nie zaleca się wyjmowania dzbanka i
rozlewania kawy do momentu zakończenia cyklu
parzenia.
Pokrywka ekspresu
do kawy trzęsie się
po zdjęciu dzbanka
z płytki grzejnej.
Upewnij się, że dzbanek znajduje się na płytce
grzejnej, a jego dziobek skierowany jest w stronę
urządzenia (nie jest skierowany w bok).
W dzbanku
znajdują się fusy z
kawy.
Przed wsypaniem kawy mielonej upewnij się, że
pokrywka zbiornika wody znajduje się na swoim
miejscu.
Uwaga: Nie wkładaj filtra i zmielonej kawy do uchwytu filtra.
Nie wsypuj zbyt dużej ilości kawy mielonej do filtra.
Uwaga: Możesz również użyć odpowiedniego płynnego środka do usuwania
kamienia.W tym przypadku postępuj zgodnie z instrukcjami zamieszczonymi
na jego opakowaniu.
Upewnij się, że dzbanek znajduje się na płytce
grzejnej, a jego dziobek skierowany jest w stronę
urządzenia (nie jest skierowany w bok).
2 Włącz urządzenie za pomocą wyłącznika i odczekaj, aż wykona ono
Odetkaj otwór na dnie uchwytu filtra.
3 Opróżnij dzbanek nad zlewem (rys. 17).
Użyj filtra papierowego o odpowiednim rozmiarze
(1x2 lub nr 2).
pełen cykl parzenia (patrz rozdział „Zasady używania”) (rys. 8).
10
4222.200.0405.1
Problem
Możliwe rozwiązanie
Upewnij się, że filtr papierowy nie jest podarty.
Kawa jest za słaba.
Użyj odpowiednich proporcji kawy i wody.
Upewnij się, że filtr papierowy nie zapada się.
Użyj filtra papierowego o odpowiednim rozmiarze
(1x2 lub nr 2).
Przed zaparzeniem kawy sprawdź, czy w dzbanku
nie znajduje się woda.
Kawa ma niedobry
smak.
Nie zostawiaj zbyt długo dzbanka z kawą na płytce
grzejnej, szczególnie jeśli znajduje się w nim mała
ilość kawy.
Kawa nie jest
wystarczająco
gorąca.
Upewnij się, że dzbanek znajduje się na płytce
grzejnej, a jego dziobek skierowany jest w stronę
urządzenia (nie jest skierowany w bok).
W dzbanku jest
mniej kawy niż
powinno.
Mielona kawa wchłania trochę wody. Wlej więcej
wody do zbiornika.
11
4222.200.0405.1