1
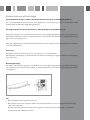
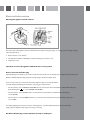
FF850 freestanding
combination fridge freezer
Manual for Installation, Use and Maintenance
Passionate about style
Customer Care Department • The
Group Ltd. • Harby Road • Langar • Nottinghamshire • NG13 9HY
T : 01949 862 012 F : 01949 862 003 E : [email protected] W : www.cda.eu
Important
The CDA Group Ltd cannot be held responsible for injuries or losses caused by incorrect use or installation of this
product. Please note that CDA reserve the right to invalidate the guarantee supplied with this product following incorrect
installation or misuse of the appliance.
Under no circumstances should any external covers be removed for servicing or maintenance except by suitably qualified personnel.
Appliance information:
Please enter the details on the appliance rating plate below for reference, to assist CDA Customer Care in the event of a
fault with your appliance and to register your appliance for guarantee purposes.
Appliance Model
Serial Number
CE Declarations of Conformity:
This appliance has been designed, constructed and marketed in compliance with safety requirements of EEC Directive
2006/95/EEC (Low voltage) and requirements of EMC Directive 2004/108/EEC.
This appliance has been manufactured to the strictest standards and complies with all applicable legislation, including
Electrical safety (LVD) and Electromagnetic interference compatibility (EMC). Parts intended to come into contact with
food conform to EEC/89/109.4
IMPORTANT INFORMATION FOR CORRECT DISPOSAL OF THE PRODUCT IN ACCORDANCE WITH EC
DIRECTIVE 2002/96/EC.
At the end of its working life, the product must not be disposed of as urban waste. It must be taken to a special local
authority differentiated waste collection centre or to a dealer providing this service.
Disposing of a household appliance separately avoids possible negative consequences for the environment and health
deriving from inappropriate disposal and enables the constituent materials to be recovered to obtain significant savings
in energy and resources. As a reminder of the need to dispose of household appliances separately, the product is marked
with a crossed-out wheeled dustbin.
Before first use of the fridge
You must allow the fridge to settle for at least twenty four hours prior to switching the power on.
It is recommended that you clean the interior of the appliance prior to first use, using a solution of bicarbonate of soda
and warm water and then thoroughly drying the interior.
The fridge may have an odour to it at first use. This will disappear as the appliance cools.
The green power light on the control panel will be lit when you have plugged the appliance in to the power supply. Then
turn the thermostat dial to position 5 (coldest) and switch on the fast freeze function until the red temperature warning
light on the control panel goes off.
When the red light has gone off, turn the thermostat down to the required level (recommended between 2-4) and switch
off the fast freeze function.
Please note:
The appliance will work continuously until it comes down to the correct temperature.
If the appliance is switched off, you should allow five minutes before switching it on again to prevent unnecessary damage
to the compressor.
Defrosting the fridge
The fridge is self-defrosting. Any water created will run out of the fridge through the channel at the back of the fridge.
It is important to keep the channel clear at all times. The defrosted water is collected in the evaporating tray at the back
of the appliance.
Use
• Never put liquids in the refrigerator uncovered.
• Never put hot foods in the refrigerator. Warm food should be allowed to cool to room temperature before being put into the refrigerator.
• Nothing should rest against the rear wall of the refrigerator, as this will cause frost and possible condensation problems which will be difficult to remove.
Setting the temperature
Both compartment temperatures are regulated by the same thermostat dial, which is found to the right of the control
panel at the top of the door frame when the fridge door is open. The thermostat can be moved between 1 (least cold)
and 5 (coldest).
Thermostat settings:
1-2 For short term storage of food
3-4 For long term storage of food
5
For freezing fresh food. Once the food has been frozen, the thermostat should then be turned back to the required setting between 1 and 4.
Fast freeze
This appliance is supplied with a fast freeze function, which allows fresh food to be frozen more quickly. To select the fast
freeze function, turn the switch, located in the top of the refrigerator compartment, to 1. To switch the fast freeze function
off, turn the switch to 0.
Please note that for better energy efficiency, the fast freeze function should be switched off when not required.
If the ambient temperature is less than 10º, then the fast freeze function can be used continuously to improve the
performance of the appliance. However, if the ambient temperature is more than 10º, then the fast freeze must be switched
off when it is not required.
To make best use of the fast freeze function, the middle two compartments should be used.
Control panel
The control panel for the fridge has three lights (Fig. 1):
A. Orange Fast Freeze light
This light is illuminated when the fast freeze function is on.
A B C
B. Green Power light
This light is illuminated when the power supply to appliance is on.
fig. 1
C. Red Temperature Warning light
This light is illuminated when the freezer compartment temperature is too warm. When this light is illuminated, switch on
the fast freeze function until the red light goes out, then switch off the fast freeze function.
Please note:
If the red light is lit for more than 24 hours, switch off the fast freeze function and call CDA Customer Care.
Defrosting the freezer
Do not use heaters or defrosting sprays in this appliance.
• Never use any metallic or sharp objects to remove the ice as this could damage the lining.
• The freezer compartment should be defrosted regularly to ensure the most efficient running of the freezer.
• Once the ice is more than 5 mm thick, the freezer must be defrosted.
• First remove the two lower freezer drawers.
• To speed up the process, put a bowl of warm water in the base of the freezer compartment.
The lower drawer is specially designed to facilitate the defrosting process.
1. Open the water drain cover which is at the back of the freezer, as in figure 1.
2. Pull the drain plug out, as in figure 2. This is found at the bottom of the freezer compartment.
3. Put the water drain cover underneath the drain plug, as shown in figure 3. This will allow the defrosted water to be collected in the drawer.
4. Empty the water from the drawer, and then replace the water drain cover and drain plug.
Once defrosting is complete, dry the inside of the freezer compartment with a sponge or clean cloth.
Use
• The freezer compartments are designed to store only frozen food.
• Never put hot or warm foods in the freezer, allow them to cool fully before putting them into the freezer.
• Follow the instructions on the food packaging for storage of frozen food. If no information is provided, foods should not be stored for more than three months after the purchase date.
Care and cleaning
Always disconnect the appliance from the power before any cleaning or maintenance.
• The refrigerator and freezer sections should be cleaned using a solution of bicarbonate of soda and lukewarm water. • Do not use abrasive products or detergents. After washing, rinse and dry thoroughly.
• Clean the shelves and balconies separately by hand using soap and water. Do not put them in the dishwasher.
• The evaporating tray and water drain hole (at the back of the refrigerator compartment) should be cleaned periodically to prevent the defrosted water from collecting inside the refrigerator compartment. The drain plug can be used to clear the drain hole.
• Once cleaning is complete, then reconnect the power.
• If the appliance is not used for prolonged periods of time, unplug and clean the appliance. The doors should be left slightly open to prevent the formation of mildew and smell.
Changing the light bulb
Disconnect the appliance from the power.
• Remove the light cover by pressing on the hooks on both sides of the cover.
• Unscrew the light bulb to remove it and replace with a new bulb (not more than 15W).
• Replace the light cover and reconnect the power.
This appliance must never be installed close to heat sources, e.g. heating elements, cookers or in damp places.
• The plug should be fully accessible at all times.
• To ensure the appliance is level, you should use the height adjustable feet at the front of the appliance.
• The cooling system at the rear of the appliance must not touch the rear wall.
• The appliance must be installed with adequate ventilation. Ensure that there is 15 cm clearance above the appliance, and that there is space between the rear of the appliance and the wall.
Troubleshooting
If you have any problems with your appliance, you should check the troubleshooting prior to calling CDA Customer Care
to prevent unnecessary service calls and potential cost.
If the appliance is not working
• Check there is power to the appliance:
• The green light on the control panel is lit
• The house fuses are intact and the fuse in the plug has not blown.
• The thermostat is not set to 0
• The plug socket is functioning fine. To check this, plug another electrical appliance in to see if the socket is working.
The appliance is working, but not very well
• The appliance is not overloaded
• The thermostat is set to an appropriate temperature
• The doors are closing properly
• The cooling system at the rear of the appliance is clean and free of dust, and not touching the rear wall.
• There is enough ventilation at the side and rear walls
The appliance is noisy
• The appliance is level and stable
• The side and rear walls are clear, and there is nothing resting on the appliance
• The cooling gas in the refrigerator will make a slight bubbling noise, even when the compressor is not running.
There is water in the lower part of the refrigerator compartment
• The drain hole in the channel at the back of the compartment is clear
Electrical information
Warning! this appliance must be earthed.
The mains lead of this appliance has been fitted with a BS 1363A 13 amp fused plug. To change a fuse in this type of plug,
follow the steps below:
1. Remove the fuse cover and fuse
2. Fit replacement 13A fuse, ASTA approved to BS 1362 type, into the fuse cover.
3. Replace fuse cover.
Important: do not use the appliance without the fuse cover in position.
How to connect an alternative plug
If the fitted plug is not suitable for your socket outlet, then it should be cut off and disposed of safely to avoid possible shock
hazard. A suitable alternative plug of at least 13 Amp rating to BS 1363 should be used.
As the colours of the wires in the mains lead of this appliance may not correspond with the
coloured markings identifying the terminals in your plug, proceed as follows:• The wire which is coloured GREEN and YELLOW must be connected to the terminal which is marked with letter (E) or by the Earth symbol
or coloured GREEN and YELLOW.
• The wire which is coloured BLUE must be connected to the terminal which is marked with the letter (N), or coloured BLACK.
• The wire which is coloured BROWN must be connected to the terminal which is marked with the letter (L) or coloured RED.
If in doubt regarding the electrical connection of this appliance, consult a qualified electrician. Do not shorten the supply cable, the appliance may require removing for servicing.
N.B. Ensure that the plug socket is situated in an easily accessible place.
To contact our Customer Care Department, or for Service,
please contact us on the details below.
Passionate about style
Customer Care Department • The
Group Ltd. • Harby Road • Langar • Nottinghamshire • NG13 9HY
T : 01949 862 012 F : 01949 862 003 E : [email protected] W : www.cda.eu