1
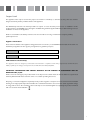
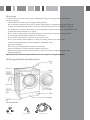
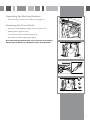
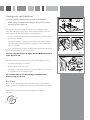
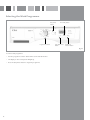
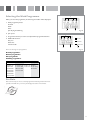
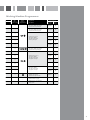
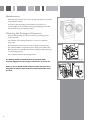
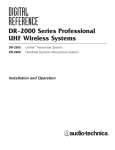
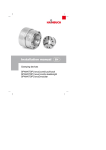
CI240 Integrated Washing Machine
Manual for Installation, Use and Maintenance
Passionate about style
Customer Care Department • The
Group Ltd. • Harby Road • Langar • Nottinghamshire • NG13 9HY
T : 01949 862 012 F : 01949 862 003 E : [email protected] W : www.cda.eu
Contents
Page 1
Important information
Page 2
Warnings
Page 3
Washing machine specifications
Page 4
Unpacking the washing machine and removing the transit bolts
Page 5
Connecting to the mains water supply
Page 6-7
Levelling and electrical information
Page 8
Before first use
Page 9
Preparing garments for washing
Page 10
Detergents and additives
Page 11-12
Selecting the wash programme
Page 13-14
Programmes
Page 15
Spin speed and anti-crease
Page 16
Time delay
Page 17
Starting up
Page 18
Wash programme phases and power cuts
Page 19-20
Maintenance and cleaning
Page 21-22
Troubleshooting
Important
This appliance must only be used for the purpose for which it is intended, i.e. domestic use. Any other use could be
dangerous and may lead to premature failure of the appliance.
The CDA Group Ltd cannot be held responsible for injuries or losses caused by incorrect use or installation of this
product. Please note that CDA reserve the right to invalidate the guarantee supplied with this product following incorrect
installation or misuse of the appliance.
Under no circumstances should any external covers be removed for servicing or maintenance except by suitably qualified personnel.
Appliance information:
Please enter the details on the appliance rating plate below for reference, to assist CDA Customer Care in the event of a
fault with your appliance and to register your appliance for guarantee purposes.
Appliance Model
Serial Number
CE Declarations of Conformity:
This appliance has been designed, constructed and marketed in compliance with safety requirements of EEC Directive
2006/95/EEC (Low voltage) and requirements of EMC Directive 2004/108/EEC.
IMPORTANT INFORMATION FOR CORRECT DISPOSAL OF THE PRODUCT IN ACCORDANCE WITH EC
DIRECTIVE 2002/96/EC.
At the end of its working life, the product must not be disposed of as urban waste. It must be taken to a special local
authority differentiated waste collection centre or to a dealer providing this service.
Disposing of a household appliance separately avoids possible negative consequences for the environment and health
deriving from inappropriate disposal and enables the constituent materials to be recovered to obtain significant savings
in energy and resources. As a reminder of the need to dispose of household appliances separately, the product is marked
with a crossed-out wheeled dustbin.
1
Warnings
To avoid the risk of fire, electric shocks, injury or damage when using your washing machine, please take the following precautions:
• Please read all the instructions before using the washing machine.
• Do not wash items that have previously been cleaned, washed, soaked or treated with petrol, solvents for dry cleaning, other inflammable substances or explosives, as they produce fumes that could catch fire or explode.
• Do not add petrol, solvents for dry cleaning or other inflammable or explosive substances to the wash water as they produce fumes that could catch fire or explode.
• Do not repair or replace any part of the washing machine or try to carry out any type of servicing unless it is recommended in the maintenance instructions in the manual.
• Do not climb onto the machine or stand on the open porthole door.
• Do not use an extension lead or adaptor to connect your washing machine to the mains supply.
• Follow the washing instructions recommended by the manufacturer of the
garment to be washed.
• Do not turn your washing machine on until you are sure that:
It has been installed in accordance with the installation instructions.
washing machine
All the water, drainage, mains electricity and earth connections meet the local regulations and/or other applicable regulations.
specifications
Important: Ensure that the transit bolts have been removed prior to using the machine.
Washing Machine Specifications
Power
cord
Work top
Control
panel
Detergent
dispenser
Drain hose
Hatch
Stainless
steel
drum
Porthole door
Filter
Kickplate
Levelling
feet
ACCESSORIES LOCATED
INSIDE THE DRUM
Accessories
Rear plugs
Drain pipe bender
71
Water inlet hose
washing machine
installation and assembly
washing machine
washing
washing
machine
machine
washing machine
AND
1 UNPACKING
installationa
UNBLOCKING THE
WASHING MACHINE
and assembly
UNPACKING
AND
installation
installation
and
andassembly
assembly
Unpacking the Washing 1Machine
UNBLOCKING THE
a
UNPACKING
installation and assembly
WASHING
• Remove the base, corner protectors and top
cover (FigureMACHINE
1).
UNPACKING
UNPACKINGAND
AND
1UNBLOCKING
a Remove the1
base,
corner protectorsTHE
and
UNBLOCKING
THE
UNPACKING
top cover.
aa
WASHING
WASHINGMACHINE
MACHINE
Removing the Transit Bolts
1 UNPACKING AND
a Remove
the base, corner protectors
UNBLOCKING
THE and
a
top cover.
• Remove the screws holding the plastic covers
to the backMACHINE
ofUNPACKING
the
WASHING
UNPACKING
washing machine (Figure 2 and 3).
a aRemove
Remove
thethe
base,
base,
corner
corner
protectors
protectors
and
and
top
top
cover.
cover.
• Loosen and remove the 3 transit bolts (Figure
3).
UNPACKING
a supplied.
Remove the base, corner protectors and
• Cover the holes with the plastic plugs
top cover.
fig. 1
Do not throw the transit bolts away. If you need to move the washing
UNBLOCKING
UNBLOCKING
machine after installation you should first replace the transit
bolts.
a There are 3 blocking screws on the back
a There are 3 blocking screws on the back
of the washing
machine.
of the washing machine.
UNBLOCKING
UNBLOCKING
b To loose and
completely
remove the
3 the 3
b To
loose and completely
remove
screws
with
the
metal
washer
a aThere
There
aretogether
are
3the
blocking
3 blocking
screws
screws
onon
the
the
back
back
screws together
with
metal
washer
and
black
rubber
and
plastic
of
of
the
the
washing
washing
machine.
machine.
UNBLOCKING
and the black rubber and plastic tubes tubes
up the blocking system.
that make upthat
themake
blocking
system.
ToTo
loose
loose
and
completely
completely
remove
remove
the
33
ab bThere
are and
3 blocking
screws
on
thethe
back
c of
Fitthe
thewashing
3together
plastic
plugs
supplied
in
the
screws
screws
together
with
with
the
the
metal
metal
washer
washer
machine.
c Fit the 3 plastic
plugs
supplied
inand
the
holes
you
removed
the
screws
from.
and
and
the
the
black
black
rubber
rubber
and
plastic
plastic
tubes
tubes
that
that
make
make
upup
thethe
blocking
blocking
system.
system.
holes youbremoved
the
screws
from.
To
loose
and
completely
remove
the 3
fig. 2
screws together with the metal washer
c cand
FitFit
the
the
3black
plastic
3 plastic
plugs
plugs
supplied
supplied
in
thethe
the
rubber
and
plasticintubes
holes
holes
you
you
removed
thethe
screws
screws
from.
from.
that
make
upremoved
the blocking
system.
c Fit the 3 plastic plugs supplied in the
holes you removed the screws from.
c
Important
Important
Important
Important
Important
c
Do not throw the blocking screws away.
You may need to move the washing
machine at a later date.
cc
fig. 3
c
Do not throwDo
the
blocking
screws
away.
Do
not
not
throw
throw
thethe
blocking
blocking
screws
screws
away.
away.
You
You
may
may
need
need
toto
move
move
thethe
washing
washing
You may need
to
move
the
washing
machine
machine
at
at
a
later
a
later
date.
date.
machine at a later date.
72
Do not throw the blocking screws away.
You may need to move the washing
machine at a later date.
72
7272
fig. 4
72
3
Connecting to the Mains Water Supply
The water supply hose is located inside the drum.
• Connect the bent end of the hose to the threaded inlet of the electrovalve located at the rear of the washing machine.
• Connect the other end of the hose to the water intake. Then securely tighten the connecting nut.
fig. 5
The drain hose must be securely fastened to the outlet to prevent
any risk of the drain hose becoming detached and causing flooding.
The washing machine must be connected to the mains water supply,
using the new supply hoses supplied with the appliance. Do not use
water supply hoses that have been used previously.
fig. 6
For your washing machine to work properly, the mains water
pressure must be between 0.05 and 1MPa (0.1 - 10 bar).
Drainage Connection
• It is recommended that you have a fixed drainage outlet 50 to 70 cm from the floor.
• Avoid the drain hose being too tight, kinked or restricted.
•
The water outlet can either be connected to a water drain or to a sink outlet spigot. This connect should be a minimum of 50cm and a maximum of 110cm from the floor. The drain hose should be no longer than 4m in length to ensure good performance from the dishwasher.
• After connecting the water supply, check to ensure there are no leaks.
4
Levelling
• To reduce the noise level from the washing machine and to prevent unnecessary movement during use, you should ensure the washing machine is level using the adjustable feet.
• First, fix and level the rear feet. When they are properly fixed, secure the metal locknut tightly against the underside of the washing machine.
• Put the washing machine into its required position.
fig. 7
• Then level the front feet in the same way as the front feet.
Please note: Raising the washing machine too high can affect the
stability of the appliance.
Electrical Connection
• Check the rating plate located on the porthole door of the washing machine before connecting the appliance to the power supply. Ensure that the voltage reaching the plug is the same as that on the plate.
fig. 8
Do not remove the rating plate. The information on it is important.
Do not plug the washing machine plug into the socket with wet or
damp hands.
To remove the power cord, pull on the body of the plug, not the cable.
5
Electrical information
Warning! This appliance must be earthed.
The mains lead of this appliance has been fitted with a BS 1363A 13 amp fused plug. To change a fuse in this type of plug,
follow the steps below:
1. Remove the fuse cover and fuse.
2. Fit replacement 13A fuse, ASTA approved to BS 1362 type, into the fuse cover.
3. Replace fuse cover.
Important: Do not use the appliance without the fuse cover in position.
How to connect an alternative plug
If the fitted plug is not suitable for your socket outlet, then it should be cut off and disposed of safely to avoid the risk of
electric shock. A suitable alternative plug of at least 13 Amp rating to BS 1363 should be used.
As the colours of the wires in the mains lead of this appliance may not correspond with the
coloured markings identifying the terminals in your plug, proceed as follows:• The wire which is coloured GREEN and YELLOW must be connected to the terminal which is marked with letter (E) or
by the Earth symbol
or coloured GREEN and YELLOW.
• The wire which is coloured BLUE must be connected to the terminal which is marked with the letter (N), or
coloured BLACK or BLUE.
• The wire which is coloured BROWN must be connected to the terminal which is marked with the letter (L) or
coloured RED or BROWN.
If in doubt regarding the electrical connection of this appliance, consult a qualified electrician. Do not shorten the
supply cable, the appliance may require removing for servicing.
N.B. Ensure that the plug socket is situated in an easily accessible place.
6
Before First Use
• When your washing machine has been correctly installed, we recommend that you pre-clean the machine.
This is to check that the installation, the connections and the drainage are all correct, and to thoroughly clean the inside of the washing machine before any wash programmes are run (see the operating instructions on the following pages).
fig. 9
• Prior to pre-cleaning you should ensure the transit bolts have been removed.
• Select the normal programme at 60ºC (Figure 9).
• Press the Start/Pause button (Figure 9).
7
Preparing Garments for Washing
Preparation
• Before placing the clothes in the drum, make sure all the pockets are
empty (Figure 10). Any small objects may block the drain pump.
Sorting the Clothes
fig. 10
Sort the clothes according to fabric and how they are made:
• We recommend using the delicate programmes for sensitive fabrics (Figure 11).
• Sort clothes according to how soiled they are (Figure 12).
Wash lightly soiled garments using a short programme.
Use a programme without prewash for medium-soiled garments.
fig. 11
Wash heavily soiled garments using a long programme with
prewash.
Sort your clothes according to colour (Figure 13).
Wash white and coloured loads separately.
fig. 12
We recommend loading the washing machine to its full capacity for
best water and energy efficiency.
Whenever possible, we recommend that you wash garments of
different sizes within the same wash programme. This improves
the washing action and also aids the correct distribution of the
garments in the drum when spin-drying, and the washing machine
will therefore be quieter.
We recommend that small garments are placed in a wash bag.
8
fig. 13
2 USING DETERGENT AND ADDITIVES
using
the appliance and practical tips
AND ADDITIVES
2 USING DETERGENT
2 USING DETERGENT AND ADDITIVES
using
applianceand
andpractical
practicaltips
tips
DETERGENT
using
thethe
appliance
Detergents and Additives
AND ADDITIVES
DETERGENT
a Your
machine’s
detergent
DETERGENT
Your washing machine’s detergent dispenser has
threewashing
compartments.
AND ADDITIVES
dispenser has three
ANDcompartments.
ADDITIVES
a Your
washing
machine’s
detergent
If you
are
going
to use
liquid
detergent
• Add the detergent or additive to the
dispenser
before
starting
a detergent
Yourbwashing
machine’s
detergent
dispenser
has three
compartments.
you must close
the wash
compartment
dispenser
three
compartments.
the wash programme (Figure 14).
flap.has
Take
the blue
tab protruding from
a
a
b the
If you
are going
use liquid detergent
bottom
of thetocompartment
between
b
Important
Important
Important
FABRIC SOFTENER
FABRIC SOFTENER
PREWASH
PREWASH
PREWASH
fig. 14
b
than the MAX mark printed on the
dispenser wall.
liquid level
never of
bedetergent
higher to
Remember
thatmust
the amount
• To use powder detergents again, thenThe
lift
the
tab
back
up and
be used
will always
depend
on:
than
theblue
MAX
mark
printed
on relocate
the
The
amount
of
clothes
to
be
washed.
dispenser
wall.
it by pushing it back into the dispenser housing.
Remember that the amount of detergent to
c
How heavily the clothes are soiled.
be The
usedwater
will always
depend
on:
(information
about
The level of liquid must never be higher
than
thehardness
MAX
mark
The
amount
of
clothes
tofrom
beprinted
washed.
water
hardness
is available
the to
relevant
Remember
that
the amount
of detergent
How
heavily
the
clothes
are
soiled.
authorities).
be usedlocal
will
always
depend
on:
on the dispenser wall.
The water hardness (information about
The water
amount
of clothes
to be washed.
hardness
is available
from the relevant
Howlocal
heavily
clothes are
authorities).
Wethe
recommend
thesoiled.
use of a
The waterdecalcifying
hardness (information
about
product if the
water
water hardness
is available
from
the area.
relevant
hardness
high
independ
your
Remember that the amount of detergent
to be used
will isalways
on:
We recommend the use of a
local authorities).
decalcifying product if the water
hardness is high in your area.
• The amount of clothes to be washed.
c
fig. 15
c
Important
Important
Important
FABRIC SOFTENER
WASH
b
or additive into the detergent dispenser
• Then release the flap so that it drops
the back
ofthe
the
dispenser.
c down
Put theat
detergent,
either
liquid
orprogramme.
powder,
before
starting
wash
The
liquid
level
must
never
be higher
or escaping
additive
the
detergent
dispenser
thaninto
the
MAX
mark
printed
on the
This will stop the liquid detergent from
from
the
compartment
before starting
thewall.
wash programme.
dispenser
The liquid level must never be higher
before it is needed.
We recommend the use of a
decalcifying
eco-noteproduct if the water
hardness is high in your area.
Remember that concentrated detergents
money it will have a negative effect on
the preservation of the environment.
eco-note
• The hardness of the water (Informationexist
on water
in your area and
can which hardness
are more environmentnature-friendly.
Remember
that concentrated detergents
be obtained from your local water board).
money it will have a negative effect
on
16
Wethe
therefore
recommend
youfig.
follow
preservation
of the environment.
the detergent manufacturer’s
instructions.
We therefore recommend you follow
exist which are more environment- and
The use of more detergent than
eco-note
nature-friendly.
We recommend the use of a decalcifying
product if the water
hardness is high in your area.
WASH
WASH
you
mustand
close
the
wash
compartment
b If you are
going
to
use
liquid
detergent
2 fingers
pull
outwards
as far as it
flap.
Take
thewash
blue
protruding
from
you must
the
compartment
will close
go.
Release
the tab
flap
and it will remain
the
bottom
of
the
compartment
between
flap. Take
the
blue
tab
protruding
from
in the vertical position and prevent
the
The detergent dispenser is designed to allow
the
use
of
liquid
detergents
2
fingers
pull
outwards
as
as it
the bottom
ofdetergent
theand
compartment
between
liquid
from
getting
out.farIt must
will
go. pull
Release
the flapas
and
will itremain
2 fingers
outwards
faritthe
as
beand
open
forthat
powdered
detergent.
Put it
rather than adding them to the drum. You
should
ensure
you close
in
the
vertical
position
and
prevent
the
the horizontal
will go. in
Release
the flapposition,
and it willpressing
remain the
liquid
detergent
getting
top
tab
with your
finger
and out.
pushing
it
the vertical
position
and
prevent
theIt must
wash compartment flap before adding theinliquid
detergent.
from
be
open
for
powdered
detergent.
Put
it
back as far
as getting
it will go.out. It must
liquid detergent
from
in the horizontal
position, pressing the
be open
for
powdered
detergent.
Put
it
top
tab detergent,
with your
finger
and
pushing
it
• To do so, hold the blue tab at the backinofthe
dispenser
and
pull
it
forwards
cthe
Put
the
either
liquid
or
powder,
horizontal
pressing
the
back
as farposition,
as itthe
willdetergent
go.
additive
dispenser
top taborwith
your into
finger
and pushing
it
until it is fully extended.
the wash programme.
backc asbefore
farthe
asstarting
it will go.
Put
detergent,
either liquid or powder,
• How heavily the clothes are soiled.
a
necessary will not improve your
Remember
thatresults,
concentrated
detergents
washing
apart
from
The
use of
more and
detergent
thancosting you
exist which
are more
environmentand
necessary
will not
improve your
nature-friendly.
washing results, and apart from costing you
money
it will have a negative effect on
the detergent manufacturer’s
the
preservation of the environment.
instructions.
Eco Note
The use of more detergent than
necessary will not improve your
washingwill
results,
and apart
fromwashing
costing you
The use of more detergent than necessary
not improve
your
77
We therefore recommend you follow
the detergent manufacturer’s
instructions.
77
results, and will have a negative effect on the preservation of the environment.
We therefore recommend you follow the detergent manufacturer’s
instructions.
77
9
Selecting the Wash Programme
Start/Pause
button
Programme selector
Time delay button
Spin/Anti-crease
button
Additional
function button
fig. 17
To select a wash programme:
• Turn the programme selector dial clockwise to the desired function.
• The display on the control panel will light up.
• Press the Start/Pause button to begin the programme.
10
ng the appliance and practical tips
1
Selecting the Wash Programme
1
When you select the programme, the following information will be displayed:
1.
Wash programme phases:
Prewash
Wash
Rinse
2
3
Spin-drying and draining
2
2. Spin speed
fig. 18
1
3. Programme number (for a few seconds) and then programme duration.
4.
3
1
Additional functions:
Easy iron
Extra rinse
Intensive2wash
3
2
3
4
fig. 19
There are four types of programme:
Normal programmes
Delicate programmes
Wool programme
Auxiliary programmes
PROGRAMMES
Normal
Delicate
Wool
Auxiliary
1 Normal cold
2 Quick 30ºC
3 Normal 30ºC
4 Normal 40ºC
5 Normal 60ºC
6 Normal 90ºC
7 Prewash 60ºC
8 Delicate cold 12 Wool cold 14 Rinses
9 Delicate 30ºC 13 Wool 35ºC 15 Spin-drying
10 Delicate 40ºC
16 Drain/End
11 Delicate 60ºC
Eco Note
We recommend you choose a wash programme without prewash whenever
possible. This will save you money and help protect the environment.
79
11
Washing Machine Programmes
Auxiliary prog.
Wool prog.
Delicate programmes
Normal programmes
1
Cotton/Linen
delicate colours
very light soil
2
Quick 30ºC
30
3
Normal 30ºc
30
Cotton/Linen
delicate colours
light soil
YES
4
Normal 40ºC
40
Cotton/Linen
fast colours
light soil
YES
60
Cotton/Linen
fast colours
medium soil
YES
YES NO
YES
6
Normal 90ºC
90
Cotton/Linen
whites
heavy soil
YES
7
Prewash 60ºC
60
Cotton/Linen
whites/fast colours
heavy soil
YES
Synthetic/mix
cotton delicate colours
very light soil
YES
8
Delicate cold
9
Delicate 30ºC
30
30
Synthetic/mix cotton
delicate colours
light soil
YES
10
Delicate 40ºC
40
40
Synthetic/mix cotton
delicate colours
medium soil
YES
Synthetic/mix cotton
white/fast colours
medium soil
YES
11
Delicate 60ºC
12
Wool cold
WOOL Cold
Wool/wool mix
white/colour
very light soil
YES NO
YES
13
Wool 35ºC
WOOL 35
Wool/wool mix
white/colour
light soil
YES NO
YES
YES NO
YES
NO
60
14
Rinses
_
Cotton/cotton mix
Synthetic/Delicate
Wool/wool mix
15
Spin-drying
_
Cotton/cotton mix
Synthetic/Delicate
Wool/wool mix
_
Cotton/cotton mix
Synthetic/Delicate
Wool/wool mix
16
Drain /End
Programme for wash and energy consumption assessment in
accordance with standard EN60456, press intensive wash button.
80
YES
NO
NO
Anti-crease
No spin
Easy-iron
YES
Cotton/Linen
whites/colours
very light soil
Cold
Spin speed
selection
Intensive
wash
Possible option buttons
Fabric type
Cold
5 (*) Normal 60ºC
(*)
12
Normal cold
Recommended
temperature
Extra
rinse
Programme
Max.
load of
clothes (Kg)
Anti-crease
Washing Machine Programmes
Max.
load of
clothes (Kg)
Wash
product
compartment
TURBO TIME PLUS
Programme
description
Total
consumption
KWh/litres
Approx.
duration
(minutes)
8
Normal wash, rinses,
automatic additive absorption
if desired and long final spin
0,10/59
50
2
SHORT wash, rinses,
automatic additive absorption
if desired and final long spin
0,25/30
30
0,30/59
52
0,60/59
57
1,52/59
80
2,20/64
110
1,50/64
100
0,10/45
50
0,20/45
50
0,40/45
55
1,00/45
70
0,05/55
30
0,45/55
40
Rinses, automatic
additive absorption if
desired and long final spin
0,05/25
23
8
Normal wash, rinses,
automatic additive
absorption if desired
and long final spin
8
8
8
Prewash, normal wash, rinses,
automatic additive absorption
if desired and long final spin
8
3,5
3,5
Delicate wash, rinses,
automatic additive
absorption if desired
and gentle final spin
3,5
3,5
2
WOOL wash, rinses,
automatic additive
absorption if desired
and gentle final spin
2
8
8
_
Drain and final long spin
0,05/0
10
8
_
Drain and end of programme.
Takes programme to
final position
0,00/0
2
NOTE: the KWh and litre consumptions and programme durations may vary depending
on the type and amount of clothes, mains water pressure, etc.
81
13
4 SPIN SPEED SELECTION
4 SPIN SPEED SELECTION
using the appliance
andappliance
practicaland
tipspractica
using the
SPIN DRYING
SPIN DRYING
Spin must
Speed
Selection
and
a
Theselected
wash options
must always be selected
after
e wash options
always
be
after Anti-Crease
the wash
Any
programme
oosing the
wash
programme.
Any
You
should
first select thechoosing
wash programme
programme
andprogramme.
then select the
wash
options
during selection cancels the previously
ange during
selection
cancelschange
the
previously
(Changing
the programme
cancels
the preset selected options).
selected
options.
ected options.
a Spin speed selection and anti-crease
Spin speed
selection
and anti-crease
SPIN SPEED SELECTION
SPIN
SPEED
SELECTION
Each selected programme has its button.
own preset spin speed.
button.
The programme selected is associated
The programme selected is associated
with certain spin revolutions, as shown
with certain
spin revolutions, on
as the
shown
Spin speed
display.
ab
b
SPEED SELECTION
4 SPIN
4
4
using
andappliance
practical
tipspractica
using and
the
and
usingthe
the appliance
appliance
practical
tips
SPIN
on the display.
• You can reduce the spin b
speedItor
remove
it completely
pressing the
can
be modified
bybypressing
thespin
spin
SPIN
DRYING
SPIN DRYING
SPIN
DRYING
button
(Figure 20).
drying
button and the number
of
It can be
modified
by pressing
the
spin
revolutions
will
be
reduced
100after
aisbypressed
Theselected
wash
must
always
be selected
drying
and
the
number
ofoptions
e wash
must
always
be
after
The options
wash
options
must
always
be
selected
after
• button
The
spin
speed
will
gradually
reduce
each
time
the
spin
button
at revolutions
a time to 400.
choosing
the wash at
programme.
Any programme
revolutions
will
be
reduced
by
100
choosing
ther.p.m.
wash
programme.
Any
programme
oosing
the
programme.
programme
wash
100
intervals
to aAny
minimum
of 400 r.p.m (Figure 21). c
selection cancels the previously
change
cancels
the during
previously
atselection
a time
to change
400.
angerevolutions
duringduring
selection
cancels
the
c previously
No spin
selected options.
selected
options.
ected
options.
Press the spin button again to get to the
a Spin
speed
selection
and anti-crease
No
spin
No
spin
a
Spin
speed
selection
anti-crease
no
spin
option.
A programme
without a
Spin speed
selection
andand
anti-crease
SPIN
SPEED
SELECTION
button.
button.
Press
the
spin
button
again
to
get
to
the
final
spin.
It
is
used
to
prevent creasing
button.
•The
Press
the
spin
button
again
to
get
to
the
no
spin
option
and
the
display
The
programme
selected
is
associated
programme
selected when
iswithout
associated
washing
no spin
option.
Aselected
programme
a special fabrics. will
The
programme
withascertain
with
show
“0”
(Figure
22).
is associated
certain
spinto
revolutions,
shownspin revolutions, as shown
final
spin.
It
is
used
prevent
creasing
with certain
spin revolutions,
asthe
shown
display.
on the display.
d on
Anti-crease
option
when
special
fabrics.
•washing
A programme
without
a final spin is used to prevent creasing when on the
display.
The wash programme stops on the last
bpressing
Itrinse,
canthe
be
modified
by pressing
the spin
washing
fabrics.
b It can
be special
modified
by
spin
SPIN
DRYING
with
the clothes
left in water.
Anti-crease
optionand
SPIN
DRYING
drying
button
and the
number of the
button
the number
ofthe
It candrying
be modified
by pressing
the
spin
When
function
is deactivated,
The
wash
programme
stops
on
last
revolutions
will be continues
reduced a
e wash
options
mustmust
always
be selected
after
cbythe100
revolutions
will
be
reduced
by
100
drying
button
the
number
ofthe
washing
machine
a
The wash
optionsand
always
be revolutions
selected
after
at a time to 400.
Anti-crease
option
rinse,
with
the
clothes
water.
revolutions
at
areduced
timeleft
to in
400.
oosing
the
wash
programme.
Any
programme
programme,
c
revolutions
will
be
by
100
choosing
the wash
programme.
Any
programme draining and spin-drying.
the
function
iscancels
deactivated,
the for example, when you are not
angeWhen
during
selection
cancels
the
previously
Itwill
is
used,
revolutions
atselection
a time
to
400.
change
during
the
previously
•No
Pressing
the
spin button
select the anti-crease option (Figure 23).
cagain
No
spin
c
spin
washing
machine
continues
the
at
home
and want to delay the spinected
options.
selected options.
Press
the
button
again toprevent
get to the
Press
thedraining
spin
button
again
to
tospin
the
drying
until
you
get
programme,
and
spin-drying.
•Spin
Thespeed
wash
programme
stops
on
theget
last
rinse,
with
thehome,
clothes to
left in water. the
No
a spin
selection
and
anti-crease
Spin
speed
selection
and
anti-crease
no
spin
option.
Aafter
programme
without
no
spin
option.
A
programme
without
a
clothes
creasing
spin-drying
and a
It is used,
forthe
example,
whentofinal
you
are
not
Press
the
spin
get
to
•button.
When
option
is again
deactivated,
thespin.
washing
machine
continues
thecreasing
It is
used
to
prevent
button.
final
spin.
Itbutton
is used
to prevent
creasing
being
leftthe
in
the
drum
to
be removed.
at
home
and
want
to
delay
the
spinprogramme
selected
is without
associated
when
washing
no spin
option.
Aselected
programme
a special fabrics.
The
programme,
draining
andis
spin-drying.
The
programme
associated
when
washing
special
fabrics.
a
drying
untilcertain
you
get
home,
to prevent
the
with
spin
as
shown
final
Itused,
is
used
torevolutions,
prevent
with spin.
certain
spin
revolutions,
ascreasing
shown
•
It
is
for
example,
when
you
are
not
at
home and want to delay the clothes
creasing
after
spin-drying
and
on
the
display.
d
Anti-crease
option
d
Anti-crease
option
when
washing
special
fabrics.
on the
display.
spinindrying
until
youto
getbe
home,
to prevent
the clothes creasing
after
OPENING
being The
left
theprogramme
drum
removed.
The
wash
programme
stops
onspin-
the last
wash
stops
on
the last
drying
and
being
left
in the
tothe
be
removed.
THE
HATCH
b It
can
be
modified
by
pressing
spin
rinse,
with
the clothes left
in water.
SPIN
rinse,
with
the clothes
leftdrum
inDRYING
water.
Anti-crease
option
It candrying
be modified
by
pressing
the
spin
button
and the
number
Whenofthe
function is deactivated, the
Whenprogramme
the
function
is
deactivated,
the
The
wash
stops
on
the
last
drying
button
and
the
number
of
ccan
e wash
options
must
always
beaselected
after
revolutions
will
be continues
reduced
by
100
Depending
on the model,
youa
washing
machine
continues
the open the
washing
machine
the
OPENING
rinse,
with
clothes
in
water.
c
revolutions
will
be
by
100by pressing
atdraining
areduced
timeleft
toand
400.
hatch
the hatch
opening
button.
programme,
draining
and spin-drying.
oosing
therevolutions
washthe
programme.
Any
programme
programme,
spin-drying.
function
is to
deactivated,
the
revolutions
at afortime
400.
THE
ItIf HATCH
isyou
used,
example, when you are not
angeWhen
during
cancels
the
previously
Itthe
isselection
used,
example,
when
arefor
not
you
cannot
open the hatch due to a
b
washing
machine
continues
the
coptions.
No
spin
home
and
want to delay the spinat home
and want
to delayat
the
spinected
breakdown
or a power cut, proceed as follows:
Press
the
spin
button
again
getuntil
tothe
the
drying
you get home,
to
the
programme,
draining
spin-drying.
a prevent
No
spin
dryingon
until
you
getand
home,
totoprevent
the
Depending
the
model,
you
can
open
remove
the
dispenser
pulling
the handle
speed
and
anti-crease
no
option.
programme
a afterbyspin-drying
creasing
and your
ItSpin
is used,
forselection
example,
when
you
are
not
clothes
creasing
spin-drying
and
Press
thespin
spin
button
again
toclothes
getwithout
to
the
hatch
by
pressing
theAafter
hatch
opening
button.
outwards
and
pressing
the
blue
lever
with
button.
final
spin.
It Ais
used
to to
prevent
creasing
being
left
ina thewith
drum
to be removed.
being
leftwant
in
the
be
removed.
at
and
todrum
delay
the
spinnohome
spin
option.
programme
without
finger.
A button
a slot will appear on the
when
special
fabrics.
selected
is
associated
IfThe
youprogramme
cannot
the
toTurn
a the
a
drying
untilItwashing
you
get
home,
todue
prevent
right.
the button to the left
final
spin.
isopen
used
tohatch
prevent
creasing
b with the aid of
with
certain
revolutions,
shown
breakdown
orspin
a power
proceed
asand
follows:
clothes
creasing
aftercut,
spin-drying
aas
coin
and
the hatch will open.
when
washing
special
fabrics.
d
Anti-crease
option
on
theleft
display.
remove
theindispenser
the handle
OPENING
OPENING
being
theprogramme
drumby
topulling
be
removed.
The and
wash
stops
onwith
the last
Iflever
your
model
of Washing machine does not
outwards
pressing the blue
your
THE
THE
HATCH
Anti-crease
option
rinse,
with the clothes
left have
in the
water.
remote opening you have toHATCH
await about
It
canwash
be
modified
pressing
finger.
A button
withby
a slot
will appear
on
the
The
programme
stops
thespin
last
When
the function
is
deactivated,
the
2on
minutes
from the end of the programme
drying
button
and
the
number
of
right.
Turn
the
button
to
the
left
with
the
aid
of
Depending
on
the
model,
you
can
open the
on the model,
can
open the
washing
continues
the being
a Depending
before
able to open the hatch.
rinse,
with themachine
clothes
leftaOPENING
inyou
water.
c
hatch
by pressing
the hatch opening
button.
revolutions
will
be
reduced
by
100
a
coin
and
the
hatch
will
open.
hatch
by
pressing
the
hatch
opening
button.
programme,
draining
and
spin-drying.
WhenForthe
function
isthe
deactivated,
added
safety,
porthole
doorthe
does not open immediately at
THE
HATCH
revolutions
at
a
time
to
400.
It
is
used,
for
example,
when
you
are
not
Ifthe
you
cannot
open the hatch due to a
machine
continues
b
Ifmodel
you
open
themachine
hatch
due
to a not
Ifwashing
your
Washing
b the
endcannot
ofof
programme.
There
is adoes
time
delay
of approximately
at
home
and
tocut,
delay
the
spinb two
breakdown
or a power
cut, proceed
as follows:
breakdown
or awant
power
proceed
asabout
follows:
programme,
draining
and
spin-drying.
have
remote
opening
you
have
to
await
a the handle
minutes
before
you
can
open
the
door.
Depending
on
the
model,
you
can
open
the
drying
until
you
get
home,
to
prevent
the
No
spin
remove
the
dispenser
by
pulling
remove
the
dispenser
by
pulling
the
handle
It2 is
used,
for
example,
when
you
are
not
minutes
from
the
end
of
the
programme
creasing
spin-drying
and
hatch clothes
by
the after
hatch
opening
button.
Press
thepressing
spin
button
again
tooutwards
get
to
the
andyour
pressing the blue lever with your
outwards
and
pressing
the
blue
lever
with
at home
and
want
to
delay
the
spinbefore
being
able
to
open
the
hatch.
being
left
inAthe
drum
to be
removed.
finger.
A button
on the
noyou
spin
option.
programme
without
a thewith a slot will
finger.
Ayou
button
with
a slot
will
appear
on
a appear
Ifdrying
cannot
open
the
hatch
due
to
a
until
get
home,
to
prevent
the
14
Turn
to the left
with the aid of
final
spin.
is
used
to
prevent
right. It
Turn
the button
to the right.
leftcreasing
with
thethe
aidbutton
of
b
82
breakdown
or a power
proceed
asand
follows:
clothes creasing
aftercut,
spin-drying
a coin
and
the hatch will open.
fig. 20
c
a
bb
d
b
d
4 SPIN SPEED SELECTION
4
using the appliance and practical tips
using the appliance and practical tips
SPIN
fig. 21
c
d
bb
d
d
a
4 SPIN SPEED SELECTION
using the appliance and practical tips
coin and the
hatchfabrics.
will open.
whenawashing
special
SPIN
fig. 22
d b
d
b
a
SPIN
fig. 23
d
82
b
4 SPIN SPEED SELECTION
using the appliance and practical tips
DELAY SECTION AND
5 TIME
ADDITIONAL FUNCTIONS
SPIN DRYING
using the appliance
a
wash options must always be selected after
TIME DELAY
sing the wash programme. Any programme
Delay
ge duringTime
selection
cancels theTime
previously
delay selection button
A delay of up to 24 hours can be selected.
ted options.
Time delay selection button
b
EASY IRON
The delay must be selected after choosing the
wash
programme.
Spin speed
selection
anti-crease
• A delay
of up to 24and
hours
can be selected. The delay must be selected after To select the delay time, press the clock button.
button. choosing the wash programme.
Each time the button is pressed the start will
The programme selected isbeassociated
put back 1 hour.
• To select
hours of delay,
press
the
delay button (Figure 24). Each with certain
spinthe
revolutions,
as
shown
Cancelling
thetime
delay
time the button is pressed the delayed start of washing is increased by on the display.
To cancel the delay you have to press the
one hour.
Select
SPIN
DELAY TIME
SELECTION
fig. 24
clock button successively. The delay will be
cancelled
It can be modified by pressing
thewhen
spin24 hours have been reached
and the button is pressed once more. If the
drying button and the number
of is changed the delay is also
programme
SPIN
SPEED
SELECTIONc
Cancelling
the reduced
delay
cancelled.
revolutions
will
be
by 100
revolutions
at
a
time
to
400.
• To cancel the delay, press the time delay button repeatedly to cycle 4
EXTRA RINSE
d
using
appliance and practical tips
ADDITIONALthe
FUNCTIONS
through the full 24-hours, and then press again.
Additional function selection button depending
No spin
on programmes.
TIME
DELAY
SECTION
AND
• The
delay
will be again
cancelledtowhen
24
hours
have been
reached
the Press the
spin
button
to
the
5get
There
are
3 options:
easy-iron,
extraand
rinse
ADDITIONAL
FUNCTIONS
and
intensive
wash.
button isA
pressed
once more.without
If the programme
is changed the delay is no spin option.
programme
a
SPIN
DRYING
the select
button to display the
final spin.
It iscancelled.
used to prevent Press
creasing
also
option required.
when
special
fabrics.
the button
The washing
wash options
must
alwaysBybepressing
selected
afterseveral times you a
can choose between several
combinations
DELAY
choosing the wash programme.
Any programmeTIME
of one, two and up to three additional
Additional
functions
Anti-crease
option
change during selection cancels
theselection
previously
Time delay
button
functions
at the same
time depending on
A delay
up
to 24 hours
be selected.
programme
selected.
Theselected
wash
programme
stops
ontheof
the
last
Additional
function selection
button
depending
oncan
programmes.
options.
using the appliance
b Select
4 SPIN SPEED SELECTION
using the appliance and practical tips
rinse, with the clothes left in water.
The delay must be selected after choosing the
a Spin speed selection and anti-crease
When
the function is deactivated,
the
To select
delayprevents
time, press
the clockfrom
button.
Thisthe
option
garments
TIME
SECTION
AND
• button.
Press the button
and the
desired
option
willisbe
(Figure
Each
time
the
button
pressed
the start
creasing
by DELAY
means
ofdisplayed
carrying
out
awill 25).
washing
machine
continues
the
5
Select
The programme
is1programme
associated
be putspecial
back
hour.
with FUNCTIONS
special turns to
ADDITIONAL
programme,
draining
andselected
spin-drying.
• By pressing
the button
several
times
you
can
choose
between
several
fluff out theas
garments
after spin-drying
using the appliance
with
certain spin
revolutions,
shown
SPIN
DRYING
Cancelling
thenot
delay
It is used,
for
example,
when
you
are
and
make
them
easier
to
iron.
on
combinations
of one, two and up to three additional functions at the
Select
the
display.
Tothe
cancel
the delay you
have to
press26).
the
at The
home
want
to
delay
spina
b
and
same
time depending
on
the
programme
wash
options
must
always
be
selected
after
fig. 25
Button:
Extra
rinse (selected
) The(Figure
clock
button
successively.
delay will
be
a
drying
until you
get home,
to
prevent
the
TIME
DELAY
Increases
the
level ofhave
the
final rinse
cancelled
when
24the
hours
been
reached
choosing
the be
wash
programme.
Any
programme
b It can
modified
by pressing
spin
obtained
in
the
clothes;
suitable
for
large
clothes
creasing
after
spin-drying
and
and
the
button
is
pressed
once
more.
If
the
changedrying
duringbutton
selection
cancels
theand
previously
Time
delay
selection
and
the
number
of button
loads
garments
to people
is changed
thebelonging
delay is also
Option
1: Easy-iron
being
left
inoptions.
the
drum to
beprogramme
removed.
delay
of sensitive
up to 24 hours
can be selected.
with
skin. Increases
water
selected
c
d
revolutions
will be Acancelled.
reduced
by
100
The delay
must be selected after choosing the
consumption!
option prevents
creasing by means of carrying out a
If during the additional function selection, the
revolutions
agarments
time
tofrom
400.
wash
programme.
a This
Spin
speedatselection
and
anti-crease
programme is changed or the ON/OFF button
ADDITIONAL
FUNCTIONS
To
select
the to
delay
time,
press
special
programme with special
turns
fluff
out
garments
after Button:
Intensive
wash
(the the
) clock button.
button.
is pressed, all the functions selected until then
Each
time function
the button
is pressed
thedepending
start will
This
specially
recommended
for
Additional
selection
button
OPENING
and make them
easier
tooption,
iron.
c spin-drying
No spin
are cancelled.
Select
The
programme
selected
is
associated
be
put
back
1
hour.
heavily soiled, stained clothes, achieves
on programmes.
THE
HATCH
Presscertain
the spin
button
again
to3delay
get
toeasy-iron,
the theextra
betterthe
results
by
extending
normal
with
spin
revolutions,
as
shown
There
are
options:
rinse
Cancelling
washintensive
cycle.without
and
wash. a
no the
spindisplay.
option. A programme
on
you
have to display
press the
Option 2: Extra rinse To cancel
Pressthe
thedelay
select
button
the
83
fig. 26
final
It is used
to
prevent
creasing
Depending
onspin.
the model,
you
can
open
the
clock option
button required.
successively.
The delay will be
Increases
the
level
of
the
final
rinse
obtained
in
the
clothes;
suitable
cancelled
when
24
hours
have
been
reached
when
washing
special
fabrics.
hatchb by
pressing
the
hatch
opening
button.
By pressing the
It can be modified by pressing
thebutton
spinseveral times youfor large
Select
the
button
is between
pressed several
once more.
If the
choose
combinations
loads
and garments
belonging
tocan
people
with
skin.
However,
this
drying
button
and and
the
number
of sensitive
programme
changed
also
If you cannot
open
the hatch
dueof
to
aistwo
one,
and upthe
to delay
three is
additional
d option
Anti-crease
option
c
will
increase
your
water
consumption.
d
cancelled.
revolutions
reduced
byat 100
b on
functions
the same time depending
breakdown
or a powerwill
cut,be
proceed
as follows:
the
programme
selected.
The wash programme
stops
on the
last
revolutions
time tothe
400.
remove the
dispenseratbya pulling
handle ADDITIONAL FUNCTIONS
rinse, with the clothes
left in water.
Button:
(
)
outwards
and pressing
thewash
blue
leverEasy-iron
with your
3: the
Intensive
Additional
selection
button depending
When
function
is deactivated,
thegarments
This function
option prevents
from
c AOption
No
spin
finger.
button
with a slot will
appear
onbythe
on programmes.
creasing
means
ofthe
carrying
out aclothes,
washing
machine
continues
the
Press
the
spin
button
again
to
get
to
This
option,
specially
recommended
for
heavily
soiled
stained
There
are
3
options:
easy-iron,
extra
rinse
right. Turn the button to the left with
theprogramme
aid of withor
special
special
turns
to
programme,
draining
and
spin-drying.
and
intensive
wash.
no
spin
option.
A extending
programme
without
acycle.
achieves
better
results
by
the
normal
washafter
fluff out
the
garments
spin-drying
a coin and
the
hatch
will open.
Press
the you
select
button
toiron.
display the
It
is
used,
for
example,
when
are
not
and
make
them
easier
to
final spin. It is used to option
prevent
creasing
Select
required.
at home
and want
to delay
the
spinIf your model
ofwashing
Washing
machine
does
not
when
special
fabrics.
By
pressing
the
several times you
Button:
Extra
rinse
( button
)
Select
a
If during
the
additional
selection,
programme
can
choose
between
combinations
drying
until
you have
getfunction
home,
toabout
prevent
the
have remote
opening
toIncreases
await
the
levelthe
ofseveral
the
final
rinse is
of
one, is
two
andclothes;
up
toallthree
additional
obtained
in
the
suitable
for
large
clothes
creasing
after
spin-drying
and
changed
or
the
Start/Stop
button
pressed,
the
functions
2 minutes
from
the
end
of
the
programme
d Anti-crease option functions at the same time depending on
loads and garments belonging to people
being
lefttoin
thearedrum
to
be
removed.
before being
able
open
the
hatch.
selected
until
then
cancelled.
the
programme
selected.
The
wash
programme
stops
on skin.
the
last water
with
sensitive
Increases
consumption!
rinse, with the clothes
left in water.)
If during the additional function selection, the
Button: Easy-iron (
programme is changed or the ON/OFF button
When the functionButton:
is deactivated,
the ) 82 from
This
option prevents
Intensive
wash ( garments
is pressed, all the functions selected until then
creasing
by
ofrecommended
carrying out a for
washing machine continues
themeans
This
option,
specially
OPENING
are cancelled.
special
programme
with
specialachieves
turns to
heavily
soiled,
stained
clothes,
programme, draining and
spin-drying.
fluff out
the garments after spin-drying
Important
Important
wash
programme.
Button:
Easy-iron
• There are 3 options: easy
iron,
extra rinse( and) intensive wash.
15
UP AND
6 STARTING
BLOCK FUNCTION SELECTION
Starting Up
using the appliance
STARTING UP
a
Start/pause button
Start/Pause button
a To start up the washing machine you
have to press the start / pause button.
• To start up the washing machine you have to pressThe
thedisplay
Start/Pause
button
will constantly
show the
minutes left until the wash is over.
(Figure 27).
• The time remaining (in minutes) until the end of theSTARTING
programme will
UP AND
6 BLOCK FUNCTION
SELECTION
appear on the display at all times.
using the appliance
fig. 27
Lock Function
BLOCK
FUNCTION
STARTING
UP
a
a
Block function selection
Start/pause
buttoncan be blocked to prevent
Lock function selection
The
various buttons
a from
To start
up pressed
the washing
them
being
and machine
affecting you
the
have
to press
the startand
/ pause
button.
selected
wash
programme
options.
This
• The lock function ensures that the programmecanwill
not
be
affected
ifplaying
any
with
display
willchildren
constantly
show
thethe
beThe
used
to stop
minutes
buttons,
etc. left until the wash is over.
buttons are pressed. It is used when children could
press
the
buttons,
etc.
The block function should be activated after
the wash programme has been selected
together with all its options.
• The lock function should be activated after the washSTARTING
programme has
UP been
AND
6 BLOCK
Activating
the block function
FUNCTION SELECTION
selected together with all its options.
Activating the lock function
a The block function is activated by
pressing the start/pause button and
holding it down for at least 3 seconds.
The display will showBLOCK
if it is activated.
FUNCTION
b
STARTING UP
b
pressing the start/pause button and
Deactivating the block function
Block function selection
b The block function is cancelled when
84
a
The various buttons can be blocked to prevent
• If you want to deactivate the lock function before
end
of
the and
the wash
comes
to anthe
end.
them the
from
beingprogramme
pressed
affecting
If you
want
to deactivate
block This
wash
programme
andthe
options.
programme, you have to hold the Start/Pauseselected
button
down
again
for
the end
of at
the with the
can befunction
used tobefore
stop children
playing
programme,
you have to hold the start
buttons,
etc.
least 3 seconds.
button down again for at least 3 seconds.
The block function should be activated after
Afterprogramme
3 seconds,has
the been
blockselected
function
the wash
indicator
the display,
together
with allwill
itsdisappear
options.
• After 3 seconds, the lock function indicator will
disappear
from
the from
display,
and it will go into pause status.
The ON/OFF
button
does not cancel
Activating
the block
function
and it will go into pause status.
the block function.
a The block function is activated by
b
pressing the start/pause button and
• The Start/Pause button does not cancel the lock function.
holding it down for at least 3 seconds.
The display will show if it is activated.
Deactivating the block function
b The block function is cancelled when
the wash programme comes to an end.
If you want to deactivate the block
function before the end of the
programme, you have to hold the start
button down again for at least 3 seconds.
After 3 seconds, the block function
indicator will disappear from the display,
and it will go into pause status.
The ON/OFF button does not cancel
the block function.
84
84
16
fig. 28
a
a
Deactivating
the
block function
Block function
selection
b various
The block
function
cancelled
when
Start/pause
button
The
buttons
can beisand
blocked
prevent
• The lock function is activated by pressing the Start/Pause
button
toto an
the
wash
programme
comes
end.
them
being
pressed
and
affecting
the
a from
To start
up
the washing
machine
you
Ifhave
you
want
to deactivate
the
block
selected
wash
programme
options.
This
to
press
the startand
/ pause
button.
holding it down for at least 3 seconds (Figure 28).
the
end playing
of the
can befunction
used
tobefore
stop
The
display
willchildren
constantly
showwith
thethe
programme,
you the
have
to hold
the start
buttons,
etc. left until
minutes
wash
is over.
button
down
again
for
at
least
3
seconds.
• The display will show the lock symbol if it is activated.
The block function should be activated after
Afterprogramme
3 seconds,has
the been
blockselected
function
the wash
indicator
together
with allwill
itsdisappear
options. from the display,
and it will go into pause status.
The ON/OFF
button
does not cancel
Activating
the block
function
Deactivating the lock function
a the
Theblock
blockfunction.
function is activated by
holding it down
for at
3 seconds.
• The lock function is cancelled when the wash programme
comes
toleast
The display will showBLOCK
if it is activated.
FUNCTION
an end (Figure 29).
using the appliance
fig. 29
7 WASH PROGRAMME PHASES AND POWER CUTS
using the appliance
PROGRAMME
PHASES
Wash Programme Phases
and Power Cuts
When the programme is running you can see
Programme Phases
which phase it is at on the display, as well as
how long there is to the end of the programme.
The active phases
willand
appear
at
• When the programme is running, the programme
phase
thesuccessively
time the top of the display as the programme
remaining will appear on the display (Figure
30). The time remaining until the end of
progresses.
•
the programme will also appear on the display.
It updates
regular
intervals,
butas
notthe
minute
The active phases will appear successively
at theattop
of the
display
by
minute.
programme progresses (Figure 30). The time remaining until the end of Any option button can be selected provided the
the programme will also appear on thewash
display.
It in
updates
regular
not been
phase
which it at
takes
effect has
intervals, but not minute by minute. passed and when the programme accepts the
fig. 30
option.
Important
Pressing
thewash
delayphase
buttonin
during
theitwash
• Any option button can be selected provided
the
which
has
no effect on the washing machine.
takes effect has not been passed and when the programme accepts Pressing the start/pause button during the wash
the option.
activates the PAUSE function.
• Pressing the time delay button during washing will have no effect on the wash programme.
If you change the wash programme during
the wash using the selector, the PAUSE
function is activated and the programme is
cancelled.
If you need to add or remove a garment,
press the start/pause button and make sure
that the water level is not above the door
overflow level and that the temperature
inside is not high. Press the start/pause
button again to restart the wash from the
same cycle phase it had stopped at.
• Pressing the Start/Pause button during the wash activates the POWER CUTS
PAUSE function.
POWER CUTS
If there is a power cut, when the electricity
If the programme is changed on the selector
dialonduring
the washing
comes back
the washing
machine will
to run from where it left off (it has
and drying process, the washer will gocontinue
onto PAUSE
status and the
several hours of memory). The same will happen
if the ON/OFF button is pressed.
programme will be cancelled.
warnings
If you need to add or remove a garment, press the Start/Stop button
and make sure that the water level is not above the door overflow
Level the washing machine by adjusting the
level and that the temperature insidefeet
is not
high.the
Press
Start/Stop
to reduce
noise the
caused
by spin-drying.
Try and
washcycle
clothes
of different
sizes in the
button again to restart the wash from the
same
phase
it had
same wash programme to favour the distribution
of the clothes inside the drum during spin-drying.
stopped at.
Power Cuts
• If there is a power cut, when the electricity comes back on the washing machine will continue to run from where it left off (it has several hours of memory).
All the models have a safety system for spin-drying
that prevents spin-drying from being carried out if the
distribution of the clothes inside the drum is too
concentrated. This prevents the appliance from
vibrating too much.
If you find that the clothes are not properly wrung out,
try spin-drying them again after having distributed the
clothes more evenly in the drum.
85
Warnings and Advice
• Try to wash clothes of different sizes in the same wash programme to favour the distribution of the clothes inside the drum during spin-drying.
•
All the models have a safety system for spin-drying that prevents spin drying from being carried out if the distribution of the clothes inside the drum is too concentrated. This prevents the appliance from vibrating
too much.
• If you find that the clothes are not properly wrung out, try spin-drying them again after having distributed the clothes more evenly in the drum.
17
washing
machine
washing machine
maintenance
and cleaning
MAINTENANCE
maintenance and cleaning
Important
Important
After each wash, leave the door open
MAINTENANCE
for a while to allow the air to circulate
freely inside the machine.
After each wash, leaveMAINTENANCE
the door open
forFrom
a while
to allow
the depending
air to circulate
time
to time,
on the
freely
inside the
machine.
hardness
of your
water,
it isopen
After
each wash,
leave
the door
recommendable
to run
full wash cycle
for
a while to allow the
air toa circulate
From
time to the
time,
depending on the
freely
machine.
usinginside
a decalcifying
product.
hardness of your water, it is
Maintenance
This
will
extend
the
life
of
yourcycle
washing
recommendable
to run
a full wash
From time to time,
depending
on the
machine.
• After each wash, leave the door openusing
for
a awhile
allow
the itairis to circulate
decalcifying
product.
hardness
oftoyour
water,
This
will extend the
your
washing
recommendable
to life
run of
a full
wash
cycle
freely inside the machine.
machine.
using a decalcifying product.
Important
This
extend
life ofityour
The will
washing
machine
be
• From time to time, depending on the hardness
of yourthe
water,
isshould
washing
machine.
disconnected
from the
mains
electricity
recommendable to run a full wash cycle
using a decalcifying
product.
This
The
washing
machine
should beor
supply
before
any cleaning
will extend the life of your washing machine.
disconnected
from
mainsout.
electricity
maintenance
is the
carried
The washing
should
supply
before machine
any cleaning
orbe
disconnectedisfrom
the mains
maintenance
carried
out. electricity
supply before any cleaning or
Cleaning the Detergentmaintenance
Dispenser
is carried out.
• Clean the detergent dispenser whenever there
is
any
washing productTHE
DETERGENT DISPENSER
1 CLEANING
residue left inside.
1 CLEANING THE DETERGENT DISPENSER
CLEANING
THE whenever
DETERGENT
1tothe
Clean
detergent
dispenser
• Pull outwards on the detergent dispenser
remove
it completely
Clean
dispenser
whenever
therethe
is detergent
any washing
product
residue left
(Figure 32).
there
is the
anydetergent
washing dispenser
product residue
left
Clean
whenever
inside.
a
there is any washing product residue left
inside.
• Use warm water and a brush to cleaninside.
the compartments (Figure 33).
a
a Pull outwards on the handle and
a Pull having
outwards
on thethem
handle
and
• Also clean the additive compartment siphons,
first.
press
theremoved
blue
with
your
a press
Pull
outwards
on lever
the
handle
and finger
the blue lever
with
your finger
to
remove
the
detergent
dispenser
press
the
blue
lever
with
your
finger
Once they have been cleaned, put them back
making
sure
that
they
fit
right
to remove the detergent dispenser
tocompletely.
remove the detergent dispenser
completely.
in to the back (Figure 33).
completely.
Use
warm
water
a brush
Use
warm
water
and and
a brush
to to
Use warm water and a brush to
• Put the dispenser back into the washing machine.
cleanthethe
compartments.
clean
compartments.
cleanthe
compartments.
DISPENSER
Important
Important
Important
b bbAlso
clean
the
additive
Also
clean
additive
Also
clean
thethe
additive
compartment
siphon.
To remove
remove
compartment
siphon.
To
compartment
siphon.
To remove
The washing machine should be disconnected
from the
mains
it,it,it,
pull
the
flap
at
the
back
out. out.
pull
thethe
flapflap
at at back
out.
pull
the back
electricity supply before any cleaning or maintenance
is carried
out.
Once
it
has
been
cleaned,
putititput it
Once
it
has
been
cleaned,
put
bb
Once it has been cleaned,
backpressing
pressing down
down to make
back
makesure
sure
back
pressing
down
to
make sure
thatititfits
fitsright
rightin.
in. Put
Put the dispenser
that
dispenser
thatinto
it fits
right
in. Put
the dispenser
back
into
the
washing
machine.
back
the
washing
machine.
A dirty or incorrectly fitted siphon will prevent
from
backthe
intodetergents
the washing
machine.
being taken in and leave water inside the compartment at the end of
dirtyororincorrectly
incorrectly fitted
fitted siphon
the wash.
A Adirty
siphon
will prevent the additives from
will
prevent
additivesfitted
from siphon
A dirty
or the
incorrectly
being taken in and leave water
being
taken
in and
leaveatwater
will prevent
the additives
from
inside
the compartment
the end
inside
compartment
at the water
end
being
taken
in and leave
of
thethe
wash.
ofinside
the wash.
the compartment at the end
of the wash.
86
fig. 31
fig. 32
b
fig. 33
86
86
18
a
THE ACCESSIBLE FILTER AND
2 CLEANING
THE OUTSIDE
maintenance and cleaning
CLEANING THE ACCESSIBLE FILTER AND
Cleaning the Filter
2 THE OUTSIDE
CLEANING
THE FILTER
maintenance and cleaning
a
CLEANING
Clean the accessible2filter
if the drain THE
pumpACCESSIBLE FILTER AND
• Clean the accessible filterisif blocked
the drainby
pump
blocked
byOUTSIDE
any THE
any isforeign
objects.
foreign objects.
open (Figure 34).
maintenance and cleaning
CLEANING THE FILTER
AND
a Open the kickplate
cover with theTHE
aid ofACCESSIBLE FILTER
a
2theCLEANING
accessible
filter
if the drain
THE
coinaid
and
by
pulling
gently
on
it.pulling
• Open the kickplate cover withathe
ofClean
a coin
and
byOUTSIDE
gently
pump
maintenance and cleaning
is blocked by anyCLEANING
foreign objects.
THE FILTER
b Place a container
under
the drain
pipe
a Open
the kickplate
cover
with
thepump
aid of
Clean
the accessible
filter
if the
drain
to collect any
water
that
comes
of on it.
a coinby
and
byforeign
pullingout
gently
is blocked
any
objects.
• Place a container under the drain
pump
filter
to
collect
any
water
thatTHE
FILTER
CLEANING
it.
b
a container
the
pipeof
a Place
Open
the
kickplate
cover
withdrain
the aid
pipe,
place itunder
on the
comes out of it (Figure 35). Remove the drain
Clean
accessible
filter
if the
drain
pump
to
collect
any
that
comes
of
athe
coin
and
by water
pulling
gently
on it.out
container and
open
the
cover.
Water
will
is blocked
by any foreign objects.
it.
• Remove the drainpipe, place it start
on the
and open
the cover.
Water
tocontainer
come out.
Remove
the drain
pipe, place
it on the
a
fig. 34
a
b
b Place a container under the drain pipe
a Open
the and
kickplate
with Water
theout
aidwill
container
the
to collect
any open
watercover
thatcover.
comes
ofof
will start to come out.
b
a
by out.
pulling
gently
start
toand
come
c When all the water
has
come
out of
theon it.
it. coin
Remove
the drain
pipe, until
place it on the
machine,
the
filter
times
• Half- or quarter-turn the filter to
the leftturn
(Figure
36).aallseveral
b When
Place
container
under
the drain
pipe
c
the
water
has
come
out
of
the
container
and
open
the
cover.
Water
will
it can be completely removed, by pulling
to
collect
any the
water
that
comes
outuntil
of
machine,
turn
several
times
start
to come
out.filter
• Water will start to come out. gently on it.
itit.can be completely removed, by pulling
b
placeout
it onofthe
gently all
onthe
it. drain
c Remove
When
the
waterpipe,
has come
the
container
andcaught
open
thein
cover.
Wateruntil
will
d Remove
thewashing
objects
or
fluff
thefilter
machine,
turn
the
filter
several
times
• When all the water has drained
out of the
machine,
turn
the
start
out. or
d Remove
the
objects
fluff caught
in the
it pump.
canto
become
completely
removed,
by pulling
filter or the drain
filter
theit.drain
pump.on it several times until it can be completely
removed
byorgently
pulling
gently
on
Put the filter,
theWhen
drain
pipe
and
cover
c Put
the water
haspipe
come
outcover
of the
theallfilter,
the drain
and
back in placedagain.
(Figure 36).
machine,
turnobjects
the
filter
timesinuntil
back
in place
again.
Remove
the
orseveral
fluff caught
the
b
c
c
itfilter
canorbethe
completely
removed, by pulling
drain pump.
c
gently
it. the
• Remove the objects or fluff caught in the filter Put
or the
drain
pump
and cover
theon
filter,
drain pipe
•
back in place again.
(Figure 37).
d Remove the objects or fluff caught in the
filter or the drain pump.
Put the filter and the filter cap back in place. Put the filter, the drain pipe and cover
back in place again.
To avoid risk of scalding, do not carry out this operation when the
c
d
d
wash water is at a temperature of over 30ºC.
Important
Important
Important
We recommend that you clean the filter
d
at least once a year.
avoid
notfilter
carry out this
We recommendTo
that
youburns,
cleandothe
when that
the wash
water
is filter
at a
We
recommend
you clean
the
at least once a operation
year.
d
of
over
atdo
least
a year.
To avoid burns,temperature
notonce
carry
out30ºC.
this
To avoid burns, do not carry out this
operation
when
the
wash
water
is
at
a
• The outside of the washing machine should beoperation
cleanedwhen
withthe
warm
soapy wash water is at a
temperature of We
over
30ºC.of over
recommend
that you
clean the filter
temperature
30ºC.
water or a gentle cleaning agent. Do not use abrasive
cleaning
products
LIMPIEZA
EXTERIOR
CLEANING
THE
OUTSIDE
at least once
a year.
To
avoid
burns,
do
not
carry
out this
or solvents.
operation
when
the wash
watershould
is at a
When there have been spillages of
The outside
of the
washing
machine
LIMPIEZA
EXTERIOR
CLEANING
THE
temperature
of
over
30ºC.
detergent or additives from the
cleaned
with warm
soapy
water
orOUTSIDE
a gentle
LIMPIEZA
EXTERIOR
CLEANING
THE
OUTSIDE
• It should then be thoroughly dried with abe
soft
cloth.
dispenser onto the washing machine
cleaning
agent. Do not use abrasive cleaning
cabinet,
clean
them
up spillages
right away
products
or
solvents.
When there
have
been
ofas
The outside of the washing machine should
Wipe any detergent spillsThe
immediately
toshould
minimise
the
risk
of
they
are
corrosive.
It
then
bewarm
thoroughly
dried with
a soft When there
have
been spillages
outside of the
washing
machine
should
detergent
or additives
from the of
be
cleaned
with
soapy
water
or a gentle
LIMPIEZATHE
EXTERIOR
CLEANING
OUTSIDE
cloth.
dispenser
onto the from
washing
cleaning
agent.water
Do notoruse
abrasive cleaning detergent
or additives
themachine
cleaned
with warm
soapy
a gentle
damage to the cabinet ofbe
your
washing
machine.
cabinet,
clean
them
up right
away as
products
or solvents.
onto
the
washing
machine
cleaning agent. Do
not
use
abrasive
cleaning should dispenser
87 When
there
have been spillages of
The
outside
ofbe
thethoroughly
washing machine
they are
corrosive.
It should
then
dried with a soft
cabinet,
clean
them
up
right
products or solvents.
detergent or additives fromaway
the as
be
cleaned with warm soapy water or a gentle
cloth.
corrosive.
It should then becleaning
thoroughly
soft cleaning they are
dispenser
onto the washing machine
agent.dried
Do notwith
use a
abrasive
products or solvents.
cloth.
87 cabinet, clean them up right away as
they are corrosive.
It should then be thoroughly dried with a soft
cloth.
87
Important
fig. 35
fig. 36
Important
Important
Important
Important
Cleaning the Outside of the Washing Machine
fig. 37
87
19
Safety and Troubleshooting
• If you detect any problems with your washing machine, you will probably be able to rectify them yourself by
consulting the following instructions.
• If this is not the case, unplug the appliance and contact the technical assistance number.
Do not open up the washing machine. It does not contain any fuses or similar components than can be replaced.
Indicator
Problems
F01
No water coming in
F02
C03
F04
Does not drain or spin-dry
Does not spin-dry
Does not start
F05 - F10
Call the Technical Assistance Team
Problems
Why won’t the washing machine start?
This may be due to the following:
• Check the door is properly shut.
• The washing machine is not plugged into the mains or there is no voltage in the mains supply.
• The Start/Pause button has not been pressed.
• If the washing machine door is not properly shut, F04 will appear on the display.
Why is the washing machine vibrating or making too much noise?
This may be due to the following:
• The blocking and transport screws have not been removed.
• The washing machine has not been correctly levelled.
• On spin-drying, the motor makes a kind of whistling noise. This is due to the mechanical action of the motor
itself and is perfectly normal.
Why doesn’t the washing machine take in water?
• If F01 shows on the display this may be caused by a cut in the water supply, a tap turned off or a blocked water inlet filter.
• The possible solutions are as follows: wait for the water supply to be reconnected, turn on the tap, or remove the 20
water inlet hose and clean the filter.
Problems
Why doesn’t the washing machine drain or spin-dry?
• If this failure is detected, F02 will appear on the display.
The reasons for the F02 indicator may be the following: • The washing machine drain pump blocked, building drainage pipes blocked, or incorrect pump electrical connection.
• Solution: if the pump is blocked, gain access to it as described in section 2, maintaining and cleaning the appliance.
Why doesn’t the washing machine spin-dry?
This may be due to the following:
• If this failure is detected, C03 will appear on the display.
• This may be due to an uneven distribution of clothes in the drum and may cause an excessive level of vibrations.
• The solution is to select a spin-drying programme.
Why can’t I see any water in the drum during the wash?
• This is due to the fact that the washing machine is provided with a system which is able to adapt to the load and type
of fabrics, adjusting the levels of water and energy used, in order to preserve the environment. So, although the water level you can see through the hatch may look low, there is no cause for concern as washing and rinsing efficiency will still be optimum.
Why is there still some water in the dispenser?
• This may be because the dispenser needs cleaning. This simple operation is described in Maintaining and cleaning
the appliance.
Why can’t I open the porthole door immediately after the wash has finished?
• Washing machines today are provided with safety systems for users. One of these is that the washing machine cannot be opened until it is certain that the drum is quite still. This is why the hatch cannot be opened for 2 minutes.
Other indications
• The washing machine can detect other indications. When this happens a number of other indicators appear on the
display: F05, F06..., F10. If this happens, call CDA Customer Care.
21
To contact our Customer Care Department, or for Service,
please contact us on the details below.
Passionate about style
Customer Care Department • The
Group Ltd. • Harby Road • Langar • Nottinghamshire • NG13 9HY
T : 01949 862 012 F : 01949 862 003 E : [email protected] W : www.cda.eu