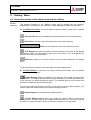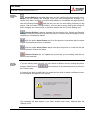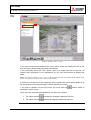
1
SUBLIME HomePrintingServices 1.0
User Guide
User Guide
SUBLIME HomePrintingServices 1.0
INDEX
1. SUBLIME HomePrintingServices 1.0 Installation
1.1.
Installation instructions ……………………………………………………………………………3
2. SUBLIME HomePrintingServices 1.0
2.1.
2.2.
2.3.
Introduction………………………………………………………………………………………….4
General description of the application……………………………………………………………5
Main functions of the menu………………………………………………………………………..6
3. “Pictures” Menu
3.1.
3.2.
Introduction………………………………………………………………………………………….8
Functions……………………………………………………………………………………….…...9
4. “Editing” Menu
4.1.
4.2.
4.3.
Introduction………………………………………………………………………………………..13
General functions of the display area and the editing………………………………………...14
Specific functions…………………………………………………………………………………16
5. “Composition” Menu
5.1.
5.2.
5.3.
Introduction………………………………………………………………………………………..23
Functions…………………………………………………………………………………………..24
Collage of pictures………………………………………………………………………………..25
6. “Web Album” Menu
6.1.
6.2.
Introduction………………………………………………………………………………………..26
Functions…………………………………………………………………………………………..27
7. “Print” Menu
7.1.
7.2.
Introduction………………………………………………………………………………………..29
Functions…………………………………………………………………………………………..30
8. Pictures Tray
8.1.
8.2.
Introduction………………………………………………………………………………………..32
Functions…………………………………………………………………………………………..33
Page 2 to 34
User Guide
SUBLIME HomePrintingServices 1.0
1. SUBLIME HomePrintingServices 1.0 Installation
1.1.
Installation instructions
Installation
System
Requirements
In order to instal Sublime HomePrintingServices you have to run setup.exe file and
select your preferred language.
The minimum requirements are:
•
•
•
Pentium III 800 MHz processor or faster.
256 Mb RAM.
Operating Systems: MS Windows 2000 or MS Windows XP.
CP-D2E Printer must be correctly installed so that WebAlbum functions are available.
Page 3 to 34
User Guide
SUBLIME HomePrintingServices 1.0
2. SUBLIME HomePrintingServices 1.0
2.1.
Introduction
Concept
SUBLIME HomePrintingServices application is a software tool which allows the user to
display and treat pictures, thanks to an easy but powerful environment.
It consists of an application which gives the user a lot of additional tools to improve
his/her pictures, with not only conventional functions to touch up the picture (rotation,
brightness and contrast settings, etc.) but also other sophisticated options (remove red
eye, etc.)
The user can also profit from a number of utilities, such as the creation of a web album,
the composition of a collage with different pictures, the printing, etc.
In the following pages the general structure of this tool will be explained, together with
its main functions.
Page 4 to 34
User Guide
SUBLIME HomePrintingServices 1.0
2. SUBLIME HomePrintingServices 1.0
2.2.
General description of the application
Appearance
This section will describe the appearance and spatial location of the SUBLIME
application elements, which are the following:
Main Menu.- located in the upper part of the application, it allows the entrance to
the main functions. The display of other areas of the application depends on the
main menu which is active at that moment.
Favourite Folders/ Submenus.- located in the left side of the application. There is
a list of favourite folders for the “Pictures” main menu. For the other menus, the
application shows the functions which are related to the selected main menu.
Display Area.- located in the central area of the application, where the pictures
saved in the computer are displayed.
Pictures Tray.- located in the lower part, it shows all the miniaturised pictures
selected to be used in concrete functions of the application. It gives you the
possibility to work simultaneously with a group of pictures.
Main Menu
Directory
Favourite
Folder
Navigator/
Submenus
Display Area
Pictures Tray
Selected
Pictures
Image 1 – SUBLIME HomePrintingServices
Page 5 to 34
User Guide
SUBLIME HomePrintingServices 1.0
2. SUBLIME HomePrintingServices 1.0
2.3.
Main functions of the menu
Description
This guide will explain the functions which are mainly represented in the main menus of
the application.
“Pictures”
Menu
It allows the miniature display of the local pictures selected in the directories structure.
Its main functions are:
•
•
•
•
•
•
•
“Editing”
Menu
To select the “Favourite folder”.
To display miniatures of the pictures in the selected folder (list of miniatures).
To select a picture or several pictures.
To add the selected picture(s) into the “Pictures tray”.
To add a new folder into “Favourite folders”.
To delete a folder of “Favourite folders”.
To look at and edit a picture.
To display and edit the selected picture from the miniatures list of a directory or of the
“Pictures tray”.
Its main functions are:
•
•
•
•
•
•
•
•
•
•
•
•
•
•
•
•
•
To look at Next Picture of the directory.
To look at Previous Picture of the directory.
Zoom.
To adjust the size of the picture which is shown.
To look at the picture in its real size.
To look at the same time at the original and the modified version of the picture.
To crop the picture.
To rotate the picture.
To resize the selected picture.
To adjust the brightness and contrast of the selected picture.
To adjust the colour of the selected picture.
To recover the local picture.
To save the local picture.
To save the picture as another file, with the same format JPEG, BMP, GIF, TIF
or PNG.
To apply the sharpen effect (Sharpen Picture).
To remove the red eyes of a selected area of the picture.
To add text in the selected picture.
Page 6 to 34
User Guide
SUBLIME HomePrintingServices 1.0
“Web Album”
Menu
It allows the interaction between the application and the Web Album. To use this
function, the user needs an Internet connection.
Its main functions are:
•
•
•
•
“Composition”
Menu
Register.
Create Photo Web Album.
My Albums.
To open Web Album.
It allows the composition of the selected pictures in the “Pictures Tray” from a
previously created template.
Its main functions are:
•
•
•
“Print” Menu
To choose the composition template among three different possibilities: 2
pictures collage; 3 pictures collage and 4 pictures collage.
To select the area to be composed: vertical or horizontal.
To print the result.
It allows the printing of a selected picture (of the miniatures list or of the Tray) or of
all the pictures in the “Pictures Tray”.
Its main functions are:
•
•
•
Pictures Tray
To prepare the printing of the selected picture.
To print the selected picture.
To print all the “Pictures Tray”.
This function, located in the lower part of the application, can be used in any menu
and it allows the display in miniature format of the selected images from the menu
“Pictures”.
The main functions to be done in the Pictures tray are the following:
•
•
•
To delete a picture.
To delete all the pictures of the Tray.
To look at and edit the picture.
In the following sections, you will see a description of the different steps for each of
these functions.
Page 7 to 34
User Guide
SUBLIME HomePrintingServices 1.0
3. “Pictures” Menu
3.1. Introduction
Concept
This menu aims at displaying in miniatures the pictures of the selected directories.
To enter the menu, you need to click the option
side of the application you could see your Favourite Folders list.
and on the left
Image 2 – “Pictures” Menu
Page 8 to 34
User Guide
SUBLIME HomePrintingServices 1.0
3. “Pictures” Menu
3.2. Functions
Functions
From the “Pictures” menu, you can have the following functions:
•
•
•
•
•
•
•
To select a favourite folder.
To display miniatures of the pictures in the selected folder (miniatures list).
To select a picture or pictures.
To add selected image(s) to the “Pictures tray”.
To add a new folder to “Favourite folders”.
To delete a folder from “Favourite folders”.
To look at and edit picture.
The functions will be now explained in detail.
Select
Favourite
Folder
When SUBLIME application is started, it scans all the favourite folders and shows the
pictures of each of them.
When you select a “Favourite Folder” by clicking it, the display area will show in
miniature the list of pictures of that folder.
Display
Miniatures
When the favourite folder is selected, the upper part of the display area shows the
name of the selected folder and its location path.
Image 3 – “Pictures” Menu > Selected folder path
Page 9 to 34
User Guide
SUBLIME HomePrintingServices 1.0
Display
Miniatures
(next).
You can display all the pictures with the following formats: JPEG, GIF, BMP, PNG and
TIFF.
If the folder does not contain any picture, the following message will appear:
If the selected directory contains more than 200 pictures, the application will
automatically show the first 200 pictures in the display area. Once the first 200 have
been displayed, you can also go forward or backwards with two different buttons, in
order to see the next or the previous pictures.
If you wish to display the next 200 pictures, click the button:
, located in the lower right part of the display area.
If you wish to display the previous 200 pictures, click the button:
, located in the upper left part of the display area.
Select
Picture/s
You can select a picture by clicking a miniature, and leaving it shading.
If you wish to do a multiple selection, chosing different pictures at the same time, use
the CONTROL or SHIFT keys of the keyboard:
- Maintaining the “Control” key, click the miniature that you wish to add, and so the
picture will be added into the selection.
- Maintaining the “Shift” key, click the miniature you wish to add, and so all the pictures
from the first to the last one selected will be added.
In the lower part of the display area you can see the following information about the
selected picture:
•
Name of the picture.
•
Resolution in pixels, for example: 1024 x 768 pixels.
If you do a multiple selection, you will only see the number of selected pictures. With
the multiple selection, you can simultaneously send different pictures to the “Pictures
tray”.
Page 10 to 34
User Guide
SUBLIME HomePrintingServices 1.0
Add Picture
to the
Pictures
Tray
If you wish to add a picture to the “Pictures tray” you need to select the miniatures to
be added and click the button
display area.
located in the lower part of the
The number of pictures contained by the “Pictures tray” is indicated above the tray.
The tray has a maximum capacity of 50 pictures; if this amount is surpassed and you
wish to add one more picture, you will see this message of error on the screen:
In the Pictures tray area (on the right side) there are two buttons:
and
To delete a miniature you only need to select the picture and click the button Remove.
If you prefer to delete all the miniatures of the tray, you need to click Remove all.
Bear in mind that you cannot add the same picture twice.
Image 4 – Pictures Tray
Page 11 to 34
User Guide
SUBLIME HomePrintingServices 1.0
Add/ Delete
Favourite
Folder
In order to delete a folder of the favourites list, you need to select it and click the button
located under the section Favourite Folders. The directory “My
Pictures” cannot be removed.
In order to add a new folder to the favourite ones, click the button
,
which is located under the section Favourite Folders; and a navigation screen for the
PC directories will be opened, allowing you to select a directory as a favourite one. The
standar Windows directory “My Pictures” will appear in the Favourite folders list, by
default.
The selection of favourite folders will be saved so that they are available in future
occasions.
Look at/
Edit Picture
To look at and edit a picture, you need to double click a miniaturised picture of the
selected folder. The picture will be shown in the mode Display and Editing, and so the
“Editing” menu is automatically turned on.
The different functions of the “Editing” menu will be explained in the next chapter.
Nota: To avoid performance problems, SUBLIME HomePrintingServices will not allow you to
modify large pictures. That’s why when you try to edit an image file bigger than 15Mb, the
following message will appear:
Page 12 to 34
User Guide
SUBLIME HomePrintingServices 1.0
4. “Editing” Menu
4.1. Introduction
Concept
This menu aims at displaying and editing the picture selected from the miniatures list of
a directory or from the “Pictures Tray”.
To enter this menu, you have two options:
1. Double click a miniature.
; and the menu will appear
2. Select a miniature and click
selected, showing that you have entered the “Editing” menu.
Once in the menu, you will see the different available functions on the left side of the
application.
Image 5 – “Editing” Menu
Page 13 to 34
User Guide
SUBLIME HomePrintingServices 1.0
4. “Editing” Menu
4.2. General functions of the display area and the editing
General
Functions
The general functions of the “Editing” menu can be divided into two sections,
depending on the operation you wish to do: either displaying or editing the pictures.
A) To DISPLAY Pictures you have different options, each of them with a specific
button, as follows:
Previous Picture, you can display the previous picture of the active directory.
Next Picture, lets you enter the next picture of the active directory.
Zoom, you can adjust the size of the selected picture.
Full Display can scale the picture so that it adjusts to the size of the display
area and this way, you can obtain a total view of the picture. This view appears by
default every time you edit a picture.
Real Size, allows you to see the picture in its real size, centered in the display
area.
These functions are located in the lower right part of the display area.
B) To EDIT Pictures, a part from the above mentioned functions, you can benefit
from the following ones:
Double Display, allows the display of two pictures: the original picture and the
modified one. The original picture is the one you have when you enter the editing tool,
or the last one you saved during the edition. The modified picture is the version that
has been modified by using the editing tool.
You cannot modify the picture from here. If you want to use the editing options, you
need to select the Simple display (look at the following function).
Simple Display can only show the modified picture.
Cancel Editing appears when you modify the picture with a tool from the
“Editing” menu. You can undo all the changes made with this tool. The tool used at the
moment of entering this option is turned off and it changes into a view mode.
Page 14 to 34
User Guide
SUBLIME HomePrintingServices 1.0
General
Functions
(next)
Accept Editing is activated whenever you are modifying the pictures with a tool,
so that you can confirm the changes. Once you have accepted the changes, you
cannot undo them. However, you have the possibility to reestablish the original picture
, and this way you can use new editing functions on this
with the following button
picture. With the option “Accept Editing”, the tool that is being used is also turned off
and it changes into a view mode, in the same way as with the “Cancel Editing” tool.
Preview Editing is always activated for the options Crop, Resize and Remove
red eyes, because you need to preview the picture in order to see the changes, before
accepting or canceling the edition.
With the option Save Picture the file of the picture is overwritten with the same
original format and the picture is updated.
With the option Save Picture as you can save the picture in a new file with the
selected format, location and name.
Restore Picture lets you update the picture that you are editing with the one
saved in the hard disk.
Change
Selected
Picture
If you are working with a picture, you can choose a different one by clicking the picture
buttons “Next/Previous”
the “Pictures tray”.
/
of the directory or by selecting directly a picture of
If a picture has been modified but not saved and you wish to select a different picture,
this information will appear in the screen:
This message will also appear if you enter another main menu, different than the
“Editing” menu.
Page 15 to 34
User Guide
SUBLIME HomePrintingServices 1.0
4. “Editing” Menu
4.3. Specific functions
Functions
In the “Editing” menu, you have the following functions for the selected picture:
•
•
•
•
•
•
•
•
Rotate.
Crop.
Resize.
Brightness and Contrast Setting.
Colour Settings.
Apply Sharpen Effect (focus).
Remove Red Eyes on a selected area.
Add Text.
These tools will now be explained in detail.
Rotate
When you wish to rotate the selected picture randomly, the tool
the “Editing” menu must be activated.
from
To rotate the picture 90 degrees to the left, 90 degrees to the right and 180 degrees,
you need to activate the buttons
,
y
, respectively.
Once you have rotated the selected picture, you can do the following:
Crop
1. The option Accept
confirms the changes made with this tool.
2. The option Cancel
undoes the changes made with this tool.
If you wish to crop a picture, you must select the tool
of the” Editing”
menu and then mark the position of the box to be crop with the
button. There are
three different possibilities: horizontal (15x10), vertical (10x15), or free (manual).
A dotted box will appear on the picture, showing the proportion you have chosen.
In order to enlarge or reduce the area to be cut, you must click the mouse on any
corner of the area and drag it in or out until you get the size you want.
Page 16 to 34
User Guide
SUBLIME HomePrintingServices 1.0
Crop
(next)
Image 6 “Editing” Menu > Crop
If you have not previously selected the “free” option, when you modify the size of the
box, the same (aspect ratio) proportion will be kept.
If you previously select the “free” option, when you modify the size of the box, its
(aspect ratio) proportion is not maintained; so you can freely define its height and
width.
Note: The aspect relation (aspect ratio) is the quotient between the width and the height of the
picture (as you can see it on TV or in a cinema screen).
In order to move the box on the image you have to press the mouse and maintain it on
the inside area of the box and drag it until the position you want.
If you wish to display only the crop area, you must click the
activated in order to crop.
button, which is
Once you have crop the selected picture, you have two options:
1. The option Accept
confirms the changes made with this tool.
2. The option Cancel
undoes the changes made with this tool.
Page 17 to 34
User Guide
SUBLIME HomePrintingServices 1.0
Resize
In order to modify the size of the selected picture you need to select the “Editing” menu
and then the
tool.
You are able to modify the following values:
: it shows the percentage (%) over the size of the original
width. If you activate the option Keep proportion, this value change will
automatically affect the “vertical Resizing”.
: it shows the percentage (%) over the size of the original
height. If you activate the option Keep proportion, this value change will
automatically affect the “horizontal Resizing”.
: with this option you keep the same percentage of the
vertical and horizontal proportions, after each preview.
During the resizing procedure, the application shows the size in pixels of the resulting
picture in a dynamic way.
Afterwards, once you have resized the selected picture, you can either accept or
cancel the changes.
Colour
Settings
The SUBLIME application works with three colour channels, offering a trichromatic
picture composed by the primary colours of light: Red (R), Green (G) and Blue (B).
You can increase their intensity by adding more light to these colours. This way you
can get pictures with full colour, with 16.7 millions of different colours, more than what
human eyes can differentiate.
Even if RGB is a standard colour method, it can change the rank of colours. To adjust
colours in the three basic channels, you must select the
the “Editing” menu.
tool in
By using the different colour sliders located in the three channels R, G y B you can set
the colour of the selected picture independently, in a scale which goes from 0% up to
100%. For example, you can adjust the red to 75% and leave the blue in its default
value, which is 50%. When you select a picture, the values will always be established
at 50%.
In the same way as with the previous functions, once you have adjusted the colour,
you can either accept or cancel the changes.
Page 18 to 34
User Guide
SUBLIME HomePrintingServices 1.0
Brightness/
Contrast
Setting
In order to increase or reduce the brightness and contrast values you need to select
the
tool in the “Editing” menu.
In the upper part of the selected picture you will see two sliders; one for brightness and
one for contrast. Using these two sliders, you can increase or decrease the brightness
and contrast scale independently, from 0% up to 100%.
In the same way as with the previous functions, once you have adjusted the brightness
and contrast, you can either accept or cancel the changes.
Image 7 “Editing” Menu > Brightness and Contrast
Page 19 to 34
User Guide
SUBLIME HomePrintingServices 1.0
Focus
In order to apply a sharpen effect on the selected picture; you need to choose the
tool in the “Editing” menu.
On the left upper part of the picture, different buttons will allow you to increase or
decrease its sharpness. If you want to reduce it, you need to click the button
whereas if you want to increase it, click the button
,
.
As happens with the previous functions, once you have sharpened the picture, you can
either accept or cancel the changes.
Remove
Red Eyes
One of the problems of pictures is the “red eyes” effect. In order to remove it from a
selected picture, you have to follow these steps:
Step
1
Description
Select the
tool in the “Editing” menu, click the
button and then draw a “shining” square on the selected picture.
Define the area in which you want to remove the red eyes. Do it as follows:
In order to enlarge or reduce the square, click any of the dots in the
dotted outline, and drag it in or out of the selected area.
In order to move the square within the picture, you need to click on the
inside area of the square and drag it until the position wanted.
2
In order to check the layout of the picture, click “Preview”
colour in the square will be green.
3
, and the red
Red eyes effect is removed “progressively”, in order to view how it looks.
You need to click on inside the shining square and drag it out of the eyes
position. This operation can be repeated as many times as necessary in
order to get to the final result.
Page 20 to 34
User Guide
SUBLIME HomePrintingServices 1.0
Remove
Red Eyes
(next).
Once you have removed the red eyes, you can either accept or cancel the
changes.
4
Image 8 “Editing” Menu > Remove Red Eye
Add Text
With this option you can add text into the picture, as follows:
Step
1
Description
Select the
tool in the “Editing” menu and then click the
button.
You will see a text box on the picture and also a dialog box where you can
write the text and give it different format features: size, font, style and
colour.
2
Page 21 to 34
User Guide
SUBLIME HomePrintingServices 1.0
Add Text
(next).
3
In order to apply the changes in the text, click the “Accept” button of the
window. This will be immediately closed, but the changes have not yet
been applied definitely.
4
If you want to put the text somewhere else in the picture, click inside the
text box and move it to the position you want.
5
If you wish to change the text or delete it before validating it, click the
button. The dialog box with the added text will be opened. Now you can
modify the text and replace it for the one you prefer. You are again in step
2.
In order to definitely validate the text, click “Accept” in the starting page.
The text and the picture fuse together and the box disappears. At this point
the action cannot be cancelled.
6
Image 9 “Editing” Menu > Add Text
Page 22 to 34
User Guide
SUBLIME HomePrintingServices 1.0
5. “Composition” Menu
5.1. Introduction
Concept
This menu allows you to make a composition with the selected pictures of the “Pictures
tray” on a previously created template.
If you wish to enter this menu, by clicking the option
be selected.
, the menu will
Once in the menu, on the left side of the application, the various available functions will
appear.
Image 10 “Composition” Menu
Page 23 to 34
User Guide
SUBLIME HomePrintingServices 1.0
5. “Composition” Menu
5.2. Functions
Functions
From the “Composition” menu, you can accede to the following functions:
•
•
•
Select the composition template.
Select composition orientation.
Print the resulting composition.
These functions will be now explained in detail.
Select
Composition
In order to select the composition template, clic
.
The SUBLIME application has three different templates:
Collage of 2 pictures (both picture of 9 cm x 6.5 cm).
Collage of 3 pictures (a picture of 9 cm x 6.5 cm plus two pictures of 6.5 cm x
4.3 cm).
Collage of 4 pictures (all of them 6.5 cm x 4.3 cm).
Once you have selected the template, you have to choose the pictures of the
“Pictures tray” which will form the composition.
With the buttons
and
you can add a new
picture to the collage or remove one. In order to add a picture, first you need to select
the picture to be added, and then click the Add Picture button. You can also remove
the last picture added by clicking the Remove Picture button.
Select
Orientation
Print
Composition
You can also establish the orientation to be composed by using the buttons located in
the upper part of the application:
•
Vertical
•
Horizontal
, allows you to use the area in a vertical position.
, allows you to use the area in a horizontal position.
You can print the resulting composition by clicking the
area to be printed is the one from the CP-D2E printer.
button. The
Page 24 to 34
User Guide
SUBLIME HomePrintingServices 1.0
5. “Composition” Menu
5.3. Collage of pictures
Pictures
Composition
In the following image you can see an example of a collage composition:
Image 11 – Composition“Four Pictures”
Page 25 to 34
User Guide
SUBLIME HomePrintingServices 1.0
6. “Web Album” Menu
6.1. Introduction
Concept
From this menu you can send pictures to an Album in the Internet. From the portal
Mitsubishi Web Album, you can share pictures with friends and relatives, and also
print the pictures you want in any establishment, which has the Mitsubishi DPS
KIOSK system.
In the Mitsubishi Album you will find a list of the DPS KIOSK available establishments
so that you can choose the nearest one.
In order to use the services offered by Web Album, you need to have an Internet
connection.
and, on the left side of the
To enter this menu, click the option
application, you will see the different available functions.
Image 12 – “Web Album” Menu
Page 26 to 34
User Guide
SUBLIME HomePrintingServices 1.0
6. “Web Album” Menu
6.2. Functions
Functions
From the “Web Album” menu you can accede to the following functions:
•
•
•
•
Register.
Create Picture Web Album.
My Albums.
Open Web Album.
They will now be explained in detail.
Register
If you want to create “Albums” in the Mistsubishi Web Album, you need to register.
Thanks to this option, you create a new user account in the Web Album and with it you
can benefit from all the services offered.
Note: The Web Album portal will automatically drop out those users who have not entered the
account during a certain period of time, and will delete the account. If you want to create a
new album, you need to register again (for which you need to install the CP-D2E Mitsubishi
printer).
If you don’t have the CP-D2E printer installed, the following message will appear:
Page 27 to 34
User Guide
SUBLIME HomePrintingServices 1.0
Create
Photo
Web Album
With this application you can create a new album with the pictures in the “Pictures
tray” and give it the name you want.
Web Album will compact the big pictures so be aware that they can lose resolution.
Anyway, after the compaction the resulting pictures will be reduced so that the biggest
side (height or width, depending on the picture) measures less than 1600 pixels,
always keeping the proportion of the original picture.
You can only create an album if you have registered for the CP-D2E printer and there
are pictures in the “Pictures Tray”.
My Albums
This option lets you enter your user account in “Web Album” and have a look at your
Albums.
Open
Web Album
With this option you open the main page of Mitsubishi, where you can enter your “Web
Album” (http://www.mitsubishialbum.com)
This option of the menu is always operative.
Page 28 to 34
User Guide
SUBLIME HomePrintingServices 1.0
7. “Print” Menu
7.1. Introduction
Concept
This application allows the printing of one or more pictures, by selecting them in the
miniatures list, the “Pictures tray” or also in the “Editing” menu. If you want to print a
group of pictures, these have to be first introduced in the “Pictures tray”.
In order to enter this menu, click the option
available functions will appear on the left part of the application.
and the different
Image 13 – “Print” Menu
Page 29 to 34
User Guide
SUBLIME HomePrintingServices 1.0
7. “Print” Menu
7.2. Functions
Functions
You can accede to the following functions from the “Print” menu:
•
•
•
Prepare printing.
Print.
Print all the tray.
These three functions will now be explained in detail.
Prepare
Printing
As soon as you enter this menu, you will see a preview of the printing, optimised by
the application following these premises:
The application automatically selects the paper orientation which fits best to the
if the
selected picture. Thus, it chooses the horizontal orientation (15x10)
picture is closer to this proportion, or the vertical orientation (10x15)
if it is
closer to this one.
The picture is settled so that there is a minimum white part around it and it is
centered in the paper.
If you prefer another “configuration” of the picture to be printed, you can modify it, by
manually adjusting the picture (zoom) with the tool:
.
The application shows the area to be printed with a shading rectangle, which appears
on the picture. You can change the location of the printing area by clicking and
dragging it to the position wanted.
From here, once the printing is prepared, you can go to the next option of the “Print”
menu.
Print
With this option you can print the selected picture with the values configured in the
above explained “prepare printing” option.
option, a dialog box with the printer
When you select the
configuration of the system will be opened. The field “paper orientation” appears with
the value established in the “prepare printing” option.
Page 30 to 34
User Guide
SUBLIME HomePrintingServices 1.0
Print
(next)
Print All
Tray
If you wish to print all the pictures in the “Pictures tray” please select
.
The printing format is the one that the application has optimised by default. Check the
previous section “prepare printing”.
When you select this option, the dialog box with the printer configuration of the system
is opened, so that you can insert its values. These values are applied to all the
pictures of the tray which will be printed. However, the orientation is modified by the
application in order to suit each selected picture.
Page 31 to 34
User Guide
SUBLIME HomePrintingServices 1.0
8. Pictures Tray
8.1. Introduction
Concept
In contrast to the previous functions, the Pictures tray is operative in any of the menus.
In it you can always find the pictures added from the “Pictures” menu or from the
“Editing” menu in a miniature format (see section 3.2 Functions)
The Pictures tray is located in the lower part of the application and it contains all the
pictures in which you want to work. It has a maximum capacity of 50 pictures.
You have to bear in mind that the “Composition” and “Web Album” menus can only
work with the pictures in the Tray.
Image 14 – Pictures Tray
Page 32 to 34
User Guide
SUBLIME HomePrintingServices 1.0
8. Pictures Tray
8.2. Functions
Functions
In the “Pictures tray” you have the following functions:
•
•
•
•
•
•
Select a picture.
Add a new picture.
Print a group of pictures.
Delete a picture.
Delete all the pictures.
View and edit a picture.
They will be now explained in detail.
Select
a Picture
In order to select a picture from the “Pictures tray” you only have to click it. There is no
“multiselection”, so you cannot select more than one picture at a time.
Add a New
Picture
In order to add a new picture into the “Pictures tray”, see section 3.2. Functions of the
Pictures menu in this guide.
Print a
Group
of Pictures
If you want to print a group of pictures at the same time, these pictures have to be in
the “Pictures tray”. For the “Print” option, see section 7.2 Functions of the Pictures
menu in this guide.
Delete a
Picture
If you want to delete a miniature of the “Pictures tray” first you have to select the
picture and then click the
tray.
button, located on the right side of the
When you delete a picture of the “Pictures tray” its physical file is not lost.
Delete All
the Pictures
In order to empty the Pictures tray, you have to click the
button,
located on the right side of the tray. By clicking it, all the pictures in the tray will be
deleted.
Page 33 to 34
User Guide
SUBLIME HomePrintingServices 1.0
View and
Edit a
Picture
If you double click a picture of the “Pictures tray” the “Editing” menu will be
automatically opened and it will show the selected picture, allowing you to apply the
different functions on the picture.
Page 34 to 34