1
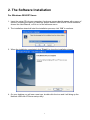
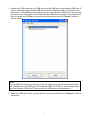
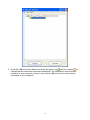
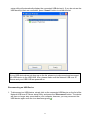
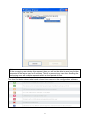
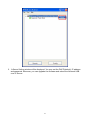
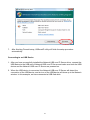
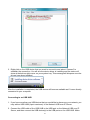
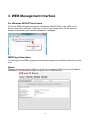
Network USB over IP Server
With 1-USB2.0 Port
User Manual
V1.1
1
2
TABLE OF CONTENTS
COPYRIGHT ...................................................................................................................................................................... 4
1. INTRODUCTION .......................................................................................................... 5
PRODUCT OVERVIEW ......................................................................................................................................... 5
COMPONENTS AND FEATURES...................................................................................................................... 5
HARDWARE INSTALLATION .............................................................................................................................. 5
2. THE SOFTWARE INSTALLATION ........................................... 7
FOR WINDOWS 2000/XP USERS ............................................................................................................... 7
FOR WINDOWS VISTA USERS ..................................................................................................................... 20
3. WEB MANAGEMENT INTERFACE ....................................... 25
FOR WINDOWS 2000/XP/VISTA USERS .............................................................................................. 25
WEB PAGE DESCRIPTION ............................................................................................................................ 25
4. TROUBLESHOOTING......................................................................................... 28
FREQUENTLY ASKED QUESTIONS............................................................................................................. 28
3
Trademarks
Windows 2000/XP/Vista are registered trademarks of Microsoft Corp. All other brands and
product names are trademarks of their respective companies.
Copyright
No part of this publication may be reproduced in any form or by any means or used to make
any derivative (such as translation, transformation or adaptation) without the express written
consent of the manufacturer as stipulated by the United States Copyright Act of 1976.
FCC Warning
This equipment has been tested and found to comply with the limits for a Class B digital
device, pursuant to subpart J of Part 15 of the FCC Rules. These limits are designed to
provide reasonable protection against harmful interference when the equipment is operated
in a commercial environment. This equipment generates, uses, and can radiate radio
frequency energy and, if not installed and used in accordance with the instruction manual,
may cause harmful interference to radio communications. Operation of this equipment in a
residential area is likely to cause harmful interference in which the user will be required to
correct the interference at their own expense.
All contents are subject to change without prior notice.
Part No. US8810U2-V1.0
4
1. Introduction
Product Overview
The Network USB over IP Servers enhance capability by letting you place your USB devices
at convenient locations directly on the Ethernet network. It’s designed to connect your USB
printers, MFP, and USB storage devices to your network, allowing all network users access
to these USB devices remotely.
Network Management
The Network USB over IP servers support the WEB management, which remote
management and a warning. A standard WEB server is permanent on these Network USB
over IP Servers. Any standard WEB browser can be used to access and manage these
Network USB over IP servers.
Components and Features
1-USB2.0 Port Network USB over IP server
․1 USB2.0 port (High-speed)
․Fast Ethernet network port: RJ-45 for 10Base-T or 100Base-TX
․1 LED to indicate Status, 2 LED’s to indicate 10/100M link lights
․One Setup CD for Windows 2000/XP/Vista, User’s Guide
․One external AC power adapter
․Built-in Reset Button
Before you start, you should prepare:
One Windows 2000/XP/Vista computer with CD-ROM drive
One USB devices with USB port
Hardware Installation
Make sure that your USB devices are switched off and that the Network USB over IP Server’s
power adapter is disconnected.
1.
Connect your USB device to the USB port of the Network USB over IP Server.
5
2.
Connect the Network USB over IP Server to the router or switch/HUB with the Ethernet
cable.
3.
Connect the power adapter to the Network USB over IP Server. When the Link LED
lights up, the Network USB over IP Server is correctly connected to the network.
6
2. The Software Installation
For Windows 2000/XP Users
1. Insert the setup CD into your computer. A welcome screen should appear with a menu of
options, including the option to install the proper Network USB over IP Server software,
access the User Manual, or Exit out of the welcome menu.
2. The installation wizard will start the installation process; click “OK” to continue.
3. When the installation completed, click “Finish” to close the installation wizard.
4. On your desktop you will see a new icon, double-click the icon and it will bring up the
Network USB over IP Server setup utility.
7
5. The setup utility will show up and display all the active Network USB over IP Servers on
your network. In this screen, you will see the product listed as “USB over IP
Server-8810C0(192.168.0.21)”. The “8810C0” is the last 6 digits of the Network USB
over IP Server’s MAC address, and the “192.168.0.21” is the Network USB over IP
Server’s IP address.
Connecting to an USB Device
8
1. Connect the USB cable on your USB device to the USB port of the Network USB over IP
Server, and make sure both the USB device and the Network USB over IP Server are
powered on. The USB device will then show up on the Network USB over IP Server utility
as a green icon. The green icon indicates that the USB device is ready to be connected. If
for any reason the USB device does not show up, please click the “Search” button to
refresh the list.
Note:
If your USB device does not show up on the list, please try to disconnect and reconnect
the USB device to the USB port of the Network USB over IP Server. Also, please make
sure the Network USB over IP Server and your USB device are powered on.
2. Select the USB device that you will want to connect and click on the “Connect” button at
the bottom.
9
3. Once the USB device has been connected, the green icon( ) will turn orange( ) to
indicate that the connection has been established. The USB device now becomes
available on your computer, and you can use this USB device as if it was directly
connected to your computer.
10
Connecting to an USB Printer or Multi-functional Printer
1. Connect the USB cable on your printer or multi-functional printer to the Network USB over
IP Server and make sure your printer is powered on. You will then see the connected
printer show up in the USB over IP Server setup utility. Select the printer from the list and
click on the “Connect” button.
11
Note:
If your printer does not show up on the list, please try to disconnect and reconnect the
printer to the USB port of the Network USB over IP Server. Also, please make sure the
Network USB over IP Server and your printer are powered on.
2. The printer will be detected as if it was plugged directly into your computer.
3. If this printer is connected to your computer for the first time, then you will need to
complete the setup wizard for the printer software and driver installation. Please follow
the wizard to setup the printer. Make sure you have the correct CD or drivers for your
printer and follow the on-screen steps in the wizard. Once the wizard is completed, you
will be able to use the printer as if it was directly connected to your computer.
12
Note:
Please refer to your printer user manual on how to setup your printer on the computer.
Connecting to an USB HUB
1. If you have more than one USB device that you would like to share over your network, you
may add an USB HUB(4-port maximum) to the Network USB over IP Server.
2. Connect the USB cable of the USB HUB to the USB port on the Network USB over IP
Server, and then connect the USB device(s) to the USB ports on the USB HUB. Make
sure the power adapter of the USB HUB is plugged in and powered on.
Note:
Network USB over IP server can only support up to 4 USB devices through an USB
HUB and certain USB devices require a direct connection to your computer in order to
function at full capacity.
3. After the USB device(s) are connected to the USB HUB, the Network USB over IP Server
13
setup utility will automatically display the connected USB device(s). If you do not see the
USB device(s) that are connected, press “Search” button to refresh the list.
Note:
If your USB device does not show up on the list, please try to disconnect and reconnect
the USB device to the USB HUB. Also, please make sure the Network USB over IP
Server and your USB HUB are powered on.
Disconnecting an USB Device
1. To disconnect an USB device, simply click on the connected USB device on the list of the
Network USB over IP Server setup utility, and press the “Disconnect” button. The device
will then no longer stay connected to your computer, however, you may reconnect the
USB device again once the icon becomes green( ).
14
Request to Disconnect
1. If the USB device is being used by another computer on your network, a red icon( ) will
be displayed in front of the USB device name. You will not have the option to disconnect
the USB device; however, you may send a courteous message to request that the other
user disconnect/release the USB device.
15
2. To send the courteous message, right-click on the USB device and select “Request
Disconnect”. A message will then be sent to the user requesting that they disconnect
from the USB device.
16
Note:
If the occupying user denies this request, then you will not be able to send any further
requests to the same user for 5 minutes. This is to prevent any user from flooding the
occupying user will multiple requests within a short period of time.
The chart list below shows what each colored icon means in the configuration software.
17
Setting the Polling Interval
1. The polling interval will allow the setup utility to pull information from your network to find
out the status of all connected Network USB over IP Server and USB devices. To
configure the polling interval, in the utility, click on File -> Settings -> Polling Interval.
2. You may set a number in the “Seconds” box. Click on “Submit” to allow the new interval
setting to take effect. Once you have set a number, the utility will automatically update any
changes made to server in the main dialog box.
Setting the Network USB over IP Server by Setup Utility
1. To configure the Network USB over IP Server by setup utility, right-click on the USB over
IP Server and select “Setting”.
18
2. A Server Setting window will be displayed. You may set the DHCP(default), IP address
and password. Moreover, you can upgrade the firmware and reboot the Network USB
over IP Server.
19
For Windows Vista Users
1. Insert the setup CD into your computer. A welcome screen should appear with a menu of
options, including the option to install the proper Network USB over IP Server software,
access the User Manual, or Exit out of the welcome menu.
2. Click “OK” to start the installation process
3. During the driver installation, a Windows Vista security message will appear. Select
“Install this driver software anyway” to continue.
20
4. Click on “Finish” to complete the installation process.
5. Once the installation process has been completed, an “Launch USBoverIP Server” icon
will be shown on Desktop.
Double click on it for the first time execution. Windows Vista will pop up a firewall setup
window, please choice “Unblock”.
21
7.
After finishing Firewall setup, USBoverIP utility will finish the setup procedure
automatically.
Connecting to an USB Device
1. After you have successfully installed the Network USB over IP Server driver, connect the
USB device to the USB port of Network USB over IP Server and make sure both the USB
device and the Network USB over IP Server are powered on.
2. When the USB device is connected, the Network USB over IP Server will detect the
connection of the USB device, and an icon of the USB device will show up in the Network
window. In this example, we have connected a USB flash disk.
22
3. Right-click on the USB device that you want to connect to and select “Connect” to
establish the connection. You will see the device driver is installing and the status will
show at the bottom right corner on your system tray. This message will disapear once the
drivers have been installed.
After the installation is completed, the USB device will become available as if it were directly
connected to your computer.
Connecting to an USB HUB
1. If you have more than one USB device that you would like to share over your network, you
may add an USB HUB(4-port maximum) to the Network USB over IP Server.
2. Connect the USB cable of the USB HUB to the USB port on the Network USB over IP
Server, and then connect the USB device(s) to the USB ports on the USB HUB. Make
23
sure the power adapter of the USB HUB is plugged in and powered on.
Note:
Network USB over IP server can only support up to 4 USB devices through an USB
HUB and certain USB devices require a direct connection to your computer in order to
function at full capacity.
24
3. WEB Management Interface
For Windows 2000/XP/Vista Users
To Access WEB management interface in Windows 2000/XP/Vista, in the USB over IP
Server setup utility, select the “USB over IP Server” and double click, OS will open the
browser automatically and load the management webpage.
WEB Page Description
The left panel of the WEB management interface provides a list of different options to choose
from.
Status:
Displays the current Network USB over IP Server, connected USB devices and IP address
information. The interface is limited to support up to 4 USB devices.
25
Setup:
You can add or change any existing password on the Network USB over IP Server in this
window. By default, the Network USB over IP Server does not come with a default password.
You can change the network settings according to your network specification. If you would
like to give the Network USB over IP a static IP address, you will need to Disable DHCP in
the “DHCP Setting” menu”. Once DHCP is disabled, enter the desired IP address on the IP
address field along with the subnet mask and click “Save & Restart” button to reboot the
Network USB over IP Server.
Please note that if the Network USB over IP Server has a set password, you will need to enter
it into the password field box.
Misc:
Allow you to restore the Network USB over IP Server back to factory default.
And, the firmware link will allow you to upload the latest firmware on the Network USB over IP
Server. Click on “Browse” to specify the firmware location on your computer. Once the
location path of firmware has been set, click “Firmware Upgrade” to begin the update.
Please note that if the Network USB over IP Server has a set password, you will need to
enter it into the password field box.
26
Restart:
The Restart window will allow you to reboot the Network USB over IP Server.
Please note that if the Network USB over IP Server has a set password, you will need to
enter it into the password field box.
27
4. Troubleshooting
Frequently Asked Questions
1. Why can’t I connect my USB device to my computer through Network USB over IP
Server?
● Make sure the USB device functions normally when you plug it into your computer via USB
cable.
● If the USB device, such as USB printer or multi-functional printer, requires a driver, please
make sure you have installed it on the computer you wish to use. Rebooting your computer
after installing USB device driver might also help.
● Although the Network USB over IP Server could work with a very wide spectrum of USB
devices, it still has limited support on some USB devices. Please refer to the supported
device list for details.
2. Why can’t I see any servers on my Network USB over IP Server listing window after
installing it?
● Please make sure that all of your Network USB over IP Servers are correctly connected to
your network. Also, certain anti-virus programs come with firewall functions that might
prevent the Network USB over IP Server setup utility from accessing the network. Please
make sure the Network USB over IP Server setup utility is not being blocked by your
anti-virus program.
3. The connected USB devices are disconnected after my computer wakes up from the
computer stand-by?
● Connected devices will automatically be released for other network users in case you
forget to release them. Please reconnect the USB devices again after your computer “wake
up”.
28