1
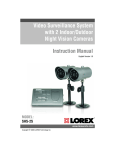
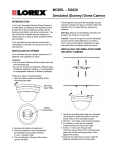
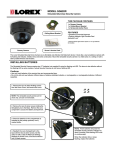
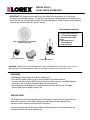
MODEL VQ2121
NIGHT VISION ACCESSORY
IMPORTANT: IR Illuminators emit light that is not visible to the human eye, as it falls on the
Infrared band of the light spectrum. To test that the Illuminator is emitting light, point it directly at the
lens of the camera – the light will be visible on the System Monitor. There may be a partial red glow
visible on the surface of the LED, which is normal.
THIS PACKAGE CONTAINS:
1 - Night Vision Accessory
1 - 12 V DC Power Supply
1 - Metal Stand for Night
Vision
3 - Mounting Screws
1 - Owners Manual
1 - Warranty Card
NIGHT VISION WITH 24 HIGH POWERED
INFRARED LED LAMP
METAL STAND
12V DC POWER SUPPLY
OWNERS
MANUAL
MOUNTING SCREWS
WARNING - REGULATED 12V DC 500mA power supply is REQUIRED for use with this camera. Use of a
non-regulated, non-conforming power supply can damage this product and will void the warranty.
FEATURES
• Weatherproof housing ideal for indoor or outdoor use.
• Infra-red LED emitters allows user to ‘See in the dark’ up to 100 ft distance
• Can be used with existing LOREX B&W observation system cameras, most B&W specialty
cameras as well as shorter distance Night Vision color cameras
• Clarity of the picture depends on the resolution of the camera that is used. The Night
Vision LEDS cover an angle of approx. 50°
APPLICATIONS
The IR Illuminator offers and effective way of illuminating an area where low light black and
white CCD Cameras, or Day Night Cameras are operating in the dark (general color
cameras are not suitable for use with the IR Illuminator).
It has an automatic light sensor control. When the light source is not sufficient enough, the
Infrared illuminator will turn on automatically.
INSTALLATION / PLACEMENT
• Plug one side of the 12V DC power supply cable into the Night Vision’s DC IN jack and the other end into
an electrical outlet
• Place the Night Vision as close as possible next to the camera and facing the same direction as the lens.
• Adjust the angle of the Illuminator to be horizontal with the angle of the camera.
• Arrange the power cord and other cables in a safe and orderly manner.
NOTE: FOR OPTIMAL PERFORMANCE , PLACE THE NIGHT VISION ACCESSORY AS CLOSE AS
POSSIBLE TO THE CAMERA
FUNCTION TESTING
•
•
•
•
Check that the unit has power.
If the light source is sufficient*, cover the light sensor to see if any red glow is coming from the LEDs
If the surrounding area is too dark, you may need to closely inspect the unit to confirm that the unit is on.
If you are unable to detect that the IR Illuminator is working by using the above mentioned methods, please
check your monitor for illumination level.
* If the surrounding light is too bright, you may have to manually simulate night setting to see the effectiveness
of the IR Illuminator.
CLEANING INSTRUCTIONS
Unplug the unit before cleaning. Use a damp cloth with a non-abrasive non-corrosive cleaning solution. Allow
the unit to dry thoroughly before powering back on.
SPECIFICATIONS
IR Turn on Level:
Power Requirement:
Current Consumption:
Operating Temperature:
Wave Length:
Weatherproof:
Weight:
Dimensions:
Housings:
8 lux ± 3 lux
12V DC Adapter 500 mA(included)
IR LED OFF 12VDC, 14mA
IR LED ON 12VDC, 500mA
14°F to 113°F (-10°C to 45°C)
850 NM
IP67
Ideal for Indoor and outdoor use
0.60 lbs
W 98mm x H 92mm xD 54mm
Black - Aluminum with Bracket