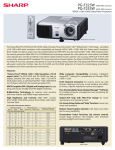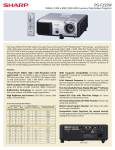
1
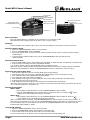
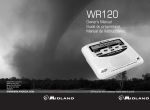
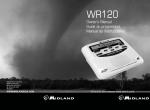
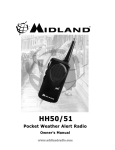
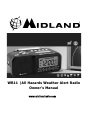
WR11 |All Hazards Weather Alert Radio
Owner’s Manual
www.midlandradio.com
Model WR11 Owner’s Manual
Time Set Button
Up Button
Test/Alert OFF Button
Alert Mode Button
Weather/FM/AM Switch
ON/RADIO/BUZZ/OFF Switch
External Antenna Connector
External Alert Jack
DC Jack for AC Power
Weather Channel Button
Weather/Snooze Button
Volume Wheel
Tuning Wheel
Battery Installation:
Place 4 AA alkaline batteries (not supplied) into the compartment on the underside of radio.
(Note: Batteries provide emergency power for the radio in case of a power outage.)
AC Adapter:
Plug the AC Adapter into a standard outlet. Plug the other end of the adapter into the DC jack on the back of the radio.
Selecting a Weather Channel:
1. Ensure the “ON/RADIO/BUZZ/OFF” switch is in the ON position.
2. Move the “WEATHER/FM/AM” switch to WEATHER.
3. Use the “WX Channel” button to move through the 7 different weather channels. Stop on the channel with the strongest
broadcast signal.
4. To put the radio into weather standby mode, press the “WEATHER/SNOOZE” button while listening to the
weather broadcast.
Activating the Weather Alert:
1. Press the “ALERT MODE” button to choose between LED, LED SIREN, or VOICE alert types. The NOAA logo will begin blinking.
2. Once an alert type is selected, alert mode is automatically activated.
3. If an alert is received, press the “TEST/ALERT OFF” button to deactivate the alert.
(Note: When radio is in weather standby, FM, AM, BUZZ or RADIO modes-and alert mode is activated, radio will automatically
override when alert information is received. If “ON/RADIO/BUZZ/OFF” switch is in OFF position, radio will not alert.)
Programming the Clock and Sleep Alarm:
1. Press and hold “TIME SET” button for 5 seconds (HOUR option will begin flashing).
2. Press the “UP” button until current hour is displayed (Note: AM/PM changes as you scroll through the hours).
3. Press “TIME SET” button again (MINUTE option will begin flashing).
4. Press “UP” button until current minutes are displayed.
5. Press “TIME SET” button again to save time setting and move to alarm setting (HOUR option will begin flashing).
6. Program the alarm the same way as time set.
7. Press “TIME SET” button when finished to save settings and exit clock/sleep alarm programming.
(Note: When setting the clock or alarm clock, if you would like to scan quickly through the minutes press and hold the “UP” button. The minutes will advance in increments of 5.)
Activating the Sleep Alarm:
Wake to Radio:
1. After setting the desired alarm time, move the “ON/RADIO/BUZZ/OFF” switch to RADIO.
2. Move the “WEATHER/FM/AM” switch to desired radio you would like to wake to. The alarm icon
will be
displayed on the LCD indicating the sleep alarm is activated.
Wake to Buzz:
1. After setting the desired alarm time, move the “ON/RADIO/BUZZ/OFF” switch to BUZZ. The alarm icon
will be displayed on the LCD indicating the sleep alarm is activated.
(Note: To temporarily silence sleep alarm, press WEATHER/SNOOZE button. This will advance the alarm time by 8 minutes. To
silence alarm for the remainder of the day, move the “ON/RADIO/BUZZ/OFF” switch to OFF position or to ON to listen to radio or
be in alert standby mode.To reset the alarm for next day move the "ON/RADIO/BUZZ/OFF to the "OFF" position then back
to desired wake position "RADIO" or "BUZZ".
Tuning the
1.
2.
3.
4.
Page 2
AM/FM Radio:
Ensure the “ON/RADIO/BUZZ/OFF” switch is in the ON position.
Move the “WEATHER/FM/AM” switch to desired position of either AM or FM.
Use the tuning wheel on the right side of the radio to tune to desired station.
Use the volume wheel on the left side of the unit to adjust the volume to desired listening level.
www.midlandradio.com
Model WR11 Owner’s Manual
One Year Limited Warranty
MIDLAND Radio Corporation will repair or replace, at its option without charge, your WR11 All Hazards Alert
Weather Radio which fails due to a defect in material or workmanship within ONE year following the initial consumer purchase. This warranty does not include any antennas, which may be a part of or included with the warranted product, or the cost of labor for removal or re-installation of the product in a vehicle or other mounting.
Accessories have a 90 day warranty from date of purchase, including any adapters. Performance of any obligation under this warranty may be obtained by returning the warranted product, prepaid freight, along with proof of
purchase to:
Midland Radio Corporation
Warranty Service Department
5900 Parretta Drive
Kansas City, MO 64120
This warranty gives you specific legal rights, and you may also have other rights, which vary from state to state.
PLEASE NOTE: The above warranty applies only to merchandise purchased in the
United States of America or any of the territories or possessions thereof, or from a
U.S. Military exchange. For warranty coverage on merchandise purchased elsewhere ask your dealer.
Service and Technical Support
* If you have a problem which you believe requires service, please call first and speak with a service technician.
Many problems can be remedied over the phone without returning the unit for service.
For Technical Support Contact:
Midland Radio Corporation
5900 Parretta Drive
Kansas City, Missouri 64120
Phone: (816) 241-8500
Fax: (816) 241-5713
E-mail: [email protected]
Website: www.midlandradio.com
If after talking with technical support you still feel your unit needs to be returned for service, follow the below instructions:
1. Pack the unit in its original packaging. Then pack the original package in a suitable shipping carton.
Caution: Improper packing may result in damage during shipment.
2. Include the following:
a. full description of any problems
b. daytime telephone number, name & address
3. For warranty service include a photocopy of the bill of sale from an authorized dealer or other proof of purchase showing the date of sale.
4. You do not need to return accessory items (batteries, owners manual) unless they might be directly related
to the problem.
5. A flat rate of $25.00 will apply to repairs not covered by warranty or units that are over one year old. Send
only cashier’s check, money order, Master Card or Visa Card number.
Send to:
Midland Radio Corporation
5900 Parretta Drive
Kansas City, Missouri 64120
Page 3
www.midlandradio.com
Accessories
Accessories can be purchased at www.midlandradio.com
18-STR
External Alert Strobe Light
-Easy Connection
-High Strobe Visibility
- $19.99
18-259W
Window Mount All Hazard/
Weather Alert Radio Antenna
- Improves Range and Reception
-17-7 Stainless Steel Rod
- $21.99
Midland Radio Corporation
Hereby certifies that this unit has
been designed and manufactured,
in accordance with PART 15 of the FCC
rules. Operation is subject to the condition
that this device does not cause harmful
interference.