1
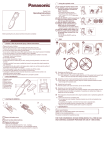
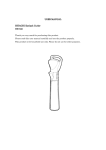
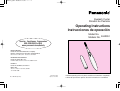
EH2351_USA 05.03.18 17:48 ページ 1
R
Eyelash Curler
Rizador de Pestaña
Operating Instructions
Instrucciones de operación
Model No.
EH2351
Modelo No.
ServiceAAssistanceAAccessories
800-338-0552(In USA)
www.panasonic.com/beauty
IN USA CONTACT:
Panasonic Consumer Electronics Company
Division of Panasonic Corporation of North America
One Panasonic Way 2F-3 Secaucus, NJ 07094
1
0
IN PUERTO RICO CONTACT:
Panasonic Puerto Rico, Inc.
P.O.Box 2036, Carolina, Puerto Rico 00984 U.S.A.
En México:
Panasonic de México, S.A de C.V.
México D.F.
Amores 1120, Col. del Valle, 03100
Tel: 54 88 10 00
No.1 EN ES (U.S.A.)
Printed in China
Impreso en China
BBefore operating this unit, please read these instructions completely.
BAntes de operar este aparato, lea este instructivo en su totalidad.
EH2351_USA 05.03.18 17:48 ページ 2
1
4
E
G
F
2
A
C
1
B
D
2
3
1
4
INDEX
ENGLISH .....................Page 4
2
ESPAÑOL .................Pagina 6
5
3
6
2
3
EH2351_USA 05.03.18 17:48 ページ 4
Parts identification (Fig. 1)
A
F
F
B
F
C
F
D
F
E
F
F
F
G
Switch
Battery cover
Cap
Brush
Comb
Heater
Ready indicator
• Change the battery when the
ready indicator on the back of
the heater does not change
from purple to pink within 2
minutes after switching the
product on.
Inserting the battery (Fig. 2)
(Battery sold separately)
1. Remove the battery cover and
insert one AA alkaline battery.
2. Replace the battery cover.
• Make sure battery matches + and
– markings.
• Do not use a rechargeable battery.
• Remove the battery when not
using the product for a long time.
Using the eyelash curler
(Fig. 3)
Use the product on three separate
areas: the center, and the inner and
outer corners of the eye.
1. Ensure that the comb is correctly
attached to the product.
2. Turn the switch on, and wait until
the ready indicator turns from
purple to pink.
3. Carefully place the comb at the
base of the upper eyelashes and
move it upwards parallel to the
eyelid, holding it there for
approximately 3 seconds. (Do
this for the center and inner and
outer corners of the eye.)
4. Then move the comb slowly up
until you reach the tips of the
eyelashes.
5. Press the eyelashes lightly with
the comb and hold it there for
approximately 3 seconds to create
a curl.
6. Brush the lower eyelash slowly
downward.
• For especially difficult to style
eyelashes, hold the comb approximately 3 seconds while pointing in
the direction that you want the
eyelashes to point.
Caution
Cleaning (Fig. 4)
•
1. Check that the product is switched
off.
2. Remove the comb.
3. Use the supplied brush to remove
any mascara that may be stuck
to the comb.
4. Use the supplied brush to remove
any dirt on the heater section of
the product.
•
•
•
•
•
•
To prevent the risk of personal injury,
observe the following safety instructions.
Care should be exercised
• Do not push the comb and heater
whenever using this product to
against the eyelids. There is a risk
prevent injury to the eye or face.
of burns.
Keep out of reach of children. Do
• Do not use the product without the
not leave this product within easy
comb attached.
reach of children. The blades and
• Do not wash this product with water.
combs are small parts that could
• Do not modify, disassemble or
present a choking hazard for a
repair.
small child.
• Consult a specialist if your eyes or
Stop using the product if you
eyelids feel unusual in any way
notice anything abnormal about
while using the product or soon
your eyes.
afterward.
Persons with conjunctivitis
• Turn the product off after use to
(sometimes called “pink eye”) or
prevent the battery from losing
other eye illnesses should not use
power.
this product.
• Remove any dirt on the product
Do not use the product while
using a cloth moistened with
wearing contact lenses.
soapy water. Do not use thinner
If your eyes or eyelids feel unusual
or benzine.
after applying mascara, stop using
• A damaged or defective product
the product immediately.
should be returned to a customer
Always check the comb and
service center or to an authorized
heater assembly for damage
customer service agent.
before each use. Do not use the
Do not attempt to use this product if
product if it has been dropped,
defective or try to repair it yourself.
struck or damaged. Keep cover in
place after each use.
Specifications
Power supply: Battery
Battery size:
1 AA alkaline battery
(Sold separately)
Weight: 41g (including battery)
4
5
EH2351_USA 05.03.18 17:48 ページ 6
Identificación de la partes
(Fig. 1)
A
F
F
B
F
C
F
D
F
E
F
F
F
G
Interruptor
Cubierta de la pila
Tapa
Cepillo
Peine
Calentador
Indicador de funcionamiento
• Cambie la pila cuando el
indicador de a punto en la
parte posterior del calentador
no cambie de morado a
rosado dentro de los 2 minutos
siguientes después de haber
encendido el producto.
Insertando la pila (Fig. 2)
(La pila se vende por separado)
1. Retire la cubierta de la pila e
inserte una pila alcalina AA.
2. Vuelva a poner la cubierta de la
pila.
• Asegúrese que la pila iguale las
marcas + y –.
• No use una pila recargable.
• Saque la pila cuando no use el
producto durante largo tiempo.
morado a rosado.
3. Coloque cuidadosamente el
peine en la base de las pestañas
superiores y muévalo hacia
arriba paralelo al párpado,
sosteniéndolo ahí durante unos
3 segundos. (Haga esto para el
centro y los extremos interno y
externo del ojo.)
4. Luego mueva el peine lentamente
hacia arriba hasta que llegue a
las puntas de las pestañas.
5. Presione ligeramente las pestañas con el peine y manténgalo
ahí durante aproximadamente 3
segundos para crear un rizo.
6. Cepille la pestaña inferior lentamente hacia abajo.
• Para pestañas especialmente
difíciles de peinar, sostenga el
peine durante aproximadamente 3
segundos al tiempo que apunta
en la dirección que Ud. desea que
las pestañas apunten.
Cuidado
Limpieza (Fig. 4)
•
1. Compruebe que el producto esté
apagado.
2. Saque el peine.
3. Use el cepillo provisto para
sacar algún resto de máscara
que estuviera pegado al peine.
4. Use el cepillo provisto para
sacar alguna suciedad en la
sección del calentador del
producto.
Usando el rizador de
pestañas (Fig. 3)
Use el producto en tres áreas
separadas: el centro y los extremos
interno y externo del ojo.
1. Asegúrese que el peine esté
montado correctamente en el
producto.
2. Encienda con el interruptor, y
espere hasta que el indicador de
funcionamiento, cambie de
6
•
•
•
•
•
•
Para prevenir el riesgo de herida personal, siga
las siguientes instrucciones de seguridad.
• No presione el peine y el calentaDeberá tener cuidado siempre que
dor contra los párpados. Hay el
use este producto para prevenir
riesgo de quemadura.
heridas en el ojo o la cara.
• No use este producto sin el peine
Manténgalo lejos del alcance de
montado.
los niños. No deje este producto
• No lo lave con agua.
en donde los niños lo alcancen
• No lo modifique, desmonte, ni
fácilmente. Las cuchillas y los
repare.
peines son pequeñas partes que
• Consulte con un especialista si se
podrían convertirse en un riesgo
siente molestias en los ojos o en
de asfixia para un niño pequeño.
sus párpados mientras y tras su
Deje de usar el producto si nota
utilización.
cualquier cosa anormal en sus
• Apague el producto después de
ojos.
usarlo para prevenir que la pila
Las personas con conjuntivitis (a
pierda energía.
veces llamada “ojo rosado”) u
• Limpie la suciedad con un paño
otras enfermedades de los ojos
húmedo con agua de jabón. No use
no deberán usar este producto.
ningún producto desengrasante ni
No use el producto mientras tiene
gasolina.
utilice lentes de contacto.
• Un producto dañado o defectuoso
Si sus ojos o párpados se sienten
deberá ser devuelto al servicio
diferentes después de aplicar
técnico o a un agente técnico
máscara, deje de usar el producto
autorizado.
inmediatamente.
No intente usar este producto si
Verifique siempre el peine y el
estuviera defectuoso ni trate de
conjunto del calentador si tienen
repararlo Ud. mismo.
daños antes de cada uso. No use
el producto si lo han dejado caer,
golpeado o dañado. Mantenga la
cubierta en su lugar después de
cada uso.
Especificaciones
Fuente de alimentación: Pila
Tamaño de la pila:
1 pila alcalina AA
(Vendida por separado)
Peso: 41 grs. (incluyendo la pila)
7