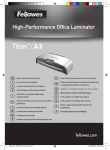
1
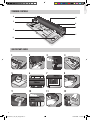
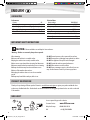
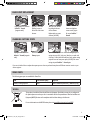
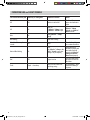
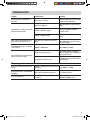
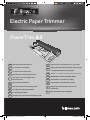
Electric
ElectricPaper
PaperTrimmer
Trimmer
PowerTrim
PowerTrim
GB
Please read these instructions before use.
F
Lire ces instructions avant utilisation.
E
Lea estas instrucciones antes del usarlo.
D
Diese Anleitungen vor Gebrauch genau durchlesen.
I
NL
S
RU
Przed użyciem proszę zapoznać się z tą instrukcją.
Перед эксплуатацией устройства ознакомьтесь
с содержанием данной инструкции.
GR
Διαβάστε τις παρακάτω οδηγίες πριν από τη χρήση.
TR
Kullanmadan önce lutfen bu talimatlari okuyen.
manuale di istruzioni.
CZ
Pred poużitím si pročtěte tyto pokyny.
Dese instructies voor gebruik lezen.
SK
Pred poużitím si prečítajte tieto pokyny.
Primo dell’uso, si raccomanda di leggere questo
Läs dessa anvisningar innan du använder apparaten.
DK
Læs venligst denne vejledning før anvendelse.
FIN
Lue nämä ohjeet ennen käyttöä.
N
PL
H
P
Kérjük, hogy használat elött olvassa el az
utasításokat.
Leia estas instruções antes da utilização.
Vennligst les nøye igjennom denne bruksanvisningen før bruk.
PowerTrim_v2.0_All_Langs.indd 1
12/02/2009 13:59:35
INDEX
TRIMMER CONTROLS / QUICK START GUIDE
ENGLISH
3
4-9
FRANCAIS
10-15
ESPAÑOL
16-21
DEUTSCH
22-27
ITALIANO
28-33
NEDERLANDS
34-39
SVENSKA
40-45
DANSK
46-51
SUOMI
52-57
NORSK
58-63
POLSKI
64-69
РУССКИЙ
0-75
EΛΛΗΝΙΚΑ
76-81
TÜRKÇE
82-87
ČESKY
88-93
SLOVENSKY
94-99
MAGYAR
100-105
PORTUGUÊS
106-111
PowerTrim_v2.0_All_Langs.indd 2
12/02/2009 13:59:36
TRIMMER CONTROLS
A
H
E
G
B
F
C
D
QUICK START GUIDE
1
2
3
4
5
6
7
8
9
10
11
12
30 cm
3
PowerTrim_v2.0_All_Langs.indd 3
4
12/02/2009 13:59:43
ENGLISH
CAPABILITIES
Performance
Format
A3
Cutting length
420mm
Max cutting capacity 30 sheets / 80gsm(6 sheets per cut)
Trimming mechanism
Electric trimming
PowerSave Auto Shut-off 30min
Technical Data
Mains voltage
Machine voltage
Frequency
Wattage
Amps
Dimensions (WxDxH)
Net weight
100-240V AC
24V DC
50-60Hz
???? Watts
???? Amps
620 x 300 x 120mm
5 kg
IMPORTANT SAFETY INSTRUCTIONS
CAUTION: Please read before use and keep for future reference.
Warning - blades are extremely sharp when exposed.
When trimming:
DO ensure the machine is on a stable surface.
DO plug the machine into an easily accessible socket.
DO test cuts on scrap sheets before trimming final documents.
DO remove staples and other metal articles prior to trimming.
DO keep the machine away from heat and water sources.
DO turn off the machine after each use.
DO unplug the machine when not in use for an extended
period.
DO keep away from children and pets, while in use.
DO NOT leave the power cord in contact with hot surfaces.
DO NOT leave power cord hanging from cupboards or shelves.
DO NOT use appliance if the power cord is damaged.
DO NOT exceed the machines quoted performance.
DO NOT allow minors to use this machine.
DO NOT open or attempt to repair, as this will void your warranty. Contact Customer Service if you have any questions.
PRODUCT REGISTRATION
Thank you for purchasing a Fellowes product. Please visit www.fellowes.com/register to register your product and benefit from
product news, feedback and offers. Product details can be found listed on the rating plate positioned on the rear side or underside
of the machine.
NEED HELP?
Let our experts help you with a solution.
Customer Service:
www.fellowes.com
Help Line Europe:
00-800-1810-1810
UK:
+44-(0)-1302-836836
4
PowerTrim_v2.0_All_Langs.indd 4
12/02/2009 13:59:44
TRIMMER CONTROLS
A
On/off switch (at side)
E
Overload protection - Paper gauge
B
Cut-Control LED touch pad
F
Illuminated LED cutting bed
C
SafeCut™ Clamp
G
SafeCut™ Guard (at rear) to protect internal mechanism
- with power breaker (magnetic closure)
D
Carry point
H
Window for paper alignment
FEATURES & TIPS
FEATURES
TIPS
SafeCut™ Guard
Ensures that power supply is stopped when guard
is opened – for service and maintenance.
SafeCut™ Clamp
Ensures that paper is securely clamped before
trimming – trimmer won’t cut when SafeCut™
Clamp is not closed.
Electric trimming
The ultimate trimming solution for safety and
comfort – PowerTrim Electric trimming.
•
•
•
•
•
Always clamp paper down with SafeCut™ Clamp before
trimming.
Make sure paper is properly adjusted.
Replace blade unit every 5000 cuts and cutting strip every
1000 cuts or when showing signs of wear. Item number for
spare parts # 54125.
Align cut line with the outer edge of the orange trimline.
For best results, mark the exact cut position on the item
before trimming and try trimming a test sheet.
Please read these instructions before use.
Cut Control function
LED touch pad with Start-Stop function to start
and stop trimming . User can stop trimming if
finished before cycle of 6 cuts has ended.
Overload protection
Indicates maximum load capacity of trimmer to
prevent overloading.
WORLDWIDE WARRANTY
Fellowes warrants all parts of the trimmer to be free of defects in material and workmanship for 2 years from the date of
purchase by the original consumer. If any part is found to be defective during warranty period, your sale and exclusive remedy will
be repair or replacement, at Fellowes’ option and expense, of the defective part. This warranty does not apply in cases of abuse,
mishandling or unauthorised repair. Any implied warranty, including that of merchantability or fitness for particular purpose,
is hereby limited in duration to the appropriate warranty period set forth above. In no event shall Fellowes be liable for any
consequential damages attributable to this product. This warranty gives you specific legal rights. You may have other legal rights
that vary from this warranty. The duration, terms and conditions of this warranty are valid worldwide, except where different
limitations, restrictions or conditions may be required by local law. For more details or to obtain services under this warranty,
please contact Fellowes or your dealer.
5
PowerTrim_v2.0_All_Langs.indd 5
12/02/2009 13:59:45
BEFORE TRIMMING
1.
Ensure the machine is on a stable surface. Check there
is enough clear space behind the machine to allow
trimmed items and off-cuts to pass through freely.
2.
Select the correct power lead for the appropriate power
supply. Fit the lead to the power converter and to the
machine (the socket is at the side of the machine). Plug
the machine (power converter) into an easily accessible
mains socket. Switch the mains supply on.
STEPS TO TRIM
3.
Switch the power on (Power switch located at the side
of the machine).
4.
The Cut-Control LED touch pad and the LED lights in
trimmer base will flash and light up.
5.
Insert document to trim. Use the Overload Protection
document gauge at the side of the cutting base to
check the thickness of items does not exceed maximum
capacity.
6.
Use transparent window with orange trimline guide
to quickly and accurately align your cuts. Align cut line
with the outer edge of the orange trimline. For best
results, mark the exact cut position on the item before
trimming and try trimming a test sheet.
7.
Alternatively, align item with the cut dimensions (A4,
photo etc.) on the base of the trimmer.
8.
9.
10.
11.
Secure document with SafeCut™ Clamp and the CutControl LED touch pad will light up blue.
On pressing the Cut-Control LED touch pad, machine
will start to trim. When touched, the Cut-Control LED
will light up in purple and then turn flashing blue when
it is cutting.
PowerTrim will complete 6 cut cycles for cutting max 30
sheets (80gsm).
The cutting can be stopped by pressing the Cut-Control
LED touch pad when cutting is in progress. Cutter will
then return to start position and scissor icon will light
up in solid blue.
When cutting is complete, material will drop automatically. Release clamping mechanism again before
removing items from cutting bed.
INTEGRATED CARRY POINTS
12.
PowerTrim has an integrated carry point in the cutting base for safe and easy movement and
transport of the trimmer.
6
PowerTrim_v2.0_All_Langs.indd 6
12/02/2009 13:59:45
BLADE UNIT REPLACEMENT
Unplug PowerTrim. Remove
SafeCut™ Guard
(magnetic catch).
Unscrew 2 cross head
(Phillips) screws on
either side of the cutter
element.
Take out cutter element
by pulling the button
on the element.
Replace with new cutter
element (#54125).
Insert new cutter
element and tighten
screws securely again.
Re-secure SafeCut™
Guard.
CHANGING CUTTING STRIPS
Unplug PowerTrim. Remove
SafeCut™ Guard (magnetic
catch).
Make sure SafeCut™
Clamp is open.
Open small safety catches to release the cutting strip. Turn
cutting strip over (left / right, top / down) to use other side
of the strip . When all areas have been used, replace cutting
strip with new one from spares pack (#54125). Re-secure
cutting strip and SafeCut™ Guard again.
If you are in doubt of how to replace these spare parts or where to purchase them please call Fellowes customer service or your
service engineer.
SPARE PARTS
The following spare parts are available for PowerTrim:
Item
Order number (CRC)
Required
1 blade / 2 cutting strips kit
54125
After ca. 5000 cuts (blade unit) / 1000 cuts (strips)
W.E.E.E.
This product is classified as Electrical and Electronic Equipment. Should the time come for you to dispose of
this product please ensure that you do so in accordance with the European Waste of Electrical and Electronic
Equipment (WEEE) Directive and in compliance with local laws relating to this directive.
For more information on the WEEE Directive please visit www.fellowesinternational.com/WEEE
7
PowerTrim_v2.0_All_Langs.indd 7
12/02/2009 13:59:53
POWERTRIM LED and LIGHT SYMBOLS
Cut-Control LED touch pad
LED array on cutting base
Indication Functions
Action
Off
Off
Machine is switched off
Turn PowerTrim on at
power switch and mains
socket
Off
On
Power on
a) SafeCut™ Clamp is open
b) SafeCut™ Guard is open
a) Insert item and close
SafeCut™ Clamp
b) Make sure SafeCut™
Guard is closed
Blue
On
Ready (SafeCut™ Clamp
closed)
Blue flashing
On
PowerTrim is Cutting
Short blue flash every 2
seconds
Off
Sleep
Press Cut-Control button
to re-activate PowerTrim
Red and Blue flashing
On
Error
(e.g. SafeCut™ Clamp or SafeCut™ Guard is open when
cutting is not yet complete)
Check PowerTrim is
switched on properly and
item inside is secured
properly with SafeCut™
Clamp and SafeCut™
Guard closed properly
Red
Off
Engine is too hot
Turn PowerTrim off and
let engine cool down for
30 minutes
Touch
Purple + short beep
Touch Cut-Control LED touch
pad during cutting
To end trimming – when
continuous trimming is
in process
8
PowerTrim_v2.0_All_Langs.indd 8
12/02/2009 13:59:54
TROUBLESHOOTING
Problem
Possible cause
Solution
Machine is not switched on
Switch on machine at rear next to plug
inlet and at the mains socket
Machine not plugged in
Move the machine to a cooler and dry
area
SafeCut™ Guard not in place
Ensure that SafeCut™ Guard is
securely in place
SafeCut™ Guard not closed
Ensure that SafeCut™ Guard is
closed
Paper is cut but cutting head still moves
along machine still continues to cut
PowerTrim is set to complete 6 cut cycles as
default.
To stop PowerTrim before 6 cycles have
been completed, just press the “scissor”
touch button again
Can’t replace cutting strips - not enough
room to lift them
SafeCut™ Clamp closed
Open SafeCut™ Clamp
Cutting strips could be worn out
Turn cutting strip over as described
above to use other side, or replace with
spare part CRC 54125
Cutting blades could be worn out
Replace (with spare part CRC 54125) as
described above
No lights showing on Cutting base or
Scissor Icon
Cut button does not work when pressed
(No function when pressed)
Poor cut quality (Cuts are not very sharp –
edge of cut items not straight)
LED warning symbols
Scissor icon is flashing in alternate blue
and red
SafeCut™ Clamp is open when cutting is not Close SafeCut™ Clamp
yet complete
Scissor icon light is red - no illuminated
cutting base
Motor is too hot when doing continue cut
Let trimmer cool down
Scissor icon light not on
SafeCut™ Guard is open or Power not
switched on
Make sure power is switched on and
SafeCut™ Guard is closed
9
PowerTrim_v2.0_All_Langs.indd 9
12/02/2009 13:59:54
EE
Declaration of Conformity
Fellowes Manufacturing Company
Yorkshire Way, West Moor Park, Doncaster, South Yorkshire, DN3 3FB, England declares that the model PowerTrim A3 conforms
with the requirements of (RoHS) the Restriction of Hazardous Substances Directive 89/336/EEC. The Low Voltage Directive
72/73/EEC as amended by directive 92/68/EEC. The Electromagnetic Compatability Directive 89/336/EEC as amended by
directive 92/31/EEC & 96/68/EEC and the following Harmonised European Normes EN standards and IEC standards.
Information Technology Product: EN-60950-1 2001 / IEC-60950-1 2001
EMC: EN-55014-1 / A2 : 2002 EN-55014-2 / A1 : 2001
Itasca, Illinois, USA
March 2009
EN-61000-3-2 : 2000
EN-61000-3-3 / A1 : 2001
James Fellowes
Help Line
Europe
00-800-1810-1810
Fellowes
Australia
+61-3-8336-9700
Japan
+81-(0)-3-5496-2401
Korea
+82-(0)-2-3462-2844
Malaysia
+60-(0)-35122-1231
Benelux
+31-(0)-76-523-2090
Canada
+1-905-475-6320
Polska
+48-(22)-771-47-40
Deutschland
+49-(0)-5131-49770
Russia
+7-(495)-228-14-03
España / Portugal
+ 34 902 33 55 69
Singapore
France
+33-(0)-1-30-6-86-80
United Kingdom
Italia
+39-71-730041
United States
+65-6221-3811
+44-(0)-1302-836836
+1-630-893-1600
1789
1789
Norwood
Norwood
Avenue,
Avenue,
Itasca,
Itasca,
Illinois
Illinois
60143-1095
60143-1095
• USA
• USA
• 630-893-1600
• 630-893-1600
fellowes.com
fellowes.com
Australia
Australia
Benelux
Benelux
Canada
Canada
China
China
Deutschland
Deutschland
España
España
France
France
Italia
Italia
Japan
Japan
Korea
Korea
Polska
Polska
Singapore
Singapore
United
United
Kingdom
Kingdom
United
United
States
States
2008
2008
Fellowes,
Fellowes,
Inc.Inc.
PartPart
No.No.
403954
403954
PowerTrim_v2.0_All_Langs.indd 1
12/02/2009 13:59:33
PP